Simple Things
Lately I was thinking about minimalism in photography. For me it is conveying a message (mood, idea, emotion, etc.) to the viewer through minimum of visual details or subjects. When you see a successful example of minimalistic photography, it seems that it is very easy to accomplish, because there are not many details in the composition that you have to think about.
But that is not true. While trying to create photographs with minimum details, I found it to be pretty difficult to come up with a good one. It is due to scarcity of detail that each detail has to be absolutely necessary and located in the right place.
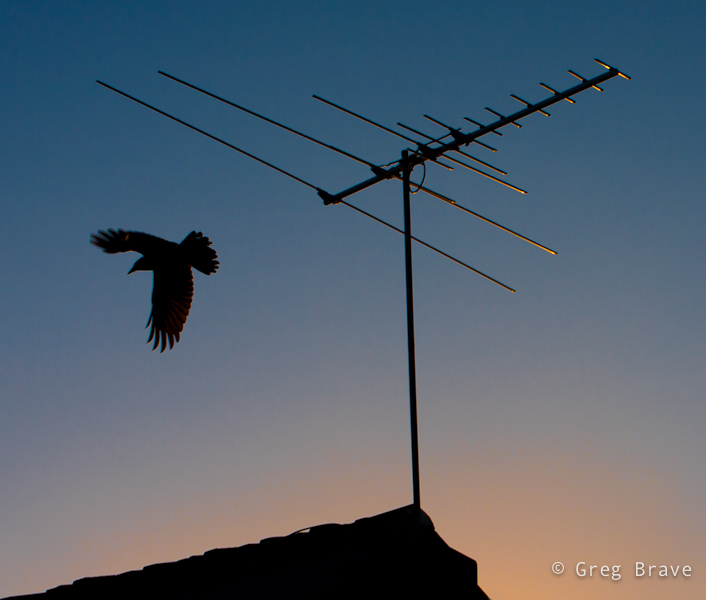
After numerous unsuccessful attempts I came up with this photo, which I like because it creates a certain mood.
Click on the photo to enlarge.
Initially I wanted to make this photo with the bird sitting on the antenna, so I was waiting with the camera aimed at the scene for the bird to sit in “photogenic” pose (which would be such that its whole silhouette would be visible), but instead the bird flew away, and then I caught it changing my composition intentions on the fly. I was lucky to catch the bird with open wings as I made only one shot.
Now when I look at this photo, I think that I could have waited more for this or another bird to appear and sit on the roof, and it would make another interesting composition. Then I’d compare the photos to decide which I like best. But these are merely afterthoughts, and this image is the only one I have.
I would be happy to hear your opinions on this photo – what would you change in it and why? And any other thoughts that you’d like to share on the subject of minimalism in photography.
Remember, you only have to enter your name to leave a comment!
Till the next time,
Greg
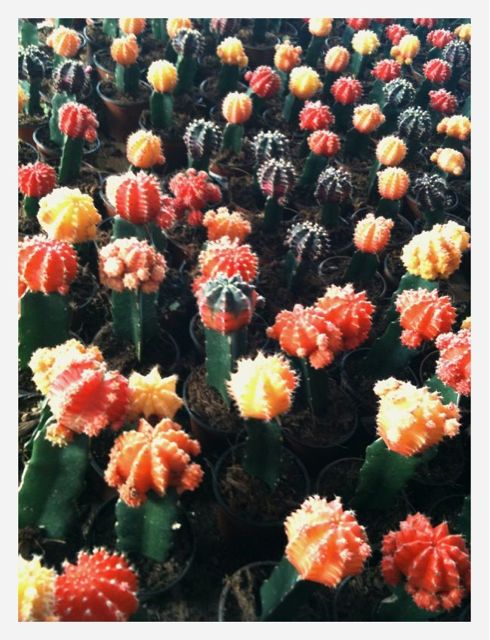
Red
Here and There
As I promised, here are some more photos from where I live now, which is Australia if you haven’t followed me until now.
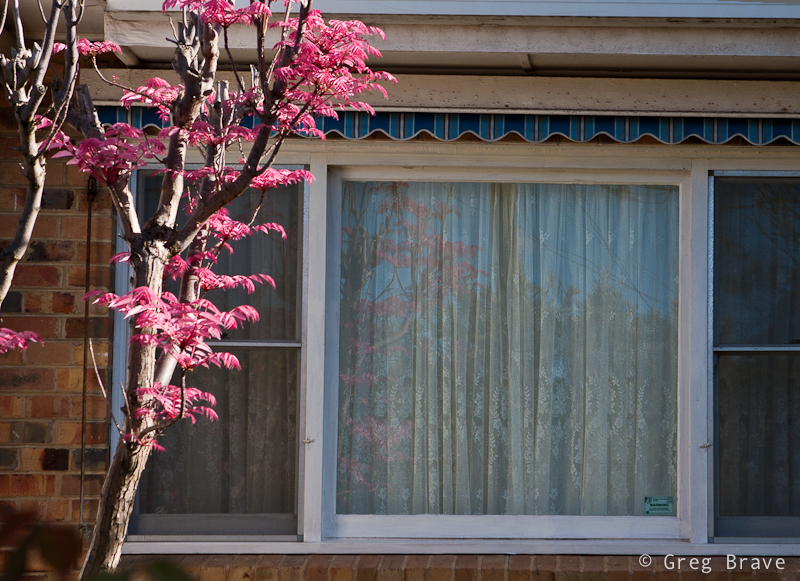
There are so many beautiful flowers and trees here, that I can’t resist photographing them and in the last month I gathered quite a collection of flowers and trees photos. Everything blooming now, it is Spring here. Take this tree for example. Imagine how it would be to look out of your living room window and see this beautiful tree!
Click on the photo to enlarge.
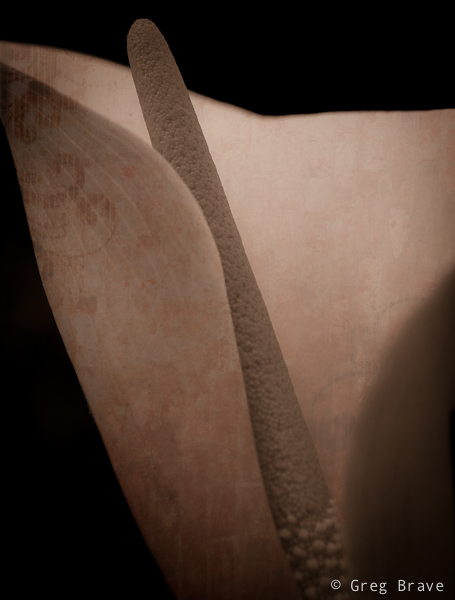
In the next photo I couldn’t resist doing some Photoshop editing, and added a texture to the flower in addition to converting it to black and white (with dual toning). If you’d like to know how I did the conversion, you can read my post “Creative Conversion to B&W in Lightroom”. Thinking of it, I probably will also write a post about how to add textures to your photos.
Click on the photo to enlarge.
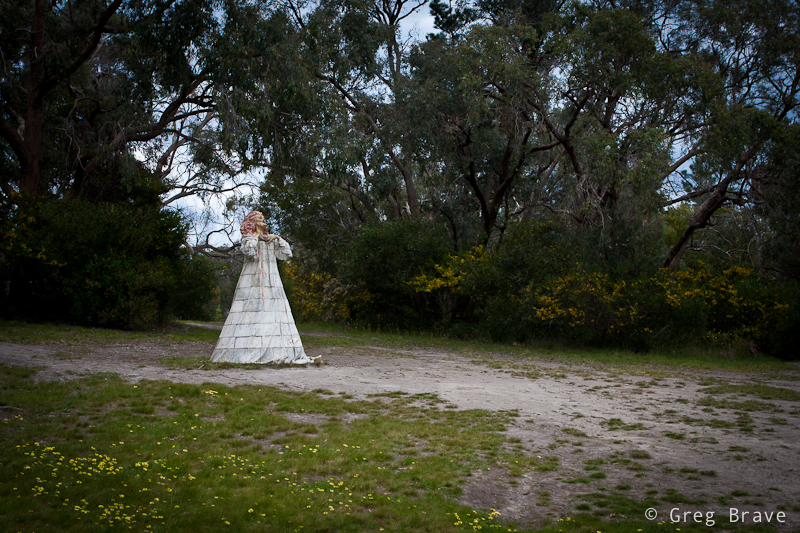
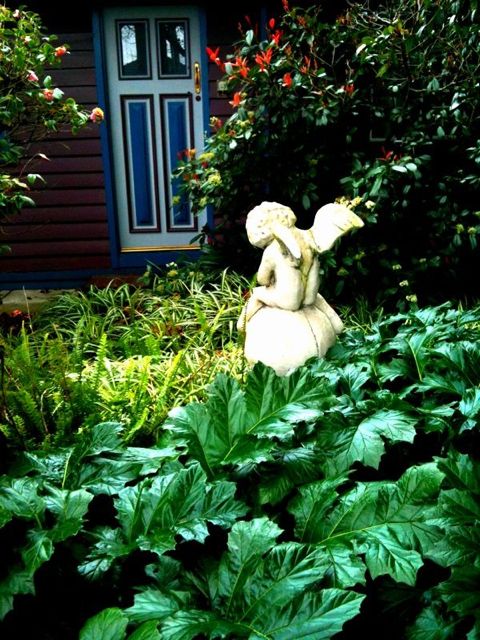
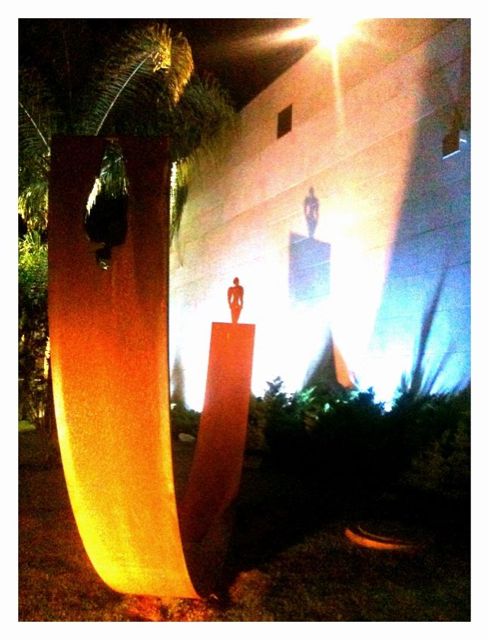
The photo below was taken at Frankston’s Sculpture Park. This sculpture of a lady standing there created a mystic mood, and I tried to capture it. Whether I succeeded or not is for you to decide.
Click on the photo to enlarge.
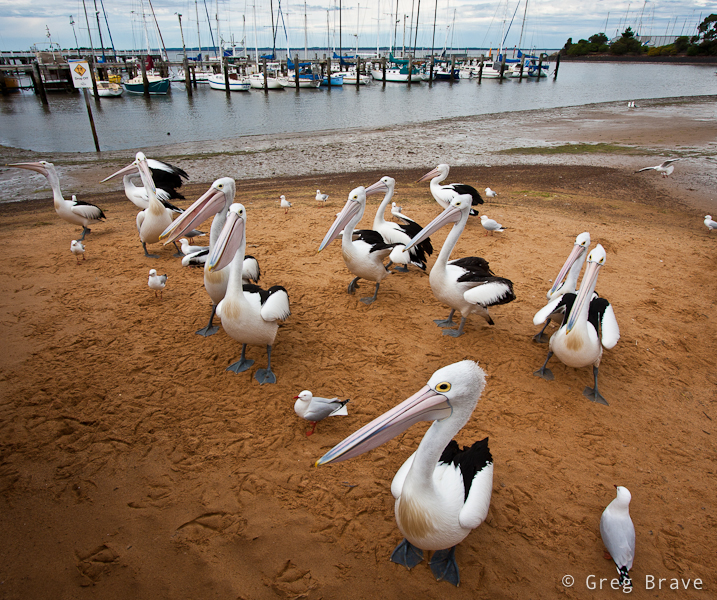
These are Pelicans that live on the small beach in Hastings (small town). They are waiting for the lady from fish shop, which is located nearby, to come out and give them some fish leftovers.
Click on the photo to enlarge.
This photo is from the same location.

Click on the photo to enlarge.
I am fascinated by the shapes of the gum trees that are so common in Australia. Here is one example, but there are so many different and magnificent tree shapes that I might just create a collection of them.
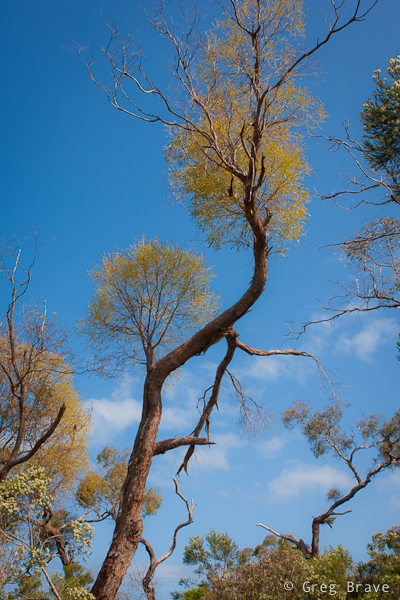
Click on the photo to enlarge.
This photo was taken in Sydney in the outdoor art exhibition “Art and About”. I liked how these two guys were looking at the huge photo.
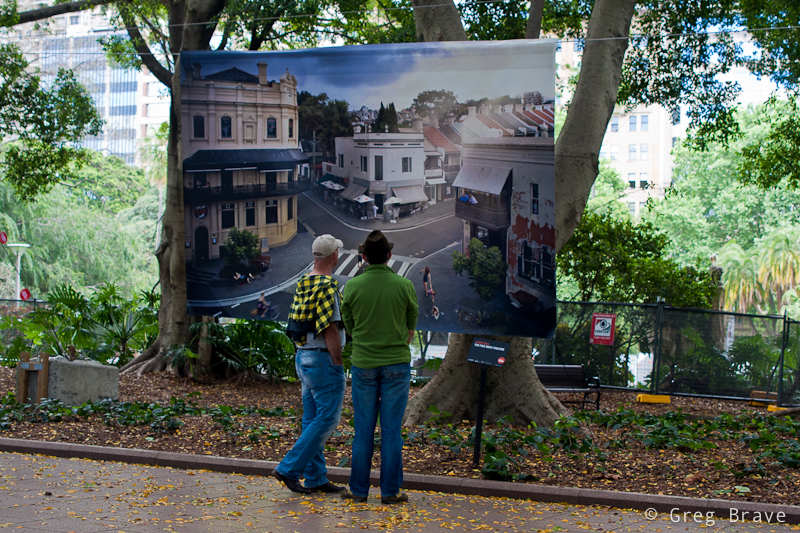
Click on the photo to enlarge.
It was a pretty short post, but I hope you liked the photos.
Any comments are always welcome and,
Remember, you only have to enter your name to leave a comment!
Greg.
Two
Henri Cartier-Bresson’s Sayings
Lately I came across something I didn’t realize existed – collection of Henri Cartier-Bresson’s quotes, and they fascinated me! I learned from them so much about Bresson’s vision of photography, and I also could understand better his photographs. I have also enriched my understanding and feeling of photography from Bresson’s quotes, and I think any evolving photographer would benefit greatly from reading them.
One thing to remember though is that Henri Cartier-Bresson was a photojournalist (he is actually considered a father of modern photojournalism), and many of his sayings result from this type of photography.
In this article I am going to present you my favorite Bresson’s sayings “bundled” with his photographs for better impact on you 🙂
![]()
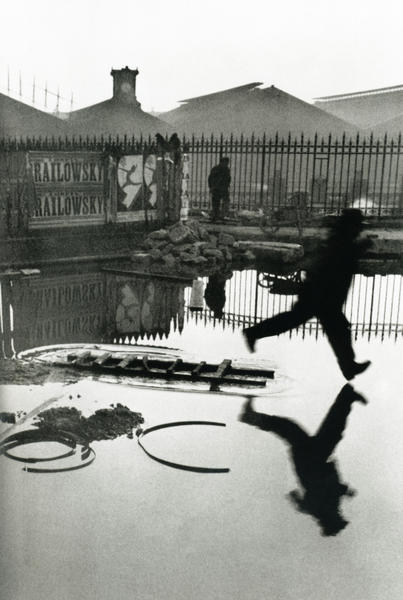
” To photograph is to hold one’s breath, when all faculties converge to capture fleeting reality. It’s at that precise moment that mastering an image becomes a great physical and intellectual joy. “
![]()
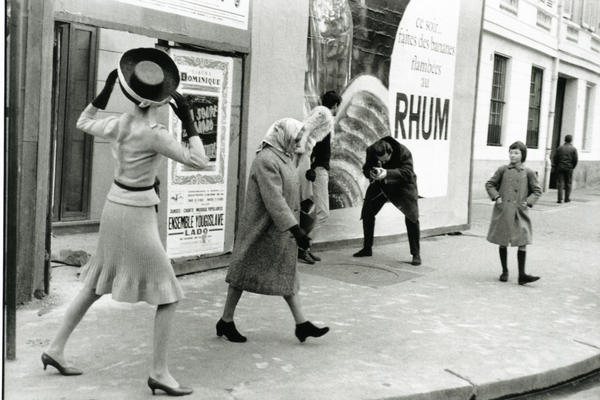
The photograph below is a great visualization of this idea. The captured moment was there only for a brief moment with no chance of repeating itself.
![]()
“To take photographs means to recognize – simultaneously and within a fraction of a second – both the fact itself and the rigorous organization of visually perceived forms that give it meaning. It is putting one’s head, one’s eye and one’s heart on the same axis.”
![]()
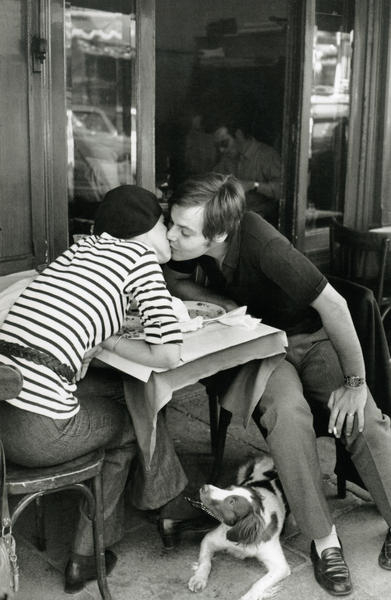
Again, the photo below illustrates this saying perfectly. All the elements in it had to be there to get final result. There is nothing redundant in it, all the elements contribute to it creating the final impression.
![]()
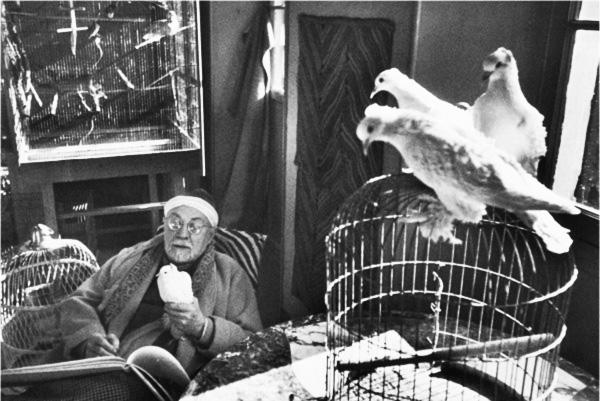
“The most difficult thing for me is a portrait. You have to try and put your camera between the skin of a person and his shirt.”
![]()
The photo below is a portrait of Henri Matisse shot by Cartier-Bresson, in which you can see two of his (Matisse’s) greatest passions – painting and pigeons. Actually I found an article about Henri Matisse in Wikipedia, but there wasn’t a word about Matisse’s pigeons. Nevertheless I was sure that they must play an important role in his life if Bresson included them in the photograph. So I kept looking for a more elaborate biography of Matisse just to make sure that these pigeons weren’t just a one-time subject of Matisse’s painting. And guess what, I found it – Marguette Bouvier in interview said about Matisse: “Henri-Matisse has a passion for birds. He considers a bird cage as indispensable as a bed in a bedroom…”. In the Matisse’s portrait there are also three bird cages, and now you know why they are there. As you can see there is no meaningless objects in Bresson’s photos.
![]()
“Photography is nothing – it’s life that interests me.”
![]()
It is also something to be thought of. Photography by itself is nothing really, you don’t photograph just for photography’s sake (at least I don’t). You photograph to express yourself, to show something that caught your attention…
![]()
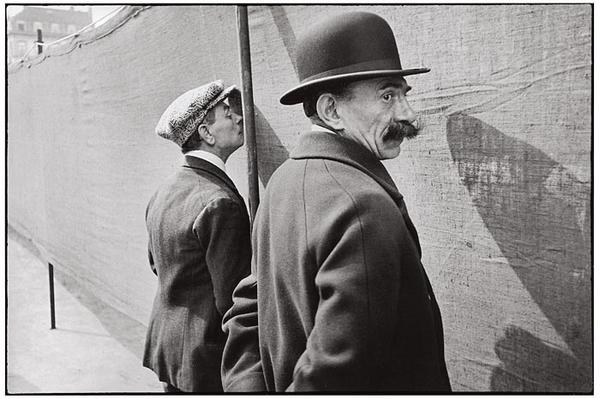
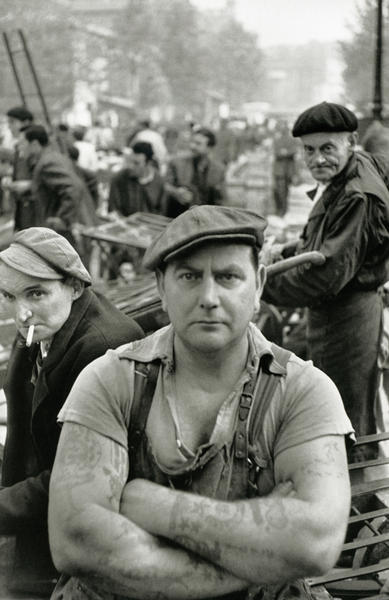
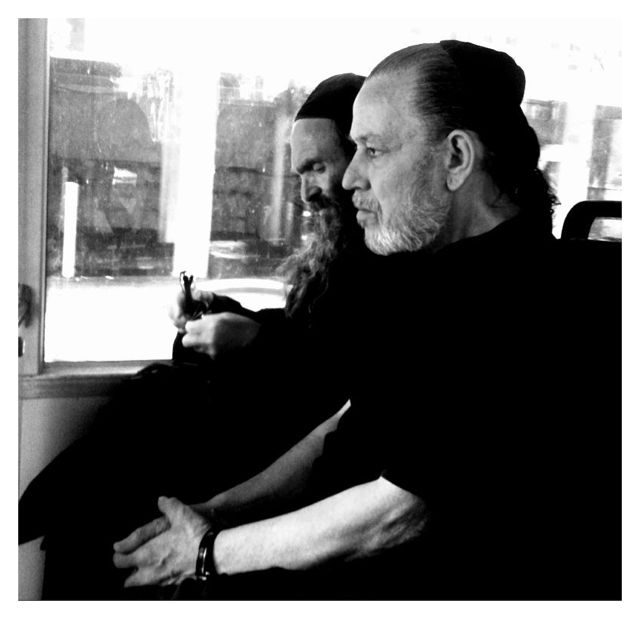
“You are asking me what makes a good picture. For me, it is the harmony between subject and form that leads each one of those elements to its maximum of expression and vigor.”
![]()
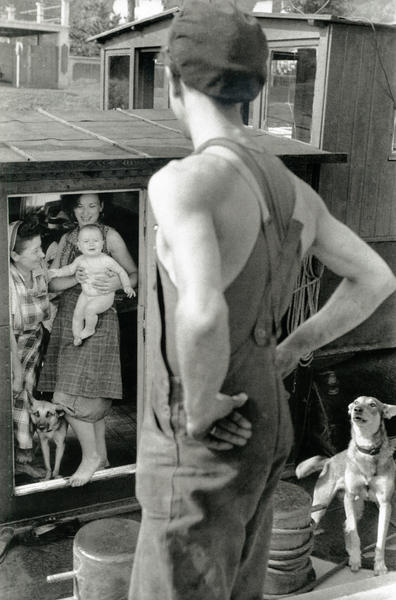
I don’t know about you, but for me this photo is powerful, and it is such not only due to the look and posture of man on the foreground but also because of the second figure behind him on the right. There is a certain similarity in the way how they look at the camera. One of the thoughts that went through my mind when looking at this photo is that maybe the person behind is the father. Or even in general looking at these two men made me think that when you are young, you are strong, and with age your body looses it’s toughness but your gaze stays the same…
![]()
“This recognition, in real life, of a rhythm of surfaces, lines, and values is for me the essence of photography; composition should be a constant of preoccupation, being a simultaneous coalition – an organic coordination of visual elements.”
![]()
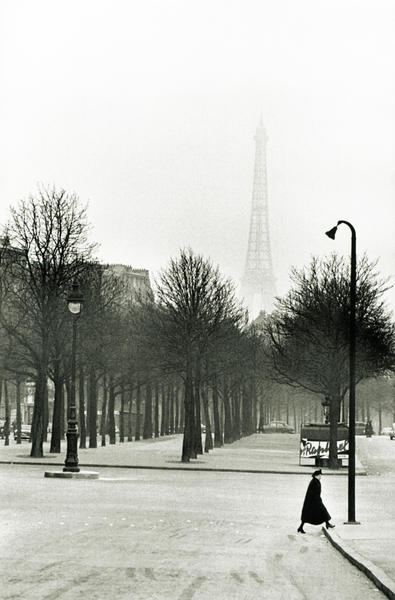
If you didn’t understand the “rhythm of surfaces, lines … ” part, take a look at the rhythm of trees in the photo below.
![]()
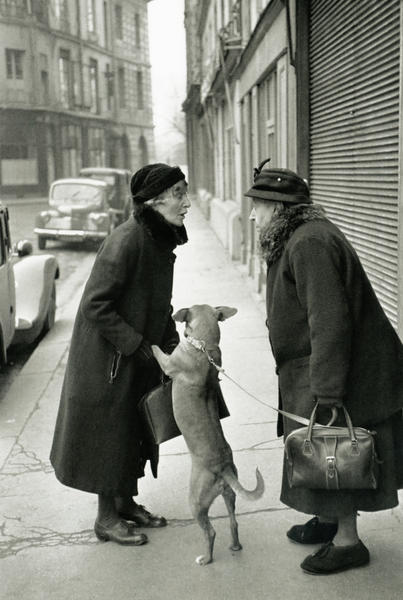
“You are asking me what makes a good picture. For me, it is the harmony between subject and form that leads each one of those elements to its maximum of expression and vigor.”
![]()
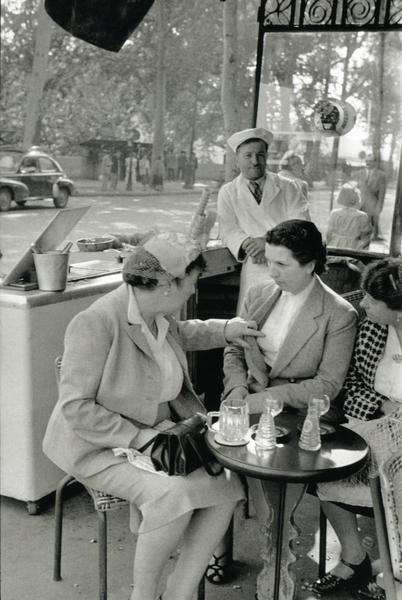
Take a minute to look at the photo below, not just flick through it, and you will see many interesting little details (the gaze of the man standing behind, the little handbag…).
![]()
“To me, photography is the simultaneous recognition, in a fraction of a second, of the significance of an event.”
![]()
![]()
“I believe that, through the act of living, the discovery of oneself is made concurrently with the discovery of the world around us.”
![]()
![]()
“Thinking should be done before and after, not during photographing. Success depends on the extent of one’s general culture. one’s set of values, one’s clarity of mind one’s vivacity. The thing to be feared most is the artificially contrived, the contrary to life.”
![]()
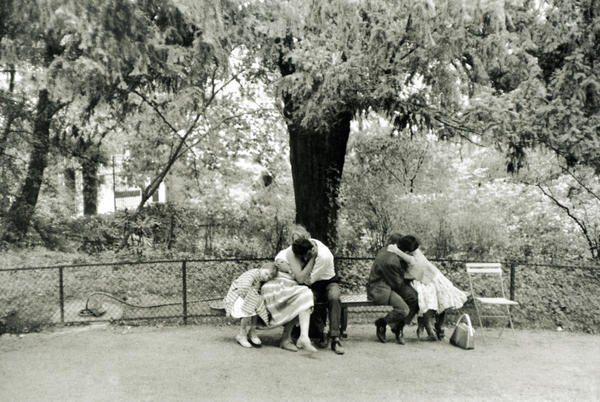
This is a powerful thought. In photojournalism and street photography you have to learn to anticipate how the situation will evolve in order to be in the right place at the right time.
![]()
“We photographers deal in things which are continually vanishing, and when they have vanished there is no contrivance on earth can make them come back again. We cannot develop and print a memory.”
![]()
Here is another wonderful example of a fleeting moment caught just at the right fraction of a second.
And here is the last quote.
![]()
“Photography appears to be an easy activity; in fact it is a varied and ambiguous process in which the only common denominator among its practitioners is in the instrument.”
![]()
The more I photograph, go over my photos, and think about photography, the more I understand how difficult good photography really is.
I hope you learned something from Henry Cartier-Bresson’s sayings, and enjoyed the photos I chose to present here.
Any comments as always are much appreciated and,
Remember, you only have to enter your name to leave a comment!
Till the next time, take care!
Greg.
Interview With Scott Hotaling
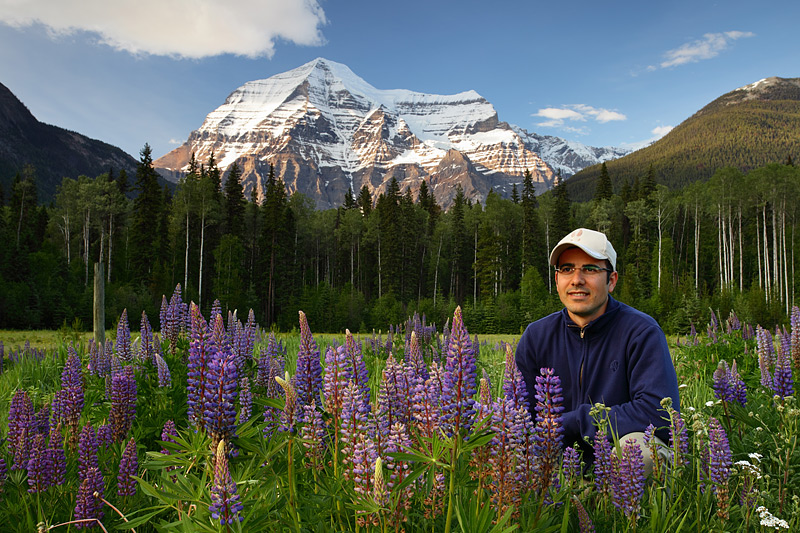
Scott Hotaling loves nature and outdoor activities and photography was a natural extension of his passions. Scott’s love and appreciation for nature can be clearly seen in his beautiful photographs. I was lucky to get an interview with him, and without further adieu please welcome Scott Hotaling!
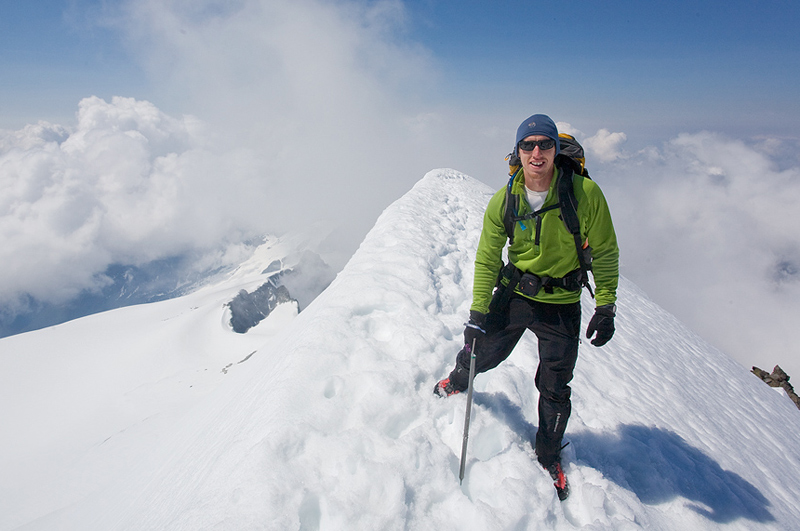
Click on the photo to enlarge.
Tell a little about yourself. What do you do for a living? How did you get involved with photography?
I’m a North Carolina native and I’ve spent a majority of my life exploring the southern Appalachian mountains. Despite a good bit of travel across North America and stints living elsewhere I still consider western North Carolina my home. Currently, I’m spending several months focusing solely on my landscape photography work but in January, I’ll be starting a doctoral graduate program in Lexington, Kentucky. So, for the time being, I’m working solely as a photographer for the first time in my career. As for getting started, it was simple cause-and-effect for me. I loved exploring new places but never managed to shoot photographs that translated the beauty I found to those around me. Most of the time I’m still trying to figure it out but every once in a while I luck into something good.

Photo by Scott Hotaling. Click on the photo to enlarge.
How do you pick your spots for taking pictures?
For me to do my best work I have to be physically drawn to a place. It’s not uncommon for me to visit a location ten or more times under a variety of seasons/conditions before I get the photo I’m after. The process can take years but it’s one I respect and enjoy. But despite frustrations and bumps along the way, at the core of it all, is a deep appreciation for a specific place and the desire to showcase it under optimal conditions. I carefully construct what the perfect conditions would be for a location in my head then do my best to capture them. In most cases, the right conditions include a certain season, landscape condition (fall color, fresh snow, etc.), time of day, cloud cover, and more.

Photo by Scott Hotaling. Click on the photo to enlarge.
What inspires you to take photos?
The natural world and the infinite combinations of light, dark, rock, plant, water, etc. that make every photograph different from the next. From a microscopic to global scale we live in an incredible place and I want to see as much of it as humanly possible, my camera simply comes along for the ride.
But, specifically, I’m particularly drawn to places with dramatic views – mountain summits, ridges, cliffs, etc. And, particularly those that aren’t easily accessed or less widely known. For example, a winter sunrise from a remote mountain summit is the best case photographic scenario I can envision.
Do you hike and photograph alone, with someone, or in a company?
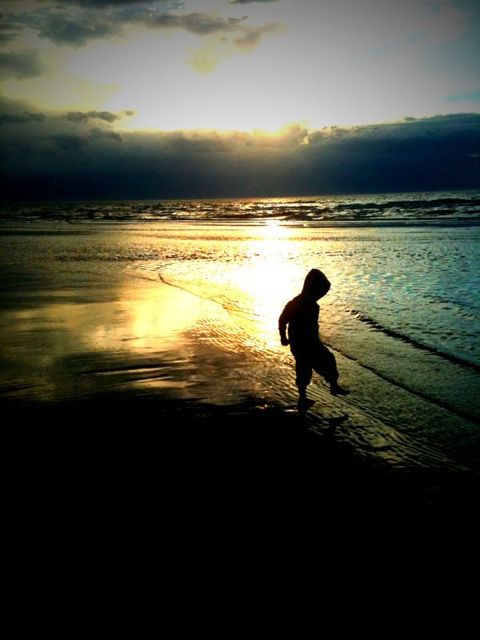
Usually alone. More by necessity than choice, my schedule and plans dictate my hiking company more than my personal preference. But, I’ve been lucky to have a wide variety of wonderful people join me for adventures and that’s always much more fun.
Photo by Scott Hotaling. Click on the photo to enlarge.
What photographic equipment do you use and for which tasks?
I like my kit to be simple. I don’t need nor want a bunch of stuff to lug around. My workhorse camera is the Canon 5D. I don’t subscribe to manufacturer debates over which system is better – it’s all the same to me. My 5D has gained my respect over the years because I can’t seem to break it. It falls on icy glaciers, gets soaked in the rain, sees temperatures below 0° F regularly in the winter and despite plenty of other daily torment, it never misses a beat. When it does finally die, that’ll be fine, I’ll just get another one.
From a lens perspective, people are often surprised to find out that I only have two – a Canon 17-40 f/4 L and 70-200 f/4 L. Much like my camera bodies, my lenses take a good deal of abuse and don’t seem to mind.
The often unheralded piece of gear in my bag that truly does the dirty work are my HiTech neutral density filters. I carry five, four graduated and one non-graduated, and use them nearly every time I’m out. My sunrise and sunset photos would be impossible to capture in one exposure (I don’t use any HDR or similar techniques) if it weren’t for those filters. I highly recommend any beginning landscape photographer look into purchasing a set.
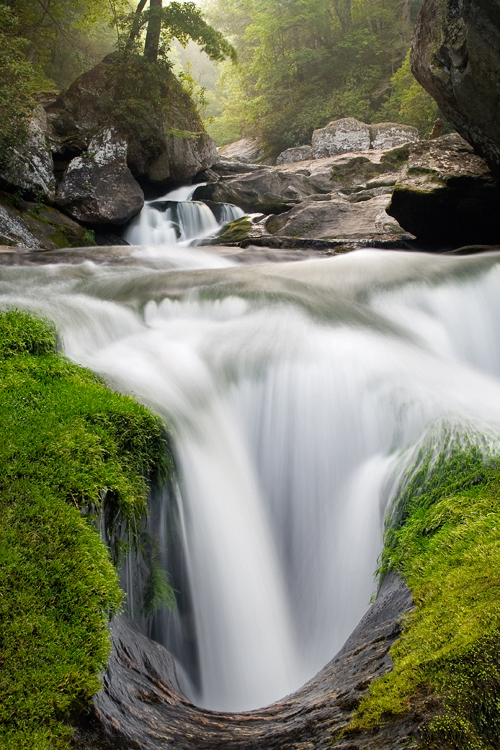
Photo by Scott Hotaling. Click on the photo to enlarge.
What is the average weight of your hiking backpack?
Average weight is a tricky subject. If I’m backpacking, my pack is probably in the 20-35 pound range depending on season and trip length. I try to stay as light as possible, despite carrying a tripod. If I’m only day hiking, I would venture a guess of 5-15 pounds.
I have this issue with tripods – I can’t find the perfect tripod for me. Which tripods do you use and why?
I’ve been using the same tripod for years. Many photographers would consider it too small, or too heavy, or too cheap but it works great for me. Both head and legs are made by Manfrotto – the head is a 466RC2 and the legs are model 3001BPRO.

Photo by Scott Hotaling. Click on the photo to enlarge.
Recently I wrote an article about using UV filters to protect lenses. What is your opinion on that issue? Do you use UV filters?
I don’t use UV filters at any time. The only use I see for one is protecting a lens when photographing in a place that has unavoidable, major hazards to the lens glass present. From a purely photographic standpoint, it doesn’t serve any purpose in my opinion.
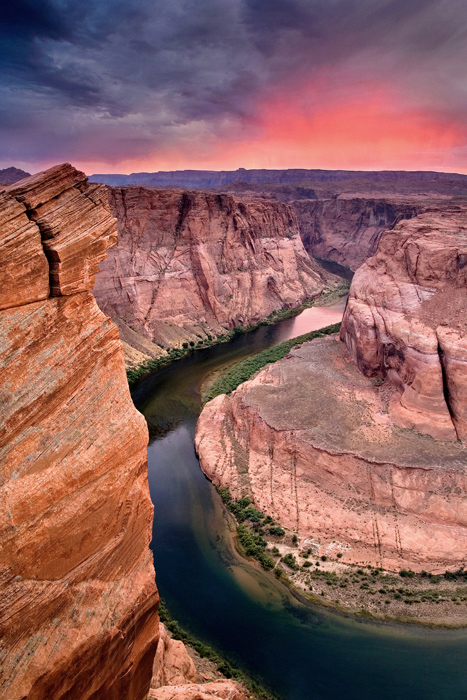
Photo by Scott Hotaling. Click on the photo to enlarge.
Do you post process your photos? What software do you use, and what are the main adjustments that you perform?
I post-process all of my photos using Adobe Bridge for RAW conversions and Adobe Photoshop CS3 (or maybe 4?) for the rest. I avoid major processing work as much as possible – the tools I stick to are, in no particular order, spot removal, levels, contrast, color balance adjustments, and localized color tweaking. Dodging and burning is a major part of my processing as well and adds depth to the finished image.
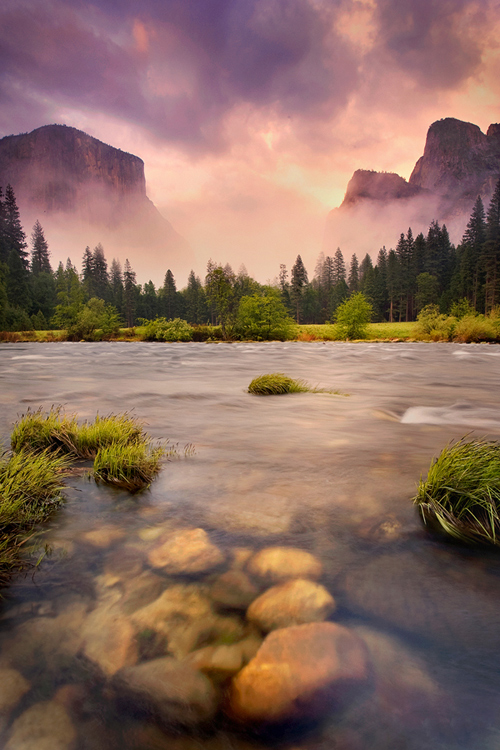
Photo by Scott Hotaling. Click on the photo to enlarge.
If you had only two advices to give to a beginning landscape photographer, what would they be?
Get off the beaten path and shoot what you love.
Thank you Scott for this great interview. I hope to see more photos from you in the future.
If you liked Scott’s photographs, you can visit his website at
http://lightofthewild.smugmug.com/
Edgar
First Impressions
I didn’t write here for over a month now and I have good reason for that. Me and my life partner Ira moved from Israel to Australia, and now we are living in Melbourne. It is a big change for us, and this month we were all busy with the move, and only recently had some time to explore our new surroundings.
Here are some of my first impressions of Australia (actually it is not my first time in Australia, but last time was three years ago).
I liked this house because of its unusual colours… it looked to me as if it was taken from some fairytale, especially under this beautiful blue sky with white clouds.
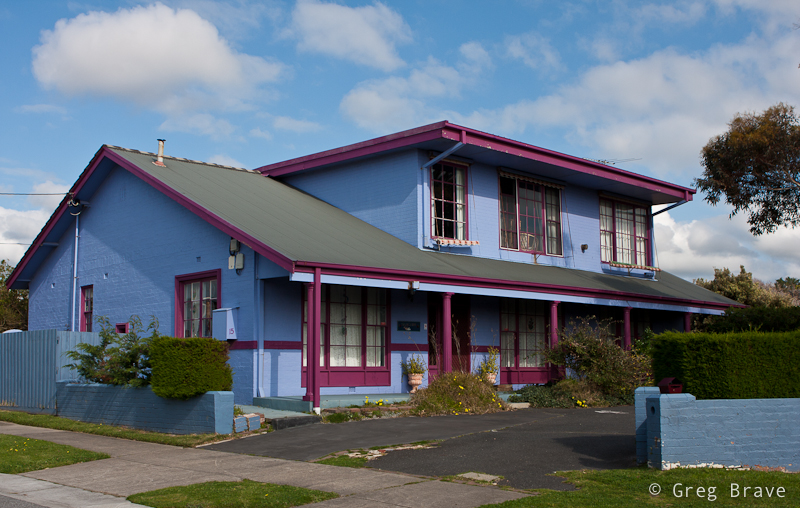
Click on the photo to enlarge.
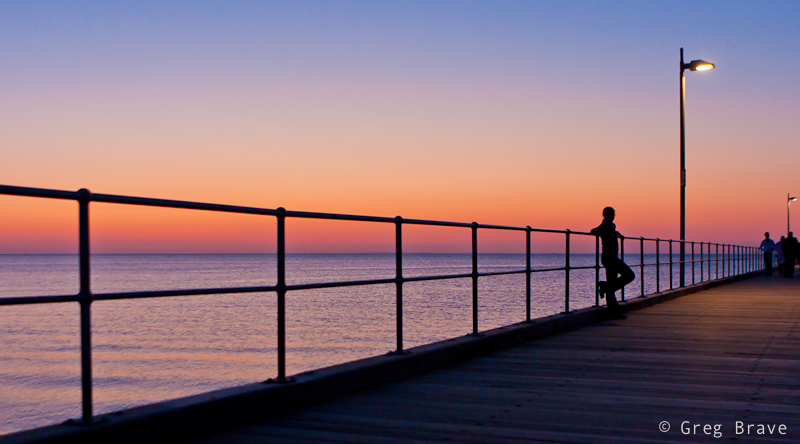
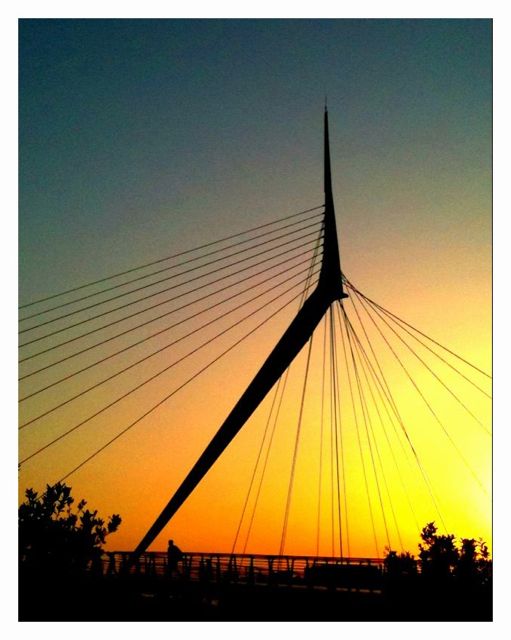
I saw many pictures of piers from all over the world, and here is my contribution to the world’s collection. I am sure that it is not the last one from me. I will also go back to this pier to photograph it under different lighting and weather conditions.
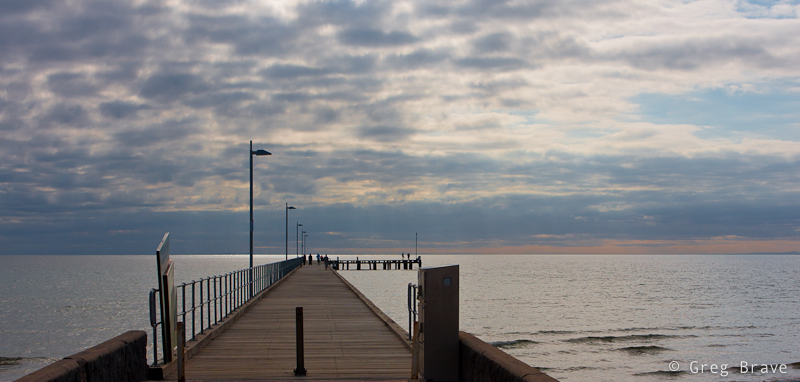
Click on the photo to enlarge.
Here is a very common sight in Australia – gum trees and parrots. I especially liked this photo because of the curved tree on the foreground and the fact that parrot’s posture slightly resembles that tree.
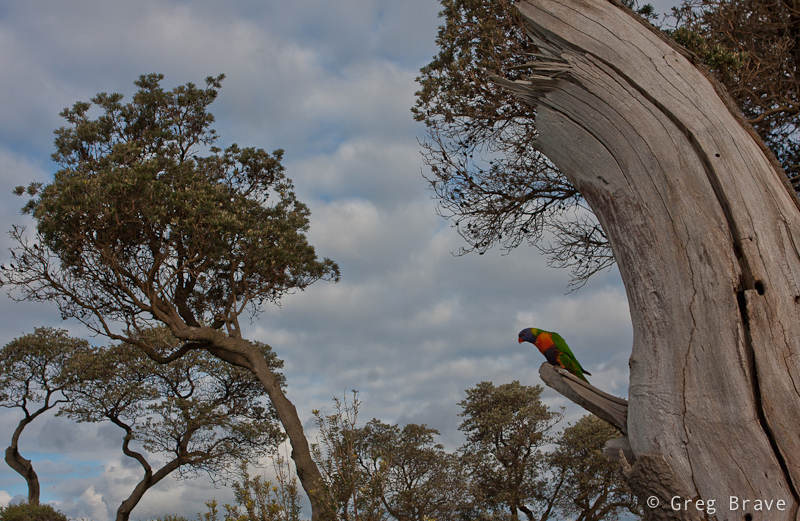
Click on the photo to enlarge.
The following photo is a view from the boardwalk on the Mornington Peninsula. The water colours are beautiful…

Click on the photo to enlarge.
A few days ago we went to the tulips festival and I couldn’t resist shooting some flower photographs, here are the ones that I liked the most.
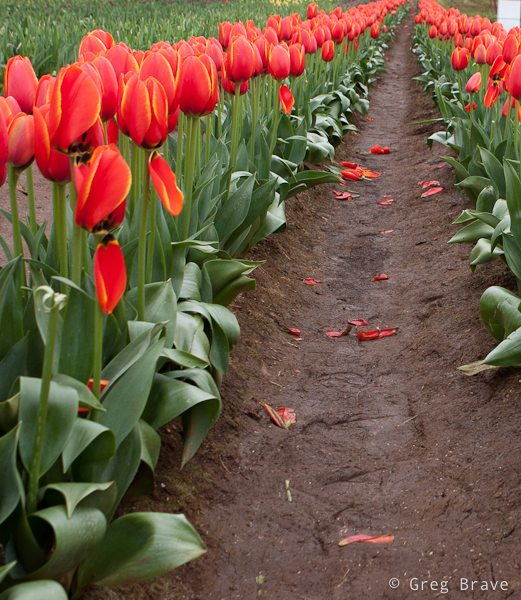
Click on the photo to enlarge.
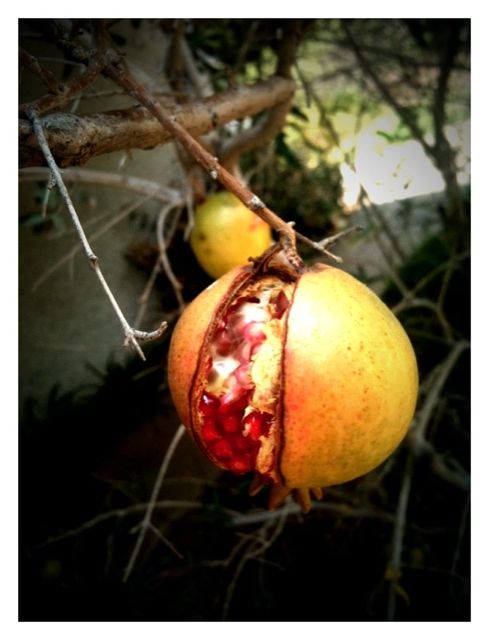
The following two are obviously post processed. The reason for post processing was that I wanted the viewer to concentrate on the form of the flowers in the left photo and not being distracted by their bright and vivid colours, and in the right photo I wanted to create a mood “appropriate” for the broken flower.
By the way, I did not break that flower! It was already like that when I saw it.
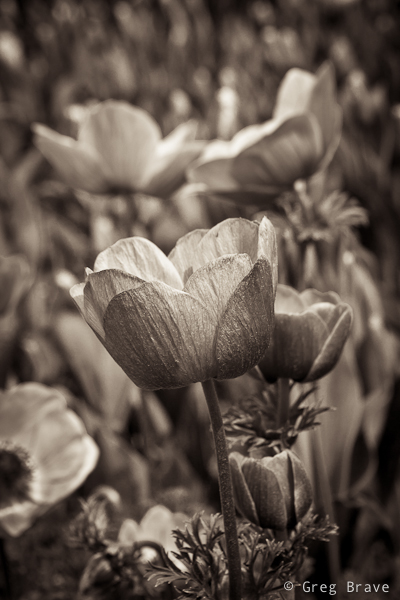
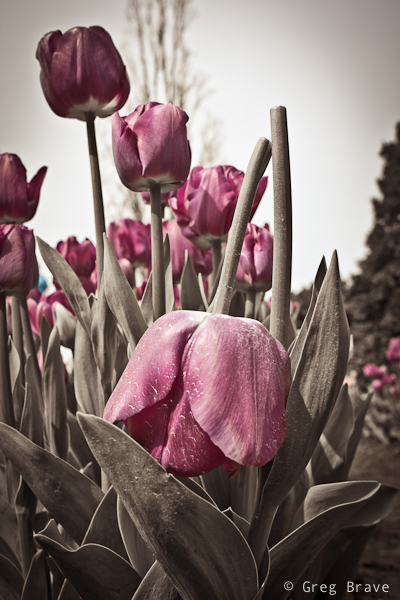
Click on the photo to enlarge.
The sunsets here in Australia are magnificent, especially if they come at the time when sky clears a bit after rain. Here is a sunset that I photographed from my back yard.
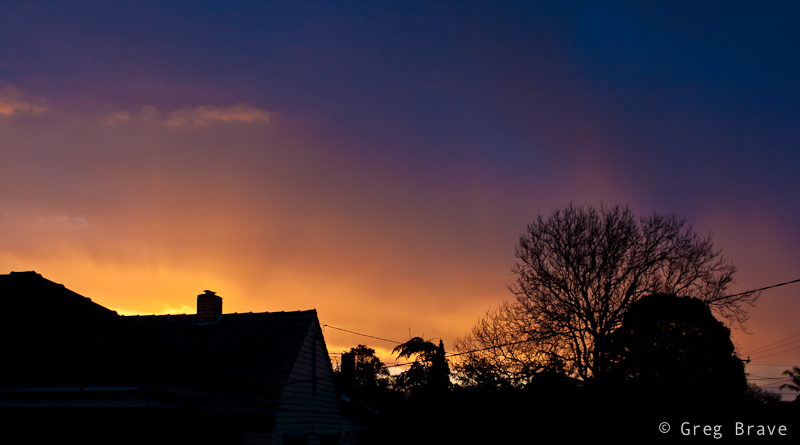
Click on the photo to enlarge.
And last but not least a series of three photographs I took at sunset from that same pier that you saw before. In two of the photos you can see Ira posing for me.

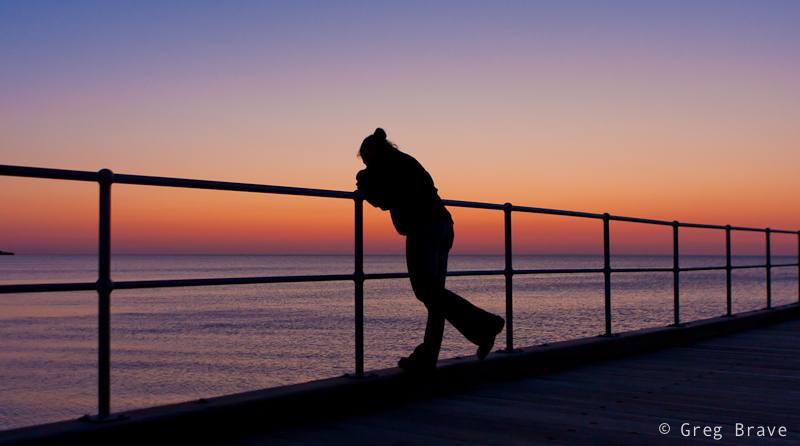
Click on the photo to enlarge.
That’s it for my first impressions of Melbourne. I hope I will be able to write and photograph more from now on and also I hope that you liked my photos.
Your comments are always highly appreciated, and
Remember, you only have to enter your name to write a comment!
Till the next time,
Take care!
Greg.
Lonely Angel
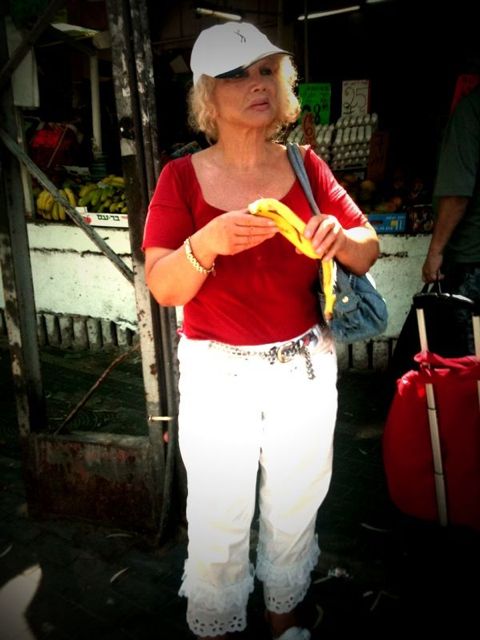
Colorful Personage
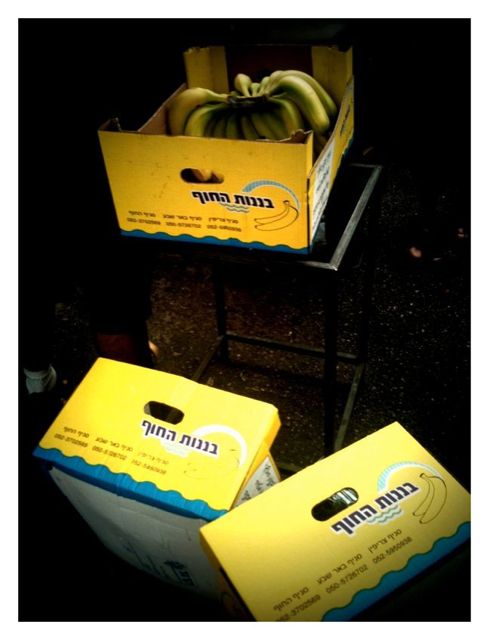
Bananas
Afternoon Nap
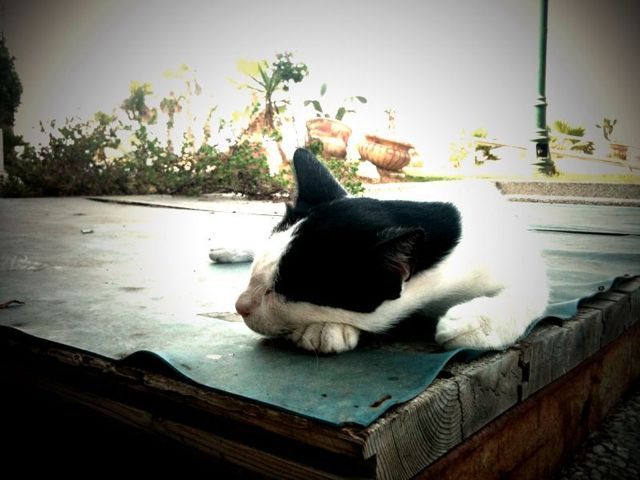
Shooting Babies – Part II
About a month ago I wrote a post about shooting baby closeups. Just a quick reminder – my friend asked me to shoot his baby boy, and I used natural window light to shoot mainly closeups because I had problems with background.
This time it so happened that I visited my friend again, and I happened to have my camera with me. His baby boy was in a playful mood and since he liked my previous photos he (not baby, my friend of course!) asked me to take a few more. This time I decided to solve all my background problems and shoot something more than closeups. In addition, it was late in the afternoon, and the sun light was almost gone, so In all photographs that you’ll see here, I used flash, and only in the first one, in addition to flash from the right, there is window light from the left.
In order to get good shots I had to solve several problems – to figure out lighting would be the most important one, and background would be the second important. Since me and my friend’s family are good friends I had no problems communicating with them and their baby boy Eric was in a perfect mood for taking photographs – he was smiling and playful.
In the photo below the main lighting was sunlight from the window on the left, but if I didn’t use flash from the right side, then the shadows on the faces would be too deep. So I used a flash and set it to 1/8th of it’s full power to fill in the shadows.

Click on the photo to enlarge.
For lighting I only had one flash (Canon 430EX) but I also had remote trigger making it possible to have lighting off-camera. In the photo below Eric was sitting on the couch, and I placed a flash with 1/4 CTO gel on it facing away from him straight into the pillows of the couch so that Eric would be lit not with direct but with reflected light (this made the light source bigger and shadows smoother). In addition I asked his father to hold a white bed sheet close to Eric’s right (camera left) side. This made the shadows on his face lighter, because light from the flash reflected from the pillows hit the white sheet, and reflected from it to the shadowed part of Eric’s face.
The background in this photo is almost black because I used flash and the ambient lighting didn’t affect the shot at all.

Click on the photo to enlarge.
For the next photo I wanted to do something different, something bright and happy. They had these pieces of soft foam that they used to place on the floor for Eric, and they made an interesting background. In addition I asked Eric’s mother to blow some bubbles for him to play with, and started shooting. I caught a few nice frames and this one I liked the most. In this shot there is still only one flash placed on the right side and reflected form the pillows.
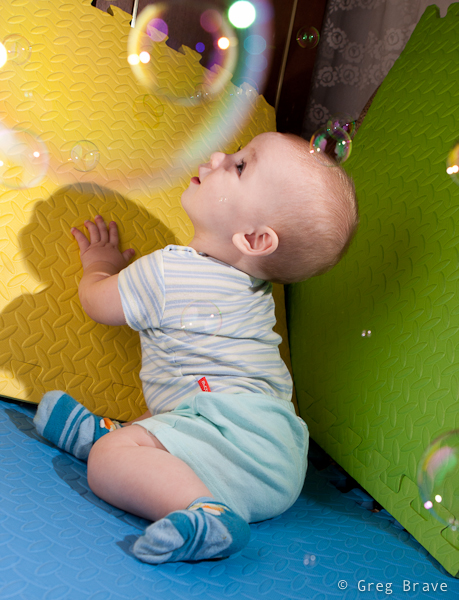
Click on the photo to enlarge.
Now we went from the living room to Eric’s room, and here I encountered another problem. The walls of Eric’s room were green, and this is bad for your white balance. I know, I know – you say “shoot in raw, and then correct in post”, but I wanted to fix this in-camera making post processing time shorter. So here is what I did – I placed my flash facing the opposite wall so that the light would reflect off of it (because this is how I wanted my lighting to be) and then I took a shot of a green wall (the opposite wall from the flash). Then I changed to manual white balance and chose that shot of a wall as a reference. This made wonders for my white balance, and photos started to look so much better!

Click on the photo to enlarge.
In this photo Eric’s father is holding the flash facing the wall and reflecting from the wall to Eric’s and his mother’s faces. Yes, it is still only one light 🙂

Click on the photo to enlarge.
And finally I wanted to play around and take some unusual shots. So I changed to a wide angle lens (with UV protector on it, in a sec you’ll understand why) and started shooting Eric from various angles from a very close distance. Eric got very interested in me and my camera and started touching the lens (you see, the UV protector was a good idea 🙂 ), and I made some very nice shots even though they were distorted due to the wide angle.

Click on the photo to enlarge.
In this post I talked about lighting and background, which are all technical details, but it is not enough to make a good shot of a baby and his parents. My advantage here was that I knew them so they were comfortable around me, and I was comfortable around them – this is very important. The more relaxed your subjects are, the better your pictures will be. It is also important to know what do you want to show in your photos (the love of parents for their child, happiness, thoughtfulness) and then try to find situations and angles to show it. And of course – experiment, experiment, and experiment!
Till the next time,
Take care!
Greg.
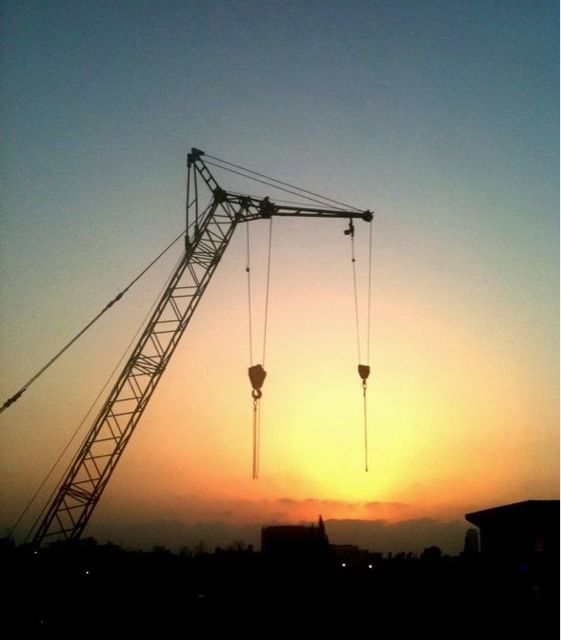
Construction
Using UV Filters For Protection – Right or Wrong?
For those of you who don’t know what the hell I am talking about, I’ll briefly explain the issue.
When you buy an expensive lens, you want to protect it’s front glass element from scratches or other accidents. So most likely the photo dealer will suggest you to buy a UV (ultraviolet) protection filter to screw on your lens. But the question is – will shooting with UV filter degrade the image quality?
Lately I found myself bothered with this question a lot. It started when I bought my Canon 24-70mm f2.8 L lens. I bought it second hand, and the guy who I bought if from told me that it was with the UV filter all the time since the day he bought it, so it is completely scratches free. Way back I took an advanced course in optics in university, and I know that adding additional optical element to optical system changes system’s overall performance. This is exactly what you are doing to your optical system, i.e. your lens, by adding additional optical element, i.e. UV filter.
So how significant this “change in performance” is? In other words will the final image suffer in quality because of that?
I felt incompetent to perform tests to find an answer myself so I did an extensive web research, and I found a lot of information on this subject. It seems that there is no single conclusion to this matter, but here is my summary on it, which in my opinion includes all the major points, fact,s and conclusions regarding using UV filter on your lens for protection.
- Putting UV filter on your lens will certainly degrade lens’s performance.
- Explanation to this is pretty simple. When you screw on the UV filter on your lens, you basically add one more optic component, but not only that you also add a space filled with air between the filter and lens’s front optic element. So when ray of light hits your lens, instead of hitting the lens’s front element and passing to other optical elements inside the lens, it first hits the UV filter, refracts, passes to the space filled with air between the UV filter and the lens, and only then enters the lens. That ray of light can also be reflected several times between the lens and the UV filter (coating on the UV filters tries to prevent that).
- The extent of the image quality degradation may vary from invisible to the human eye to a severe degradation in contrast and sharpness (and other image qualities), and it depends on the following factors:
- The quality of the UV filter
- I found many photographers complaining about Tiffen UV filters (even about the expensive ones). I even saw a test one guy did showing that using a Tiffen UV filter significantly decreases sharpness and contrast. That guy didn’t write the exact model of that filter though.
- There is general agreement among photographers that expensive UV filters with double coating are the best choice if you must put a UV filter on your lens. Many photographers recommend the high end UV filters from B&W, Nikon, Hoya (Super HMC), Singh-Ray.
- The subject that you are shooting – or more important the direction of light. For example if you are shooting into the light, then with UV filter there are more chances to have lens flare (partial solution is to use lens hood).
- The lens. If the lens that you use is not of high quality, it may already produce less than great images, and adding a UV filter won’t make them worse than they already are.
- The quality of the UV filter
- There is everlasting debate whether one really needs the UV filter to protect the lens. Here are some pros and cons:
- Pros:
- UV filter gets dirty instead of the lens, so you don’t have to clean the lens that often (just clean the UV filter), thus protecting the lens’s coating.
- When shooting on the beach, or during sand storms, or in any conditions where there are tiny particles in the air, which eventually land on your lens, you are risking scratching your lens when cleaning. Better scratch the UV filter.
- Lens cleaning tip – when there are tiny particles on your lens don’t wipe them off because that can scratch the lens. Wash the front element first and then wipe it with micro fiber cloth.
- If you accidentally drop your lens, or bump it into something, the UV filter will take the blow saving the lens.
- Actually another opinion is that in such situations if UV filter breaks then its glass might easily scratch the lens.
- The degradation of image quality resulted from UV filter is negligible in most cases.
- Pros:
-
- Cons:
- This one is somewhat philosophic – why put a 100 dollars piece of glass on a $1500 expensive lens? It means that it is very difficult to produce a high quality lens, and this is why it is so expensive, and by putting a relatively cheap (to the lens’s price) UV filter, you must degrade it’s quality.
- Lens hood does great job protecting the lens so no UV filter is needed in most situations.
- Don’t over protect your equipment risking loosing in image quality. Be reasonable, and predict when your lens might be in danger and when not.
- The hard coating on most expensive lenses is very strong and can withstand numerous washes and cleanings (as long as you do it wisely).
- Buy Lens Warranty instead of UV filter 🙂
- Cons:
Here is a great test of UV filters in action by Ken & Christine
In conclusion, there is no simple right or wrong here. Having all the information above you must decide for yourself whether to use UV filters or not. I decided to use them when shooting on the streets or in dusty conditions, but to remove them when shooting portraits, studio, or landscapes, in other words when there is little risk to damage the lens. I also use lens hoods almost all the time. If I was a millionaire and money wasn’t an issue 🙂 , I probably wouldn’t use the UV filters at all just to be sure that I am getting the maximum quality that my lens can deliver.
If you have additional information regarding this issue, you are welcome to share it here, and
Remember, you only have to enter your name to leave a comment!
Have a great day,
Greg.
Infinity

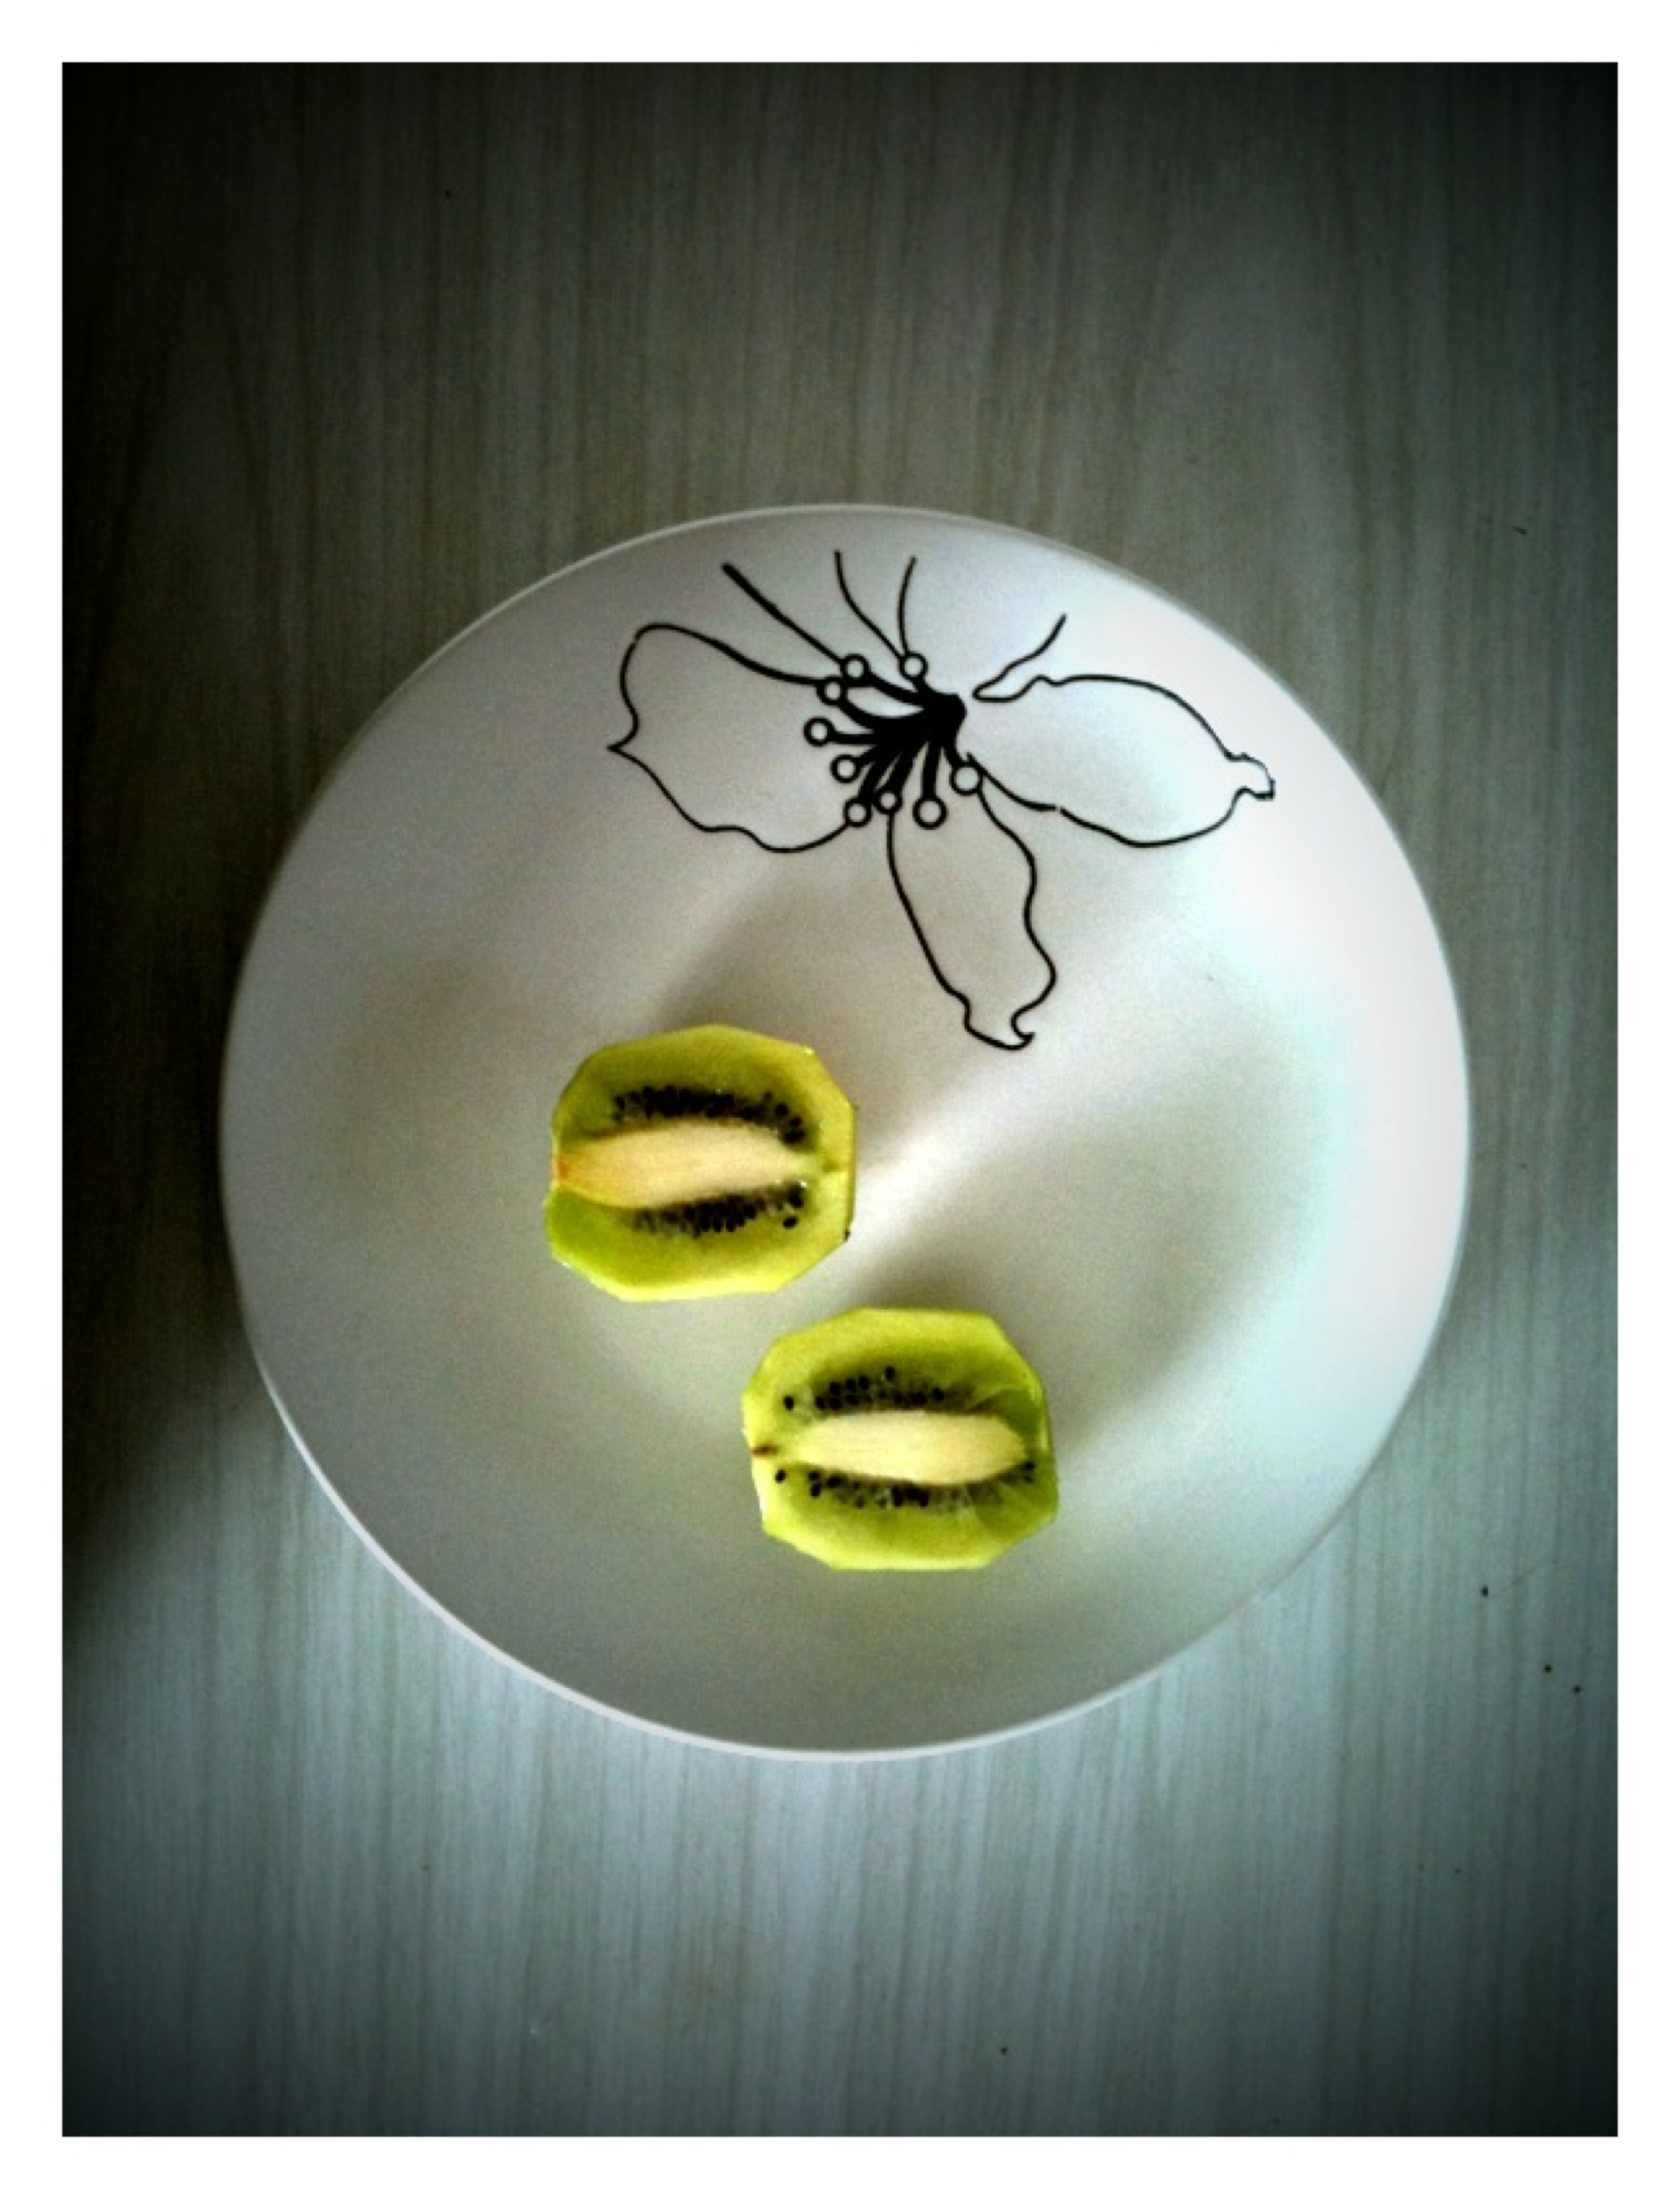
Oriental Food

Finding Sources Of Inspiration And Ideas for Photographs
It is a very common issue among photographers, therefore many articles were written on this, and now it is my turn. In this post I will describe how I try to keep myself inspired and what helps me to come up with ideas for photographs hoping that you find my experience useful.
Inspiration and ideas go somewhat together – when you feel inspired, most of the chances that you’ll have ideas for photographs, and when you have an idea for photograph, it’ll probably inspire you to bring it to life. Therefore the following text will be a mix of tips for getting inspired and coming up with ideas for images.
- I have a notepad in which I write quotes from different sources, which inspire me. You know, you read something or watch TV and at some point you hear a sentence that makes you go ” That’s right! What a great thought!”. If you don’t write it down most of the chances that you’ll forget it. So I write down these quotes and go over them from time to time or when I feel uninspired. That helps a lot, because not only you will be reading inspirational quotes, but you will also remember the circumstances at which you wrote it down, and that in itself can bring back the inspiration.
- During your “good” periods, when you feel inspired think of the things, events, places, people, which inspire you and write all that in the same notepad. It’ll help you a lot to get some of the inspiration back during the “low” periods.
- Another thing that inspires me is listening to the music that I like. Listening to music while looking around for ideas for photographs can be a huge help. Think about it for a second – in the movies they always use various kinds of music to create different moods. Take action movies for example. A certain music can add tension to otherwise usual situation. So when you listen to certain music and look around you, you will see things differently depending on the music that you listen to and it just might inspire you to raise your camera.
- I have a separate folder on my computer with my best photographs. When I create an image that I like very much, I add it to that folder. When inspiration leaves me and I feel that I won’t ever be able to create one good image, I go over my best images to remind myself what I am capable of.
- When I come across an image that captivates me, I try to find out who is the photographer and then visit his website. If I find his works exceptional I bookmark his website. Over the years I gathered list of photographers that inspire me, and I come back and go over their work when I need inspiration.
- I bet it happened to many of you, you keen photographers! You walk around doing your daily routine, and then suddenly a picture or a scene pops into your mind. It might be due to something that you see in front of you (on the street, in public transport, etc.), or because of your thoughts at that moment. It doesn’t matter why. But when it happens – write it down in a few words so that you won’t forget it. I do it in my iPhone because it is always with me. I have this nice diary application called Momento, and I write down there in a few words these pictures of my imagination. It doesn’t mean that I implement them all, but when I am out of ideas, I take a look at my notes and it helps.
- In the Momento app that I mentioned above I can also add photos to text. So if I see certain situation and an idea pops to my mind based on that situation, I simply take a photo of it and add it to the diary entry.
Well that’s about it. All these things combined help me stay inspired and keep shooting during my lowest periods and I hope that you’ll find useful at least some of them.
If you have your own ways to get ideas for photographs and stay inspired, I sure would like to hear about them in the comment section below, and
Remember, you only need to enter your name to leave a comment!
Greg.
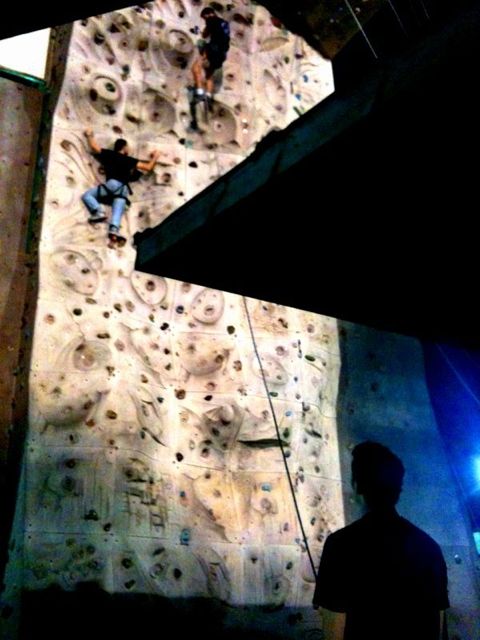
Evening Climb
Two Photography Books Review
I am self-taught photographer. Actually I did take one course in photography, but it didn’t help me much, besides understanding the fact that I don’t like to shoot in groups where ten cameras are pointed at single subject. I learned photography from much practice, web sites, other photographer’s work, tutorials, and books.
Books… books… sounds easy right? You pick up a book, you read it, and you become that much smarter. Well, as I found out in photography it is not always the case. There are tons of photography related books, but I might just start a war here by saying that many of them are pretty much the same. You know, books that named something like “The complete photography book” or “Everything you need to know about digital photography” or “The most useful photography tips”. I am just throwing titles here so you’d get the idea.
Here is the thing – when you’re into photography for a couple of years, and you already got your basics as to how to operate your camera, what are f-stops and shutter speeds, ISO, you know all the basic stuff – you realize that all such books have no value for you whatsoever because they are chewing on the same material over and over again. In photography all these basics are just the beginning, not really photography but the initial tools to it, and frankly you can learn all that on the net much faster.
So realizing that, I was looking for books that would really be helpful to me in my evolution as a photographer. And here are two of the books that I found to be just great! I learned so much from them, and I am sure that many of you will too, if you decide to read them.
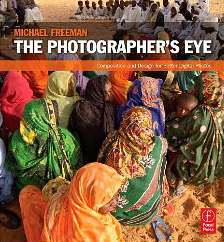 |
“The Photographer’s Eye” by Michael Freeman
In this book Michael describes different aspects of photographic composition such as framing the image, graphic and photographic elements of composition, composing with light and color, the intent of the photographer when composing, and more. What I liked the most about this book is that Michael doesn’t say that you need to do this or that in order to get a successful image. He describes all the different aspects of composition and how they might affect the result, giving appropriate examples along the way. |
| Michael explains certain rules of photographic composition and at the same time shows that rules are meant to be broken.
In my opinion this book is… how can I put it… the advanced basics of composition in photography. I really couldn’t say that this book is very basic, but at the same time I think that any photographer should read it right after his camera’s manual, or even before. It is not enough to know how to operate your expensive equipment (though it is essential, I must say 🙂 ) in order to create compelling photographs. You have to understand how composition is created in photography, and Michael Freeman explains it perfectly in this book. If I would learn photography in any institution, I’d sure hope that this book is included in the curriculum. In short – read it, you won’t regret it. |
|
 |
“The Moment It Clicks” by Joe McNally
This book is actually is pretty famous one, and Joe McNally is pretty famous himself. He was Life magazine’s staff photographer, he also shot for National Geographic, and many other big names. Really, I am sure that Joe McNally doesn’t need my introduction 🙂 Recently I’ve read some negative feedback about this book, saying that Joe doesn’t teach in this book useful things but instead talks about his life and photographs. Another argument was that Joe has a big budget for his assignment and he could allow to buy expensive props for his shots. I felt pity for the person who wrote |
| that feedback as he (or she) didn’t understand what really this book is about. In this book Joe writes about his assignments – how he got them, what were the demands, and how he solved them. There is not a lot of technical data, but there ARE enough technical details, for a thinking person to fill in the blanks.
More important to me was to know HOW this man thinks, how he operates under pressure, and where his creativity comes from. Joe writes about all this in this book. It is also PACKED with creative solutions to many difficult problems that Joe’s assignments presented. I learned a lot from this book, and if you read it with right mindset you will too. This book’s aim is to inspire photographers to explore and develop their creativity, to show that any photographic problem can be solved one way or another. And it contains lots of examples to back it up. From the other side Joe also tells the truth about photographer’s life, that it is not easy, and not everything always goes the way that you’d like it to. Again, when you are past the basics of photography, you need to develop your photographic vision and creativity, and this book helped me a lot in my quest. I think it could help you too should you decide to read it. |
|
Did you read any of these two books? What do you think of them?
Remember, you only have to enter your name to leave a comment!
Greg.
Enhancing Photographs in Lightroom
There is so much talk about post processing, and whether it is good or bad. There are people who never post process their photos, and there are also people who always process their photos, and also anything in between.
I do process my images in Lightroom or Photoshop, but not always. Sometimes the weather is perfect, and the air is so clear that nothing needs improvement. But in our busy world, we don’t always have the time to wait for the perfect conditions, and have to settle for whatever weather there is when we have the time for shooting. In such cases post processing can significantly improve the end result, and it is very important to shoot RAW in such cases because it gives you more flexibility in post processing.
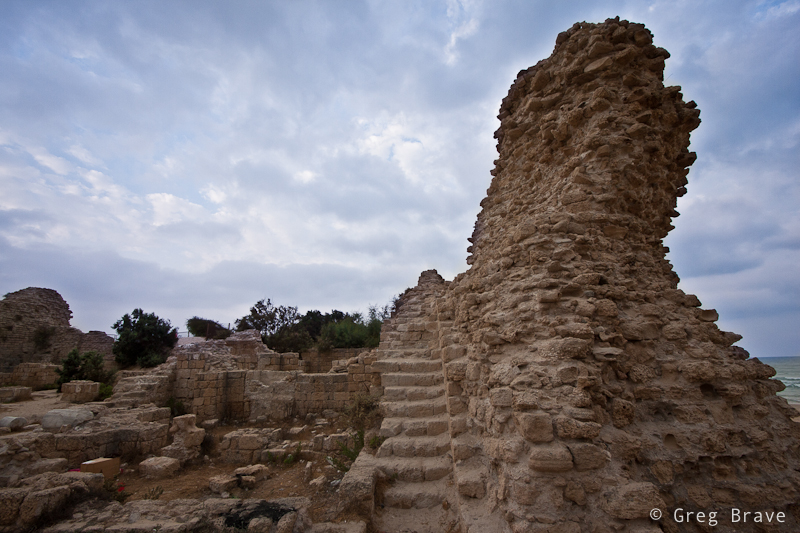
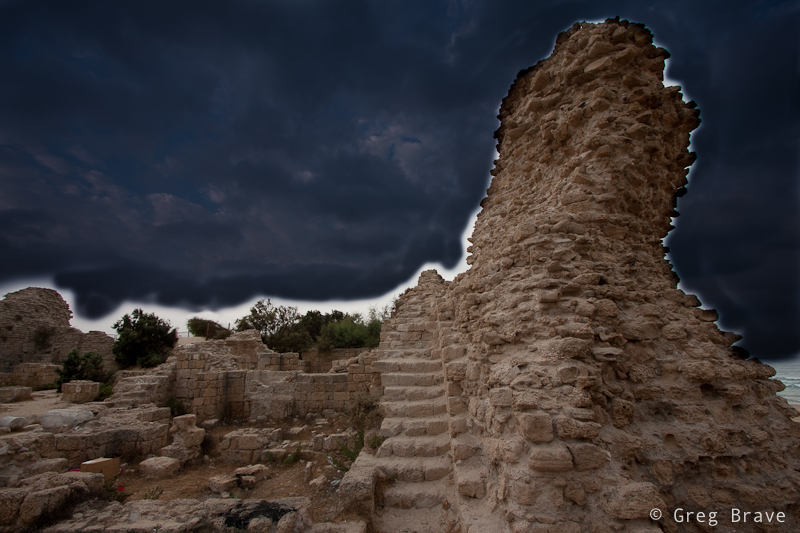
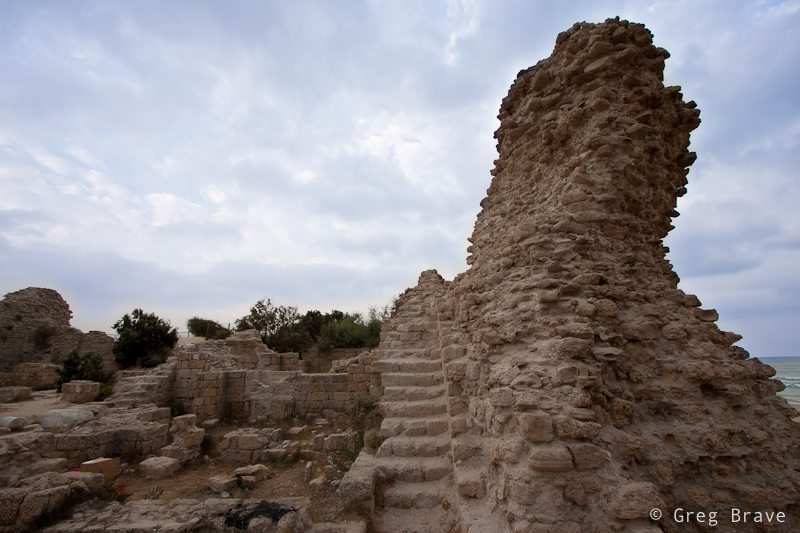
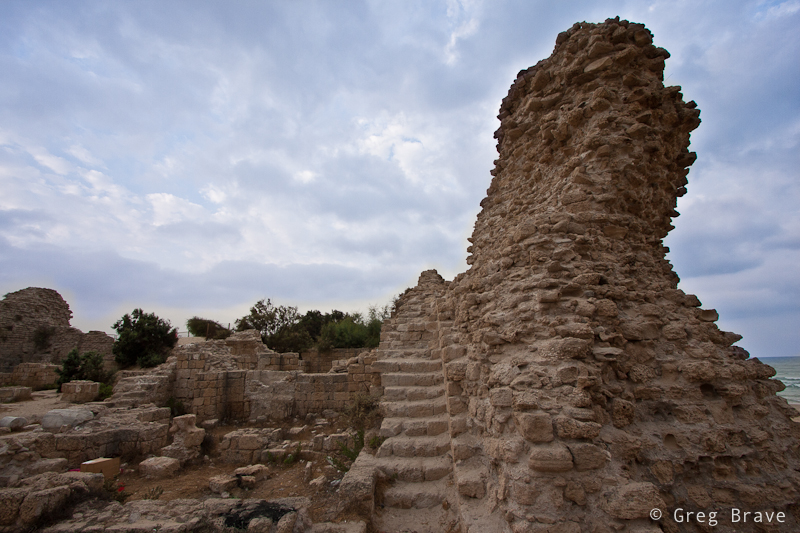
In this post I will walk you through my Lightroom post processing steps, using one of the recent photos I took. Below on the left you can see the initial photo of an old fortress that I took on early morning. Unfortunately the sky was covered with clouds so that there was no contrast in the photograph.
Below on the right you can see the final image, after I finished working on it in Lightroom 3.

Click on the photo to enlarge.
So how I achieved this end result? Let me walk you step by step. All the steps below were performed in the Develop module.

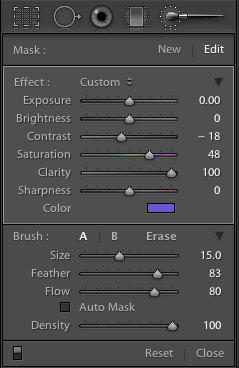
First of all the sky bothered me the most in my initial image. It lacked contrast and was completely colorless. So I opened the adjustment brush, set it up and covered the sky area. Below you can see the screen shot of the settings that I used for the adjustment brush. Let’s go through some of them:
Contrast – though in most cases increasing contrast is more useful, in this case with clouds decreasing the contrast revealed more detail in the clouds.
Saturation – I increased the saturation of the adjustment brush because I also changed the Color to a shade of blue (as I’ll show in the next screen shot), and for this addition of color to be seen better I had to increase the saturation.
Clarity – Clarity is always good for clouds :). Really, increasing clarity makes clouds pop.
Color – I decided to add a slight color tint to the clouds so that they won’t be boring gray, but still have a realistic color.
Feather and Flow of the brush are needed for creating smooth gradients between the adjusted and not adjusted areas. The values that you see here are not a must, and you’ll have to play with them to find what suits your taste.
Below you can see the color selection box and the values that I chose. 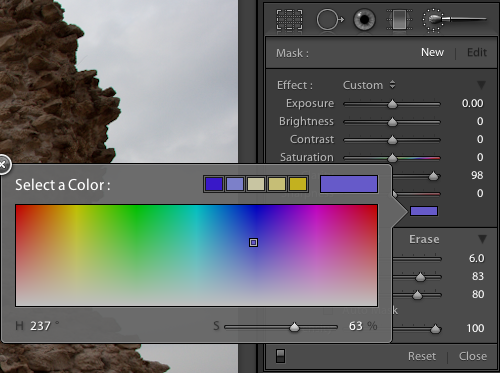
Now, I painted with the adjustment brush over the sky. There is a slight problem when you want to paint with adjustment brush over large areas, especially when the changes that brush does are subtle – you might miss a few spots in the middle and even more at the edges. I found a pretty easy solution for this: temporarily, in the adjustment brush settings decrease the exposure value to -4 so that in addition to all your essential adjustments, you’ll also significantly darken the image in the painted area. This will make the painted area perfectly visible. Then, after selecting everything that you want, slide the exposure slider back to it’s initial position.
In the image below you can see the clouds painted over with the adjustment brush with exposure set to -4.
Click on the photo to enlarge.
And here you can see the result of painting with the adjustment brush after I returned the exposure slider to zero:
Click on the photo to enlarge.
After adjusting the sky I examined the overall look and decided to make a few more adjustments to the whole image. In the screen shot below you can see the initial settings, with which I started.
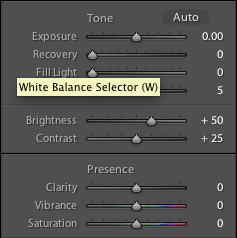
Let me explain the adjustments that I did.
I decreased Exposure slider to -0.45 in order to reveal even more details in clouds, but this also darkened too much the lower part of the image. To compensate for that I increased the Fill Light slider to 20. After increasing the fill light, I felt lack of contrast in the fortress, so I increased the Contrast to +34. Next I increased the Clarity and Vibrance just a little for a finishing touch. In the screen shot below you can see the final settings.
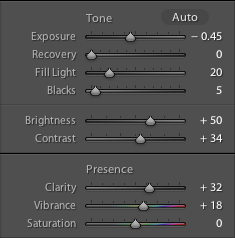
And this is how the image looked like after performing those changes.
Click on the photo to enlarge.
We’re almost done, but not just yet.
I stared at the image for a few minutes, and it seemed to me that something was missing. Finally I understood what it was – subtle vignetting. Let me explain. The shape of the right column together with the clouds create a sense of movement from the outer frame towards the center of the image, and vignetting would emphasize this sense of movement.
And here is the final image (same one as in the beginning of this post).
Click on the photo to enlarge.
So this is how I do my post processing – by first analyzing the image, deciding what is missing or could be improved, and performing the adjustments. Of course this whole process is not “scientific” at all. It is very intuitive and imaginative, because in order to achieve an end result you have to visualize it first. Sometimes though it is more like “lets move this slider and see what it does to the image”.
Did you find this article helpful? How do you post process your images? Any examples of before and after will be much appreciated, and
Remember, you only have to enter your name to leave a comment!
Greg.
Summertime
Creative Conversion to B&W in Lightroom
From time to time we all encounter black and white (B&W) images that look very dramatic. Many times I’ve seen B&W images that simply took my breath away, but somehow most of the times when I tried to convert some of my most beautiful images to B&W (which I thought would look great in B&W), I was disappointed. I tried to increase contrast but it didn’t help a lot. And then I discovered (by myself! 🙂 ) the way of manipulating B&W images in Lightroom to significantly improve their visual impact, and I want to share it with you here.
I mostly shoot RAW, so my images are always in color even if I shot them with BW intentions. In order to turn them into B&W in Lightroom I go to the develop module and choose B&W. But only converting to B&W most of the times doesn’t deliver good results, and image often looks dull and uninteresting. Even if you try to adjust the color version of the image (vibrance, contrast, etc.) before converting to B&W, still the B&W version lots of times won’t be satisfying.
Here’s what I do. In the develop module of Lightroom there is the following section:

When your image is in color then the “Color” is highlighted, and if you click on the “B&W” it is automatically converted to black and white, below it appears caption “Black & White Mix” and 8 sliders (from Red to Magenta).
Below you can see an example of colored photograph before I clicked on the B&W, and immediately after. As you can see the B&W image is not that good.
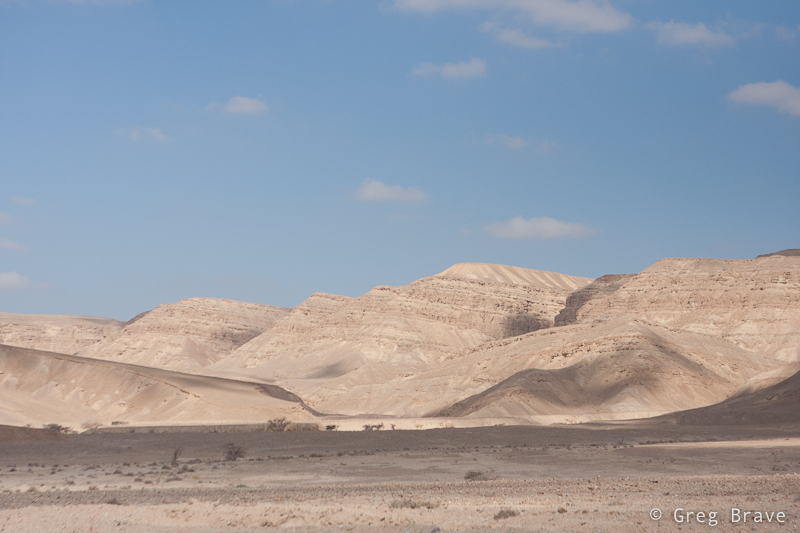

Click on the photo to enlarge.
Now I’ll show you how the black and white version of the above image can be improved.
After I converted the above image to black and white by clicking on “B&W” button, here is what the Black and White Mix looked like:

Each slider in the mix is responsible for a different color, but since the image is in BW, when you drag the slider, what changes is the brightness of that color in the B&W image. So for example if I want to darken the sky, I drag the blue slider to the left side. In this manner I adjust all the sliders, so that my final image looks just as I envisioned it in the first place.
Back to my example. Here is the final image after adjusting the sliders:
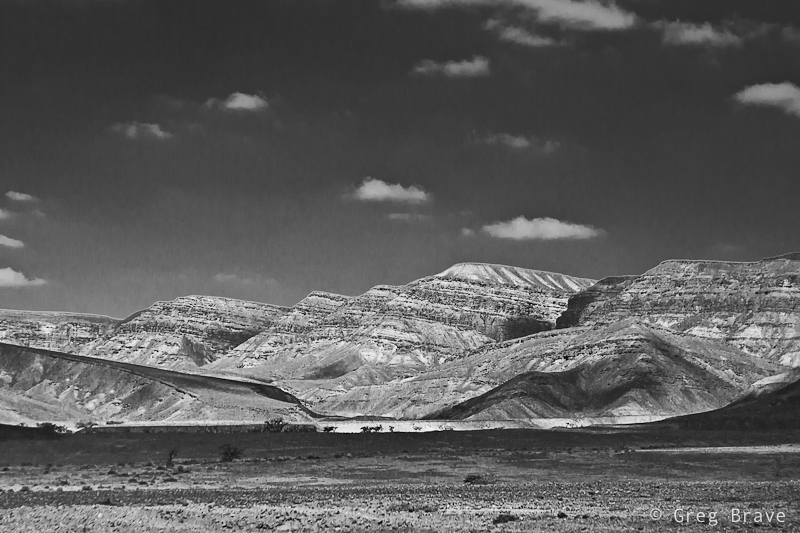
Click on the photo to enlarge.
And here is how the sliders of the final image are positioned:

Blue slider is moved to the left in order to darken the sky and make the white clouds stand out. Yellow slider is moved to the right to make the hills brighter. Some other sliders are also adjusted but not all of them. For example I didn’t change the position of the red slider, because there is almost no red tones in the image, so dragging it doesn’t change much.
Of course you can use this technique with any image and not only landscape shots.
Here is another example. I shot these green leaves with intention to later convert them to B&W for a more graphic representation.
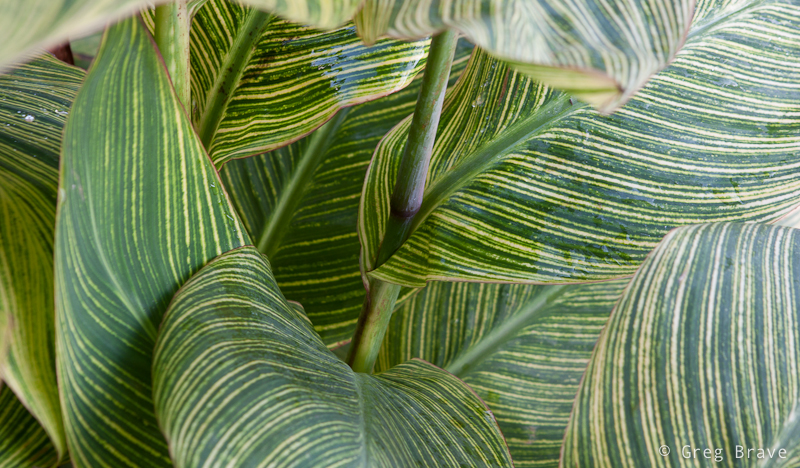
Click on the photo to enlarge.
This is what the sliders looked like before I played with them:

And this is the final version of the image just the way I imagined it in the first place. Below it you can see the final positions of the sliders.
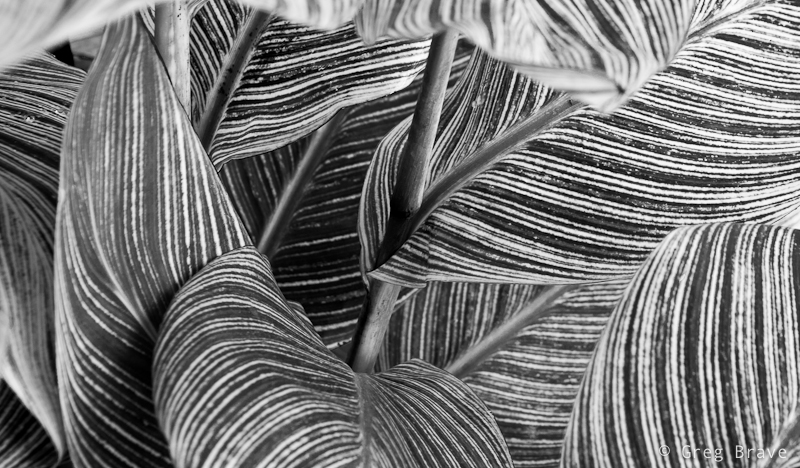
Click on the photo to enlarge.

Converting just to black and white is not the limit. In this final example you can see another shot of the same leaves, but with two versions of creative editing.
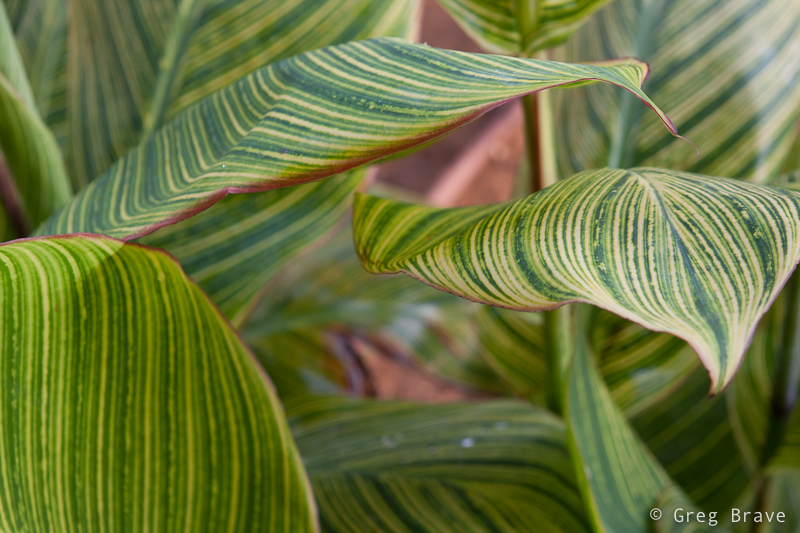
Click on the photo to enlarge.
The first is the black and white version, but then I tried to add a sepia tint and vignetting and ended up liking this second version even more than the B&W one, but it only became possible after creating the B&W version using technique that I showed.


Click on the photo to enlarge.
If you have your own techniques for converting to B&W you are most welcome to share them here, and
Remember, you only have to enter your name to leave a comment!
Here’s to your creativity!
Greg.
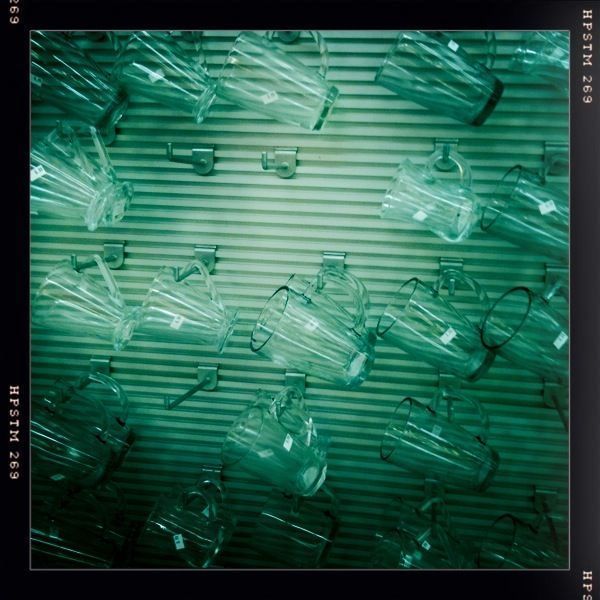
Cups
Interview with Ilia Shalamaev
Before reading this interview I suggest reading my Introduction to Interviews with Photographers.
Ilia was born in Uzbekistan. When he was thirteen he moved to Israel with his parents. Ilia’s affair with Mother Nature started when he was a young boy and continues to this day. The breakthrough in his photography happened in the year of 2000 when he bought his first digital camera, and since then you can find Ilia’s photographs in many books and leading magazines such as National Geographic, Practical Photography, The Guardian, Daily Mail, Telegraph and many more.
Ilia also specializes in bird photography and has a large collection of magnificent birds photographs.
Ilia kindly agreed to this interview and made time in his busy schedule to answer my questions.
Please welcome Nature, Bird, and Wildlife photographer Ilia Shalamaev!
Click on the photo to enlarge.
How do you choose the locations to shoot your beautiful landscape images? I mean how do you know that from a certain location you’ll get a great image?
Choosing the right location is the most difficult part of the job. I try to look for right places before I actually bring the gear to the field. Second thing is to decide in what season and hour of the day the subject will look in its best. What left is to wait for the right moment to give it a shot.
Photo by Ilia Shalamaev. Click on the photo to enlarge.
The colors in your landscapes are absolutely magnificent. Is this due to post processing enhancements, good lenses, or just perfectly chosen weather conditions and time of the day?
Most of my landscapes I take in the magic light of sunrises or sunsets, the harsh light of midday, especially in our region leaves no chance for a decent image. In addition, the right use of polarizer and set of ND Grads (Neutral Density Graduated filters) really enhances the color saturation and dynamic range of the images I take.
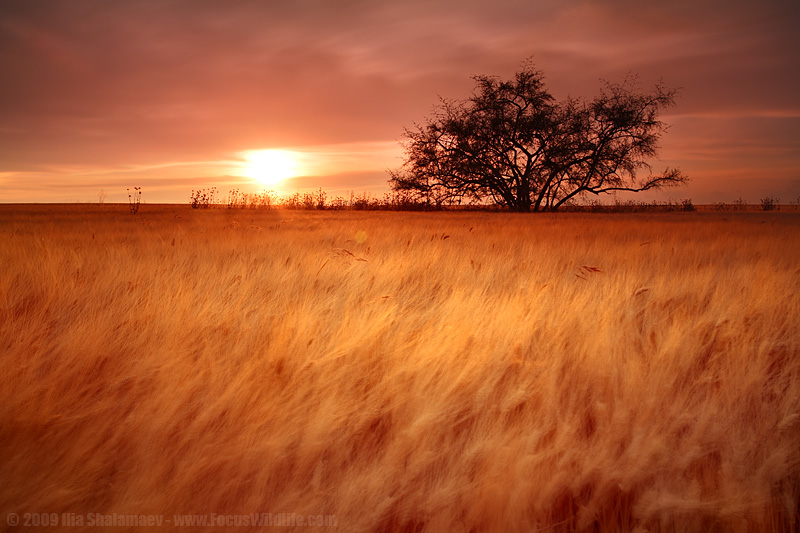
Photo by Ilia Shalamaev. Click on the photo to enlarge.
I understand that in order to get some of your beautiful images you had to hike quite a distance outdoors. Could you share some of your tips regarding hiking with photographic equipment in the nature?
There are some must things for traveling in the wilderness: Good hiking boots, pro backpack for the gear, light tripod, a lot of water and a light thermal jacket with you. The backpack should be very comfortable and protected from rain. As to photo gear, try to take with you the minimum you need. Usually on a hike I don’t take more than two lenses with me .
Photo by Ilia Shalamaev. Click on the photo to enlarge.
In your image “The Charm of Light” you managed to beautifully capture sun rays spilling over the waterfall. How did you do it ?
In that case most of the credit should go to Mother Nature. Rays of sunshine on that warm morning melted the last remaining snow and filled the air with mist that joined millions tiny droplets of water, created by the 60 meters high waterfall. All these combined created this celebration of nature.
The gear I used for this shot is canon 5D, canon 17-40mm f/4 lens, 2 stops soft ND-Grad, tripod.
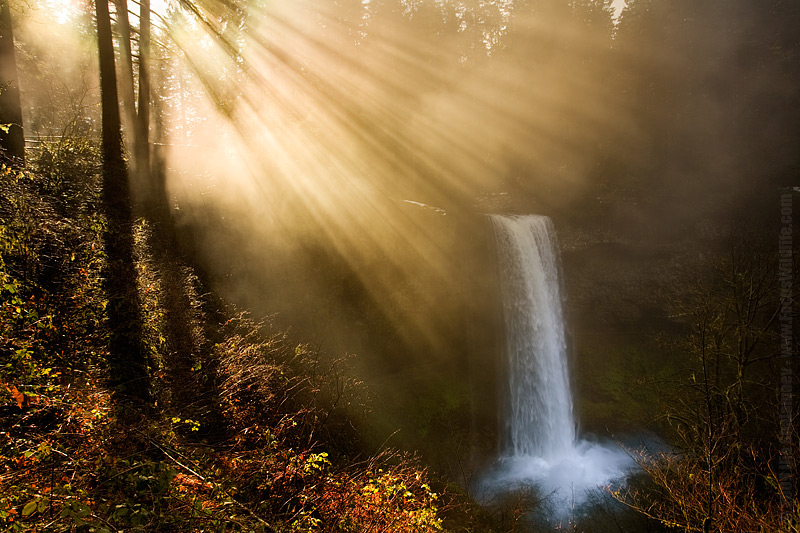
“The Charm of Light”. Photo by Ilia Shalamaev. Click on the photo to enlarge.
You are also a professional bird photographer, having a wonderful collection of high quality images.
What are the most important aspects of bird photography?
It is a bit difficult for me to pick just one so I will mention two of them:
a. Patience – you will need a lot of it, in order to success in this field of photography. Sitting for hours in a tiny hideout with 45 degrees Celsius inside, without moving or making a noise, is just one example of bird photographer’s reality.
b. Knowing your subject. Bird photographer should understand his subject and in many cases predict its behavior, in order to get intimate images of it.
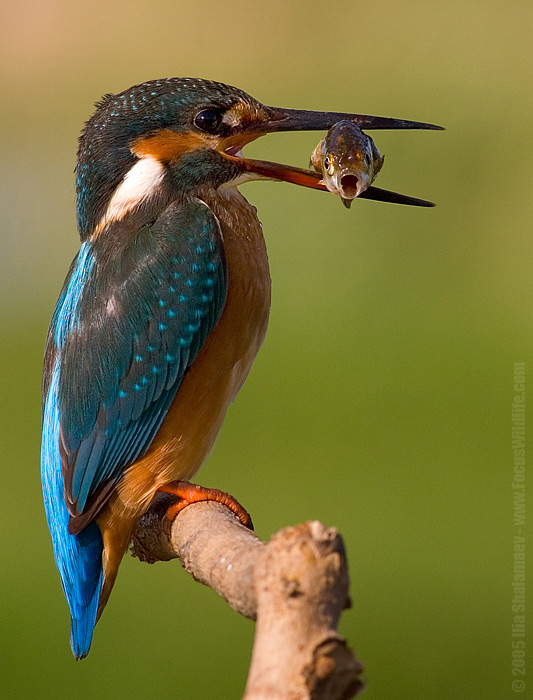
Photo by Ilia Shalamaev. Click on the photo to enlarge.
I assume that technically to be able to create such shots you have to use some professional equipment. What equipment do you use specifically for your bird photography?
I use Canon gear. Canon 5dMKII body and canon 500mm f/4 IS L lens, Gitzo basalt fiber tripod. Occasionally canon EX 580 flash.
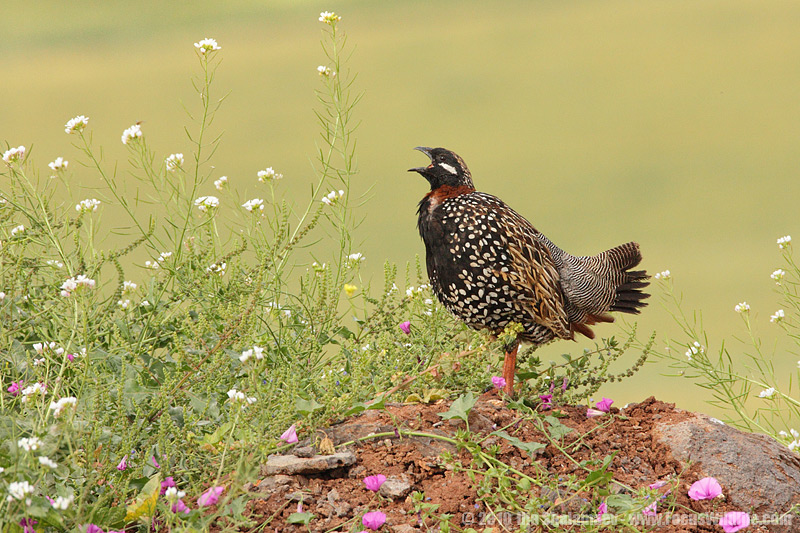
Photo by Ilia Shalamaev. Click on the photo to enlarge.
What photographic equipment do you use for everything else?
For my landscape photography I use the same
- 5D MKII body
- Canon 17-40mm f/4 L lens
- Canon 70-200mm f/4 L lens
- Sigma 15mm f/2.8 Fisheye lens
- BW, Marumy, Singh-Ray, Cokin, Hightech filters (polarizer, ND, ND-Grads)
- Slick Carbon fiber tripod with RRS ball head and L plate
There is no other camera body on the market that can compete with output quality of the 5D MKII in even close to its price range, due to 5D’s full frame, high resolution sensor and its reasonable price. So it’s obvious that this body is an ultimate tool for landscape photographer. Many will say that its focus system is not match for Nikon D700 FF camera and will be perfectly right, but I don’t even use automatic focus when shooting landscapes, so it’s not an issue for me.
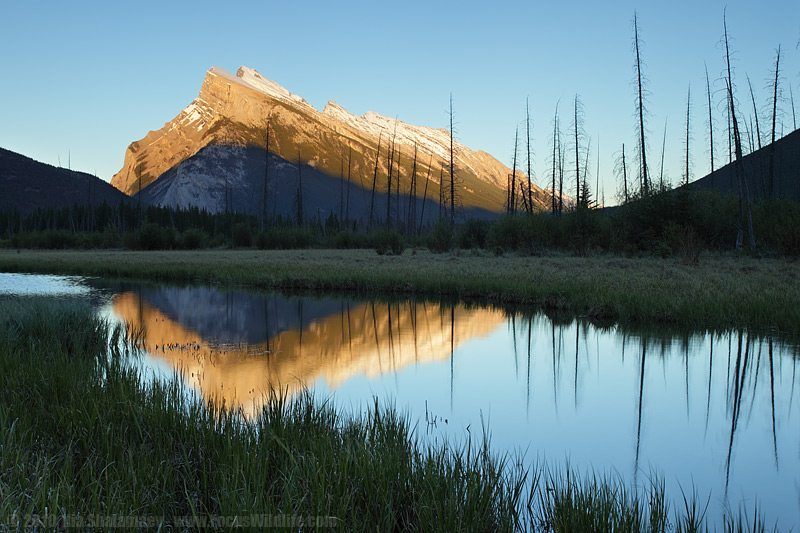
Photo by Ilia Shalamaev. Click on the photo to enlarge.
You also conduct nature photography workshops in Israel. Tell us about your workshops. How can people sign up for your workshops?
I give master classes of landscapes and birds photography, mostly in association with “Galitz” school of photography. Next start date, for 5 meetings Landscapes photography workshop, is in 26 of September 2010.
It has become my tradition to ask this question – if you had only two advices to give to a beginning photographer, what would they be?
1. Watch and understand your subjects before thinking about taking pictures.
2. Do not choose the easiest target – find one that not many have photographed. Better choose subject that you have repeated access to, and concentrate on it. Eventually you will obtain the pictures you first imagined.
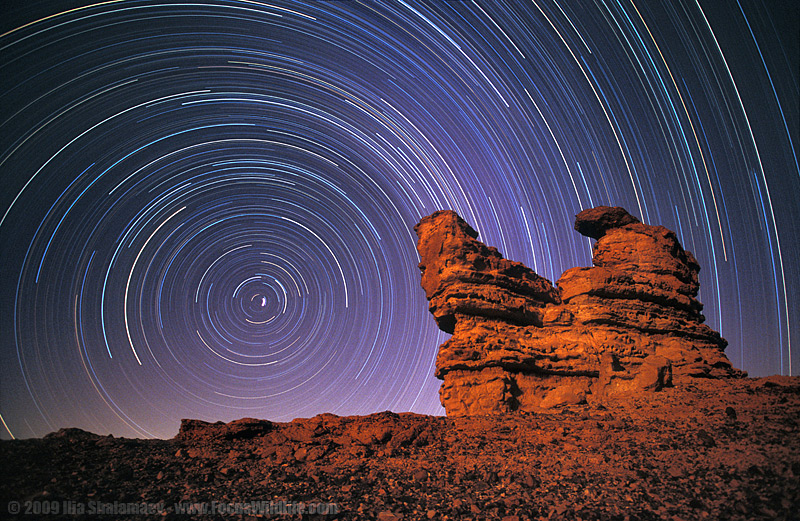
Photo by Ilia Shalamaev. Click on the photo to enlarge.
Ilia, thank you very much for your time, effort and knowledge, and keep up the great job that you are doing!
You can see more of Ilia’s work on his
Nature Photography Website
Shooting Baby Closeups
Recently my good friend asked me to photograph his baby son Eric. I gladly accepted because I don’t usually get to photograph babies and wanted to give it a try. The only problem was that my friend’s house didn’t have any suitable place to make a little studio out of, every place I looked at was too cluttered with stuff, which could distract the viewer’s attention from Eric. Finally I found a few places but knew in advance that the resulting photographs won’t be the way I’d like them to be.
Still I wanted to make at least a few photographs that would stand out and satisfy my artistic demands 🙂 The only solution I could come up with was to shoot close-up shots of Eric so that background wouldn’t matter much. Three of those shots I chose to present here.
The key aspect of the following photographs is the light. It is different in all three of them, but in each photo it plays very important role.
For the following photograph I used a 100mm Canon macro lens at f2.8. I had a flash with me and tried to use it, bouncing from the ceiling or walls and varying its power, but I didn’t like the results – the light was too harsh and too white for my taste. Yes I could use a 1/4 CTO gel to warm up the light a little bit, but I choose a different approach instead – I asked my friend to take Eric and come closer to the window.
It was about 5 o’clock in the afternoon and sun light was still pretty strong, but was already getting warmer as sun got lower and lower. After positioning the happy couple the way that there were no significant shadows on Eric’s face I started to shoot, and the photo below was the winner of that batch. I like it because of the intimacy it transmits to the viewer, the closeness between the child and his parent. Because the light coming from the window was much stronger than the light in the room I could set the exposure so that the background remained completely black.
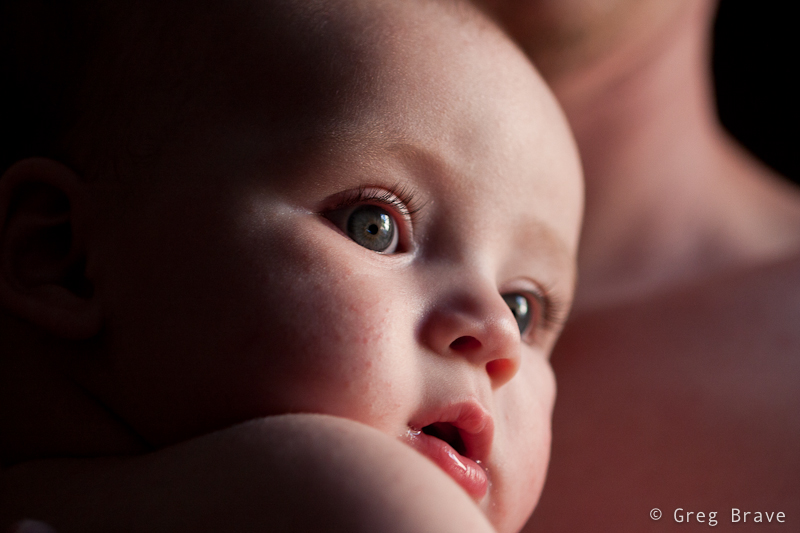
Click on the photo to enlarge.
For the next two photos I used a 70-200mm f4 L Canon zoom lens at f4.
In the next photo I took Eric to another window in the house, with transparent white curtains to serve as background. I intentionally went for the high contrast in lighting in order to create a little drama. But nevertheless as you can see there are no harsh shadows on Eric’s face, that would be unaesthetic for my taste. I like the way his eyes are emphasized in this photograph as if they were eyes of an adult but on a cute baby face.

Click on the photo to enlarge.
I also included the photo below in this article to demonstrate use of reflected light. In this photograph my friend hold’s Eric close to his body, and the light from the window reflects from his body and lights Eric’s face with soft warm light. So in order to create warm light you don’t always need gels and flashes… sometimes human skin can do the job just fine! 🙂

Click on the photo to enlarge.
What additional tips can you share regarding photographing babies? Did you like the photographs presented here?
As always comments are highly appreciated, and
Remember, you only have to enter your name to leave a comment!
Till the next time,
Take care!
Greg.
Loneliness
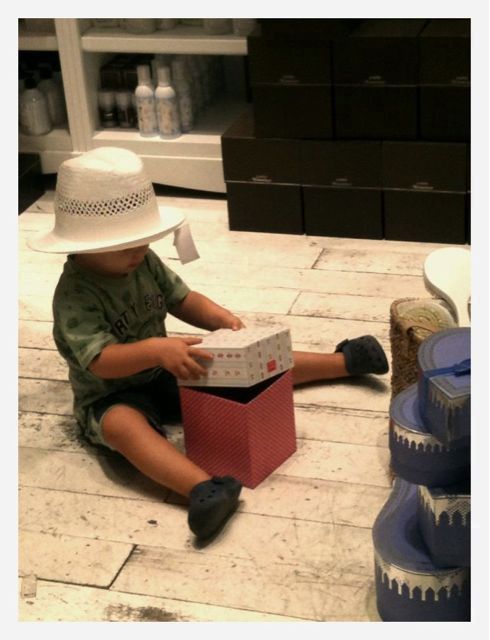
Hat Boy
Vision Driven Photography by David Duchemin
For two days now I am watching the live workshop with David Duchemin called “Vision Driven Photography” and I am fascinated by it!
Actually only recently I discovered the creativeLIVE website. What they do there is they have workshops, or classes with some fascinating people and broadcast them live. During the live broadcast anyone can watch the workshop for free, and they make it financially possible by recording these classes on HD video and selling them. And after watching this workshop with David Duchemin I can say that these workshops are really worth buying too.
This workshop with David Duchemin for example is divided into three days, one session each day. And the guys at creativeLIVE are pretty amazing – in between the session they repeatedly broadcast the recorded session also for free! So you don’t have to watch it at exact time it is live, you can do it at any time of the day.
If you read this post at the day that it is posted you can still watch the remaining parts of the workshop for free – just click on the link above
David Duchemin is a great photographer. You can see his work at www.pixelatedimage.com and he also has written several e-books, some of which after seeing his workshop I’m definitely going to buy (on his web site they cost only $5 each!).
If you are not familiar with David Duchemin’s work, I recommend visiting his web site, and soon I’ll post reviews of his ebooks that I’ll purchase.
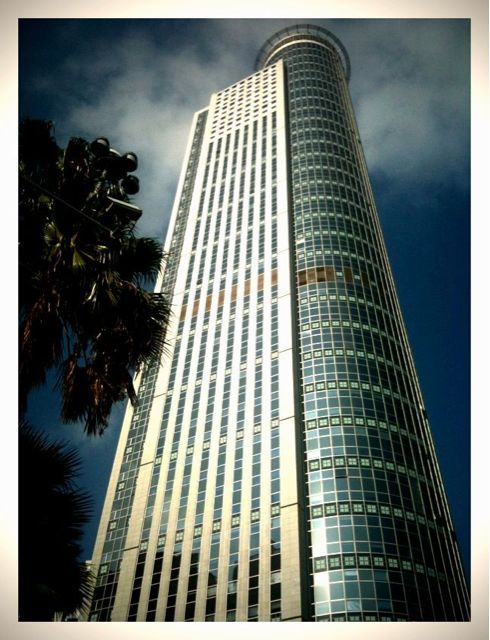
Skyscraper
Cat Woman

The Charm of Old Jaffa
Any photographer who lived in Israel, amateur or professional, must have visited for at least one photographic session the old Jaffa town. It is known for its beautiful alleys, old architecture, and historic heritage. The downsize of this is that it is difficult to create unique images of Jaffa since so many have photographed it before. But still I decided to give it a try.
One early morning Ira and I went to the Old Jaffa. Ira to take a walk there and me to try and create unique images of Jaffa. I would like to share some of those here.
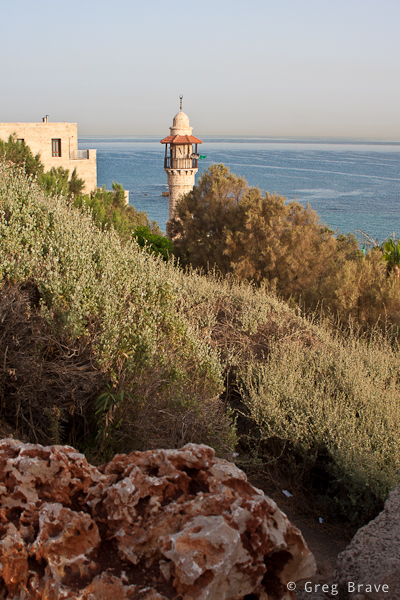
In the photo below you can see the Sea Mosque. It is a small mosque (closed to visitors) standing near the Jaffa’s sea promenade.
Click on the photo to enlarge.
This is Wishing Bridge. On the bridge’s rails there are Zodiac signs. Ancient legend has it that if you stand on the bridge, touch your Zodiac sign, look at the sea, and make a wish, it will come true. I was standing near this bridge for some time thinking how I could photograph it differently, because I’ve seen so many photographs of this place. And then this little dog showed up, and just before stepping on to the bridge turned back to it’s owner for permission. I snapped the photo right that moment, and it looks like the dog invites the viewer to the bridge.

Click on the photo to enlarge.
In the next photo you can see The Faith Statue. Even though I shot several photos from much closer distance, I like this photo the most, because in my opinion the palm trees add a nice touch to the overall mood of the image.

Click on the photo to enlarge.
This one is just a closeup, but I like it. In order to create something like this you need to have the fluffs 🙂 which are in focus to be much closer to you than the rest of them. Otherwise the background won’t be blurry enough.

Click on the photo to enlarge.
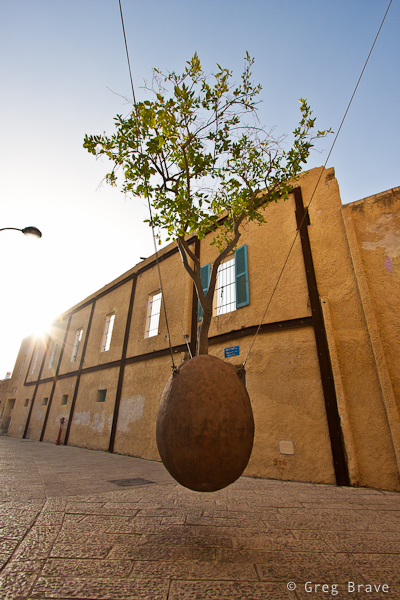
Now this is very famous Suspended Orange Tree of Jaffa. When we came there the sun was getting pretty high and I was looking for ways to use it in my photograph. Instead of shooting with the sun behind me, I decided to try and include the sun in the frame. Since I shot RAW I could later brighten the shadowed foreground (I did it in Lightroom by increasing the fill light). After shooting the photo on the left, I started thinking of ways to give this composition a more surreal look. Suspended tree itself is somewhat surreal, and so I wanted to enhance it. While I was wandering around the tree and thinking, I suddenly saw Ira standing behind it… actually I saw only her legs and it looked interesting to me and I photographed her standing behind the suspended tree so it looked like the tree had legs to stand on the ground. As I was getting ready to wrap it up and go somewhere else, this woman showed up from one of the alleys, and Ira was still standing behind the tree. I quickly snapped another shot and ended up liking it the most.

Click on the photo to enlarge.
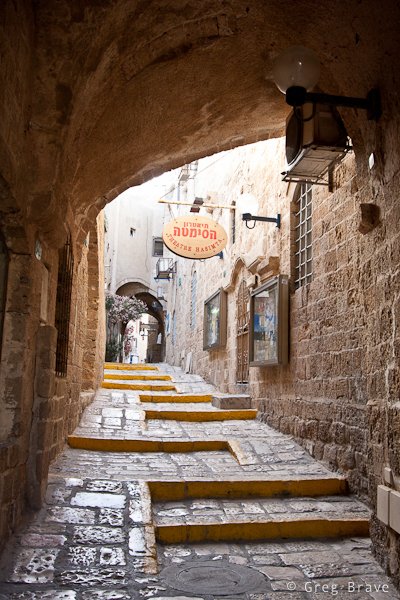
Many artists live in old Jaffa. In the photos below you can see a typical alley and an entrance to artist’s home. The paintings that are hanged on the walls help create the unique Jaffa atmosphere of art, ancient age, beauty, and relaxation.
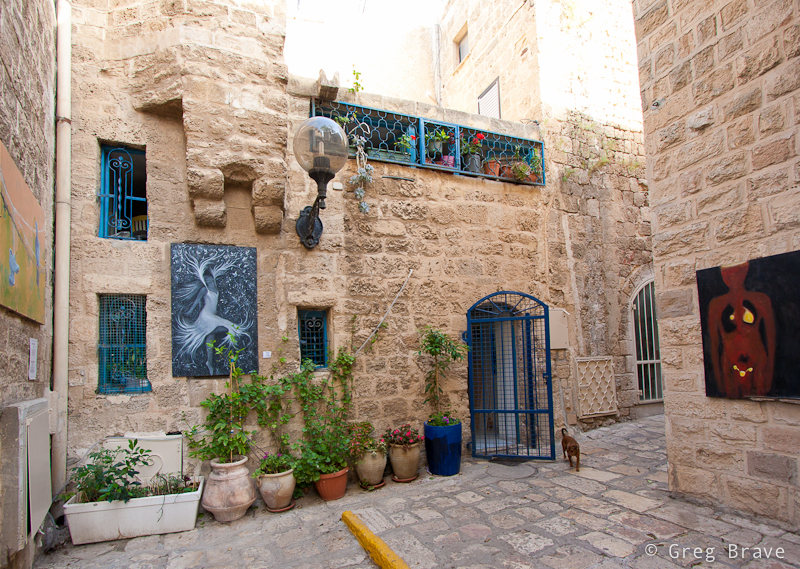
Click on the photo to enlarge.
But not only artists live in old Jaffa town. There are also many half ruined buildings occupied by homeless people, and one can strongly feel the presence of poverty. I saw this man sitting on the plastic chair right there on one of the Jaffa’s streets. He had such a wise-proud look that I couldn’t resist and snapped a photo of him.

Click on the photo to enlarge.
That concludes my photographic reportage of Old Jaffa town in Israel.
As always comments are highly appreciated, and
Remember, you only have to enter your name to leave a comment!
Greg.
The Horror Is Back
Benefits of My Daily iPhoto Project
On November 2009 I decided to start a project in which I would post to my blog one photo a day , which you can see on the sidebar. I got iPhone 3Gs as a present from my sister back then, and wanted to improve my compositional skills. So I set up an application that allowed me to post photos that I take with my iPhone directly to Photopathway.
I must say right away that I didn’t success in posting a photo every single day. It was and still is too hard for me because I don’t want to post just any photo. I want to post photos that have at least some artistic value, and I simply can’t create such photos on a daily basis. But I post at least 2 – 3 photos a week.
As I said – I started this project to improve my compositional skills but recently I realized that there is one additional huge benefit to it. A few days ago I looked at my whole collection of daily photos. As I looked at each photo from the past to the present, memories started emerging in my head. Memories from each day when I shot the photo. But not only I remembered where and why I shot the photo, but most of the times I could remember that whole day!
So this project is also my “visual diary”. I even don’t have to write anything in this diary. Just by looking at my photographs I can remember many many things that happened on that day, what my mood was, and what my thoughts were.
I suggest everyone to try this photo-a-day thing, and even if not every day then at least few times a week. And my conclusion from all this is – to try and take photos more frequently, and also try to make such photos that will make it easier later to remember the happenings of that day.
Does anyone else has visual diary?
Remember, you only have to enter your name to leave a comment!
Cheers
Greg.
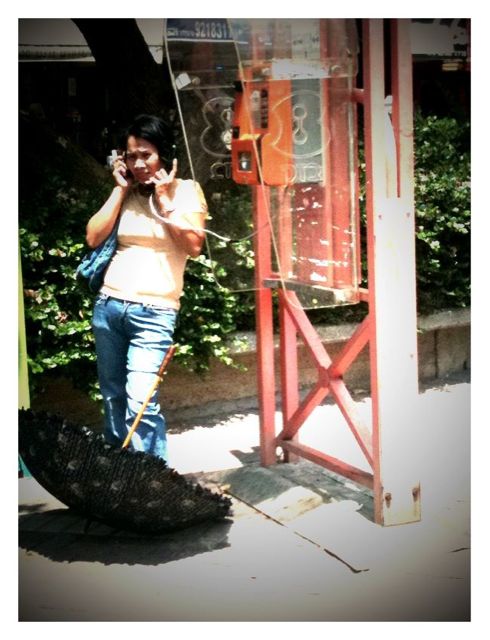
Who is she talking to?
Expressing Emotions Through Photography
One of the greatest powers of photography is the ability of expressing one’s emotions through it. The most powerful photographs out there are the ones that successfully convey a certain mood or emotion.
But to convey an emotion through photograph is not an easy task. Often times you photograph a scene and think that it is pretty powerful, and then the resulting image disappoints. In order to successfully achieve the desired result many things have to come in place.
Let’s see what are the tools that if used correctly will allow your photographs to be emotional.
Light. It is very important in any photograph, and it has to be just right when expressing emotions. For example when you express anger, you might want to keep the scene in dark colors, while photographs expressing joy and happiness are mostly bright and shiny.
Color. Another important component. The first example that comes to my mind is the Red color, which can represent danger (in various signs) but in other contexts can also represent romance (red roses, red lips). Another example would be Green color, which has calming effect, if you want to create sense of tranquility in your photo you might want to fill it with green color (trees, plants, jungle, sea). When you consider various combinations of colors – the possibilities are endless, and don’t forget the power of black and white photographs!
Composition. It is absolutely essential to have an appropriate composition for expressing any emotion through your photograph. Sometimes just a slight change of camera angle can make all the difference and emotionally faded image comes to life.
Focus. When you want to emphasize a certain part of your image you put it in sharp focus while making other parts more blurred, but this rule isn’t written in stone. Sometimes the blurred parts of an image create all the mood, and hint the viewer about the story of the photograph. So it is not about the image being sharp or not, but about using the focus in such ways that will contribute to your final result.
There can be endless combinations of these components, and it is photographer’s job to find and create the ones that work, the ones that convey emotions to the viewer in a powerful way.
I decided to try and convey the emotions of love and affection. There are million of different ways to do that – photograph a young couple in different settings, a mother with child, etc. I decided to do that with still life.
When Ira and I were on vacation a few months ago, we bought this tiny figure of two hippos as a symbol of our feelings, and this figure immediately came to my mind as being perfect for the task. But just a figure wasn’t enough, so I thought what else can I add to the composition? I knew for sure that I wanted the image to be in bright and happy colors, so I was looking for something colorful. I ended up with these beautiful tiny blue flowers (forgive me for not knowing their name), and below the hippos and flowers I placed dry tree leaves, which were bright yellow.
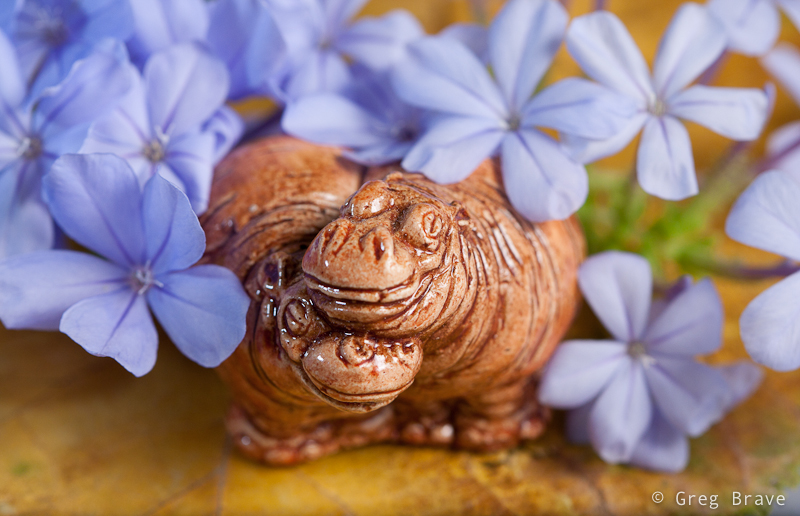
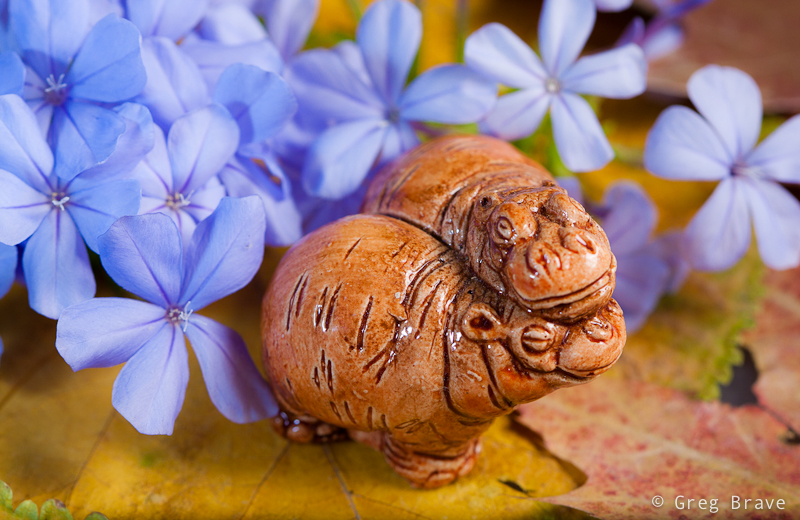
Click on the photo to enlarge.
Now, when I had all the components, all that was left was to combine them together in one composition. I tried many different variations and the two that you see above I liked the most. In order to concentrate the viewer’s attention on the hippos I used wide aperture and focused on their eyes. This way most of the flowers were blurred creating a happy, bright, and colorful background for the “hippos in love”.
Photographing hippos, I noticed how tender these flowers were, and photographed them alone to try and show their tenderness. Two photos below is what I came up with.


Click on the photo to enlarge.
I can’t say to what extent I succeeded in conveying the emotions of love, affection, and tenderness through these images. It is for you to decide. Can you feel it through my images? How would you express your emotions through photography?
Remember, you only have to enter your name to leave a comment!
Till the next time,
Greg
Ugly vs. Fat

The Power of Pseudo HDR with Photomatix
If you are new to the whole HDR concept I suggest you first read my posts titled HDR Introduction and Pseudo HDR
Anyone who heard about Photomatix, knows that it creates HDR images. But in addition to a usual HDRs combined from several exposures, you can also create a nice pseudo HDR images – in short an “HDR looking” image made from a single RAW file.
In order to do that you open just that one RAW file in Photomatix, and it “understands” that you want to create a pseudo HDR. Then you use the great tone mapping tools that Photomatix offers and tweak your final result. In my next post I will go into more detail of how exactly to work with Photomatix, but here I just want show a little of what’s possible.
I would like to illustrate this by presenting the before and after versions of an old car photograph. As you can see the change is quite drastic, and it shows how much information is really hidden inside that RAW file.
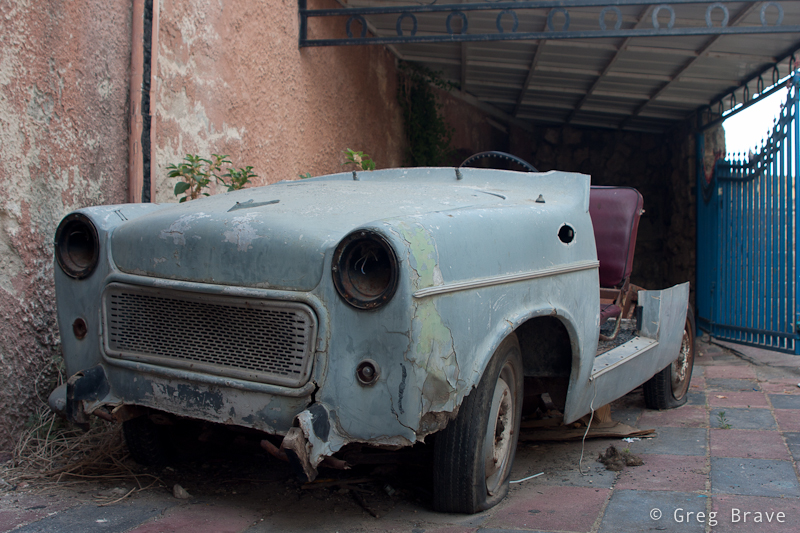
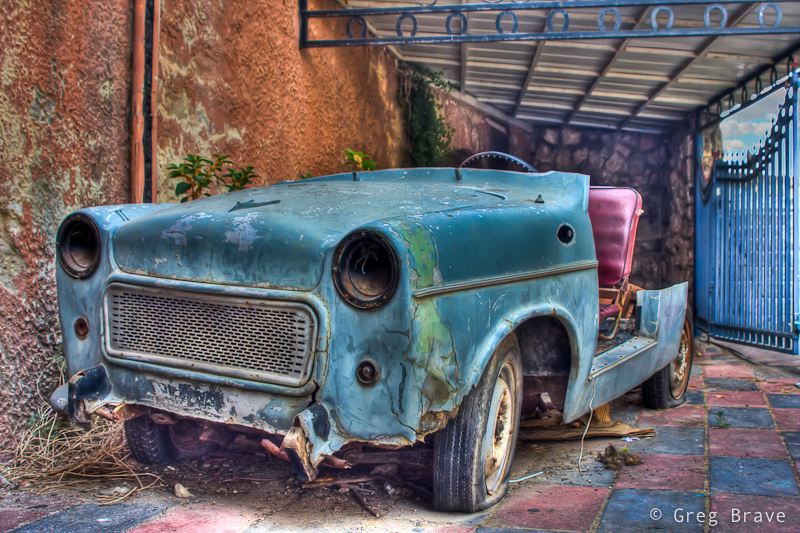
Photographs by Greg Brave. Click on the photo to enlarge.
Somehow in my mind an “exaggerated” HDR images, the ones with slightly unreal look, are always associated with old cars and industrial scenes, so in order for this post to be complete I am adding here another pseudo HDR image (yes, that one is also made from a single RAW file), containing industrial buildings.

Photograph by Greg Brave. Click on the photo to enlarge.
One of the advantages of pseudo HDR is that you don’t always have to use tripod to make it. What I mean is that in order to create ordinary HDR image you’d have to take multiple exposures and use tripod to stabilize your camera so that all your exposures would be framed exactly the same. This is not a problem when you are using only one raw file.
So if you have in your photo collection some single RAW photos that don’t look too interesting, you may want to use Photomatix to create a pseudo HDR from them and see what happens. The result might surprise you!
Till the next time, take care!
Greg.
Pool
Before The Plunge
Creating abstract photographs
This time I would like to talk about creating abstract photographs. There are many ways of doing it, and one of the simplest ones is to take a closeup shot of something with interesting texture making it unclear what it is from one side but creating an interesting combination of forms, colors etc. from the other side.
For example you can find an old wooden door with paint which partially came off and take a closeup of it, or take closeup shots of rusty metal. Another idea would be taking closeup shots of architectural creations including particular parts without revealing the form of the building. There are many more ways of course, and these are only a few examples.
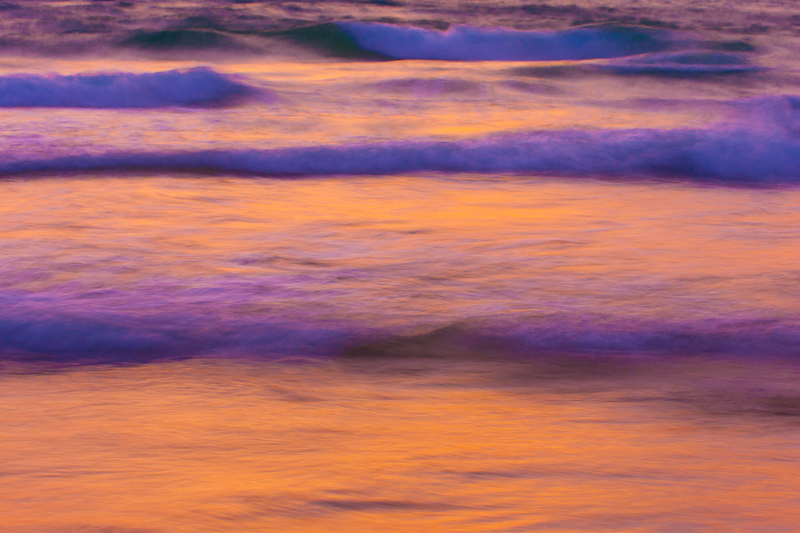
For these series of abstract photographs I decided to photograph waves. I came to the seashore about an hour before the sunset, put down my tripod, mounted my Canon 40D and started shooting.
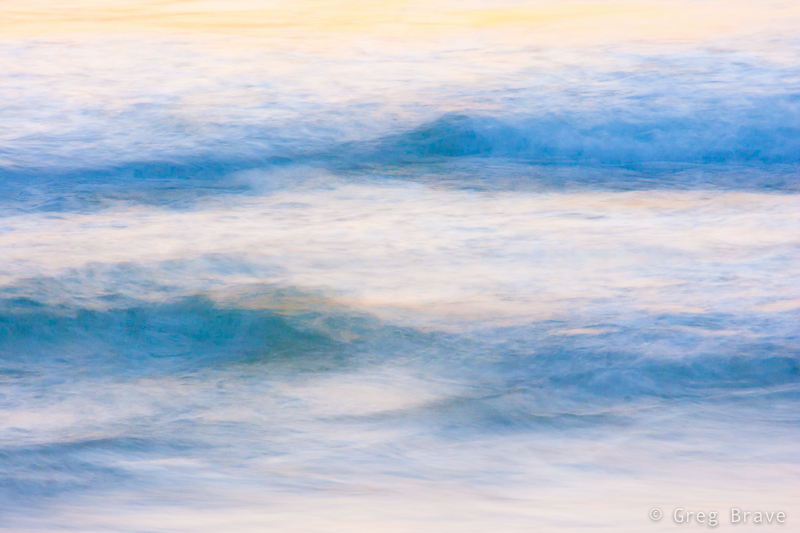
Photographs by Greg Brave. Click on the photo to enlarge.
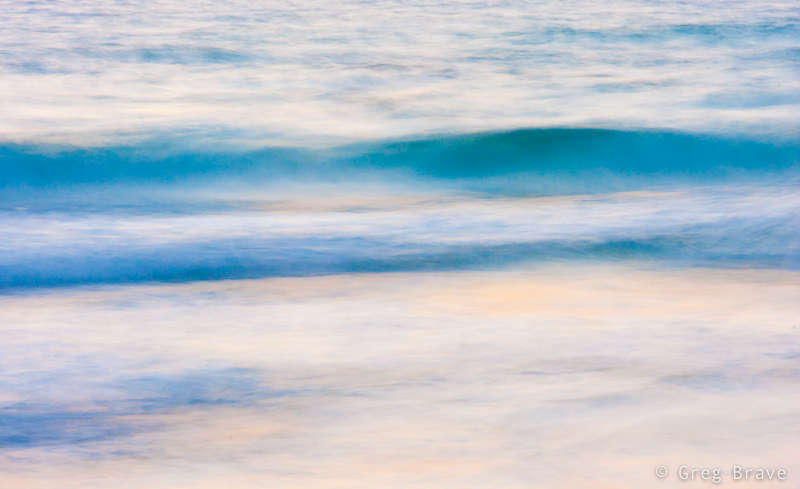
As you can see these all tight crops (well all except one) of waves taken with long exposure. Using long exposure in this case is critical because if I would use normal exposure (1/50 sec and faster) then the waves would be easily recognizable even in tight crops.
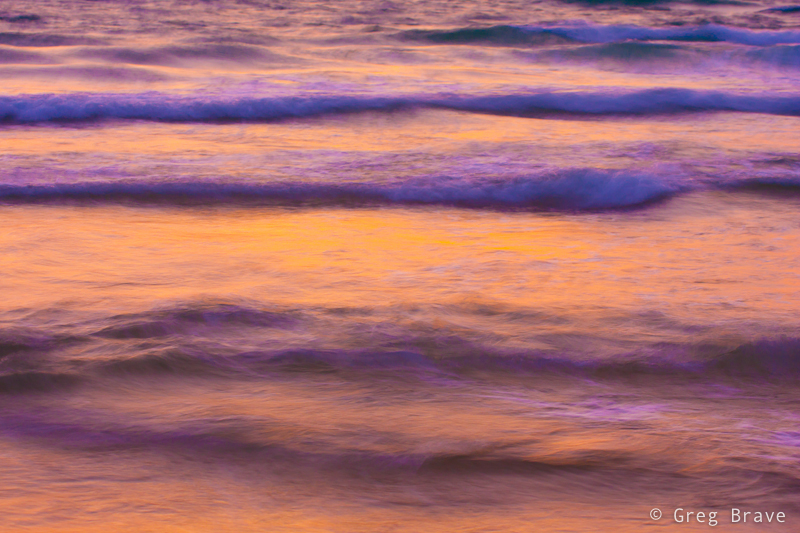
Photographs by Greg Brave. Click on the photo to enlarge.
After the shoot I came home, opened the photos in Lightroom and started playing with them trying to get the best abstract results I can. And I found something really beautiful, which I would like to share with you.
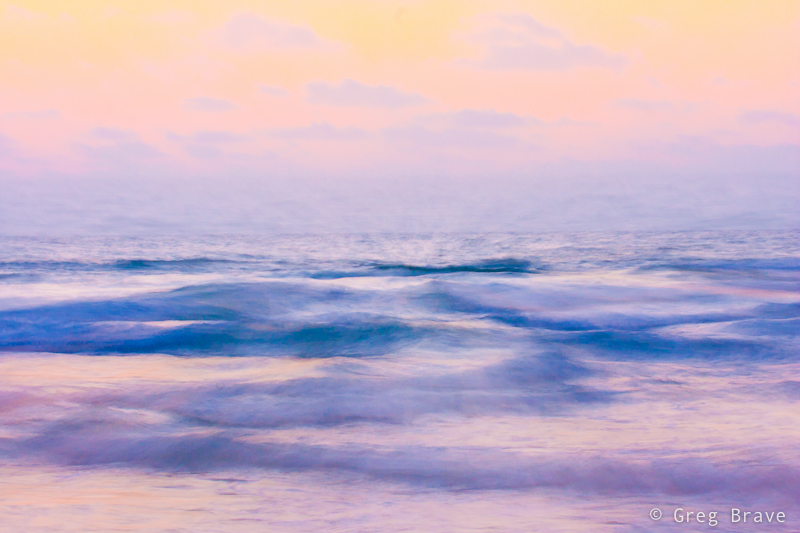
Everybody plays with Vibrance and Saturation controls (in any photo processing application), but when you work on a “real world” images, not abstract, increasing saturation or vibrance too much makes the image look not real, over-saturated. But in this case my goal was to create a beautiful abstract image, and I saw that when I crank the saturation slider to the maximum, it gives me very nice result making the photos look more like paintings and also emphasizing the warm sunset colors. But it wasn’t perfect, and I am sure that many of you encountered this – when you increase the saturation to a certain level you start having color artifacts in your image, and you are forced to decrease it to the level where there are no artifacts.
Here is what I found in Lightroom – in order to eliminate these color artifacts you have to increase the Luminance Noise Reduction slider (in the Develop module) until no color artifacts present in the image! I was stunned – because now I could increase saturation as much as I wanted. There is one downside to it though – the image looses some of its sharpness, which wasn’t a problem in my case.
Photograph by Greg Brave. Click on the photo to enlarge.
I would be happy to hear what you think of these images. How would you create an abstract photograph?
Remember, you only have to enter your name to leave a comment!
Have a Great and Creative day!
Greg.
Concentration
How Photographic Ideas Can Come to You
This is a very interesting question you know. I am sure that anyone who takes interest in photography at times thinks about it. In my head sometimes these thoughts sound like “I’d really like to make a great photograph… yeah… but what should I shoot?… what should I create?… ”
If you really want to create something, especially if you are not sure yet what it is, you have to allocate a certain amount of time to thinking about it. I mean that you have to tell yourself – “today between 10:00 and 11:00 I am thinking about creating an interesting (also can be beautiful, romantic, breathtaking, sad… anything you prefer) photograph”.
I want to demonstrate this from my own experience. A few days ago I felt this urge to photograph something at my tiny home studio. I didn’t have any idea what it would be, but I just had this desire to create. So I made myself sit down for about 45 minutes, come up with ideas, and briefly sketch them on piece of paper.
My first problem was that not ANY idea that came to my mind was possible to shoot because I was limited to the objects that I had in my apartment. Having realized that fact, instead of just thinking of any idea for photograph, I started looking around my home at different objects and thinking how can I use them creatively?
While looking I saw my table lamp. Actually it was always standing on my table, but until I made myself to think creatively, I never thought about this lamp as a subject for my photographs. And then, while looking at this lamp I remembered of some TV program I saw as a kid that had these two lamps jumping around like live beings, and I decided to try and create something in that direction.
I still had no idea what would come out of it, and I didn’t have any definite final result. So I just started sketching this lamp standing on the table in different poses and thinking what can be done with that. No, I can’t draw, and it doesn’t matter, because you need sketching only to help your thinking process.
One of the ideas that came to my mind was to photograph this small lamp with it’s light bulb lying beneath it, while the lamp “sadly looking” at the bulb. And so I did as you can see in the image below.

Photograph by Greg Brave. Click on the photo to enlarge.
In this image of lonely lamp looking at its light bulb I used only one flash from the left side with 1/2 CTO gel on it (this gel makes the white flash light to be warmer). I wanted a warm lighting here. Looking at the result I felt that it is not enough for an interesting image… I felt that it doesn’t conveys the “stare” of the lamp at the light bulb.
And then suddenly it hit me – I need another lamp to make this more interesting! And luckily my life partner Ira had one on her table. I took that lamp and started playing with two lamps. Finally great idea came to me – to make the second lamp “look” inside the first lamp as if to see “what happened? why you lost your bulb?” and so you can see my compositional setup in the photo below.
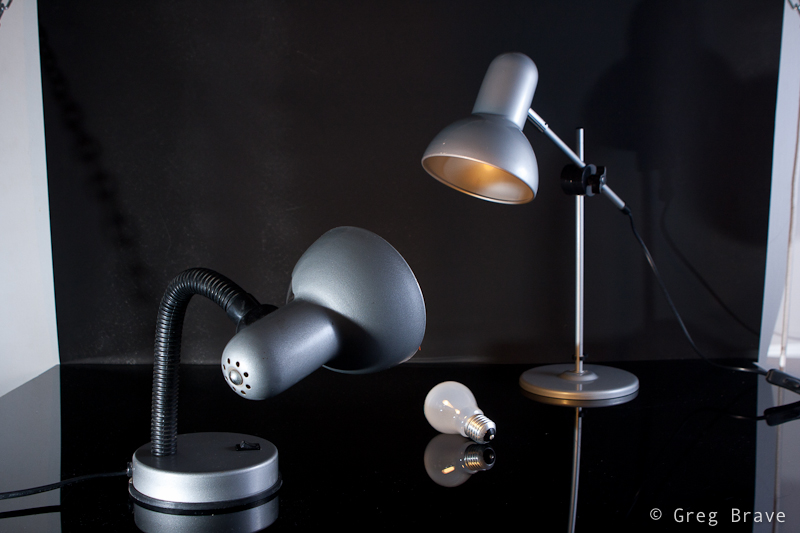
Photograph by Greg Brave. Click on the photo to enlarge.
Now, having the final idea of a shot in place I started thinking of little details. I wanted to emphasize the fact that the second lamp did have its bulb. How would I do that? Well, I decided that I would light the whole scene with white light, but I would also have yellow (warm) light coming out of the second lamp towards the first lamp. And you can see in the photo below that the down-looking lamp is warm-lit.
The final photograph below I accomplished using three strobes. Two strobes without any gels from left and right sides (I had to play with their powers to achieve the desired lighting), and the third strobe with 1/2 CTO gel on it I held in my hand and pointed inside the first lamp.
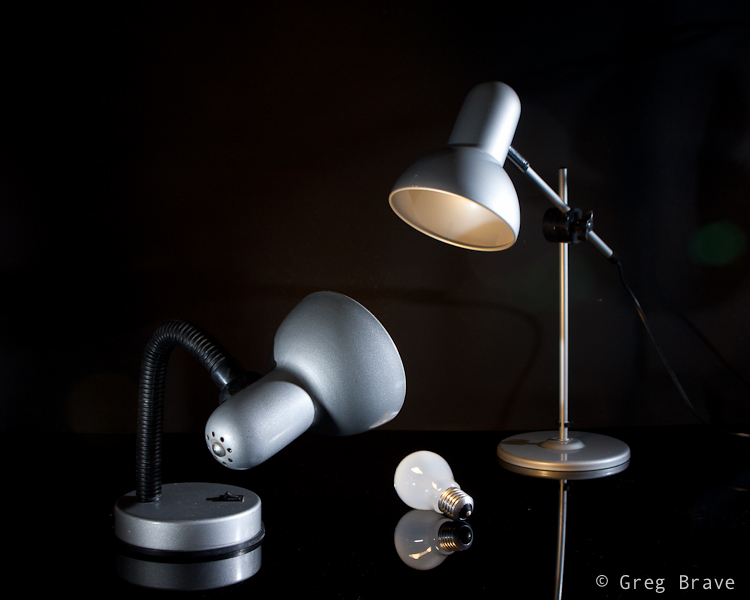
Photograph by Greg Brave. Click on the photo to enlarge.
After getting the final image above, I felt that there is not enough emphasis on the light that comes out of the second lamp. I wanted those rays of light to actually be seen. And here is a point that I am sure not all of you thought about. Rays of light are invisible unless they reflect off of something and hit our eyes. So in order to make these rays of light to be actually visible I had to have them reflect off of something – for example dust, or smoke. So if I would fill up the whole area with smoke then the rays of light would be seen. But then the rays of my two other flashes would also be seen, and the whole image wouldn’t be clear and crisp.
So I decided to take this work to Photoshop, and artificially add the rays of light, using the original light warmth that 1/2 CTO gel gave me (just used eyedropper tool in photoshop to sample that color). To give you an idea how I did it – think of Radial Blur filter in Photoshop. If you have additional questions regarding how I did it feel free to ask me in the comments. And for all the people who are against “Photoshop manipulation” – in the case of this photograph my goal was not to show reality, but to convey an idea of mine, therefore I am totally cool with using Photoshop here.
Here is the final result, which I am pretty happy to come up with.
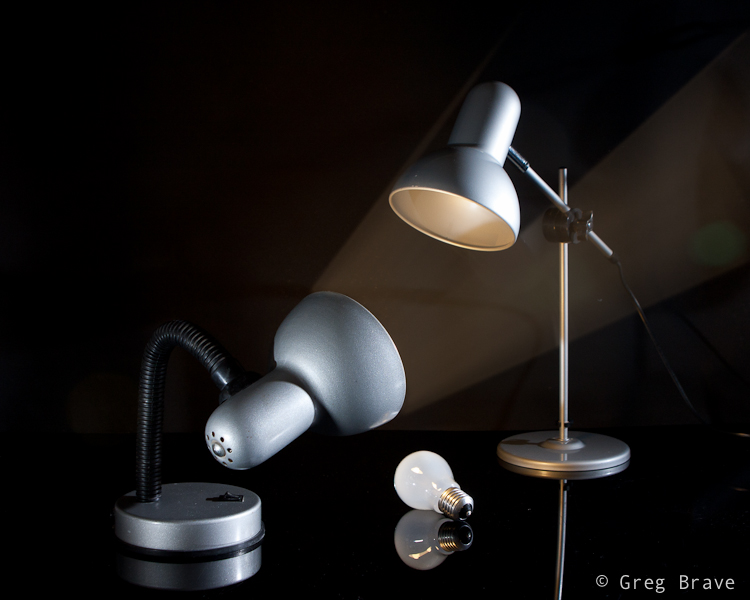
Photograph by Greg Brave. Click on the photo to enlarge.
In conclusion – the main idea of this article is to show that in order to come up with interesting photographs, you have to allocate time for thinking – what you want to do and how you are going to do it. Even if you don’t have any specific idea in mind, just make yourself sit down and think for half an hour or so, and I am sure that you’ll come up with something interesting!
As always your thoughts and comments are welcome.
Do you agree with this article? If you don’t then why? Can you suggest additional steps towards being more creative?
Remember, you only have to enter your name to leave a comment!
Till the next time,
Cheers!
Greg.
Photographing Sunflowers at Sunset
Hello everybody!
Today I’d like to talk about photographing sunflowers in the outdoors. I mean not one or two sunflowers at home but photographing them in the open field.
It all began when my friend asked me to make a picture for her. She wanted a very specific photograph of a large field of sunflowers, that would be completely yellow because in her imagination all the sunflowers would look up at the sky. This idea came to her while she was driving along a sunflower field, but she didn’t really pay attention to them.
I was glad to have an assignment like this because I just love any opportunity to be creative, and also if she would later hang my photo on her wall, it would be very flattering. So we decided on a day and drove to that sunflower field. I chose second half of the day towards sunset, but early enough to have time to scout the area and choose location.
When we arrived at the sunflower field I was surprised to see that all the sunflowers were NOT holding their heads up, as you can see in the photograph below. I am sure that there is a scientific explanation to this (maybe they were ripe and heavy for example), but in my mind I have always imagined sunflowers to hold their head up high. As a result it was impossible to make a photograph that my friend wanted. In the photo below you can see that there is too much green in between the yellow.

Photograph by Greg Brave. Click on the photo to enlarge.
But since we have already came I decided not to leave empty-handed and began to think of various creative ideas to shoot the sunflowers in their current state. Let me remind you that it was around sunset time and the sun was getting lower and lower. The shot that you see below was made almost against the sun. The sun was almost facing directly inside the lens and then I lowered it a little. So the flare can be seen, and in my opinion it contributes greatly to this photograph by creating a certain end-of-the-day mood. I also like how it lights the white “hair” on the stalk emphasizing its shape.

Photograph by Greg Brave. Click on the photo to enlarge.
When the sun descended more, the contrast between the sky and the sunflower field grew and it was impossible to capture both the blue sky and the yellow sunflower heads without flash. Either the sky was burned out and the sunflowers were correctly exposed, or the sky was correctly exposed and the sunflowers became very dark. So I took my Canon 430EXII flash out and started using it together with my Yongnuo remote trigger. I was shooting on manual, setting the exposure to correctly expose the sky and setting the flash power so that sunflower would also be correctly exposed. I asked my friend to hold the flash in a way that the sunflower would be lit from the side creating nice shadows.
But, of course, nothing comes out right from the first try, and I want to show that here. As you can see from the photograph below the lighting on the sunflower looks too bright and too artificial, and the shadows are too harsh. In addition there is a big shadowed area of the sunflower as a result of incorrect flash position. And even though the sky is correctly exposed it is not enough to make a good picture.
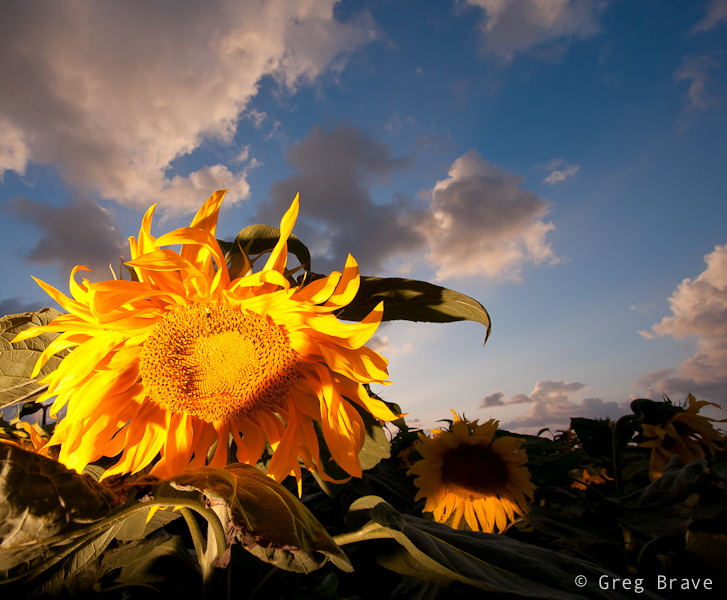
Photograph by Greg Brave. Click on the photo to enlarge.
But I didn’t give up, and after numerous attempts and adjustments I found the right combinations and my photographs started to improve. I was thinking less and less about technical side of the photographing process and concentrated more on the creative side. In the photo below you can see more natural lighting and balanced composition.
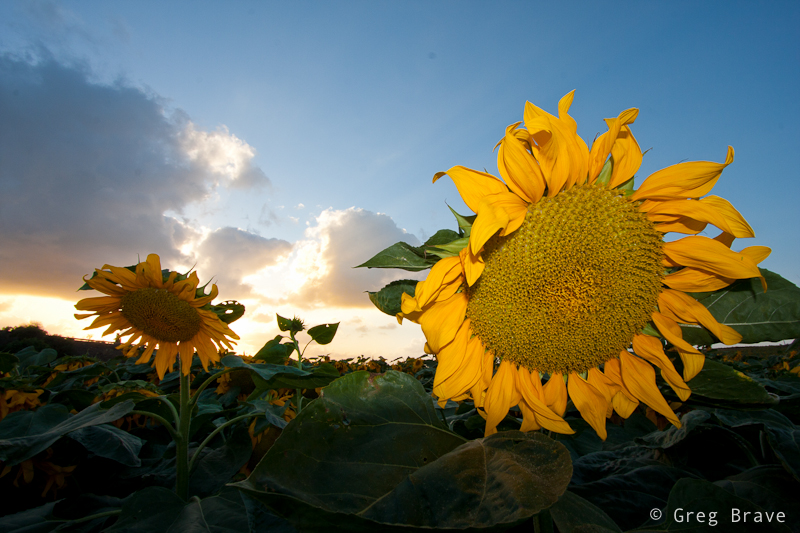
Photograph by Greg Brave. Click on the photo to enlarge.
I thought that the sunflower above came out too yellow so I decided to add a 1/4 CTO gel to the flash and see what happens. And I liked the result of that, which you can see in the photographs below. I liked the warmth of the light, which matched good (in my opinion) with the warm colors of the sunset.
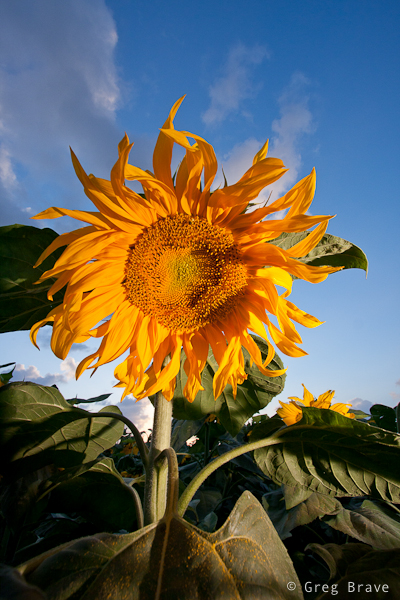
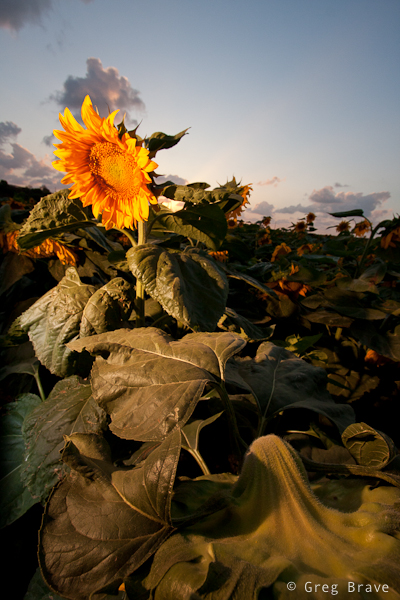
Photographs by Greg Brave. Click on the photo to enlarge.
As the sun was getting almost down to the horizon I got this interesting idea to shoot the sunflower with the setting sun in an interesting juxtaposition (never believed I would use this word 🙂 ), and because the sunflower heads weren’t looking up I could do that! I came low under the sunflower and positioned it to be in front of the sun, asking my friend to point the flash from my right at the sunflower. I needed the flash to point a little up so that the light wouldn’t spill on the green leaves.
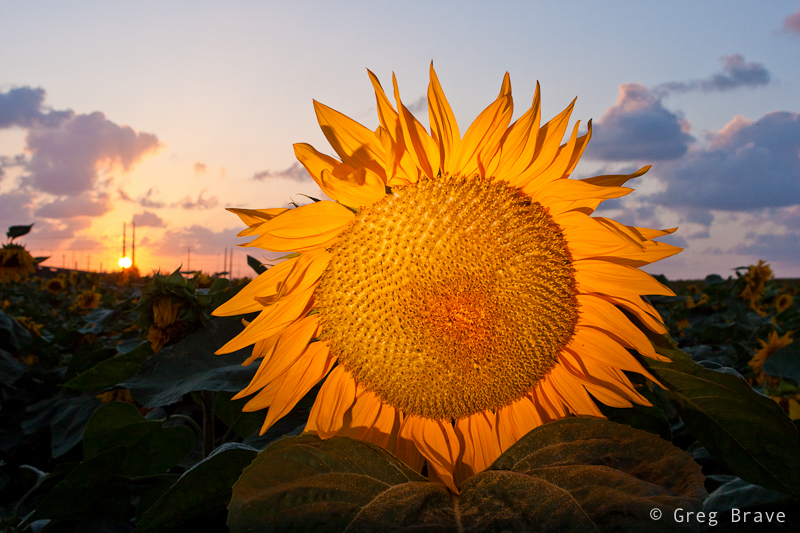
Photograph by Greg Brave. Click on the photo to enlarge.
After getting the shot above I was pretty much satisfied but decided to try more compositions and lighting directions just to see what comes out. And it turned out to be the right decision, because in my opinion then I made my best photo of that evening.
I call it “Don’t want to look at the sunset”
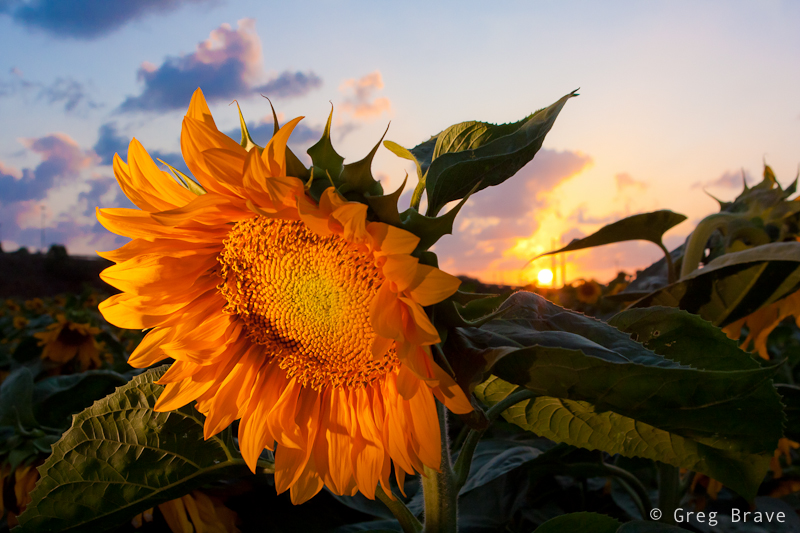
Photograph by Greg Brave. Click on the photo to enlarge.
One more thing – you could say that I didn’t have to use flash but to take several exposures and combine them together in HDR. Yes, I could but in order to do that I had to use tripod and also if it was windy (even a little), it would be difficult to create a good HDR photograph. Taking into account that I had limited time as the sun was setting pretty fast, if I was using tripod I wouldn’t have time and flexibility to try as much different compositions as I did just hand-holding my camera.
I hope you liked viewing these photographs, and learned something new in the process.
I want to read your comments and your suggestions are always appreciated. If you have pictures of sunflowers that you’d like me to review, you can send them to greg at photopathway dot com and I’d be glad to do that here on my blog.
Remember you only have to enter your name to leave a comment!
Railway

Magic Circle
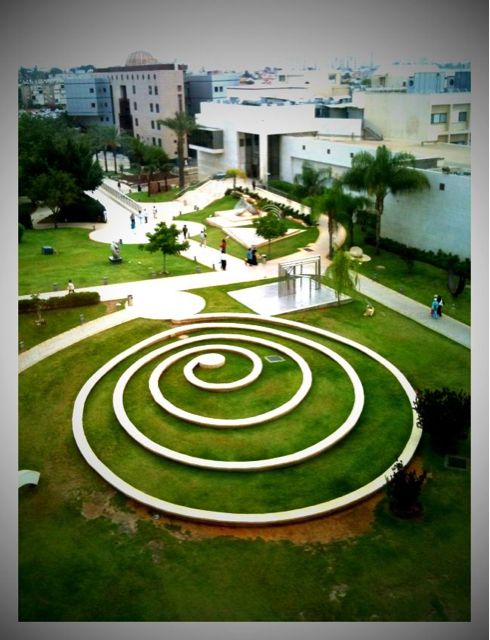
In the bus
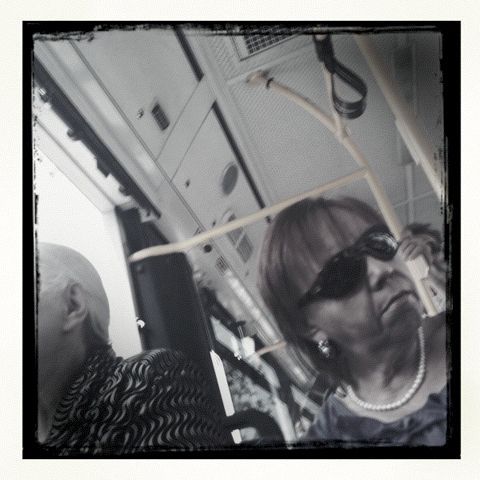
Watching You
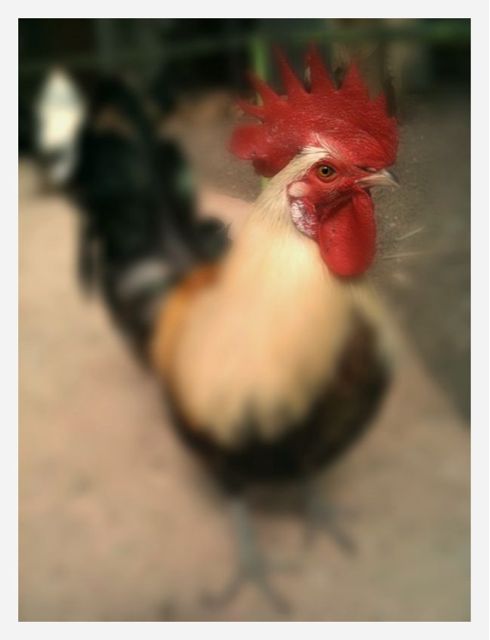
Demonstration