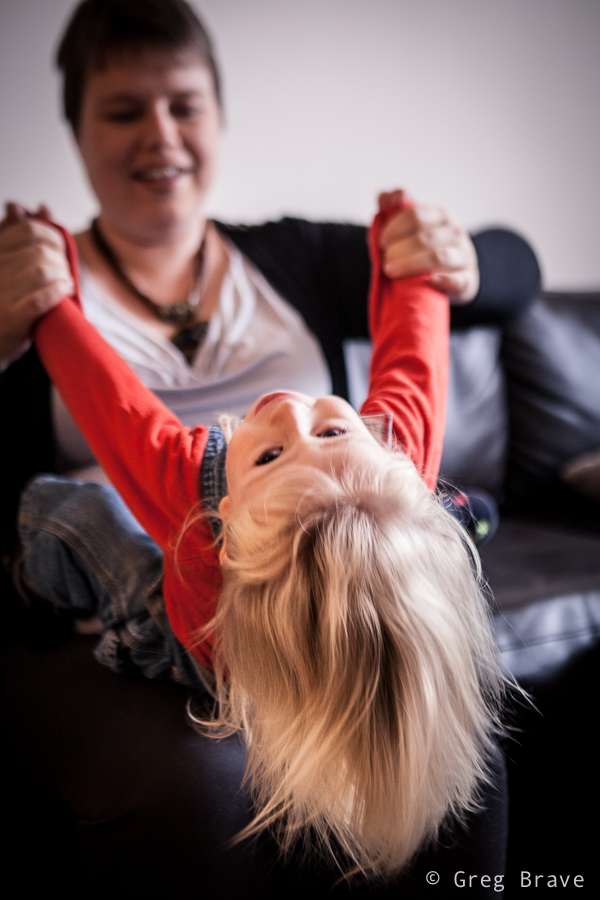
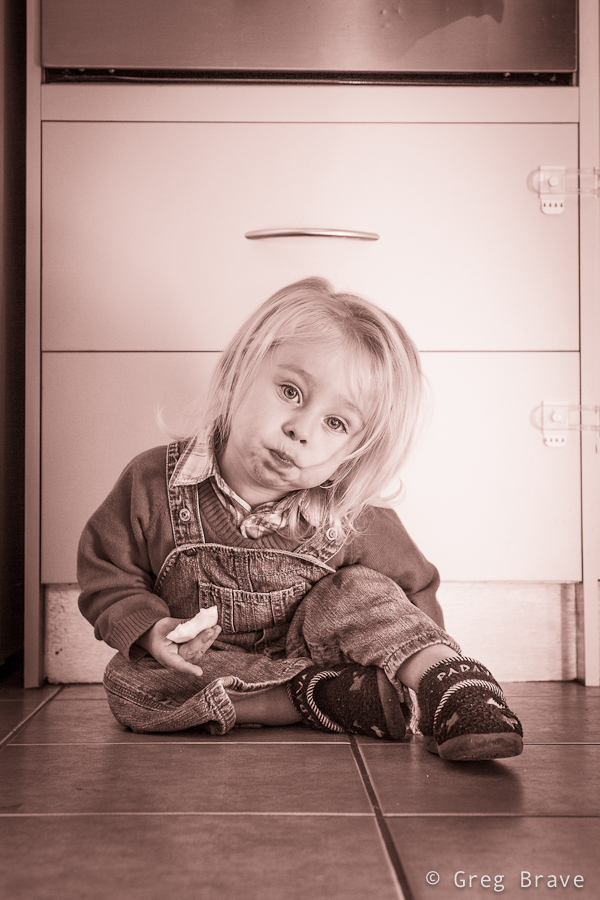
A couple of weeks ago I’ve got another family photoshoot. It was a very nice couple and a cutest little boy Leon who just recently turned 2 so they wanted some photos to remember this age. Parents wanted photos to be taken in the boys’ natural environment – their home and backyard. Therefore for me it was an “on location” photo shoot and I had to bring my lighting equipment.
Click on the photo to enlarge.
When shooting kids in studio you have time to set up all the lighting equipment before the session, but when you come to a family home, chances are you won’t have that luxury. There also might not be enough space for your light stands and stuff, which was exactly the case in this shoot. Lucky for me there was a large window with white curtains that provided a great light source. I also mounted a Canon 430ex speedlight on my camera and used it as additional light source, bouncing the light from the walls and ceiling.
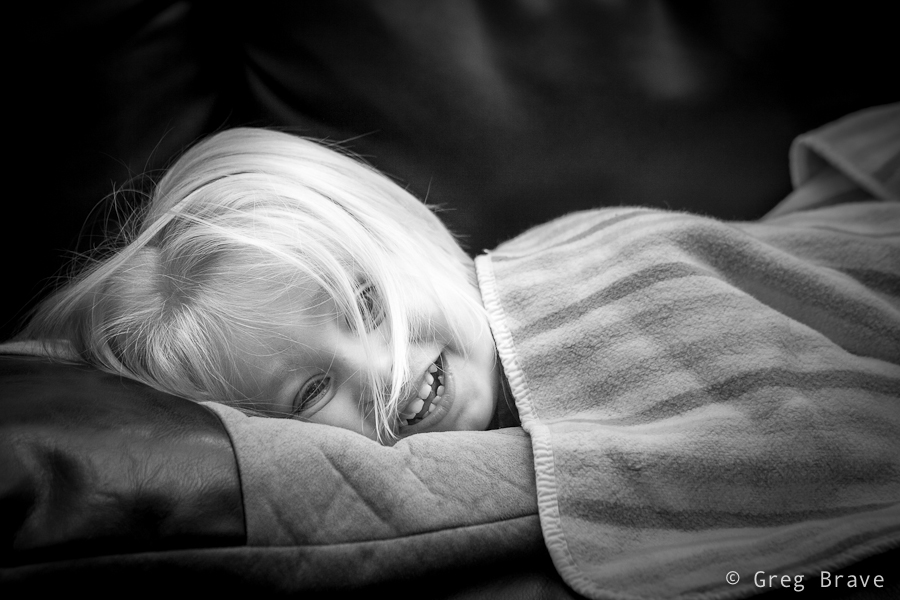
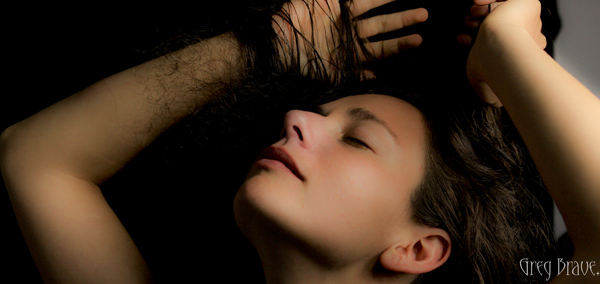
For example, in the photo below I pointed the flash at the ceiling to get Leons’ beautiful long hair to be lit from above.
Click on the photo to enlarge.
With little kids most of the times you have first to earn their trust by playing with them and smiling a lot :), and then you have to react to their movements and catch those brief moments in which they forget about your presence and act naturally. I was also looking to capture various emotions and moods of the child.
Click on the photo to enlarge.
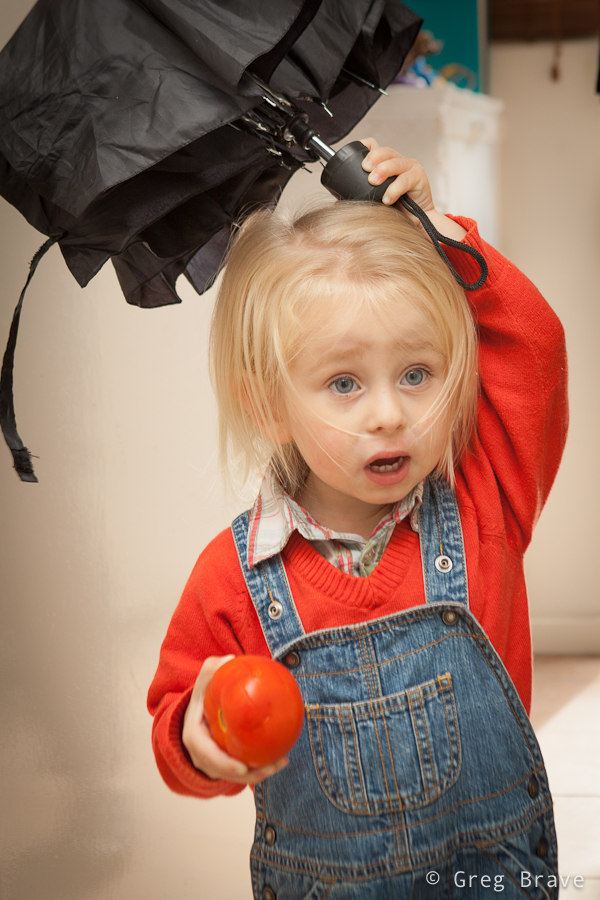
Another good idea is to give a kid something to play with. When Leon saw my large shoot-through umbrella, his eyes lit up with interest and he started to play with it, but it turned out to be too big for him. However his parents found a solution – they gave him a smaller umbrella, which kept him (and me) occupied for a while.
Click on the photo to enlarge.
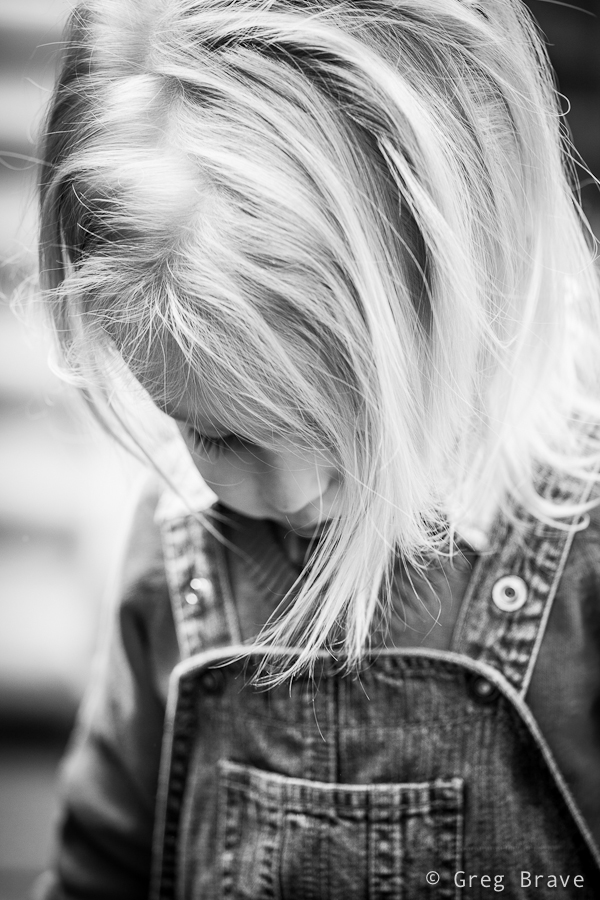
At some point during the shoot Leon got so comfortable with me and my camera that he started intentionally posing for me. When kids pose for camera it is nothing like when adults do it. Kids are natural, they can’t look “posing for camera” by definition, and I can prove it to you. In the next two photos Leon was intentionally posing for me.
Click on the photo to enlarge.
Could you tell that he was intentionally posing?
Click on the photo to enlarge.
I didn’t think so!
Click on the photo to enlarge.
I enjoyed this photoshoot very much and most importantly – the parents loved my work!
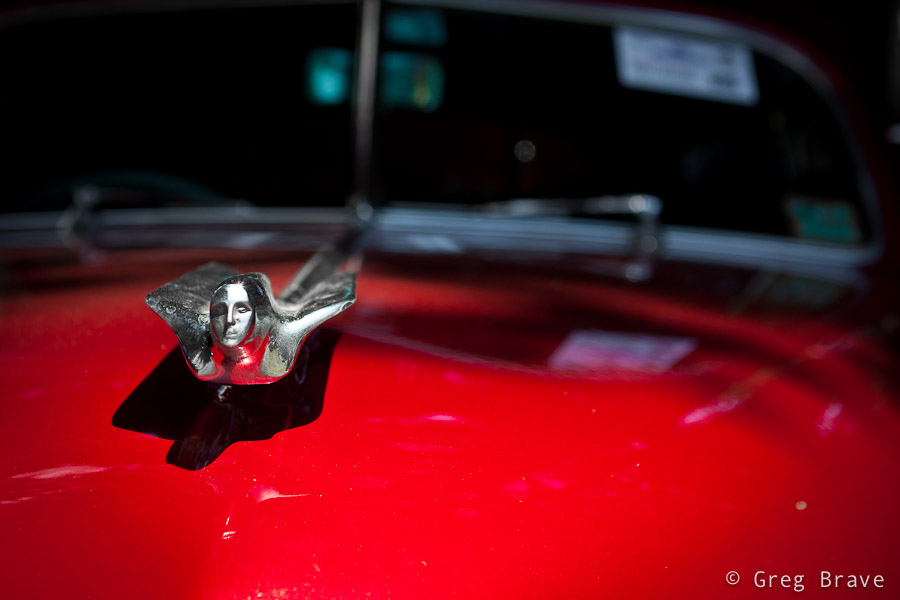
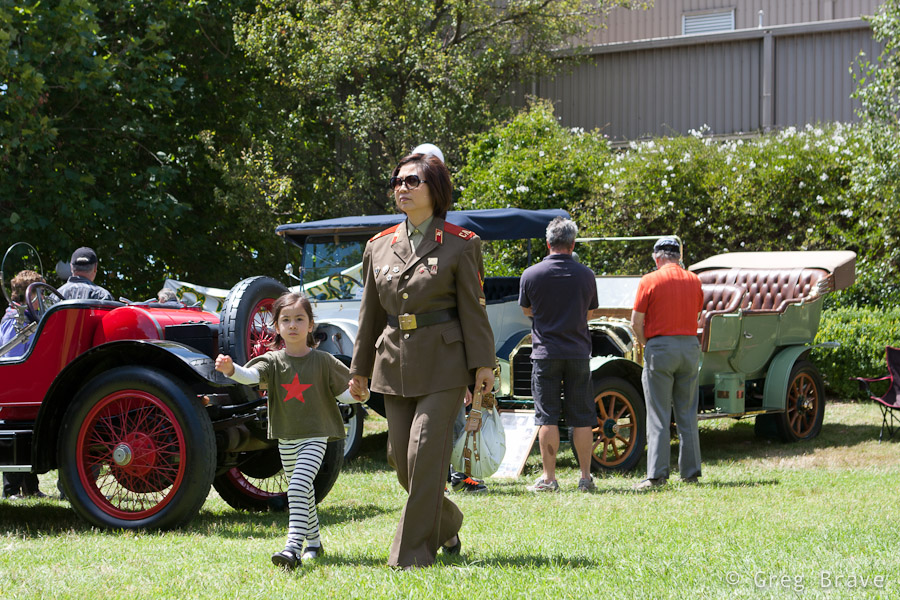
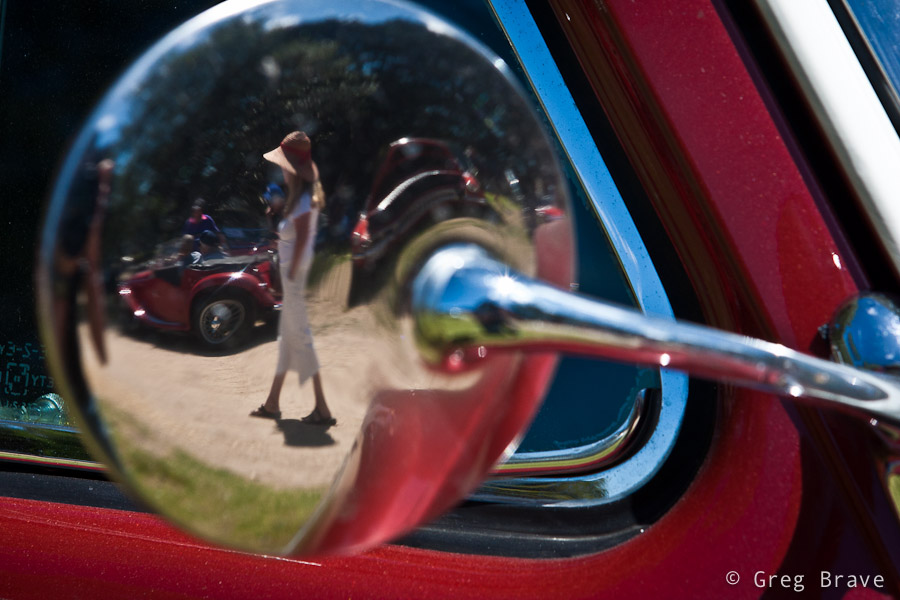
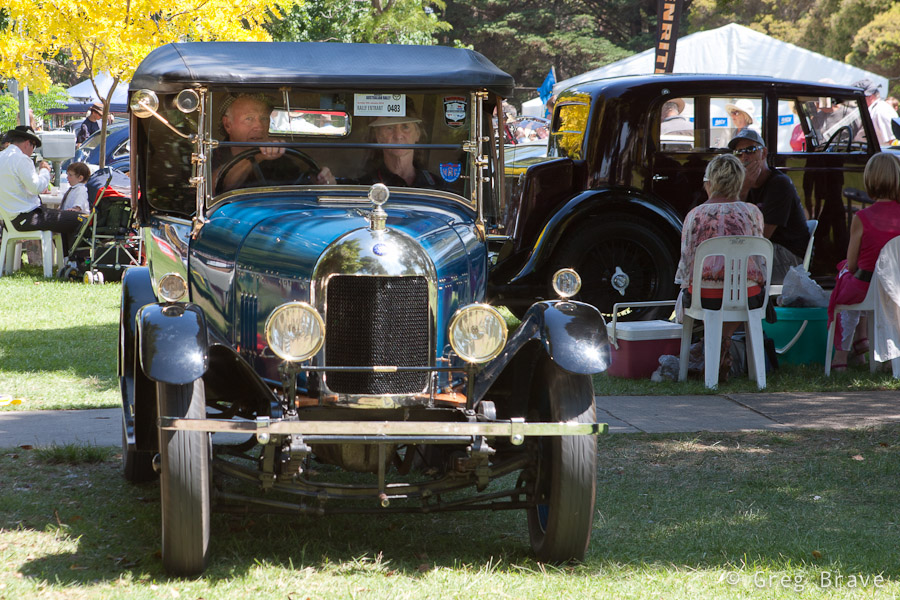
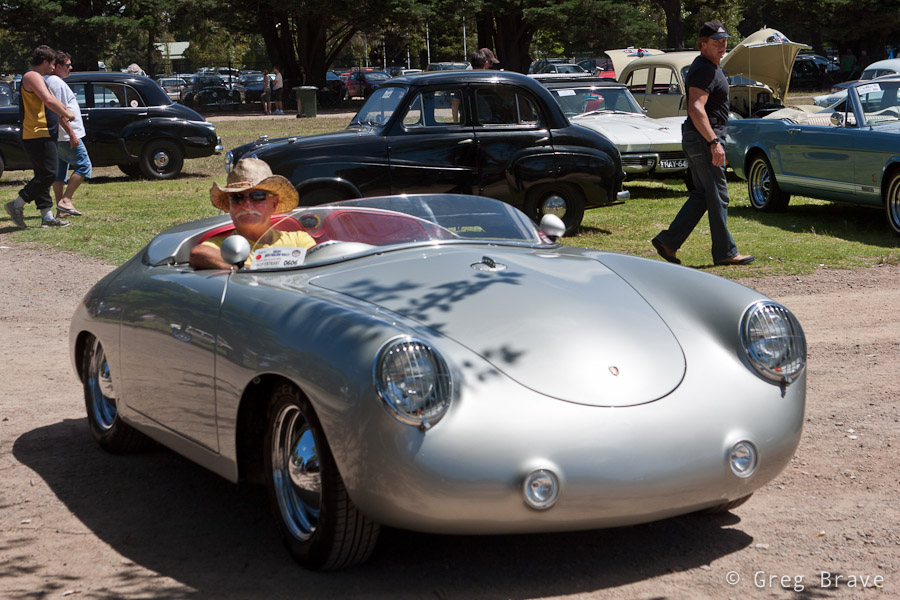
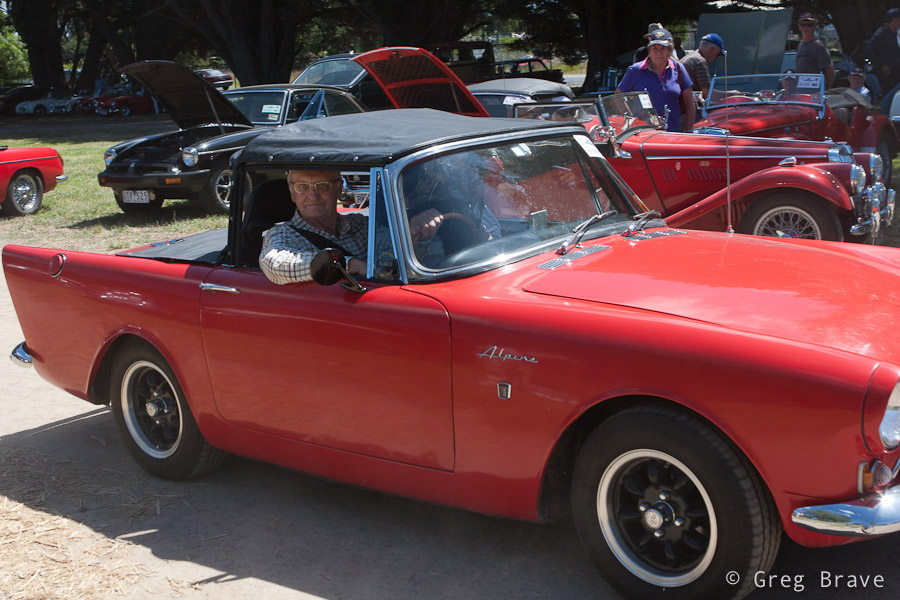
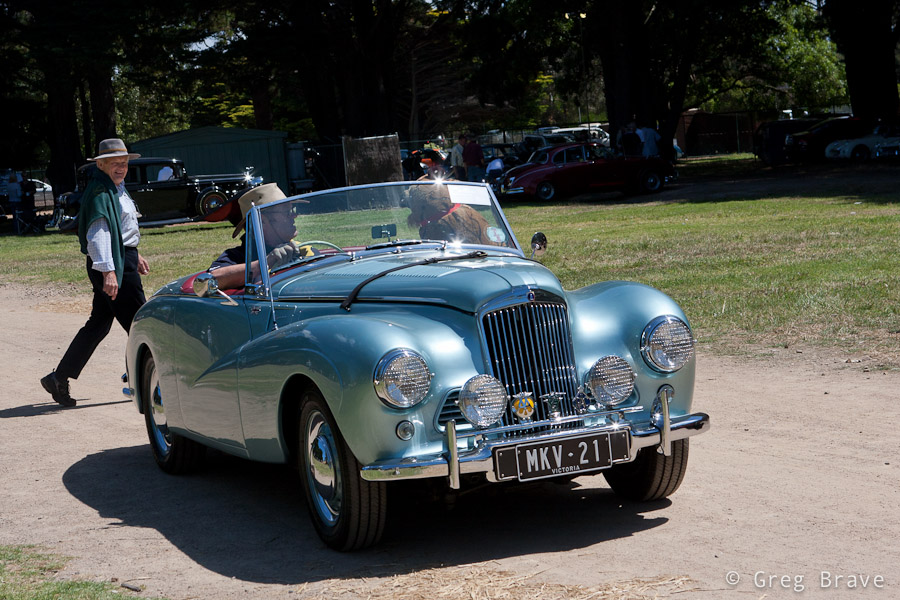
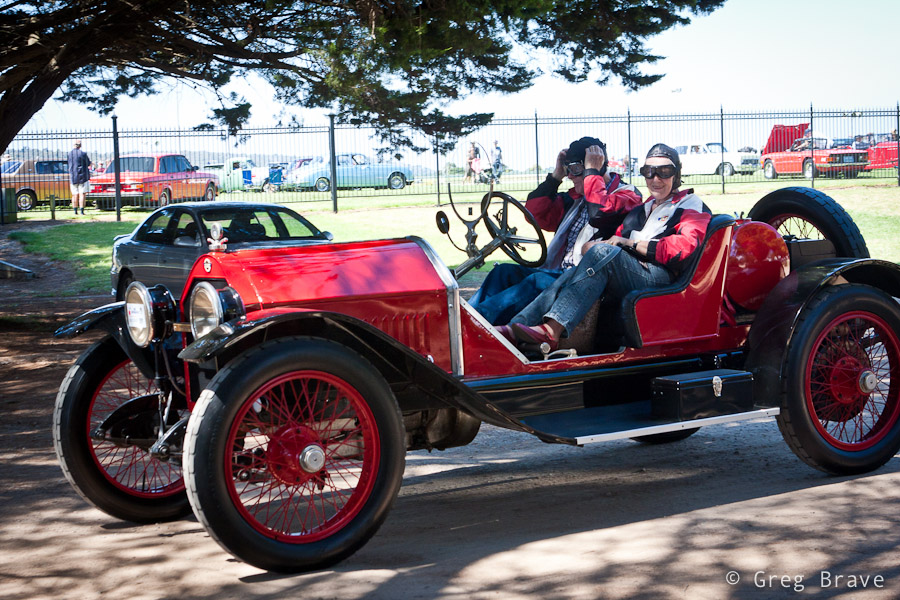
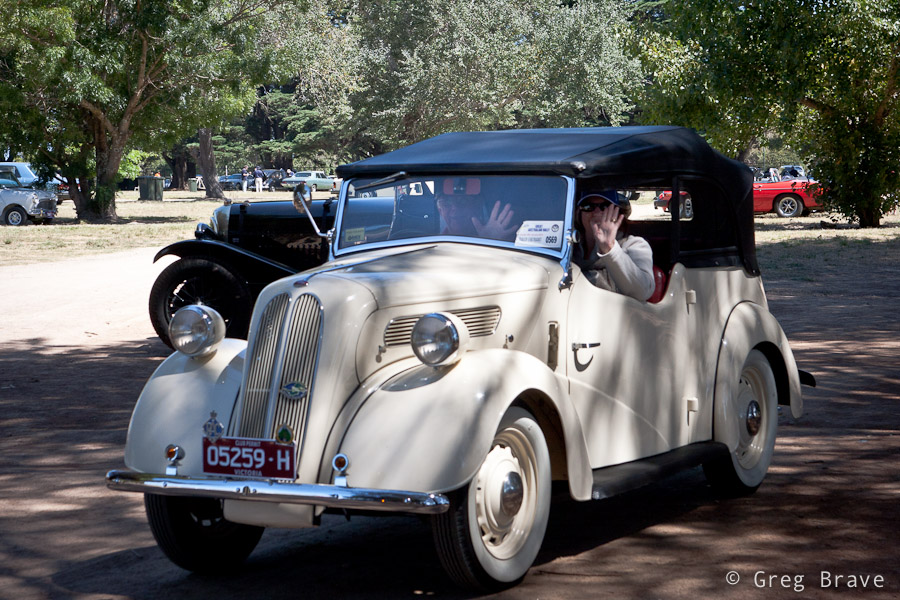
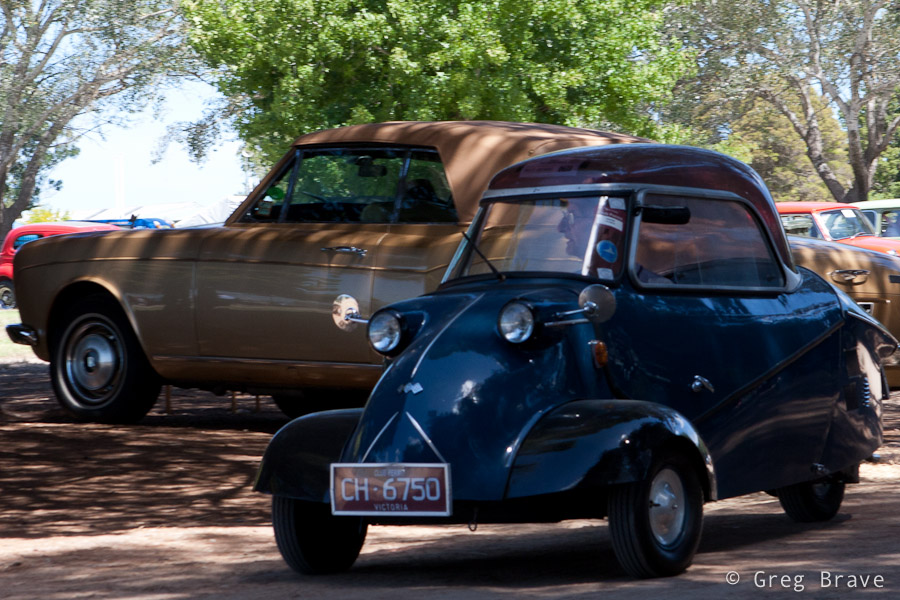
A couple of weeks ago Ira and I visited a collectible cars show at the Mornington’s racecourse. There were lots of beautiful old cars and we had lots of fun.There were also quite a few photographers taking shots of these beauties. But from my photographic perspective, I didn’t want to simply photograph the cars as I am sure there are already many photos of each model that was showcased there.
So instead I tried to look at the event not as “this is a car show, so I am going to photograph cars” but more as “this is a social event featuring nice cars, so there will be people interacting with them, and I want to capture this interaction”. And even when I photographed only the cars I tried to convey how I see them. For example when shooting the b&w Jaguar in the photo above I tried to show the “facial expression” of that car which was kind of “right in your face” 🙂
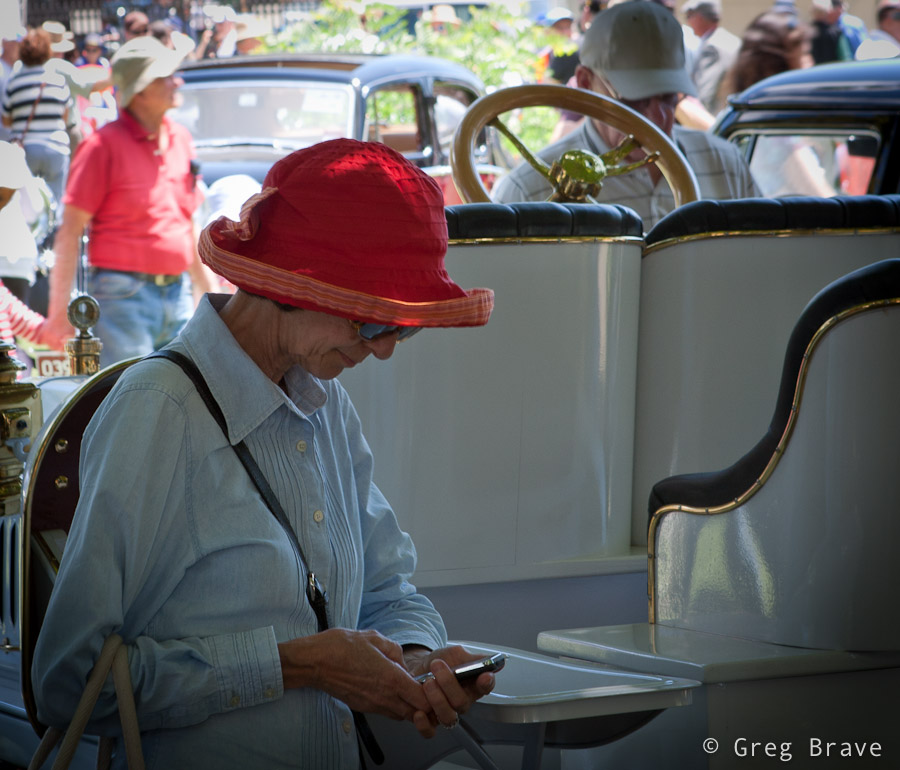
We spent about one and a half hours at the show, and just when I thought that I’m done photographing, the car owners began starting up their cars and drive away – it was the end of that day. During the show the cars were standing unattended, while their owners were sitting somewhere in the shadow chatting and drinking coffee, so now it was a great opportunity for me to capture the cars together with their owners, and I tried to make the most of it.
From the technical side the biggest problem was the harsh sunlight, which created deep shadows and sharp transitions from light to shadow, so it was difficult to capture both the car and its surroundings and the driver sitting inside the car in the shadow. My solution to that problem was to shoot in RAW and slightly overexpose my photographs. This way in post processing I could lighten up the shadows and darken the highlights (the RAW format gives you a bit of freedom in correcting your exposure).
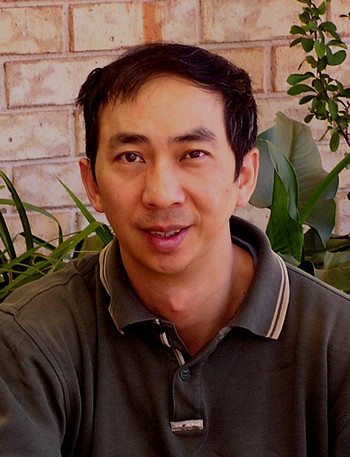
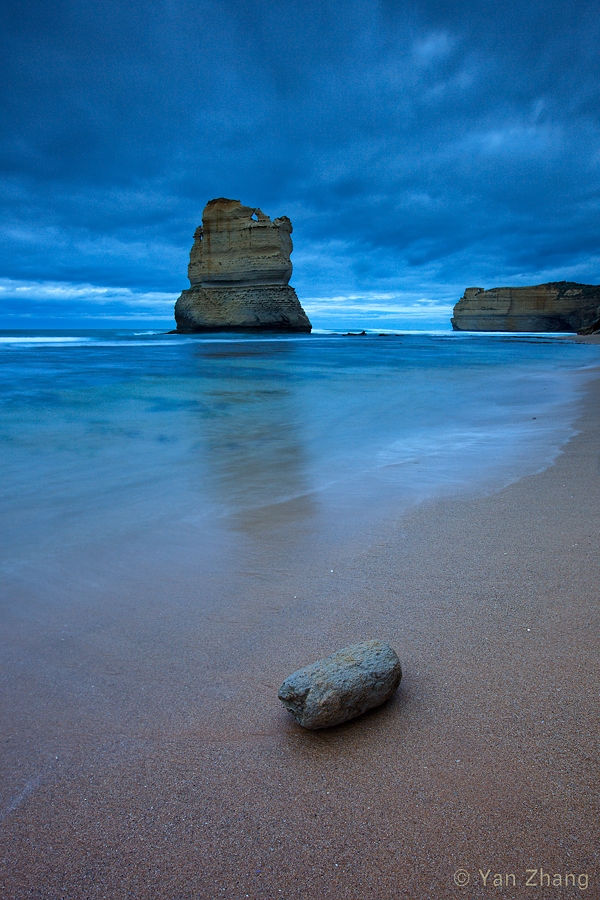
I first saw Yan Zhang’s photos on 1x.com and I loved them. Then I followed the link to his own website. Needless to say – I wasn’t disappointed. Yan is a very talented and passionate nature photographer. Luckily for me and you, my readers, he kindly agreed to an interview for Photopathway.
Ladies and gentlemen please welcome Yan Zhang !
Click on the photo to enlarge.
Tell a little about yourself. What do you do for a living?
I am a computer scientist, currently working as a professor in University of Western Sydney. I have been in academia in last 16 years.
How did you get involved with photography?
Well, this is an interesting question. I had a manual SLR camera before 2007, but only used it when I travelled. In 2007 I noticed that digital SLR cameras had become more and more popular, and I decided to buy one as well. I just went to a camera shop and asked which camera was good. The shop owner showed me Canon 400D, and said this was the best camera so far. So I bought it :).
Since I had my Canon 400D, I started to shoot around and during traveling. Sometime around 2008, I developed a deep interest in landscape photography, and since then, landscape photography has become my unique focus in photography.
Photo by Yan Zhang. Click on the photo to enlarge.
Your landscapes are magnificent. How do you choose your locations?
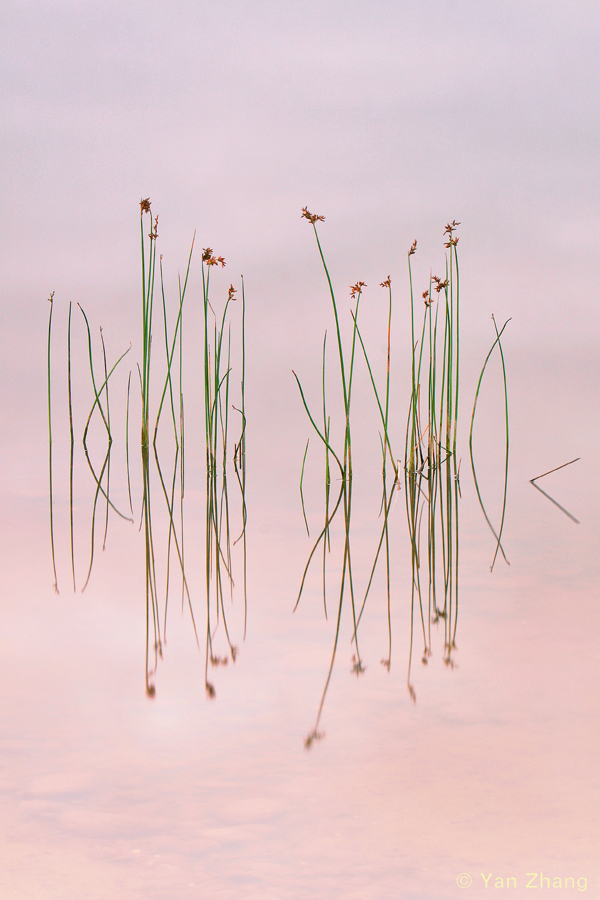
I think locations for landscape photography are not as hard to find as people usually think, except for those extreme places. In fact, some of my landscape photos were taken just around my home or my work place. For instance, the following photo (Reeds) was the first photo I sold since I had my first digital SLR camera in 2007 and it was taken at an unnamed small pond near my home. The next photo (The Touch) was taken in my university campus this July.
Photos by Yan Zhang. Click on the photo to enlarge.
In general, I always pay special attention to subjects that have certain characteristics. Once I found something attracting me, I then imagine whether it would look interesting under suitable light and weather conditions. Photograph “The Touch” was made this way: In order to capture the best light and sky, I went to this location more than 30 times within 3 months.
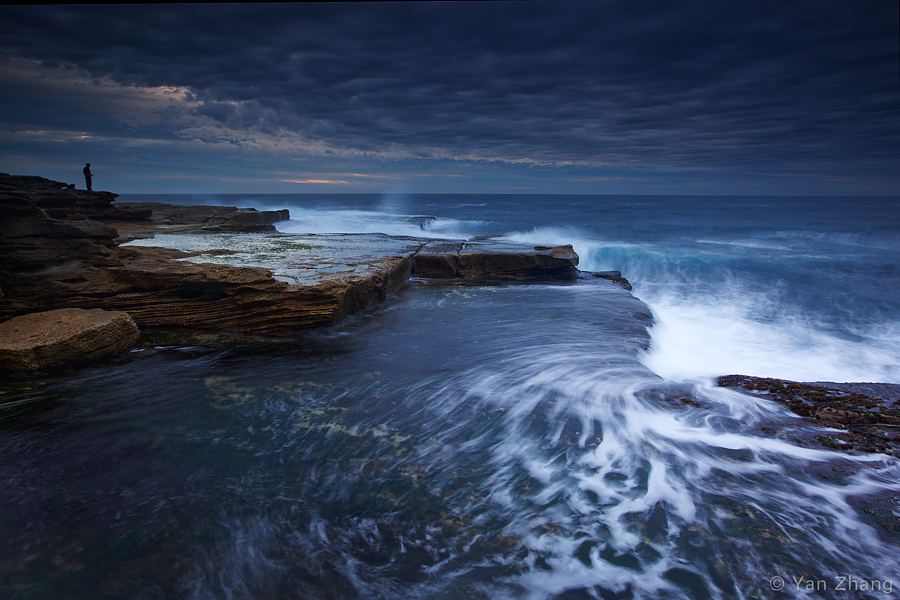
Since I am living in Sydney, I think I am very lucky to have the access to beautiful coast areas near Sydney. The following images were made on the East Coast of Sydney this year:
Photos by Yan Zhang. Click on the photo to enlarge.
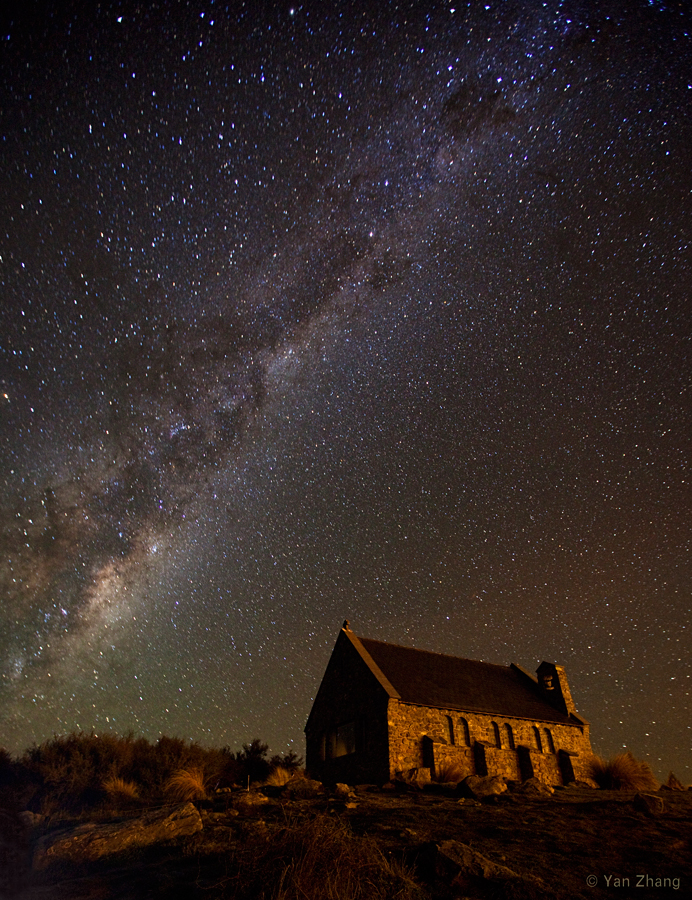
Nevertheless, most landscape photographers believe that travelling to those unique places probably is essential to make original and stunning photographs. In recent years, I have travelled a lot to several places overseas to make photographs. China and New Zealand are the two special countries that I go for my landscape photography, because these two countries have many unique landscape locations and are relatively easy for me to travel to.
When you are planning your trip abroad, to the place you’ve never been before, how do you decide on your photographic locations?
This is a hard task indeed. Usually, I do a lot of research before I go. Looking at other photographers’ works on those candidate locations is very helpful. Traveller’s guide is also another information source. However, sometimes I think it is more important to discover some places that haven’t been considered by other photographers. In that case, it takes me a lot of time to find such interesting places abroad. However, once I found one, I would come back again and again to make good photographs.
Photo by Yan Zhang. Click on the photo to enlarge.
Where do you draw your inspiration? What motivates you?
I have a deep passion for the nature, which always motivates me to experience such a pure beauty only existing in the nature’s wilderness. For a very long time, I knew that I was so passionate about the nature, but somehow I did not know how to express that until I started landscape photography in 2007. For me, I think photography probably is the most effective way to get close to the nature.
Do you hike and photograph alone, or you have a partner?
Most of the time, I travel only with my camera and make photographs alone. However, since I’m living relatively close to Blue Mountains area of Sydney, almost every weekend, my wife and I spend one day hiking in the Blue Mountains. Sometimes I take my camera gear with me on our hike.
What photographic equipment do you use?
As I mentioned earlier, I started with Canon 400D, then in 2008 I bought my Canon 5D Mark II full frame digital SLR camera. Now I am still using it. Since I only focus on landscape photography, filters are critical to my photography. I use both Lee and Singh Ray graduated ND (Neutral Density) reserve and graduated ND filters. I also use CPL (Circular Polarizer) filter sometimes for certain subjects such as waterfalls.
For landscape photography, I think that having a complete filter system and mastering it in practice are very critical to achieve high standard landscape photographs. A stable tripod is also essential.
Photo by Yan Zhang. Click on the photo to enlarge.
How do you post process your photos? What software do you use, and what are the main adjustments that you perform?
I believe in the principle of “getting it right in camera in the first place” in my photography practice. During the process, I always put great efforts in the field to make proper shots. Nevertheless, post process is an unavoidable procedure in current digital photography. I always shoot in RAW format and process in Photoshop CS 5.
Generally speaking, my approach to photo adjustments in CS 5 is quite standard: first open raw file in Adobe Camera Raw, perform necessary adjustments there, then load it to CS 5 to perform further adjustments, such as using layer masks, curves, contrast, etc., to adjust the photo to meet my vision.
However, from time to time, I apply a specific Photoshop technique to do a certain adjustment. It is called Tony Kuper (TK) Luminosity Mask technique (http://goodlight.us). It is a very powerful technique allowing you to do some very subtle adjustments on certain pixels to increase/decrease their brightness, and so on.
Photo by Yan Zhang. Click on the photo to enlarge.
Do you have any specific goals that you want to achieve in or with your photographs?
I said earlier that I started my digital landscape photography in 2007, and I sold my first landscape photo in the same year. Since then, each year I would sell some of my photographs through various art exhibitions in my area. In September 2010, I established my own photography website. Recently I sold several large prints. As an amateur photographer, I feel I am very lucky to be selling photos.
Having said that, I should stress that my photography goal is not just to make my works to be of some commercial value. More importantly, I wish my works to be recognised by the professional photography community. This was the main motivation that brought me to get involved in 1x.com photography website’s activities.
Photo by Yan Zhang. Click on the photo to enlarge.
This one is a selfish question, but I had to ask it :). In my photographic portfolio, landscapes section, did you see a photo that you particularly liked? And if you did, what did you like about it?
Yes. I like this shot:
because this image presents a nice mood with mist in the forest. The vertical trees in the mist create a good depth of field, which makes me try to explore this wilderness.
And finally, my traditional question. If you had only two advices to give to a beginning photographer, what would they be?
My two advices for beginning photographers who are dedicated to landscape photography would be:
(1) Originality – I believe that originality is the key to make photographs that differ yourself from other photographers;
(2) Persistence – to make outstanding photographs you have to be persistent, to stick to the idea you have in mind and then try every effort to fulfil this idea or adjust it in the field.
Photos by Yan Zhang. Click on the photo to enlarge.
Yan, thank you very much for this interview, and good luck in your future artistic endeavors!
You can see more of Yan’s beautiful photographs on his website:
Thinking of it, maybe I should’ve titled this post “story of an idea” because I will be talking about creation of one particular image. But I eventually I decided on the current title because the way this creation emerged from the depths of my imagination is one of the most common ways.
A few weeks ago I had a photo session with Ira, in which my primary goal was to try some new lighting techniques that I thought of. In that shoot I decided to focus on close up portraits (chest line and up). I experimented with different backgrounds and asked Ira to put on a few different shirts.
At first nothing was working for me. The lighting was bad, and I didn’t get any interesting results… but then again, I didn’t start this shoot with a specific idea in mind – it’s like that phrase from Alice in wonderland:
– In which direction should I go?
– It depends on where do you want to arrive
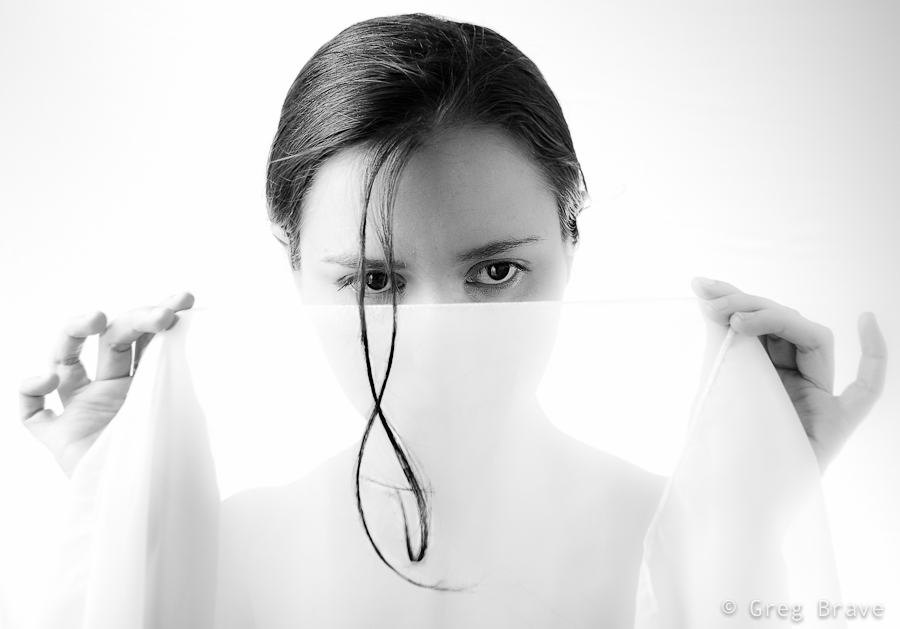
But I felt inspired that day and just kept on shooting and trying to get some nice shots. At one point Ira suggested adding an accessory – a piece of white semi transparent white fabric that she had, and I agreed to try it – it is a good idea to listen to your model, especially when you are out of ideas 🙂
Trying different variations we came up with this photograph:
Click on the photo to enlarge.
I liked it, but quite frankly it lacks an idea behind it. I looked at this photo and thought “nice photo! but what am I trying to tell with it?”. And I couldn’t find an answer. So I forgot about this photo for a while and focused on other tasks.
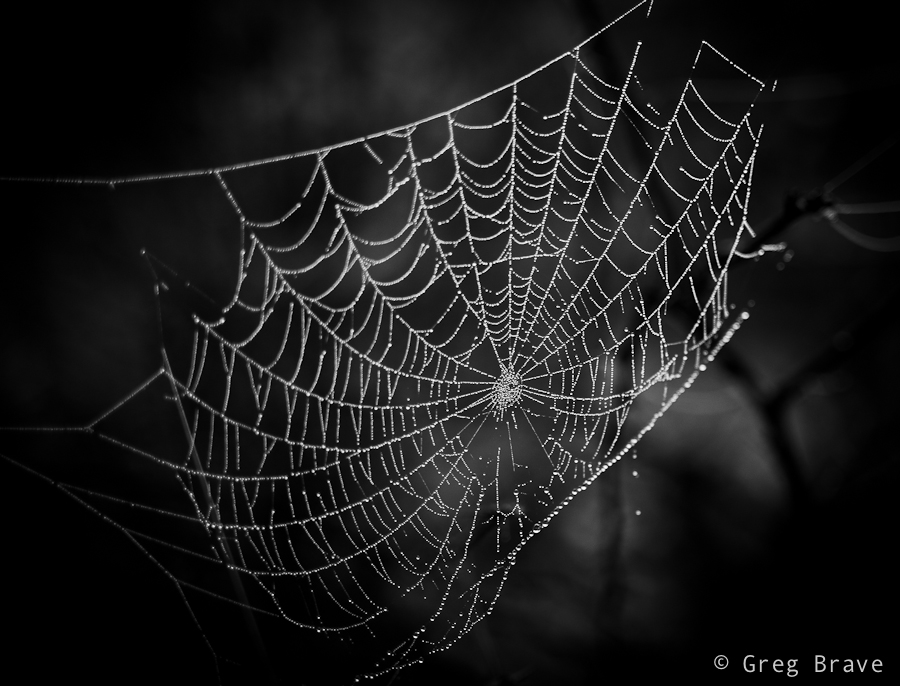
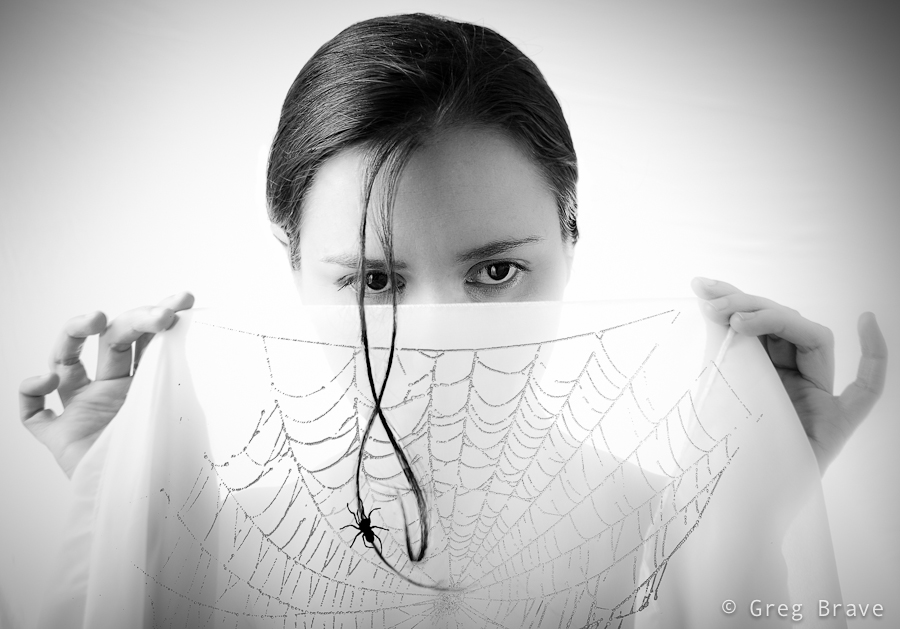
After a while (a few days have passed since the shoot), when I was watching a Phlearn Pro photoshop tutorial (which by the way was magnificent!), suddenly an idea emerged in my mind. I remembered this photo of a spider’s web that I took:
Click on the photo to enlarge.
And it suddenly got layered, in my mind, onto that photo of Ira holding white fabric, as if she was holding the web itself. I rushed into photoshop to try it, to see how it looks in reality. It was nice but still something was missing… what was it? The spider of course. So I searched the net for images of spiders and chose the one I liked the most. Then I brought it as a layer into my working file, and converted the spider to be pure black.
Now I needed to find a meaningful placement for the spider. I tried different variations before I came up with the final result, which you can see below. I call this image “The Way Up” :
Click on the photo to enlarge.
By describing my creative process on one particular image I wanted to show one of the many ways creative ideas come to life – they are not always pre-conceived, and sometimes, as it was in this case, they develop step by step over time, graduating slowly towards the end result.
What do you think about the final image? Your thoughts, comments, and suggestions are always appreciated!
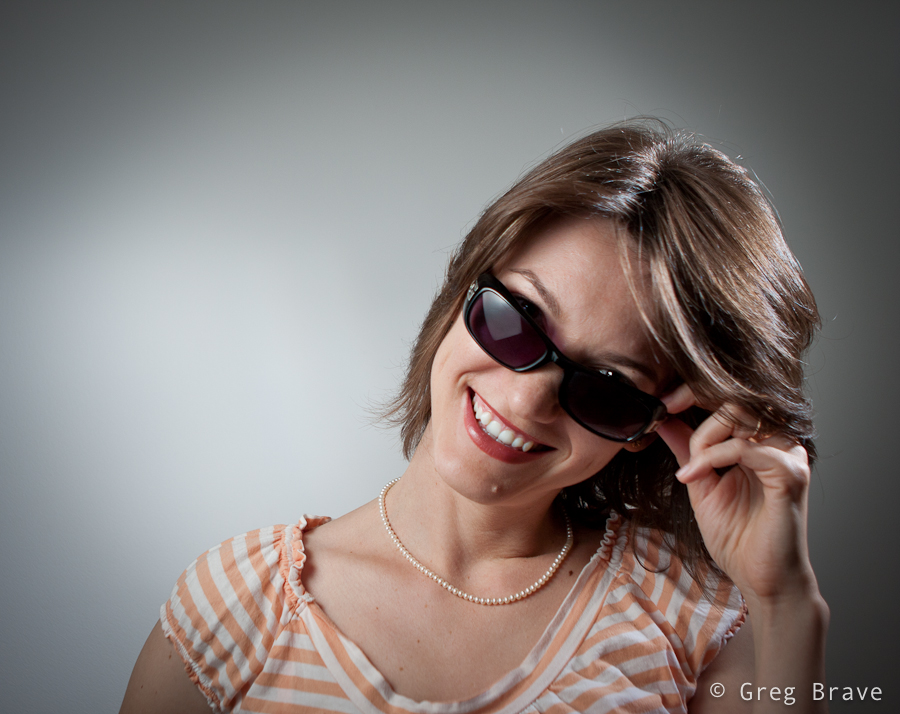
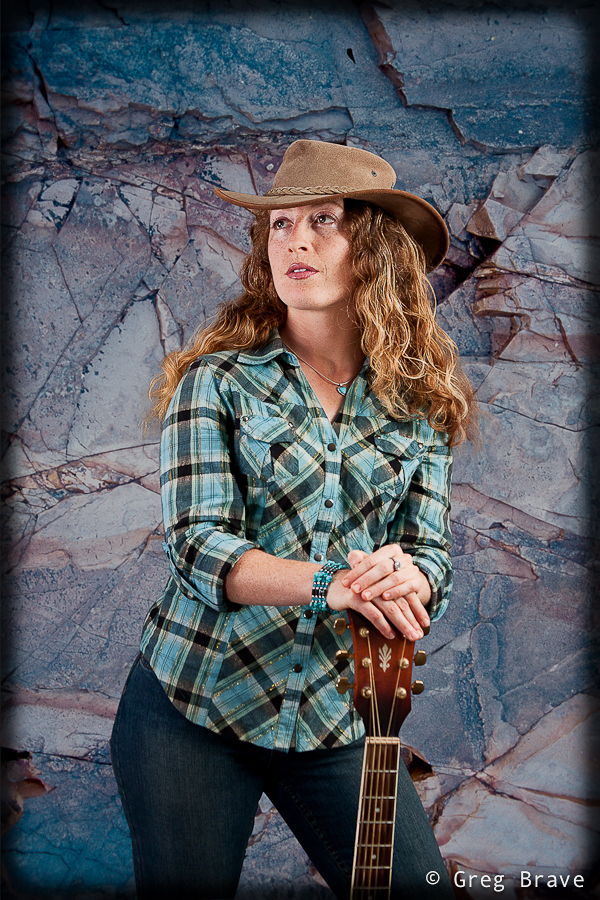
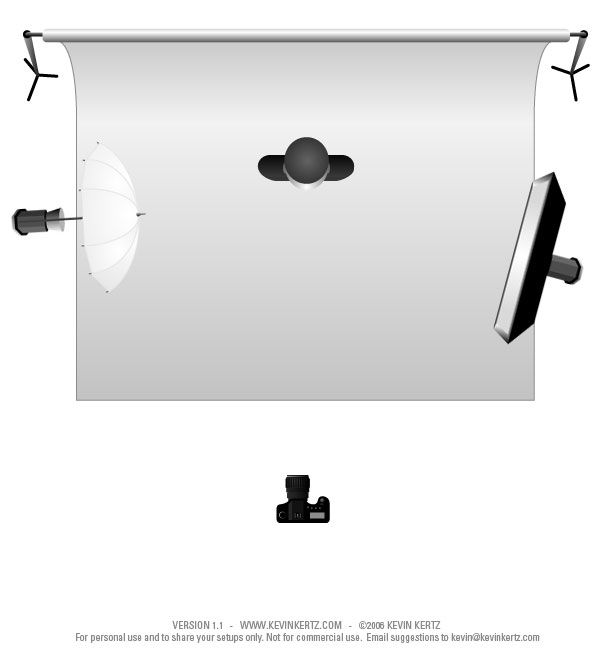
Recently one of my friend’s friends, Renata, saw these portraits I shot about a month ago, and liked them. So we decided to do a studio photo shoot with her. When I said “studio”, I meant a tiny studio that I put up in my living room. It consists of a black or white background, one light stand with Canon EX430 flash inside soft box, and one tripod converted to light stand with Yongnuo flash and white shoot-through umbrella.
Shooting in my home studio I am limited by the size of my living room, so I can’t use any focal length I want. The biggest zoom I can use is about 100mm. In that case I have to stand at the far end from the model, and still be able to shoot almost only head-shots.
The following photo was made using Canon 100mm f2.8 macro lens. Even though when shooting studio portraits I usually use my soft box as the main light, in this photo my main light was the Youngnuo flash through white umbrella from the left, and I used my soft box as hair light from the top right and it also acted as a fill in light to soften the shadows.
I placed the lights at such angles so that almost no light would spill on the background as I wanted the background to remain black. It is intentional that the Renata’s dress is also black and looks only slightly lighter than the background – I wanted to make an emphasis on her face.
Canon 100mm f2.8 macro; Shot at f8, 1/200 sec | Click on the photo to enlarge.
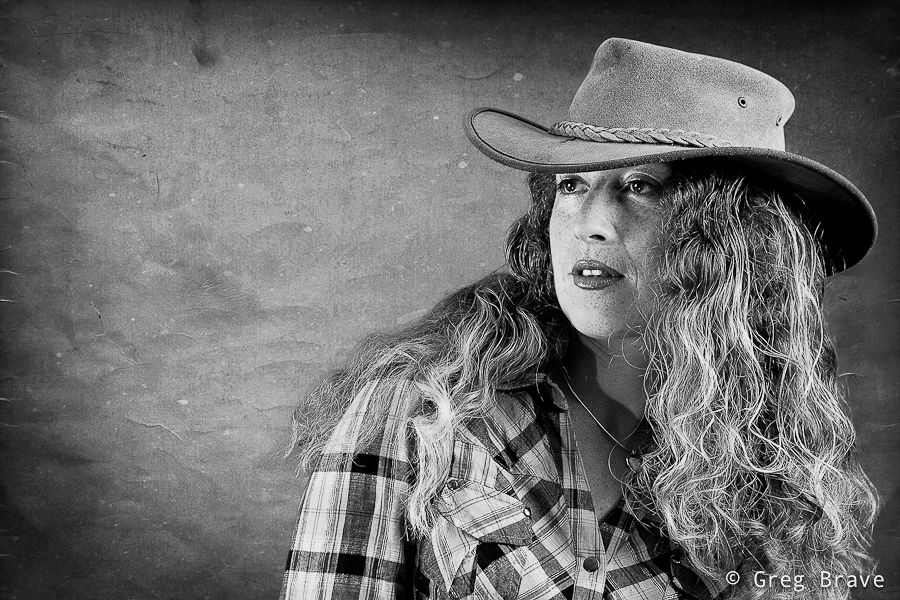
Continuing the discussion regarding the photo above – shooting that portrait I looked for Renata’s natural expression. At first she was a bit constrained trying to pose for the camera, but then we started a conversation about all kinds of topics and she got more relaxed. At one point I put the camera down and we continued speaking about a particularly interesting subject for her, and I noticed that she got completely relaxed. So I grabbed a camera and started shooting. This is when I got the shot above.
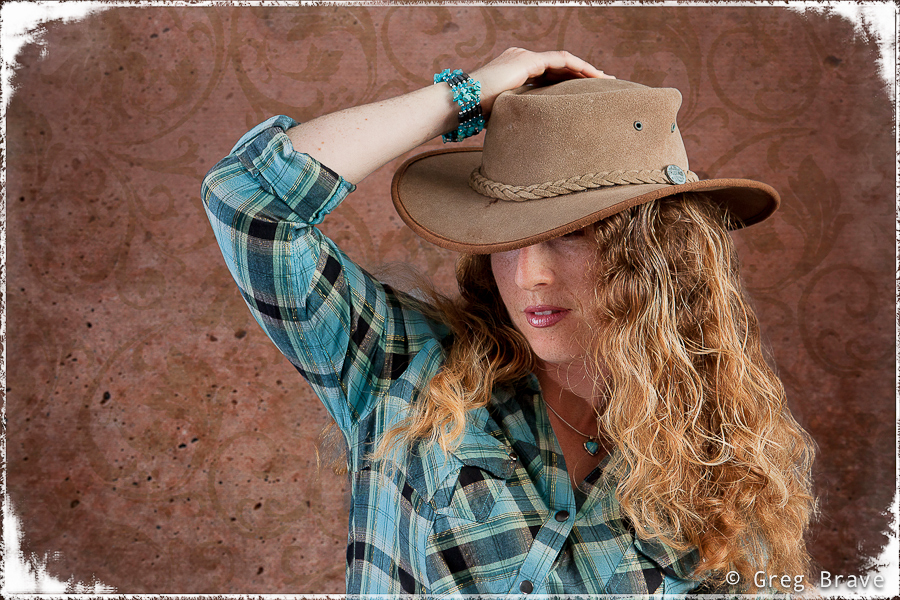
Next photo is posed, of course. It was my idea to shoot Renata with a candle, but after trying everything I had in mind, I couldn’t make a single nice photo. Then I asked my model to do anything she liked with the candle and just watched and shot. After a while I saw her making this pose and thought – “this is what I was looking for!”, so I asked her to remain in that pose and shot several variations. The photo below is the one me and Renata liked the most .
Sigma 28mm f1.8; Shot at f5, 1/200 sec | Click on the photo to enlarge.
In the next photo, I wanted to try a bit more dramatic lighting with stronger shadows. One of my primary concerns was to make her left eye (the one to your right when looking at the photo) free of shadows coming from the nose. I wanted it to be as vivid and visible as the right eye, and still to have strong shadows. This involved moving the main light around the model until I found the desired angle. All my flashes were set to manual mode, so in order to achieve stronger lighting I just increased the power of the flash.
Sigma 28mm f1.8; Shot at f5, 1/200 sec | Click on the photo to enlarge.
One more aspect to think about is the flash recycle time. I use small strobes (Canon EX 430 and Yongnuo), which are powered by 4 AAA batteries. Using such strobes at full power means waiting two to five seconds between shots, loosing priceless facial expressions and body poses. So I never use my strobes at full power unless I absolutely have no choice. I usually don’t go above 1/4th of the full power and set ISO and f-stop accordingly (taking the DOF into account of course).
After getting a few decent portraits, which were the main goal of the photo shoot, we started to improvise. I particularly liked the shot with the sunglasses. I liked Renata’s expression in that one – it is radiant and tender at the same time. Of course I didn’t get this shot on the first try, but the final result is what counts, right? 🙂
Canon 24-70mm f2.8 L; Shot at 24mm f2.8 1/200 sec | Click on the photo to enlarge.
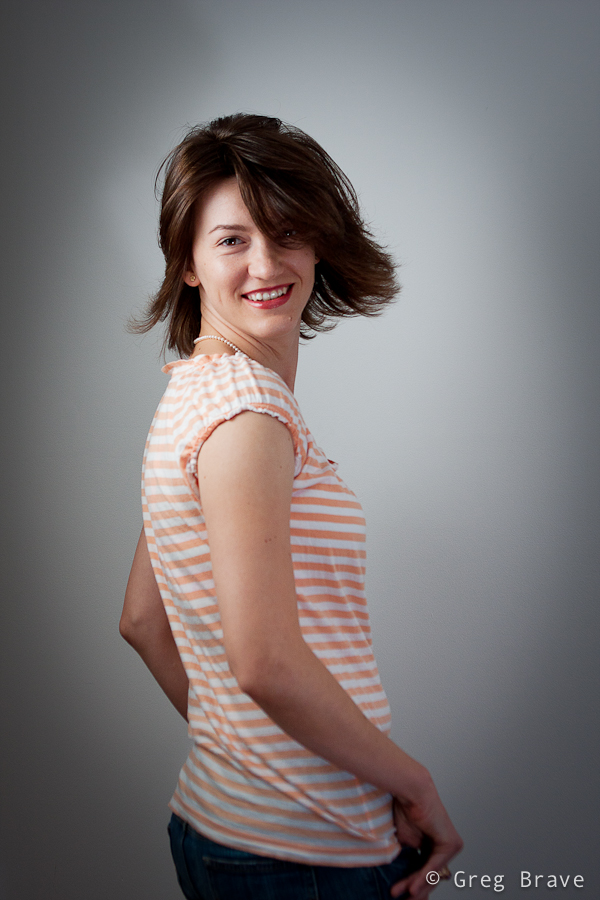
The following photograph is my favorite. I love the dynamics of it. For this photo I had Renata stand facing the background and then turning swiftly around on my mark. I really wanted to catch that hair movement. It wasn’t as easy as it sounds because at each turn hair moves differently, and it doesn’t always look as nice as in the photo below. I probably did about 15 shots before making this one.
Canon 24-70mm f2.8 L; Shot at 42mm f4 1/200 sec | Click on the photo to enlarge.
I really enjoyed this photo shoot and I am pretty satisfied with the results. I find the background a bit boring, therefore thinking of my next photo shoot to be on-location somewhere.
I hope you found this article to be helpful and interesting, or at least one of these 🙂
Your comments / questions / suggestions are always appreciated!
For quite some time now I wanted to shoot portraits, and finally I found a model to shoot!
Since photography is my hobby I don’t have a studio, so I had to improvise. I converted my living room into a studio for a day, and shot my model on gray muslin background. I bet everybody heard about these famous muslin backgrounds. But what the guys who sell them to you don’t mention is that you receive the muslin in a really crumpled state, and if it is 3 by 6 meters long, there is no way you can iron it by yourself. But I had no other choice than to use what I had.
My solution to this problem was in post processing – I had to “cut” the model from the original background and paste it onto another background in Photoshop. You can see before and after images in the example below.
Click on the photos to enlarge.
In order create precise selection of the model in Photoshop I used the pen tool. Many people don’t use this tool because they find it confusing just like I did before I saw this tutorial:
After getting used to the Pen tool, I promise you that you won’t ever go back to lasso or any other selection tool when you need to do a complex selection. After I selected the model using pen tool, I used the option “Refine Edge” to refine the edge of the selection in the areas with model’s hair. It is really important to make the hair look natural on the new background. My last step in the selection process was feathering the whole selection by 2 pixels to add a more seamless transition from the model to background.
Click on the photo to enlarge.
If you don’t want to cut and paste your model, and still use your crumpled muslin background, here is how you can do that:
If you have enough space, put your model far from the background, and use wide aperture – this will make the background go out of focus and its wrinkles won’t be visible. In addition to that, you can setup your lighting so that no significant light will fall on the background making it dark (you can use gobos for that).
Click on the photo to enlarge.
In all the photos you see here I used pretty much the same lighting setup, only slightly varying the position of my strobes and their strength. Here is my basic lighting setup diagram:
Click on the photo to enlarge.
You probably wonder where I got backgrounds that I use on these photos, and it is no secret. You must have heard about OnOne software. I used one of their products named PhotoFrame. This product can work as a standalone application or as a plug-in for Photoshop and Lightroom. The primary aim of this product is to supply the user with lots of photo-frame templates, so you can choose and add nice framing to your images, but it also has a great collection of backgrounds. I downloaded their trial version here. In the image below you can also see the frame that I created with this plug-in.
Click on the photo to enlarge.
But it is the only frame that I used from PhotoFrame. Other “frames” that you can see in the photos here, are simply a creative use of vignetting feature in Lightroom, which is pretty easy to achieve – you simply reduce the roundness of the vignette somewhere around -90 to -100, set it’s midpoint between 0 and 15, and the amount slider is up to you.
Click on the photo to enlarge.
While most important aspects of portrait photography lie in the artistic sphere rather than technical, still in order to get acceptable results, all the technical details must be carried out correctly, and this is why I dedicated this article to them. Nevertheless after all the technical aspects are set and done, I forget about them and concentrate on the model and on my artistic perceptions of what I want to achieve from the shoot.
Click on the photo to enlarge.
If you have any questions regarding the issues brought up in this post, feel free to leave them in the comments below, and as always any other comments are highly appreciated.
Sometimes I see a photograph, and I wonder how it was done, what tricks or special equipment (if at all) did the photographer use to achieve the result? In most cases there is no way of asking him, and I have to guess and speculate on how it was done.
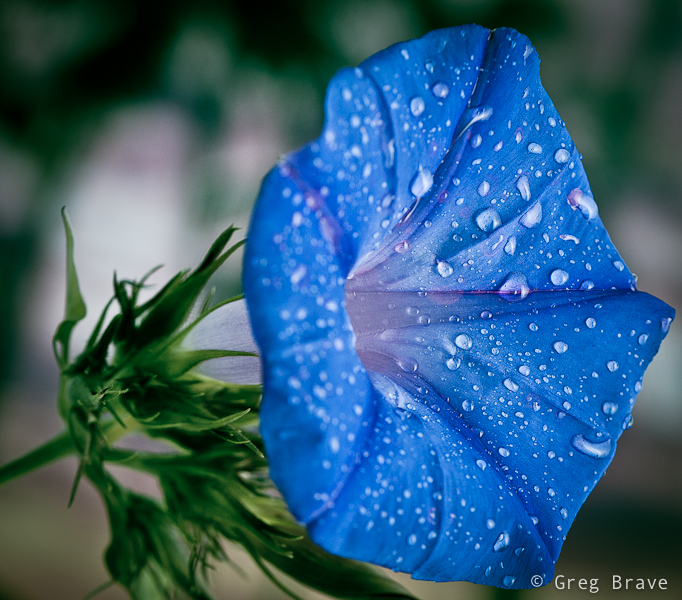
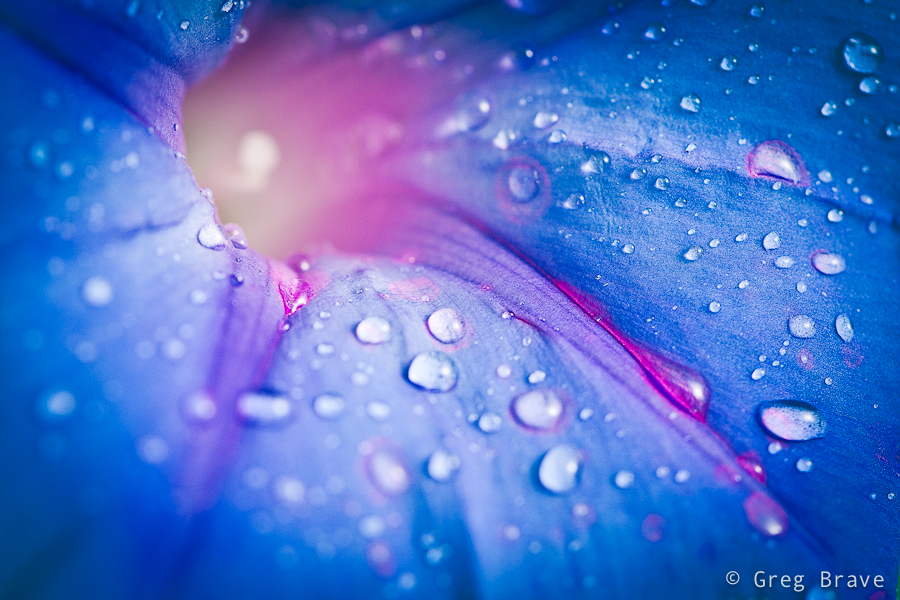
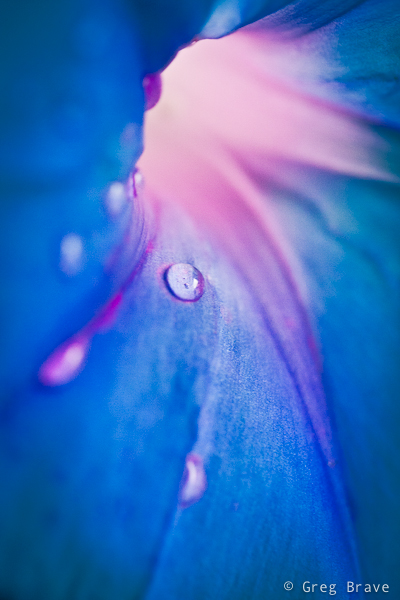
A few days ago I did a few flower macro shots, and posted one of them in a couple of forums. In the responses I’ve received I saw some questions as to how I did it, so I decided to write a post about it.
I used Canon 100 mm f2.8 Macro lens, a light tent, and two flashes – the main one from the right side, and another flash from the left side. I set the second flash to be much weaker, so it would make the back side of the flower just a little brighter.
I didn’t want big depth of field so I set my aperture to f5. On the contrary, I wanted to be able to control what exactly will be in focus.
The shutter speed was 1/200 of a second, but it is not important in this case because I didn’t use ambient light – only strobes.
Since I had total control of my lighting, and I could set it to be as bright as I wanted to, I used ISO of 100, the lowest ISO on my Canon 40D. As you probably know, the lower your ISO setting, the less noise you’ll get in your photo.
Of course I used tripod. This is an important point. You might think that shooting at speed of 1/200sec doesn’t require the use of tripod, and under certain circumstances you might be right. For example when using wide angle lens with fairly closed aperture. But in my case I used telephoto lens (100mm) with f5, which means that even the slightest movement will shift the focus from where I want it to be to another random location. So, the conclusion is that in macro shots tripod is almost always an essential piece of equipment.
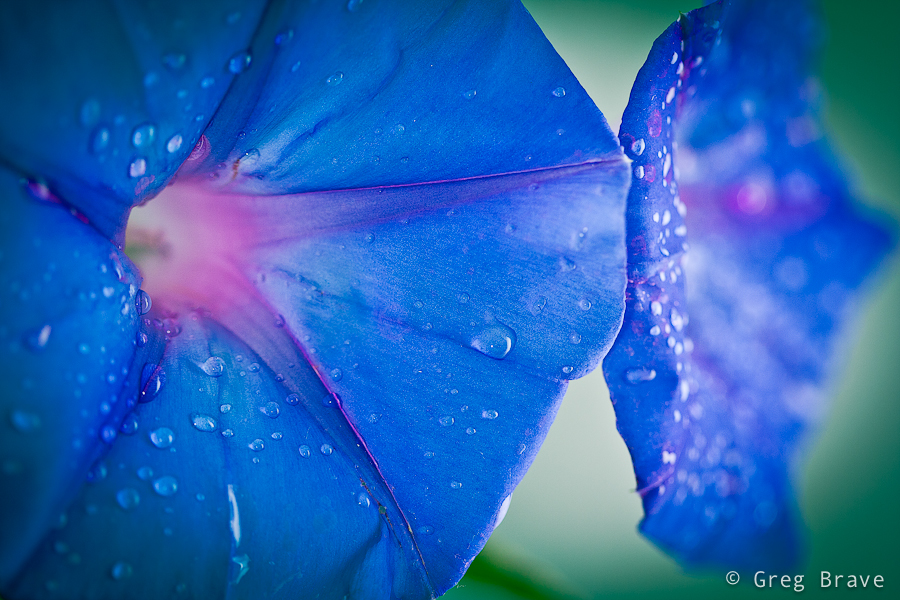
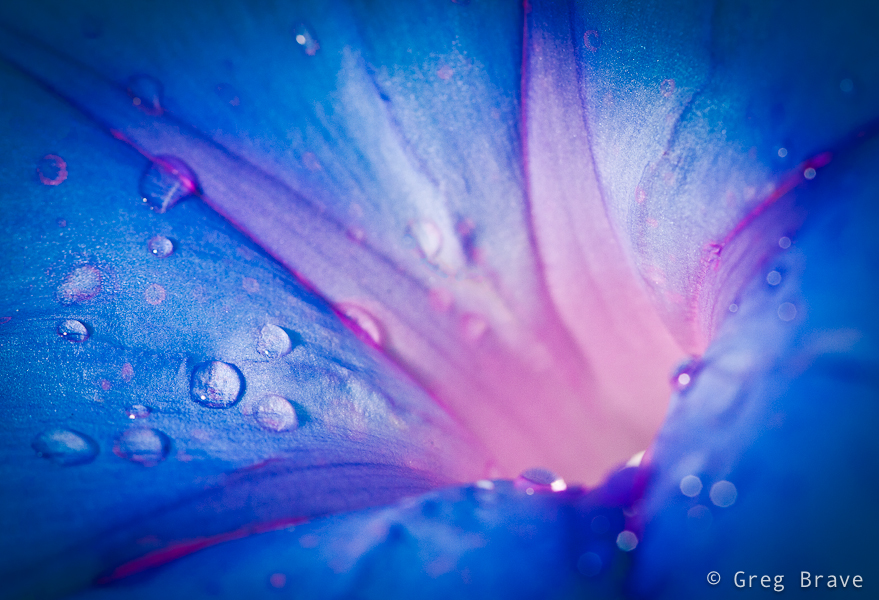
As you can see on the shot I sprayed the flower with water. Water drops are a very nice touch to many natural subjects, not only flowers. Sometimes photographers photograph the water drops on their subject in such a way that a reflection of something would be visible in the drops, and it makes for great images. In my case I wanted to achieve the exact opposite – I didn’t want any reflections in the water drops in order to focus the attention of the viewer on the flower, and to achieve that I photographed my flower in a white light tent.
And finally, the background. In the shot above and in one of additional examples from that photo-shoot below you will see that my background wasn’t plain white. But what was it? It is easy – I used one of my calendars with colorful photos as the background. When shooting macro, DOF is so tiny that a photograph placed 30 cm behind the subject becomes totally indistinguishable collection of colorful splashes, which makes for a nice background.
Below you can see a few more examples from that shoot
>
I hope you learned something from my experience.
As always, feel free to share your thoughts and suggestions in the comments section.
Cheers,
Greg.
P.S. For those of you who wonder, the flower’s name is Morning Glory
Imagine that you need to photograph a large dark space, like a cave, or a church, but you only have a single flash. Is it even possible?
Quite some time ago I saw in a photography magazine photo of a big beautiful cave, perfectly lit, all the beautiful stalactites perfectly visible, and I thought to myself – there is no way photographer could bring powerful studio lighting equipment down there!
Fortunately there was a brief description to this photo – photographer put his camera on tripod and set it to long exposure, then during the exposure time he ran around the cave with small strobe flash and flashed all the areas of the cave. “Simple and Genious” I thought to myself back then.
Genious? Sure. Simple? Well, not really.
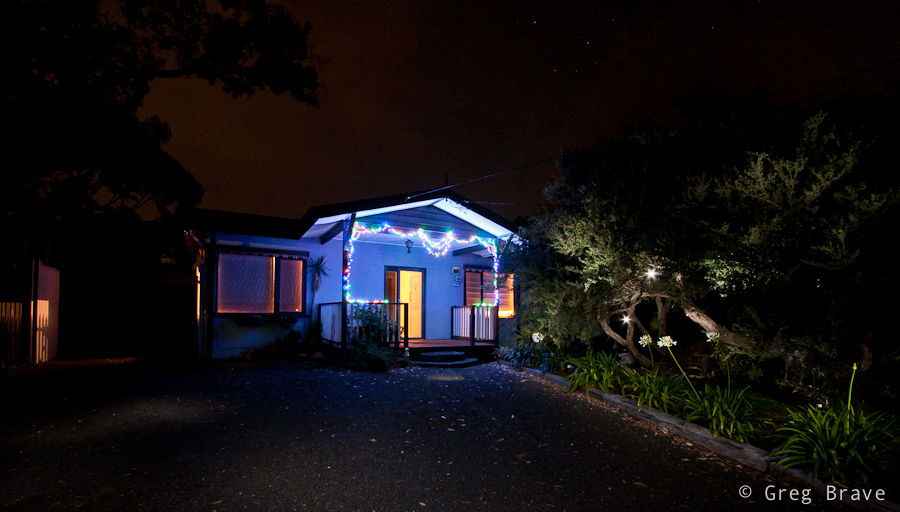
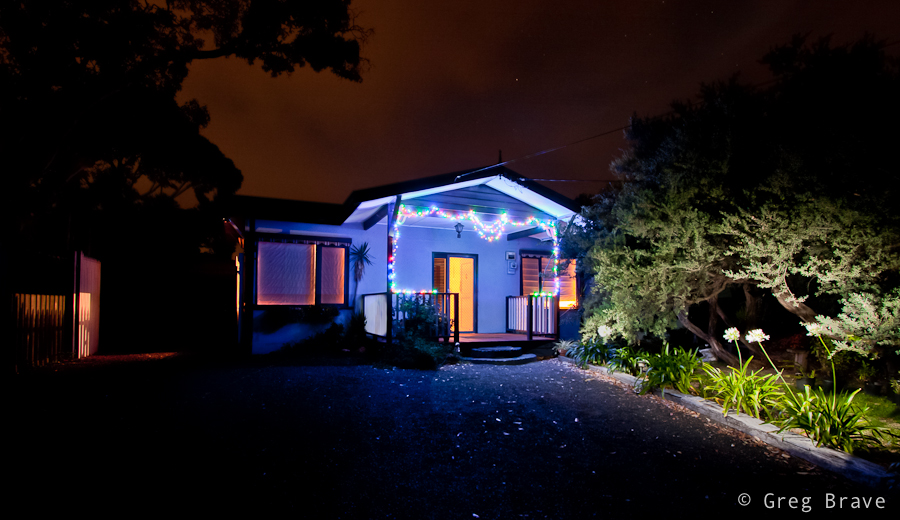
Recently I decided to photograph the front of my sister’s house decorated with shiny Christmas lights. Yes they still haven’t took them off, because my three year old nephew likes to turn them on every night before he goes to sleep :).
In order for Christmas lights to be visible, I had to do that after dark, and I only had one flash (not that it matters but it was Canon 430 EX). So I decided to try the technique described above, and it turned out not as simple as I first thought it would.
I’d like to share with you the tips that I learned from this experience, hoping they will make it easier for you should you decide to use this technique. I will do this in the form of step-by-step instructions how to perform this kind of shoot.
Here we go:
1. Set your camera on a tripod and compose your shot.
2. Choose the desired f-stop (here your guide should be only your artistic intentions, and not exposure considerations).
3. Focus your camera where you need to, then switch to manual focus. The reason for switching to manual focus is that in the dark it is hard for automatic focus to work, so each time you’ll press the shutter it may take a long time for camera to focus if at all.
4. Look at the scene and decide which areas need to be lit and which don’t.
5. Set your flash power to about 1/8th of its max power.
6. Press the shutter, and run around the scene with a flash in your hand flashing all the areas that need light. Flash ONCE each area.
7. Take a look at the result, and go over all the areas that needed to be lit. If they are too dark, next time you’ll flash them twice, or increase the flash power. Using low flash power and flashing several times the same area gives you more versatility in case you need different areas to be lit diferently.
8. Repeat the steps 6 and 7 until you are satisfied with the result.
In addition to this process you also need to have in mind the following:
When flashing hold the flash pointed outwards from your body, and as far from you as possible so that no light will spill on you (otherwise “ghosts” of you will be visible in the image).
Always point the flash away from the camera, so that no direct light from the flash will hit the lens (otherwise you’ll see bright points of light all across the image).
Remember that the longer the exposure time, the more noise you’ll have in the photo. Try to complete the shot as quickly as possible, unless you want the noise for artistic purposes.
Here are a few examples of the house that I photographed:
In the photo above, you can see that I deliberately flashed into the lens a couple of times to create lights in the tree. This is also a good example of what you’ll see in your image if you do it by chance.
And here is another example, this time without the lights, and with better lit right side.
Feel free to ask questions and share your experiences in the comment section below.
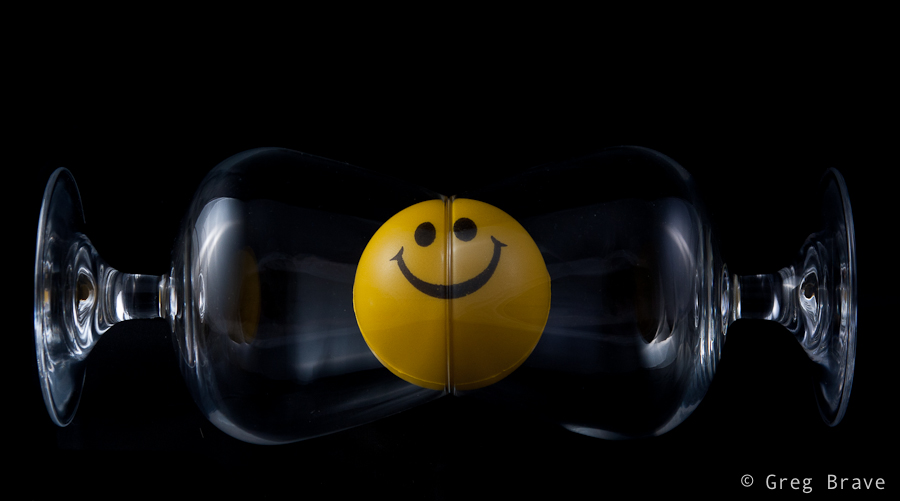
This is another photo-sharing post. Recently I had the time to revive my small home studio, so while I was at it, I took some photos… actually I took a lot of photos, most of which aren’t worthy of sharing.
Here’s the only two I liked:
This photo was taken inside light tent with two flashes (one from each side). I call it “Almost Symmetrical”. Nothing much to it, just having fun 🙂
Click on the photo to enlarge.
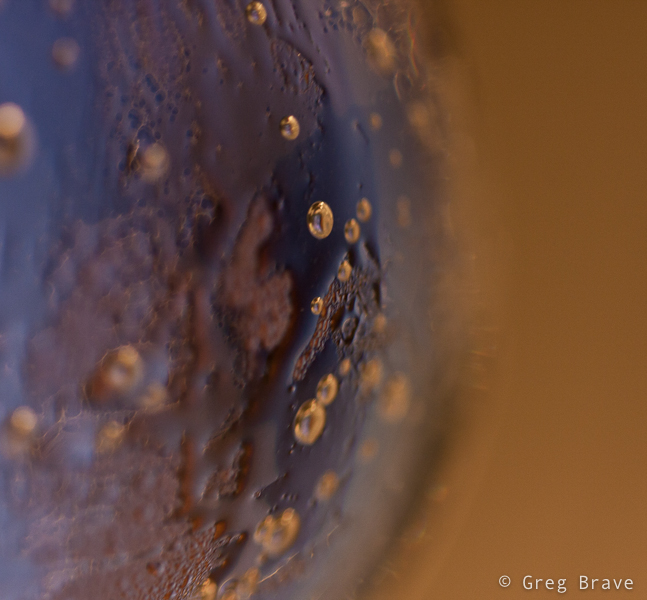
And I also liked this abstract photo, which is really a closeup of glass filled with cold bubbling mineral water, with yellow light in background.
You might think I’m going a little bit crazy here, but hey, don’t make any rushed judgments!
Yes, flash won’t help you to light the landscape but it can help you make your sunset photos a little bit different. Usually when you see sunset photos, the foreground elements of composition are silhouettes due to the high contrast between the backlight from the setting sun and the darkness of the foreground. Sometimes these silhouettes of objects or people look good in the photo, but sometimes adding a little foreground light can improve the final image.
In the following example you can see pretty much the same composition taken with (on the right) and without (on the left) the flash.
Click on the photo to enlarge.
While the silhouette in the left photo looks nice, using a little bit of light to show the cool red hair of the standing person adds a nice touch to the photograph. It also reveals a bit more detail in the foreground, though I’m not sure if it is a good thing in this case.
In the photo below I also used flash to light the foreground, and show the beautiful color and texture of the wood. Without flash this photo would have been too dark and much less interesting. Another way of achieving this result would be shooting several frames with different exposures and later combining them into an HDR image, but it would take much more time and possibly look less realistic.
Click on the photo to enlarge.
These are only a few examples of endless possibilities which open up when you start using flash in many situations where it is not normally used, not only during sunset. For example you can use flash when shooting in harsh daylight in order to soften the hard shadows that daylight produces.
Hopefully this post inspired you and gave you a starting point for your own creative ideas when and where to use that flash that has been lying in your photo bag for too long 🙂
If you have any original ideas or examples of unusual use of flash, please share them in the comments.
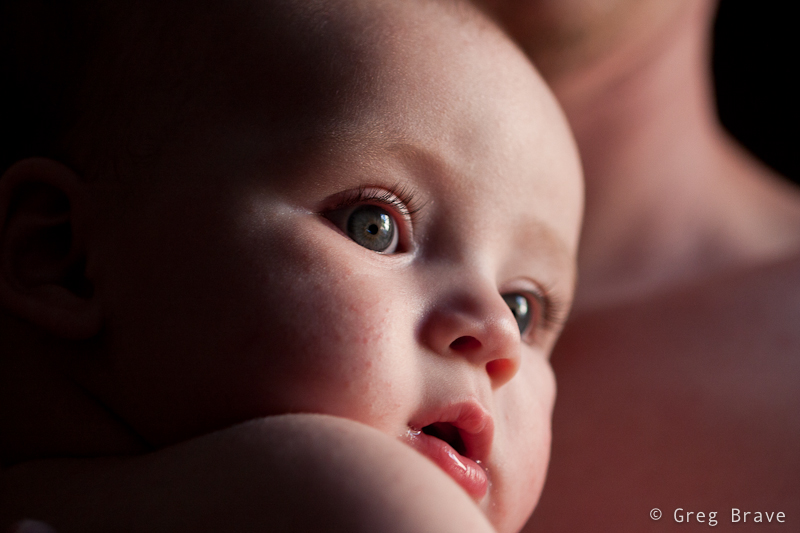
Recently my good friend asked me to photograph his baby son Eric. I gladly accepted because I don’t usually get to photograph babies and wanted to give it a try. The only problem was that my friend’s house didn’t have any suitable place to make a little studio out of, every place I looked at was too cluttered with stuff, which could distract the viewer’s attention from Eric. Finally I found a few places but knew in advance that the resulting photographs won’t be the way I’d like them to be.
Still I wanted to make at least a few photographs that would stand out and satisfy my artistic demands 🙂 The only solution I could come up with was to shoot close-up shots of Eric so that background wouldn’t matter much. Three of those shots I chose to present here.
The key aspect of the following photographs is the light. It is different in all three of them, but in each photo it plays very important role.
For the following photograph I used a 100mm Canon macro lens at f2.8. I had a flash with me and tried to use it, bouncing from the ceiling or walls and varying its power, but I didn’t like the results – the light was too harsh and too white for my taste. Yes I could use a 1/4 CTO gel to warm up the light a little bit, but I choose a different approach instead – I asked my friend to take Eric and come closer to the window.
It was about 5 o’clock in the afternoon and sun light was still pretty strong, but was already getting warmer as sun got lower and lower. After positioning the happy couple the way that there were no significant shadows on Eric’s face I started to shoot, and the photo below was the winner of that batch. I like it because of the intimacy it transmits to the viewer, the closeness between the child and his parent. Because the light coming from the window was much stronger than the light in the room I could set the exposure so that the background remained completely black.
In the next photo I took Eric to another window in the house, with transparent white curtains to serve as background. I intentionally went for the high contrast in lighting in order to create a little drama. But nevertheless as you can see there are no harsh shadows on Eric’s face, that would be unaesthetic for my taste. I like the way his eyes are emphasized in this photograph as if they were eyes of an adult but on a cute baby face.
Click on the photo to enlarge.
I also included the photo below in this article to demonstrate use of reflected light. In this photograph my friend hold’s Eric close to his body, and the light from the window reflects from his body and lights Eric’s face with soft warm light. So in order to create warm light you don’t always need gels and flashes… sometimes human skin can do the job just fine! 🙂
Click on the photo to enlarge.
What additional tips can you share regarding photographing babies? Did you like the photographs presented here?
As always comments are highly appreciated, and
Remember, you only have to enter your name to leave a comment!
This is a very interesting question you know. I am sure that anyone who takes interest in photography at times thinks about it. In my head sometimes these thoughts sound like “I’d really like to make a great photograph… yeah… but what should I shoot?… what should I create?… ”
If you really want to create something, especially if you are not sure yet what it is, you have to allocate a certain amount of time to thinking about it. I mean that you have to tell yourself – “today between 10:00 and 11:00 I am thinking about creating an interesting (also can be beautiful, romantic, breathtaking, sad… anything you prefer) photograph”.
I want to demonstrate this from my own experience. A few days ago I felt this urge to photograph something at my tiny home studio. I didn’t have any idea what it would be, but I just had this desire to create. So I made myself sit down for about 45 minutes, come up with ideas, and briefly sketch them on piece of paper.
My first problem was that not ANY idea that came to my mind was possible to shoot because I was limited to the objects that I had in my apartment. Having realized that fact, instead of just thinking of any idea for photograph, I started looking around my home at different objects and thinking how can I use them creatively?
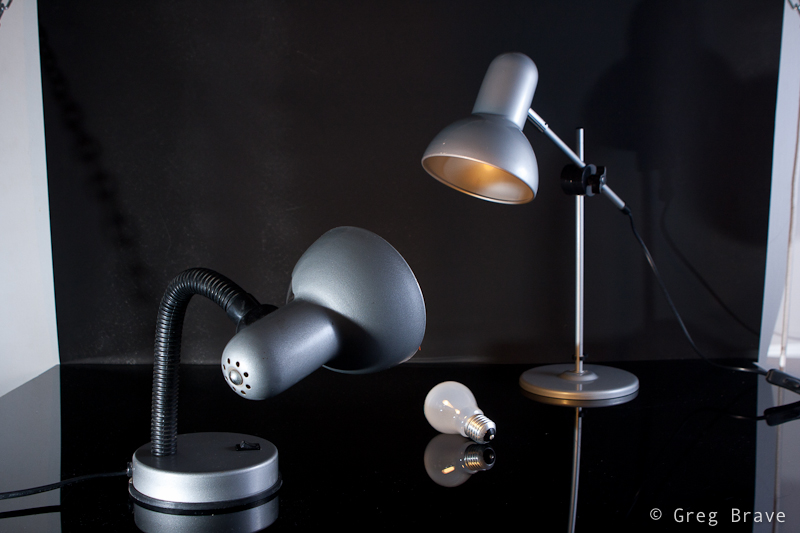
While looking I saw my table lamp. Actually it was always standing on my table, but until I made myself to think creatively, I never thought about this lamp as a subject for my photographs. And then, while looking at this lamp I remembered of some TV program I saw as a kid that had these two lamps jumping around like live beings, and I decided to try and create something in that direction.
I still had no idea what would come out of it, and I didn’t have any definite final result. So I just started sketching this lamp standing on the table in different poses and thinking what can be done with that. No, I can’t draw, and it doesn’t matter, because you need sketching only to help your thinking process.
One of the ideas that came to my mind was to photograph this small lamp with it’s light bulb lying beneath it, while the lamp “sadly looking” at the bulb. And so I did as you can see in the image below.
Photograph by Greg Brave. Click on the photo to enlarge.
In this image of lonely lamp looking at its light bulb I used only one flash from the left side with 1/2 CTO gel on it (this gel makes the white flash light to be warmer). I wanted a warm lighting here. Looking at the result I felt that it is not enough for an interesting image… I felt that it doesn’t conveys the “stare” of the lamp at the light bulb.
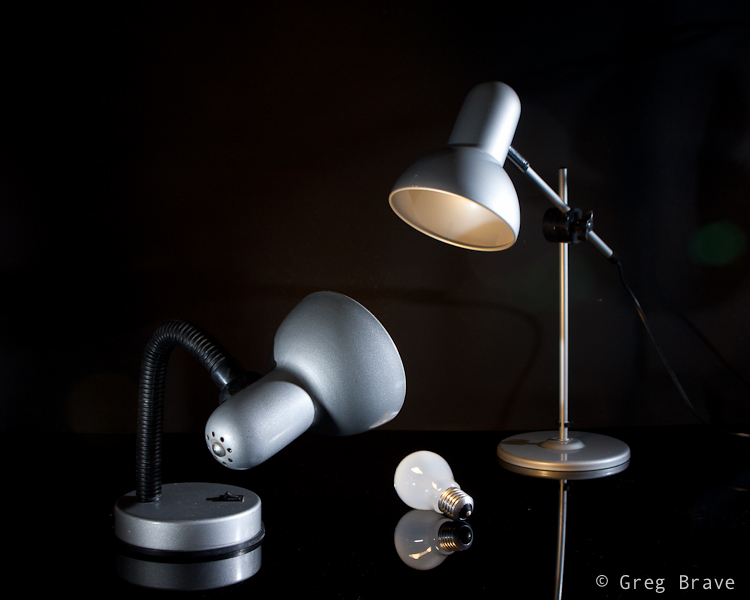
And then suddenly it hit me – I need another lamp to make this more interesting! And luckily my life partner Ira had one on her table. I took that lamp and started playing with two lamps. Finally great idea came to me – to make the second lamp “look” inside the first lamp as if to see “what happened? why you lost your bulb?” and so you can see my compositional setup in the photo below.
Photograph by Greg Brave. Click on the photo to enlarge.
Now, having the final idea of a shot in place I started thinking of little details. I wanted to emphasize the fact that the second lamp did have its bulb. How would I do that? Well, I decided that I would light the whole scene with white light, but I would also have yellow (warm) light coming out of the second lamp towards the first lamp. And you can see in the photo below that the down-looking lamp is warm-lit.
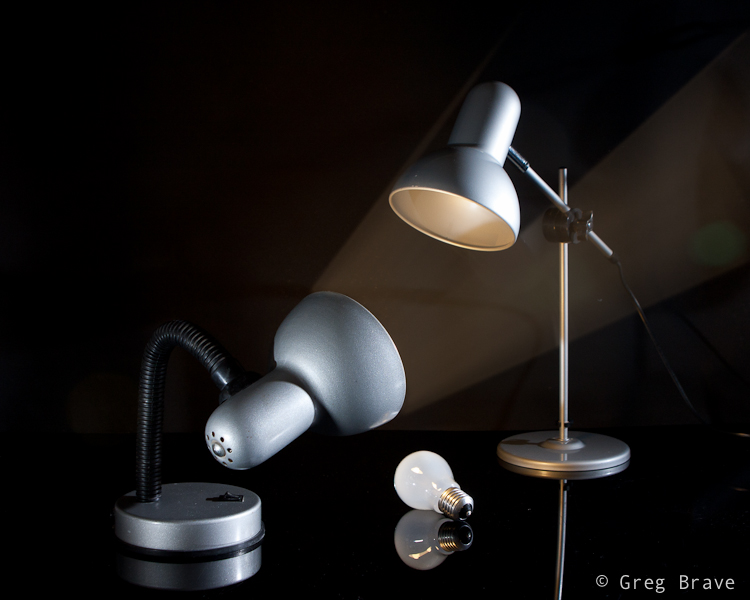
The final photograph below I accomplished using three strobes. Two strobes without any gels from left and right sides (I had to play with their powers to achieve the desired lighting), and the third strobe with 1/2 CTO gel on it I held in my hand and pointed inside the first lamp.
Photograph by Greg Brave. Click on the photo to enlarge.
After getting the final image above, I felt that there is not enough emphasis on the light that comes out of the second lamp. I wanted those rays of light to actually be seen. And here is a point that I am sure not all of you thought about. Rays of light are invisible unless they reflect off of something and hit our eyes. So in order to make these rays of light to be actually visible I had to have them reflect off of something – for example dust, or smoke. So if I would fill up the whole area with smoke then the rays of light would be seen. But then the rays of my two other flashes would also be seen, and the whole image wouldn’t be clear and crisp.
So I decided to take this work to Photoshop, and artificially add the rays of light, using the original light warmth that 1/2 CTO gel gave me (just used eyedropper tool in photoshop to sample that color). To give you an idea how I did it – think of Radial Blur filter in Photoshop. If you have additional questions regarding how I did it feel free to ask me in the comments. And for all the people who are against “Photoshop manipulation” – in the case of this photograph my goal was not to show reality, but to convey an idea of mine, therefore I am totally cool with using Photoshop here.
Here is the final result, which I am pretty happy to come up with.
Photograph by Greg Brave. Click on the photo to enlarge.
In conclusion – the main idea of this article is to show that in order to come up with interesting photographs, you have to allocate time for thinking – what you want to do and how you are going to do it. Even if you don’t have any specific idea in mind, just make yourself sit down and think for half an hour or so, and I am sure that you’ll come up with something interesting!
As always your thoughts and comments are welcome.
Do you agree with this article? If you don’t then why? Can you suggest additional steps towards being more creative?
Remember, you only have to enter your name to leave a comment!
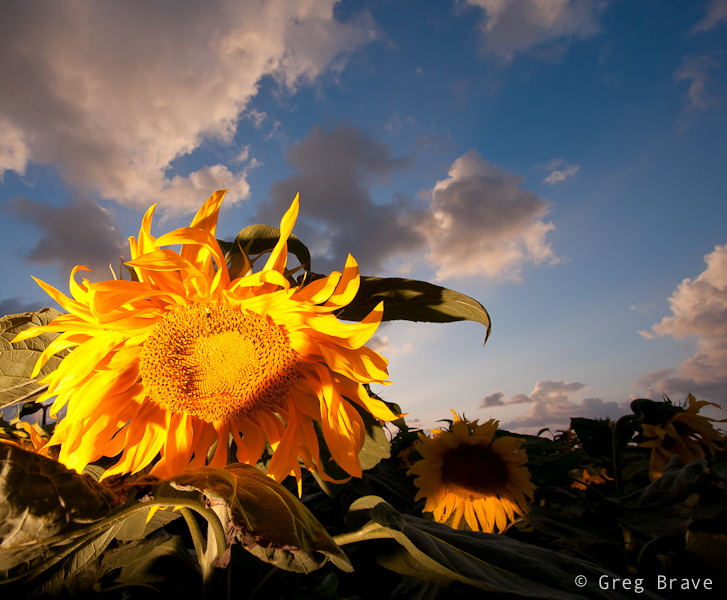
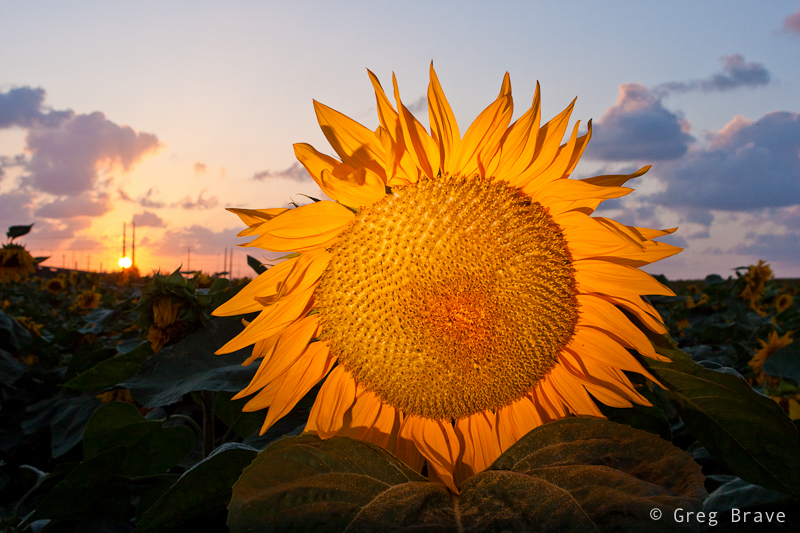
Today I’d like to talk about photographing sunflowers in the outdoors. I mean not one or two sunflowers at home but photographing them in the open field.
It all began when my friend asked me to make a picture for her. She wanted a very specific photograph of a large field of sunflowers, that would be completely yellow because in her imagination all the sunflowers would look up at the sky. This idea came to her while she was driving along a sunflower field, but she didn’t really pay attention to them.
I was glad to have an assignment like this because I just love any opportunity to be creative, and also if she would later hang my photo on her wall, it would be very flattering. So we decided on a day and drove to that sunflower field. I chose second half of the day towards sunset, but early enough to have time to scout the area and choose location.
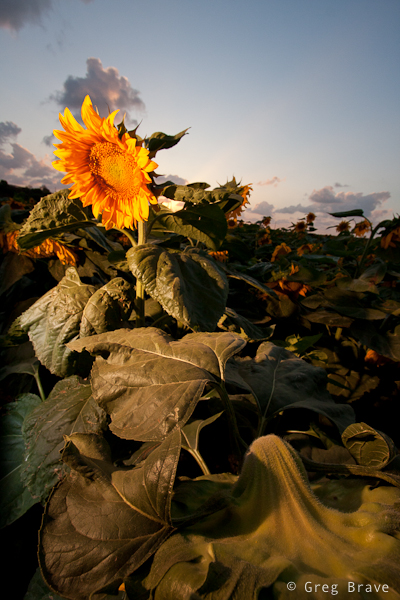
When we arrived at the sunflower field I was surprised to see that all the sunflowers were NOT holding their heads up, as you can see in the photograph below. I am sure that there is a scientific explanation to this (maybe they were ripe and heavy for example), but in my mind I have always imagined sunflowers to hold their head up high. As a result it was impossible to make a photograph that my friend wanted. In the photo below you can see that there is too much green in between the yellow.
Photograph by Greg Brave. Click on the photo to enlarge.
But since we have already came I decided not to leave empty-handed and began to think of various creative ideas to shoot the sunflowers in their current state. Let me remind you that it was around sunset time and the sun was getting lower and lower. The shot that you see below was made almost against the sun. The sun was almost facing directly inside the lens and then I lowered it a little. So the flare can be seen, and in my opinion it contributes greatly to this photograph by creating a certain end-of-the-day mood. I also like how it lights the white “hair” on the stalk emphasizing its shape.
Photograph by Greg Brave. Click on the photo to enlarge.
When the sun descended more, the contrast between the sky and the sunflower field grew and it was impossible to capture both the blue sky and the yellow sunflower heads without flash. Either the sky was burned out and the sunflowers were correctly exposed, or the sky was correctly exposed and the sunflowers became very dark. So I took my Canon 430EXII flash out and started using it together with my Yongnuo remote trigger. I was shooting on manual, setting the exposure to correctly expose the sky and setting the flash power so that sunflower would also be correctly exposed. I asked my friend to hold the flash in a way that the sunflower would be lit from the side creating nice shadows.
But, of course, nothing comes out right from the first try, and I want to show that here. As you can see from the photograph below the lighting on the sunflower looks too bright and too artificial, and the shadows are too harsh. In addition there is a big shadowed area of the sunflower as a result of incorrect flash position. And even though the sky is correctly exposed it is not enough to make a good picture.
Photograph by Greg Brave. Click on the photo to enlarge.
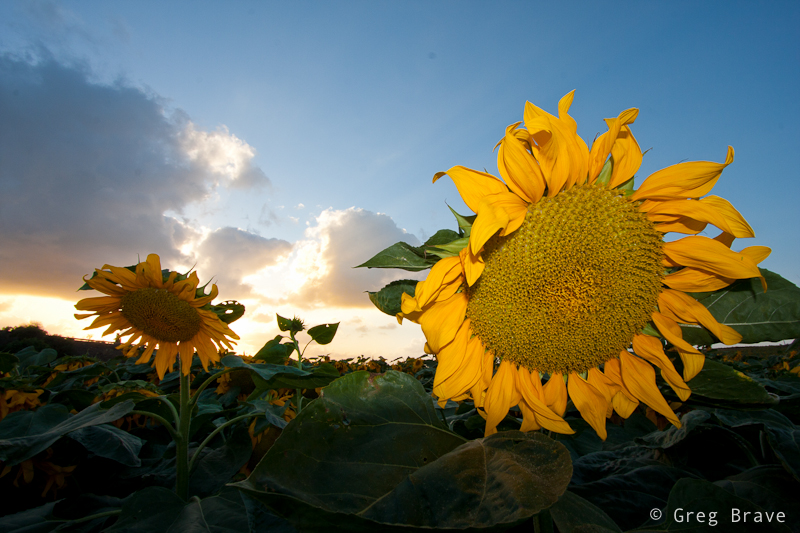
But I didn’t give up, and after numerous attempts and adjustments I found the right combinations and my photographs started to improve. I was thinking less and less about technical side of the photographing process and concentrated more on the creative side. In the photo below you can see more natural lighting and balanced composition.
Photograph by Greg Brave. Click on the photo to enlarge.
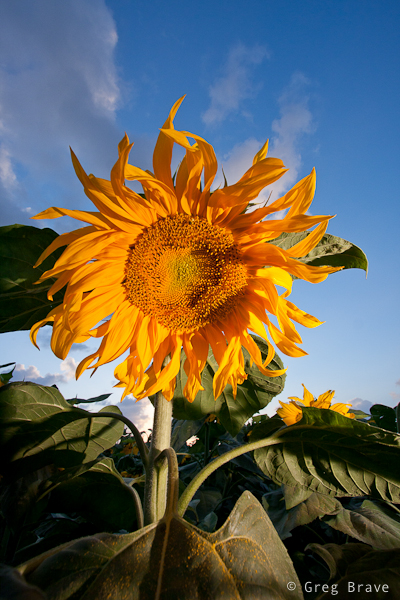
I thought that the sunflower above came out too yellow so I decided to add a 1/4 CTO gel to the flash and see what happens. And I liked the result of that, which you can see in the photographs below. I liked the warmth of the light, which matched good (in my opinion) with the warm colors of the sunset.
Photographs by Greg Brave. Click on the photo to enlarge.
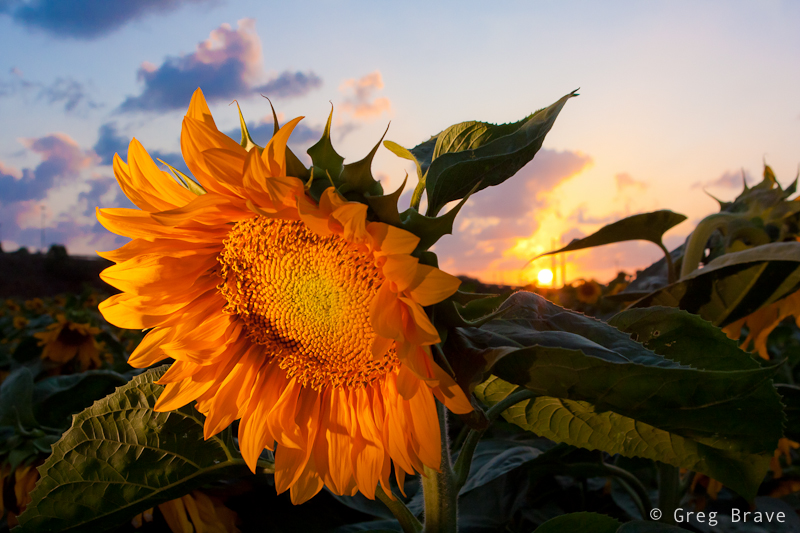
As the sun was getting almost down to the horizon I got this interesting idea to shoot the sunflower with the setting sun in an interesting juxtaposition (never believed I would use this word 🙂 ), and because the sunflower heads weren’t looking up I could do that! I came low under the sunflower and positioned it to be in front of the sun, asking my friend to point the flash from my right at the sunflower. I needed the flash to point a little up so that the light wouldn’t spill on the green leaves.
Photograph by Greg Brave. Click on the photo to enlarge.
After getting the shot above I was pretty much satisfied but decided to try more compositions and lighting directions just to see what comes out. And it turned out to be the right decision, because in my opinion then I made my best photo of that evening.
I call it “Don’t want to look at the sunset”
Photograph by Greg Brave. Click on the photo to enlarge.
One more thing – you could say that I didn’t have to use flash but to take several exposures and combine them together in HDR. Yes, I could but in order to do that I had to use tripod and also if it was windy (even a little), it would be difficult to create a good HDR photograph. Taking into account that I had limited time as the sun was setting pretty fast, if I was using tripod I wouldn’t have time and flexibility to try as much different compositions as I did just hand-holding my camera.
I hope you liked viewing these photographs, and learned something new in the process.
I want to read your comments and your suggestions are always appreciated. If you have pictures of sunflowers that you’d like me to review, you can send them to greg at photopathway dot com and I’d be glad to do that here on my blog.
Remember you only have to enter your name to leave a comment!
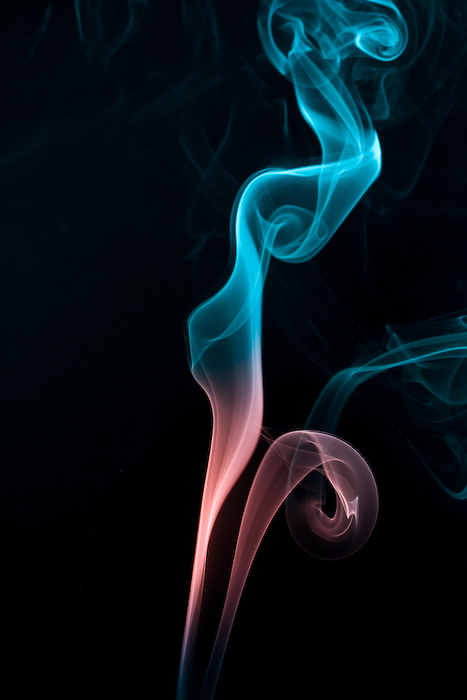
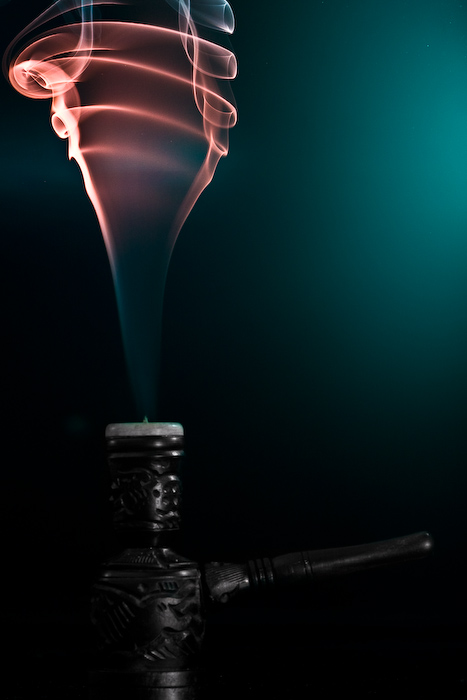
In every photographer’s evolution process comes a time when he tries to photograph smoke. As a result you can see many photos of smoke on the internet. Now my time has come!
As always I wanted to do something different with smoke, so that my photos will differ from most of what can be seen online. Common practice with photographing smoke is to photograph it with plain white flash and then add color to it in photoshop. But I decided to do it a little bit different – I used flashes with colored gels on them, so I received the colored smoke “in-camera”. That was not enough for me and I tried to use two flashes with different color gels pointing at different parts of smoke, and here you can see what came out of it:
Photo by Greg Brave. Click on the photo to enlarge.
The red flash had a gobo so that the light wouldn’t spill on the top blue part, and it was also stronger than blue flash so it would overpower the blue light spilling from above. Of course I didn’t get the result that you see in the photo above right away. It took me couple dozens of shots to achieve it.
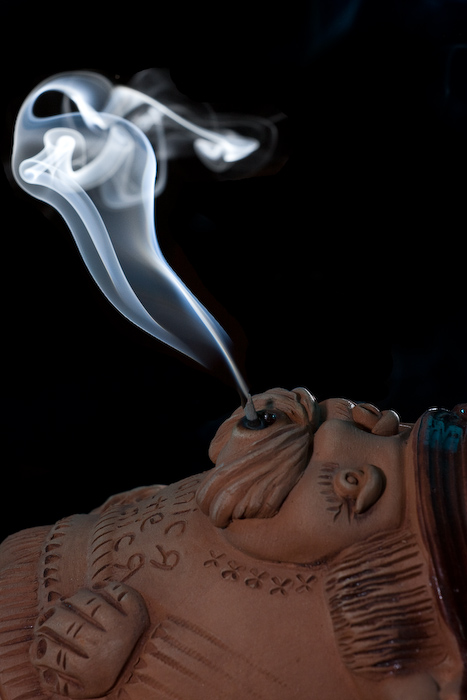
My next move was the following one – I thought that most of the beautiful smoke I saw online wasn’t “attached” to anything, so I tried to add a “source” to the smoke as you can see in the photo below.
Photo by Greg Brave. Click on the photo to enlarge.
In this photo I faced a technical issue – the flash power that I needed to properly light the smoke was too much for the “smoker” and resulted in overexposed lower part of the photo. I solved this issue by using again two flashes. The flash that was lighting the smoke was placed behind and to the right of the “smoker” and set to “high” power. Then I used a second flash to light the smoker, and placed it in front of the smoker and a little bit to the left. This flash was set to a much lower power and was directed in such a way that the light from it wouldn’t spill on the background (because I wanted a black background).
Here is another attempt of adding a source to the smoke.
Photo by Greg Brave. Click on the photo to enlarge.
For this shot I also used two flashes – one with dark-green and another with red gel on it. The red flash was placed from the left and pointed high up to light the upper part of the smoke, while the green flash was placed to the right of the composition and pointed to the lower part. In this photo I had a glossy background and you can see the greenish reflection of the flash in it. I tried to shoot this scene also with matte background but I liked this version more because it adds nice color touch to the overall dark image.
Continuing my experiments I placed two smoke sources and tried to blow on the smoke to create different shapes while I am taking shots of it. I got many interesting photos this way, and this is the one photo I chose to present here:
Photo by Greg Brave. Click on the photo to enlarge.
Strangely it reminds me of two opposite sex persons having a conversation. In this shot and two of the following shots I used two flashes with blue and red gels on them, placed from the sides of the frame pointed up at the smoke and away from the background.
This is pretty important – if you want your background to remain dark, you have to point your flashes towards the camera and away from the background. When I say “towards the camera” it doesn’t mean that flashes have to point straight into the lens, they just need to be pointed in the direction of the camera and, again, away from the background. This way, since the light travels in straight lines it won’t hit the background (unless it reflects off something, so make sure it doesn’t) leaving it black.
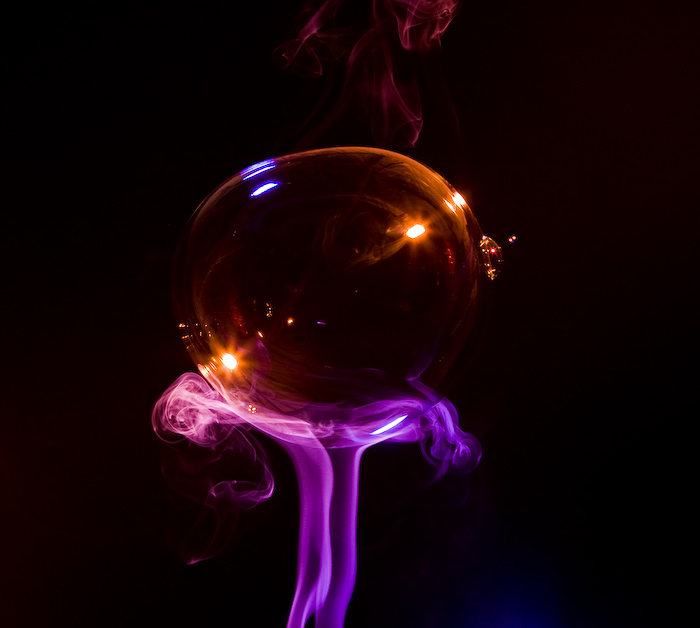
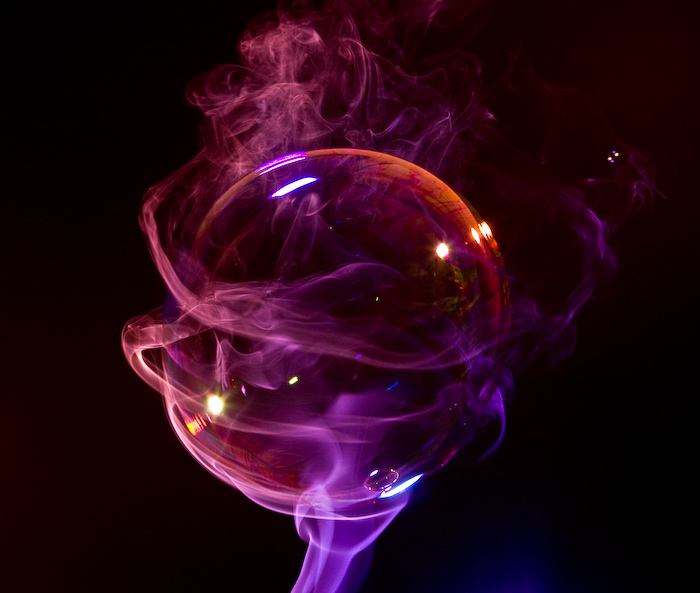
During the time that I was experimenting with smoke I was constantly thinking what more can I do to make my photos stand out. And one day, at work, my friend brought this childish toy to make soap bubbles. We had so much fun playing with it and remembering the days that we were kids… and then it hit me – I can combine smoke with bubbles to create beautiful images. At this point I started to visualize what can be done with smoke and bubbles, and the idea that I liked the most was to create image of a soap bubble resting on top of smoke pillar.
This was not an easy task to do, as I didn’t have anyone to help me shoot this. So here is what I did: I placed my camera on a tripod, and pointed it exactly at the area where I intended to “place” a bubble on top of the smoke pillar. I focused the lens on the plane of the smoke and changed to manual focus. Then I connected a remote shutter release cable so that I could stand away from the camera. Then I just made a soap bubble and tried to place it where I wanted, shooting in continuous mode during this whole process. Then bubble would pop, and after checking the LCD and seeing that I didn’t get any satisfactory results I would repeat the process.
Eventually, after way too many failures 🙂 here is what I’ve got:
Photo by Greg Brave. Click on the photo to enlarge.
This is pretty much what I had in mind. But in the process I also got the following image, and I like it much more than the image above. It looks like a planet in deep space…
Photo by Greg Brave. Click on the photo to enlarge.
One more tip if you decide to try this yourself – bubbles reflect everything, and I mean EVERYTHING around them. So after seeing myself being reflected in the bubbles, I had to wear black sweater and a black hat to eliminate my reflection as much as possible. I also turned off any additional lights in the room.
In the next, and last photo I tried a little different approach – I used only one flash but I shot it through umbrella in order to make my light source bigger. In the result below you can see that umbrella can be recognized in the reflection, but I still like this photo. I call it “Aliens!” 🙂
Photo by Greg Brave. Click on the photo to enlarge.
I hope that you learned something new from my experience with smoke and bubbles and it inspired you to try this yourself.
Comments, suggestions and critiques are welcome as always, and if you have any questions, technical or other, you can leave a comment or drop me an email to greg at photopathway dot com
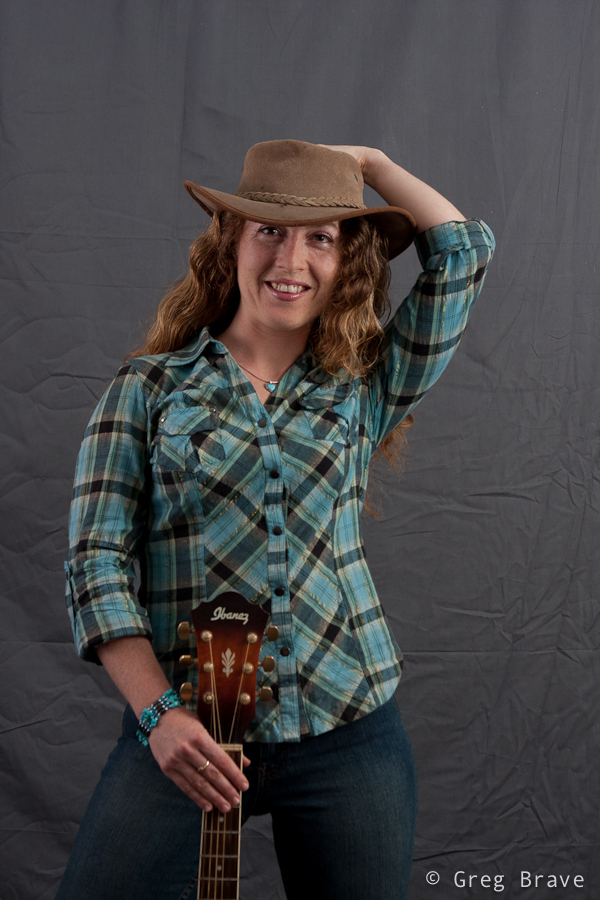
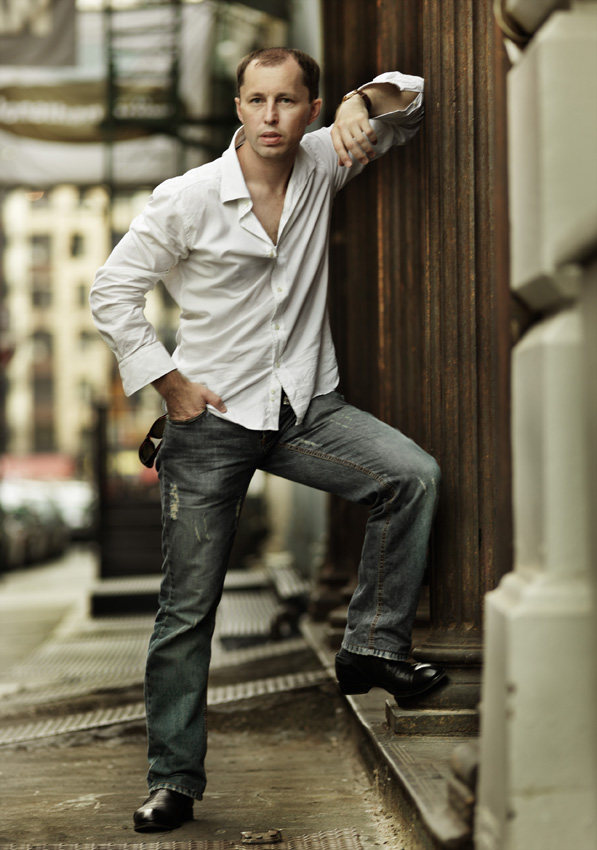
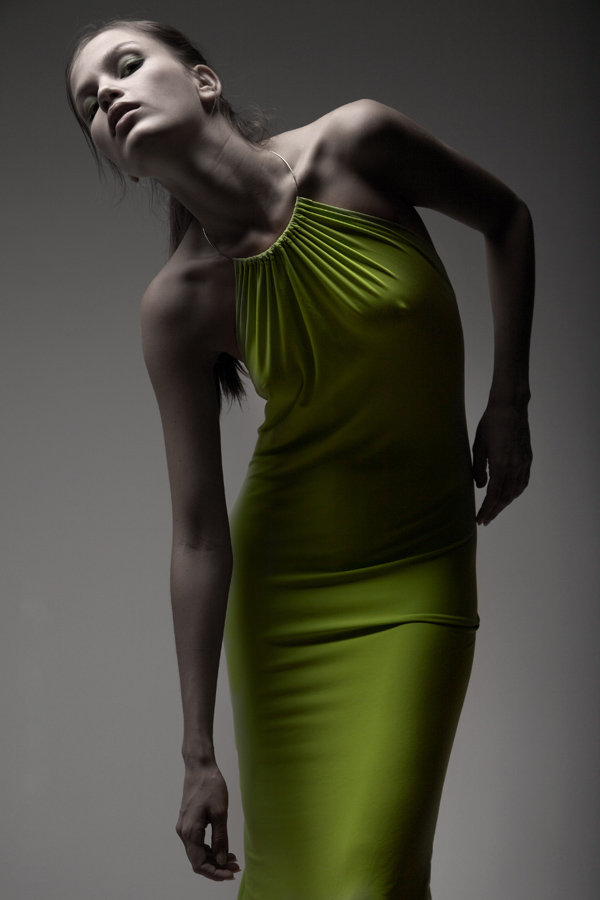
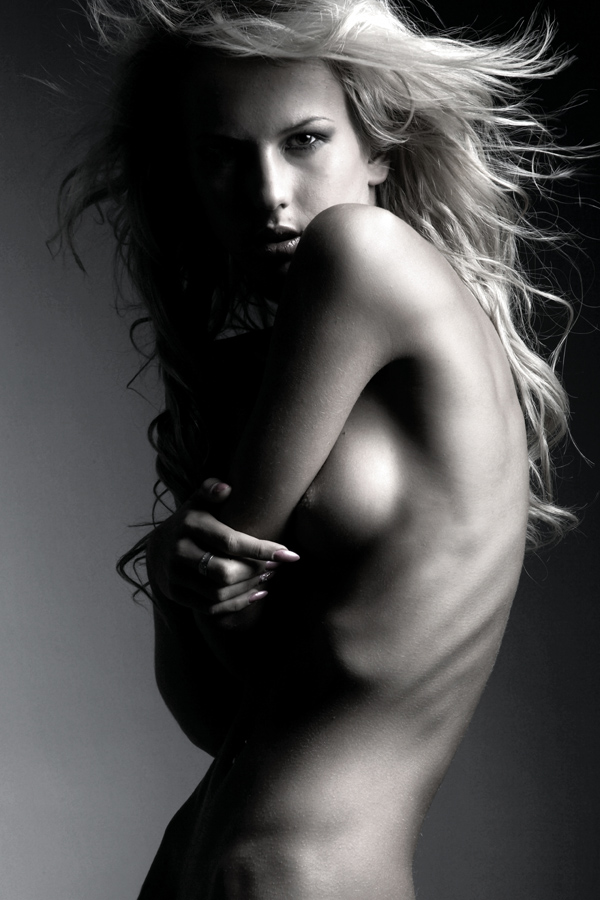
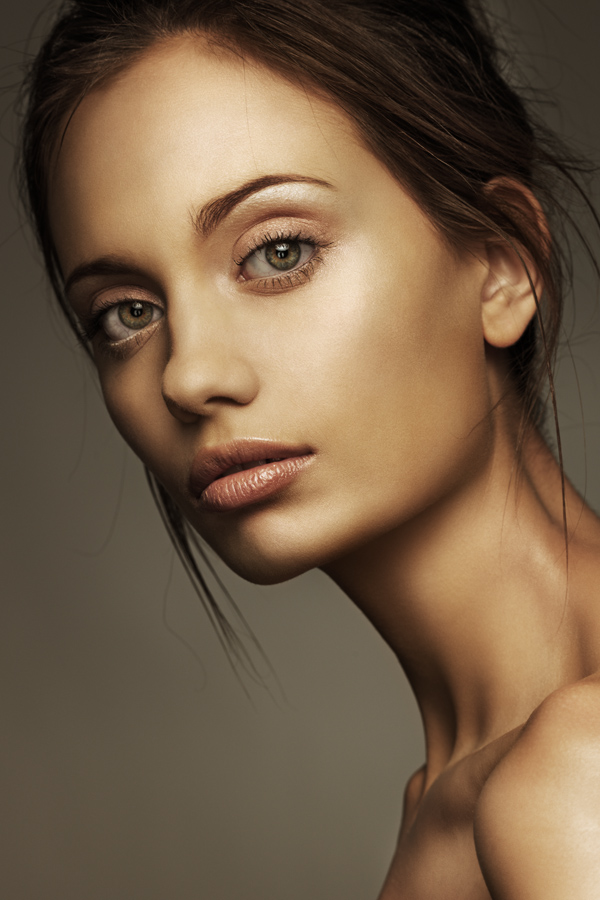
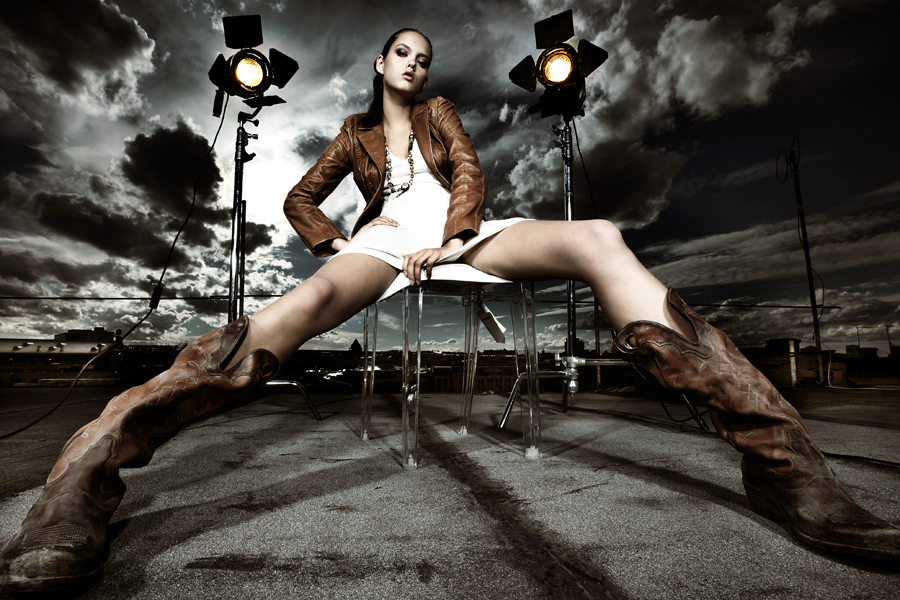
Oleg Igorin is a fashion photographer currently working in New York. He has a pretty busy schedule but he was able to make time for this rather short interview. In compensation I get to show here quite a lot of his magnificent work!
Oleg Igorin. Click on the photo to enlarge.
First of all a little about you.
5 years ago, in Moscow, I bough a compact digital camera and started photographing. My first models were my friends. In time I got many clients, and it allowed me to set up my own large studio Moscow that gradually turned to my own rental business. Half a year ago I decided to move to New York, which is the capital of world’s commercial photography, and now I am working on creating my own studio and making connections with people in fashion industry
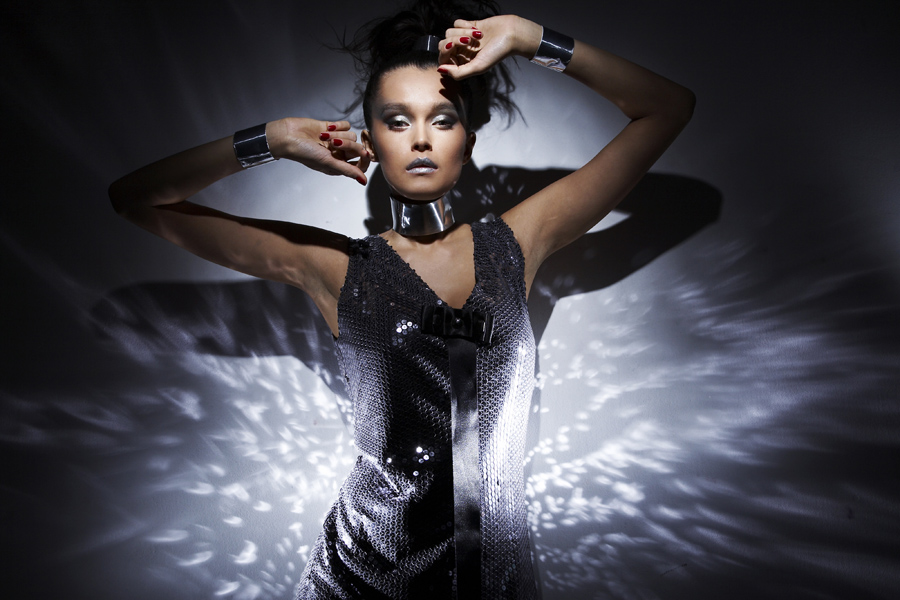
Photograph by Oleg Igorin. Click on the photo to enlarge.
Were you always interested in fashion photography or this interest developed over time?
Yes, I was always interested in fashion and beauty photography. I liked to paint and now it helps me to feel better the photographs that I make.
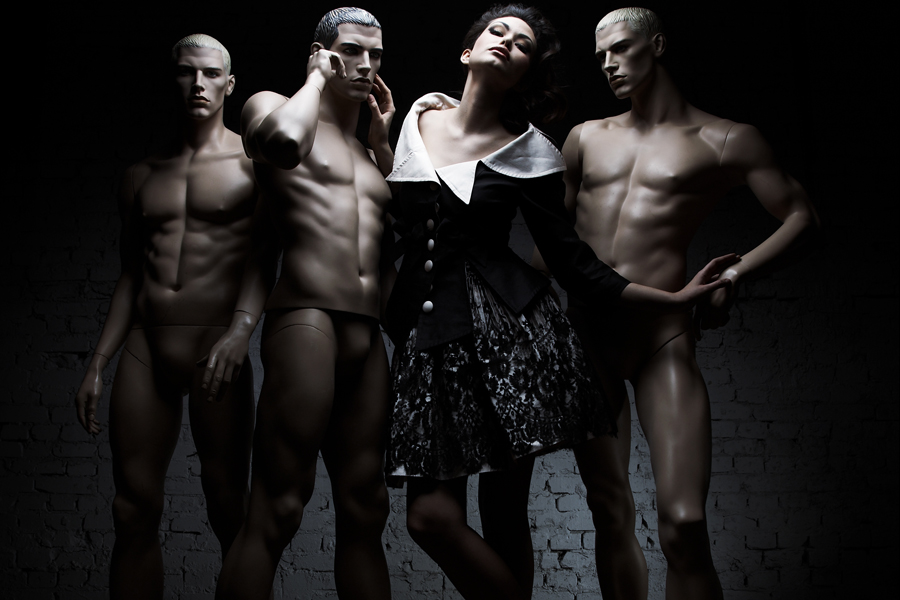
Photographs by Oleg Igorin. Click on the photo to enlarge.
How would you describe your photographic style?
With my work I want to show the beauty of people and fashion.
What does it take to be a fashion photographer?
It is very hard work that takes most of my time. But this is also a very interesting part of my life.
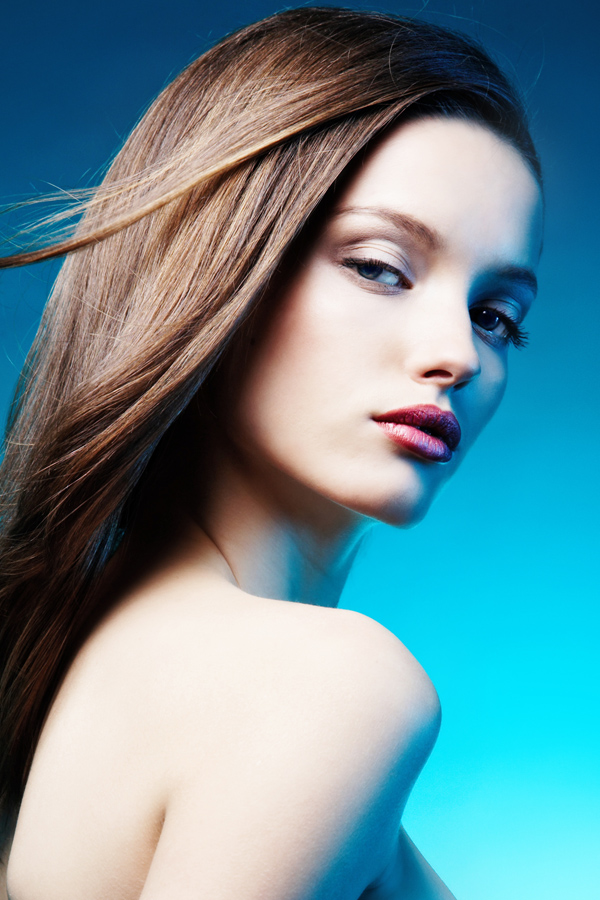
Photographs by Oleg Igorin. Click on the photo to enlarge.
Do you find your models or models find you?
Models are the part of my work. They appear when I need them.
Photograph by Oleg Igorin. Click on the photo to enlarge.
And now to more technical questions.
When you are photographing your models on the streets of New York city, how do you do that? I mean do you just take the model out on the street, take out all your gear and shoot ignoring the people around you, or you make certain preparations, ask people not to interfere?
New York is very “photographed” city and shooting on the streets doesn’t take a lot of people’s attention. For me it is much more interesting to take shots not in touristic places, but in the real New York – places that are usually not crowded.
Photographs by Oleg Igorin. Click on the photo to enlarge.
Where do you prefer to shoot – in your studio, or on location, and why?
I like studio, and I also like outdoor shooting. But I don’t like shooting in interiors. I don’t like it when a certain interior “forces” it’s story on my work.
Photograph by Oleg Igorin. Click on the photo to enlarge.
What photo and lighting gear are you using?
I use Hasselblad H3D-II 31MP, and for lighting I use Hensel equipment.
Can you share with us some of your favorite lighting techniques?
I like to experiment with lighting techniques, making a lot of discoveries every day. And I think that every photographer needs to do the same.
Photograph by Oleg Igorin. Click on the photo to enlarge.
What advice would you give to beginner photographers that want to start in fashion industry?
One of the best way is to work as an assistant of fashion photographer. You will get experience, connections and self-confidence.
Photographs by Oleg Igorin. Click on the photo to enlarge.
Thank you Oleg for your time and for sharing these great photographs with me and my readers!
Greg.
Starting to work with lighting the first thing you hear is that you have to work with off camera flashes. So you get a flash sync cord. But then you want to have two, three, or more flashes in your setup and encounter the problem triggering them all at once.
Then you find out about the wireless flash triggers and start looking into that. The first wireless trigger you find is the “Pocket Wizard” which is the most popular but costs a fortune, and you say to yourself – “I can’t afford this luxury of wireless triggering my flashes”.
And finally you find this post, where I write about my cheap wireless triggers 🙂
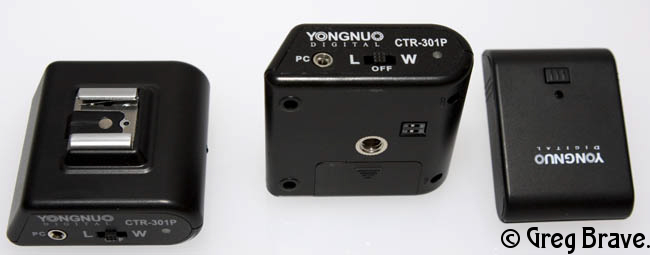
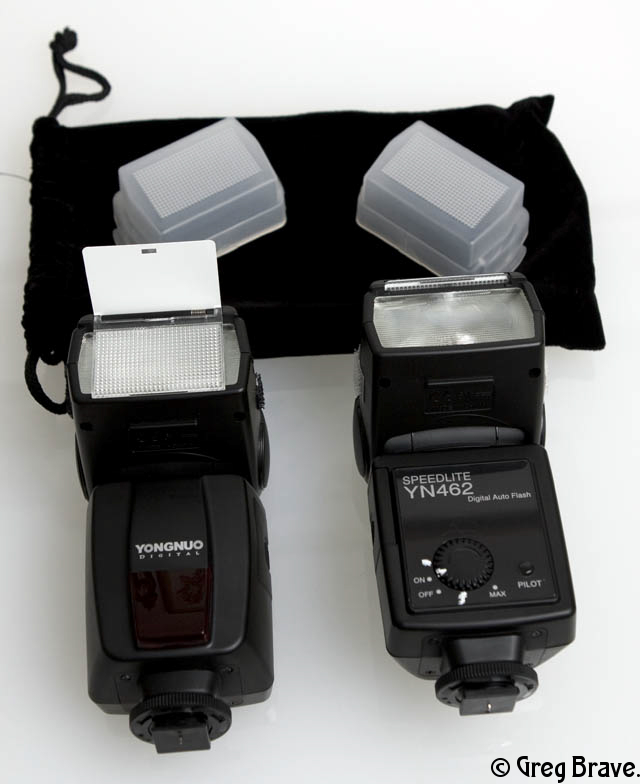
I found a cheap solution for wireless triggering my flashes. Same company (Yongnuo) that manufactures the flashes I wrote about, also makes wireless triggers for flash devices. They are cheap and have a 30 meters working range.
You will have to buy one transmitter, which goes on camera, and as many receivers as the number of flash units that you have. For example a bundle of one transmitter and two receivers on Ebay costs about $52.
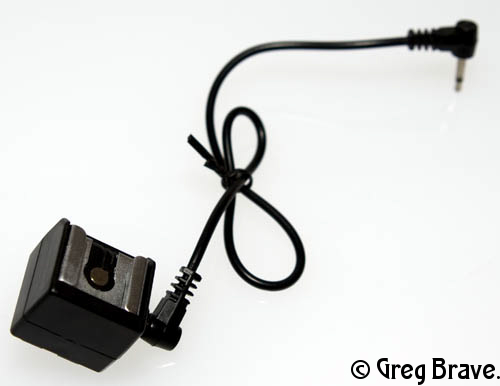
Their single disadvantage for me was that the receiver has only the regular tripod mount (as you can see in the picture), but I needed it to have the hot shoe mount. In order to solve this problem I bought flash sync hot shoe adapters ($12) for each receiver (see the photo below). However there are similar wireless flash triggers (also Chinese and cheap) that come with hot shoe mount.
I mount the flash on the flash sync hot shoe adapter and connect it to the receiver with PC cord.
Additional advantage of these wireless flash triggers is that they can trigger the flash in two ways:
1. From the transmitter that you put on your camera.
2. From any other flash that fires in their line of sight.
Disadvantages of these wireless flash triggers may be in the build quality. I am working with them only couple of months (and they worked good until now), and I have no idea for how long they will function properly. Compared to pocked wizards their working range is pretty short but personally I never encountered (or could think of) a situation where 30 meters weren’t enough for me.
In conclusion I think that these triggers are perfect for beginners, and who knows, maybe I won’t ever consider upgrading to anything else.
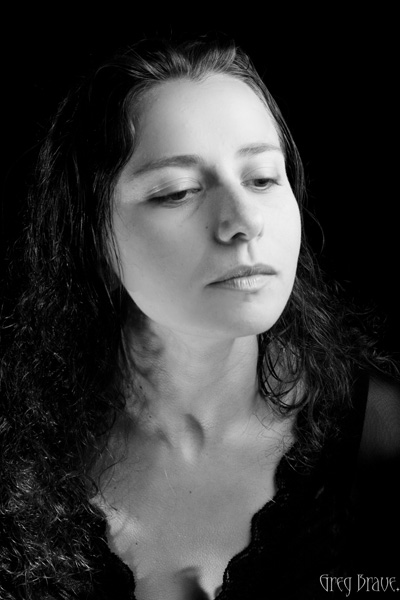
As a result of my interest in working with light in photography I am starting to get interested in portraiture. From time to time I stumble across a good portrait on the net and find myself thinking about how photographer achieved the final result, and what things he had to consider before making the portrait. I also think about the lighting techniques used in different portraits. Finally I decided to give it a try myself. In the following photos you can see what came out of it.
My lighting equipment was pretty simple: Two flashes (Canon 430EX and Yongnuo) One flash was used as a main light placed on a light stand shooting through umbrella. Second flash was also on a stand but without umbrella used mostly as fill light or hair light. I had a piece of black fabric for the background, but in any case my ambient light was pretty low and most of the light came from flashes.
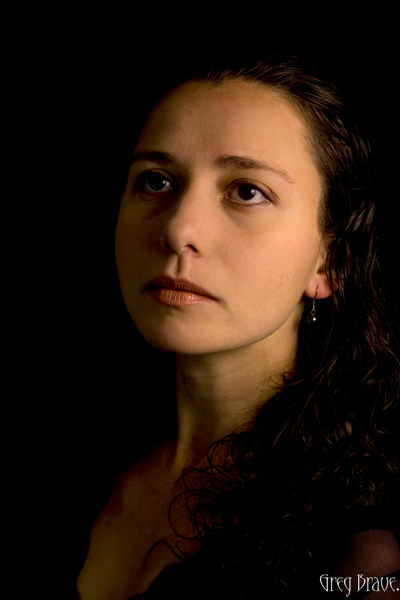
This portrait is pretty straight forward. I think that my lighting is a little harsh, and I don’t have a hair light from the left/top to separate the model from the background. I could say that I intended it to be that way… but I didn’t 🙂
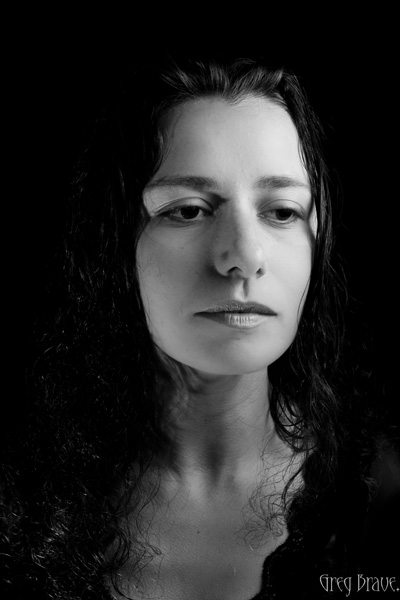
In the next two photographs I experimented with different facial expressions that in my opinion suited the model. I chose B&W because of two main reasons:
1. There were not many colors in the scene anyway, and I wanted to make the viewer concentrate on the expression of the model.
2. I confess – I couldn’t achieve the skin tone that I wanted.
I noticed an undesirable shadow near model’s right eye only after the shoot so I couldn’t do much about it, but I sure will pay more attention to this kind of details in the future.
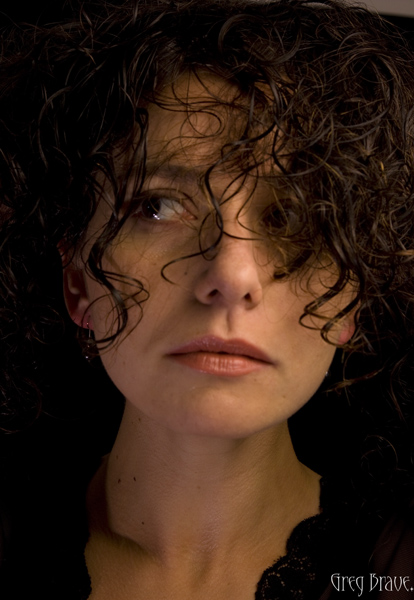
While shooting I asked my model for different poses (even though it was a strictly portrait shoot, I think that pose affects the facial expression), and at first I took all the control. What I mean is that I told her what to do, where to look, where to turn her head, etc.
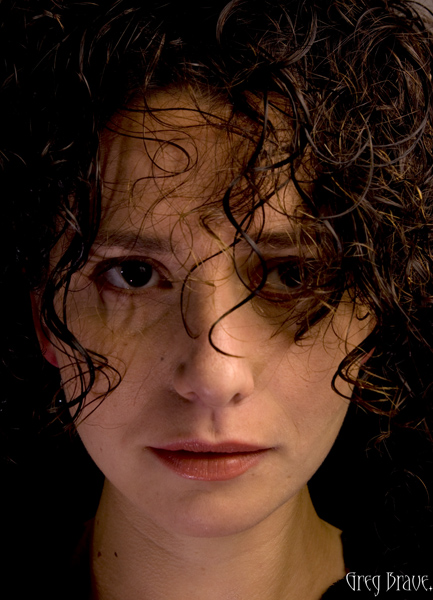
But at some point I told her to feel free to do what she wanted, to pose as she would like to be photographed herself. And it was the best decision I ever made in that shoot.
Just look at the following photos.
And as she got more relaxed I could get more interesting photographs. Here is an example of one, which I especially like:
I felt great after this photo session because finally I got to try something that I thought a great deal of. I doubted that I could get any satisfactory results. And though I do understand that I have a long way to go from here, I still really like these photos and they keep me motivated to continue improving my skills.
I will be more than grateful for any comments or suggestions. Feel free to comment on my work – it will help me and other readers a lot!
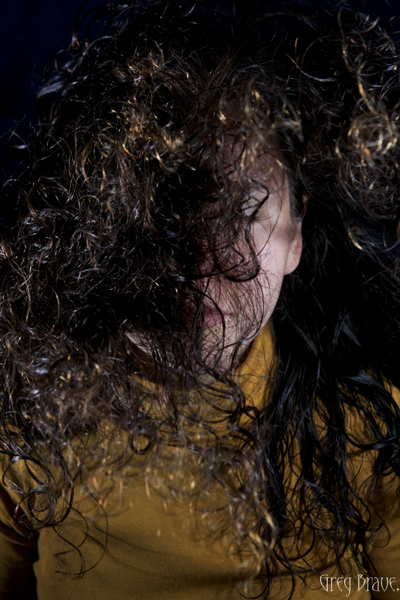
And here is one last photo from that photo session:
After I wrote several posts about lighting (Light Study I, Light Study II, Patterns and Light Study), I received several responses from my readers saying – “You have up to three flash units in your setup! That is expensive. Not many amateurs who would like to experiment with lighting can afford that.”
Well, this is not exactly true. I agree that Canon flashes are expensive (even second hand), for example I bought my primary Canon 430 EX flash second hand for about 240 USD, and Nikon flashes are in the same price range. There are additional known brands that are a little cheaper but still expensive.
But I found really cheap flashes on e-bay from Chinese company named Yongnuo. Two of them cost me on e-bay only about 95 bucks (for both). Now you have to agree that this is cheap and much more affordable than branded flashes.
Of course there are pros and cons to such a purchase. Let me list here some of them:
Pros:
Price. Very affordable flash units.
Flash comes with diffuser dome, built-in bounce card, and wide angle cover (see on the photo below)
Flash head can be rotated in all the common directions almost the same as Canon/Nikon flashes.
The output power of the flash can be controlled (but look at the “Cons” section also)
GN number – 33, which means that this flash is pretty powerful.
Cons:
Recycling time of 5 seconds. My Canon 430EX recycles at about 2.5 seconds with Ni-Mh batteries.
No ETTL controls (so that flash power has to be set manually)
No flash zoom adjustments.
Power is controlled by turning wheel (see the photo below) and not digitally, so I can’t set, for example, exactly 1/2 power. I can do it only approximately.
No PC sync connector (but actually my Canon 430EX doesn’t have it either).
I am also not sure about the build quality. What I mean is that externally this flash looks good, but I don’t know how long it will work. Until now I have been using it for two months and didn’t have any problems.
Looking at the pros and cons, I can say that some of the cons are not that important to me – for example the fact that there is no ETTL controls doesn’t bother me because I always work manually with these flashes. I use them primarily as off camera flashes with remote trigger. If I have to use flash on-camera, I use my Canon 430EX. No flash zoom adjustments are also not that important – if you put your flash behind an umbrella or put a gobo on it – the zoom doesn’t really matter. Even without all this, you can just vary the placement distance of the flash.
I would like to warn you again – I can’t guarantee that the build quality of these flashes is the same as the branded ones. It probably is not. But in my opinion for beginners they can be a perfect start.
In conclusion – if you have the money buy the good and proved branded models, but if your budget is limited like mine and you still want to learn how to work with light, these Yongnuo flashes are good solution for starters.
The white marks that you see near the power wheel are made by me.
In my next post on lighting I will talk about my remote flash triggers. So everyone interested – stay tuned!
If you got interested in these flashes you can visit the e-bay store where I found them. This is not an advertisement, I am not affiliated in any way with that store and don’t receive any benefits if you buy there.
This time I was inspired by some abstract photographs I saw on the net, and wanted to try and do something abstract (or almost abstract 🙂 ) myself. For this shoot I used Canon 100mm F2.8 Macro lens, and two flashes with gels on them. The colors that you see on the final photographs were not edited in photoshop. I achieved them only by lighting, and of course this Canon macro lens is great!
As I said I wanted to achieve abstract photographs with certain aesthetic value main goal being my personal study of light techniques. First of all I needed a texture, so I walked around my apartment and searched for something suitable. Eventually I found a big blue plate with interesting ornament. Then I filled it with water (since the plate wasn’t deep, I had to be careful not to spill). Finally I had to decide on lighting. Because the plate was blue, I decided to choose a matching blue gel on my main flash to the right of the stage. I also wanted to have more than one color in the frame so I added another flash with pink-red gel to the left and a little behind the stage. I set the second flash to lower power than my main flash. Both flashes were with gobos (if you don’t know what gobo is, read my previous post).
The first photograph (from the left) is simple this plate with water (which is not seen). You can see that the strong foreground blue color slightly changes to purple towards the back due to the second flash coloring. And also because I was using a macro lens from close distance, the depth of focus is pretty low.
Then I thought of making some splashes in the plate and see what happens. Everybody saw at least some photos with water drops and ripples, so I thought that I can also try some of that, and my second photo shows one of the many interesting pictures I got.
When I had enough of playing with splashes, I added a sunflower petal to the picture and dropped a small water drop on it. Now I had to change my secondary lighting because the petal was yellow, and red light didn’t do it any justice. After experimenting I finally decided to put very light green gel on my secondary flash, and it resulted in emphasizing the yellow color of the petal with light and gentle shades of green. Third and fourth photos were taken with this setup (left flash on low power with light-green gel and right flash with blue gel).
And finally the fifth photo was taken using only the left flash with light-green gel on it. I worked on this photograph for quite some time to achieve the deep interesting shadows.
As always any comments and your own experiences are welcome!
Finally two additional flash units that I ordered on e-bay arrived and I could experiment with more than a single light source. Now I have one Canon flash (430 EX, bought second hand) and two Yongnuo flashes. Yongnuo (full name is Shenzhen Yong Nuo) is a Chinese company, which makes photographic equipment. They sell many products, which can be cheap replacements for the branded expensive Canon or Nikon stuff. For example these two new Yongnuo flash units cost me less than one Canon 430EX second hand! Anyway I’ll talk about the equipment in another post.
Basically what I was doing in this photo-session is placing light sources differently, shooting the picture, and looking at the result. My aim was to be able to predict how the image would look like so in the future I will be able to first visualize in my mind certain composition and then consciously achieve it using my light sources.
At first I couldn’t get any result that would satisfy me, my light was too scattered around and uncontrollable. Then I understood that I need more directional light, so I created gobos. This is something I learned from Strobist. You know that website right? If you don’t and interested in light, you definitely should visit it.
Anyway gobo is a simple cardboard rectangle box that you can do yourself. You then place it on your flash so it directs the light from it in one direction. And this helped a lot in achieving more predictable and neat results.
In addition I used colored gels on my flashes. Gels are transparent colored plastic stripes that you put on the flash to make its color different from daylight. By the way, there is one trick I learned myself in the process: if you use these gels, and work with auto white balance, your camera may try to adjust its white balance incorrectly since there is too much colored light in the scene. My solution was to put the white balance to “daylight” and that solved it.
And now to the results I received, and what I did to receive them:
In the first photo (from the left) I used two flashes. Both flashes were with gobos. The flash on the right side was without gel, and I pointed it more to the “base” of the light bulb. The flash on the left side was equipped with red gel and gobo, and was pointed a little above the lamp. This way I got less specular highlights on the light bulb. Both flashes were on manual control and placed approximately at the same distance from the subject, but the power of the left flash was weaker. This way I tried to achieve the feeling that the light bulb is glowing with red light.
In the second photo the setup was essentially identical to the previous one. I just added blue gel to the right flash. While this added interesting color to the photo I tend to like the first photo better because in my opinion it better achieves my goal – getting the light bulb to glow with red color.
Next two photos are of a champagne glass lighted with the same two flashes (still having gobos on them) left flash with red gel and right flash with blue gel. The difference now is that I put the left flash on minimum power so there would be much more blue and only a touch of red. Of course I achieved the result you see in the photos by trial and error.
One more thing to notice is that the background is almost completely black. This is not because I had a black backdrop. Actually my background was plain white wall, but all my light was directional (thanks to gobos) and none of it got spilled on the background. And since I worked with exposure settings that were too “low” for the ambient light in the room, as a result the background was heavily underexposed. If I wanted to have a background, I could use my third flash to light it.
That’s it for today’s photo-session. If you have any questions or comments, please feel free to leave comments here or drop me an email and I will be happy to get back to you. And, of course, your own experiences will be highly appreciated!
Just one more thing – don’t forget to visit the Strobist web site – I learned a lot there and sure that you would too!
Recently I have built a photographic table in order to improve my photographic skills, and now I am studying light and compositions. By studying I mean reading some books, looking at many photographs from a good photographers, and, of course trying to shoot myself.
In this photo session I was trying to create a repeatable pattern from some cups that I have. I saw that I could arrange them in some interesting ways but something was missing from the overall composition. After a long hard thinking and trying I finally came up with the idea of grapes. When I added grapes to the composition, I felt that they contributed a lot and I tried to arrange them in various shapes. By the way, I had to wash these grapes pretty hard in order to get rid of any dirt and fertilizer remnants.
In the first two photographs you can see two of the most successful patterns I could come up with.
However I had one more problem during my shoot – the Light. I had only one flash and it was without any diffuser, so I had to find a right place for it, so that the final lighting would be satisfactory.
I finally placed the flash on a stand on the right side of the composition, about a meter above, and not facing directly to the subjects but pointed “above” them, hitting a white wall behind.
You can see that the shadows inside the cups in the second photo are going rather steeply down as a result of flash placement. I also had to shoot my composition at such an angle that these shadows (inside the cup) wouldn’t be too harsh and too visible.
Another important thing composition-wise was to make the reflections remain in the frame, which gives additional dimension to the final photograph.
In the third photograph I tried to create another interesting form. Originally this photograph isn’t as tightly cropped, but putting it in this slideshow somehow cropped it. I am still new to making slideshows like that, and I will have to figure out why it happened.
Will be glad to hear any opinions and to answer any questions regarding these photos.