Sometimes, after shooting portraits, when I look at the photos, I see that in some of them the persons’ iris is too dark. In that case I want to brighten it (obviously 🙂 ). To do that, in Lightroom 3 I used to choose the adjustment brush, bump up the brightness slider a little bit, and brush the eyes. This presented a problem because it would brighten up everything I “brushed”, so I had to be very accurate with the brush and the process took quite some time considering I would do it to many photos.
Luckily Lightroom 4 improved the overall processing workflow and now I can do it much faster and more efficiently. So If you have Lightroom 4 and want to brighten up a bit eyes of your models here’s a quick and easy way to do it.
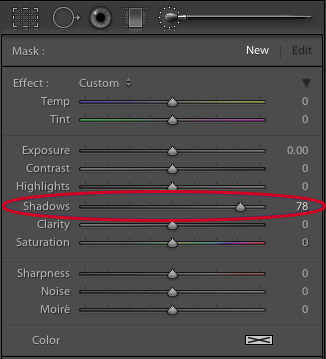
1. Go to develop module in Lightroom and select the adjustment brush:
2. Increase the Shadows slider quite a bit, but make sure that all other sliders are zeroed out.
3. Brush over your model’s eyes quickly, not trying to make the exact selection.
4. Adjust the Shadows slider to taste 🙂
What happens is that the Shadows slider brightens (or darkens if you slide it to the left) only the darks, and usually around the area of the eye, the iris is the darkest part. The eyelashes and the pupils are completely black and Shadows slider doesn’t affect them. So if you accidentally select a small portion of the white of the eye, or the skin, they won’t be affected by this adjustment.
Here’s an example of before and after using this technique
Before (click to enlarge)
After (click to enlarge)
I hope you will find it useful, and be sure to let me know how you go in the comments section below!
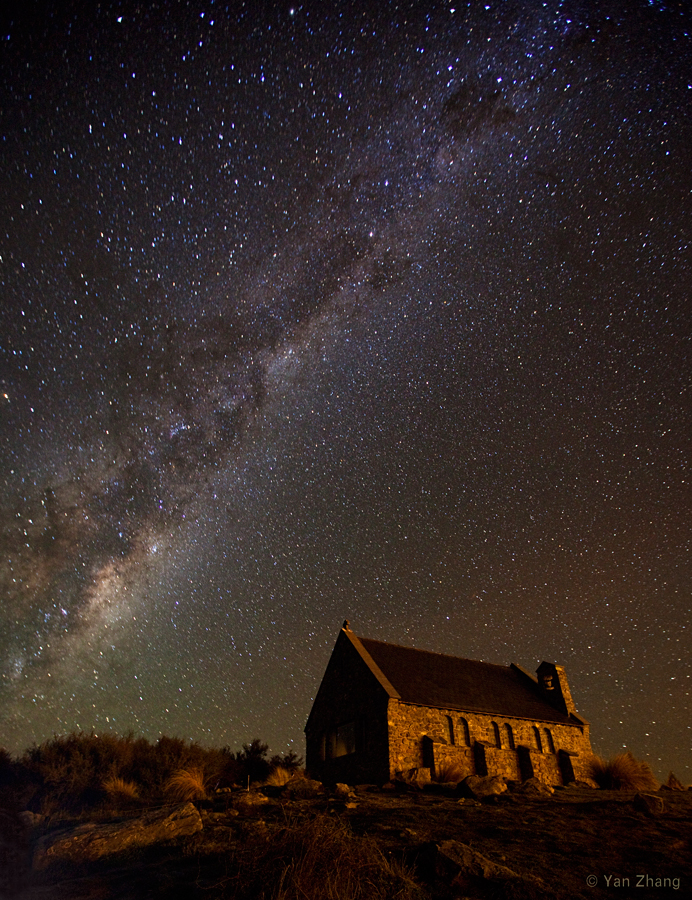
I first saw Yan Zhang’s photos on 1x.com and I loved them. Then I followed the link to his own website. Needless to say – I wasn’t disappointed. Yan is a very talented and passionate nature photographer. Luckily for me and you, my readers, he kindly agreed to an interview for Photopathway.
Ladies and gentlemen please welcome Yan Zhang !
Click on the photo to enlarge.
Tell a little about yourself. What do you do for a living?
I am a computer scientist, currently working as a professor in University of Western Sydney. I have been in academia in last 16 years.
How did you get involved with photography?
Well, this is an interesting question. I had a manual SLR camera before 2007, but only used it when I travelled. In 2007 I noticed that digital SLR cameras had become more and more popular, and I decided to buy one as well. I just went to a camera shop and asked which camera was good. The shop owner showed me Canon 400D, and said this was the best camera so far. So I bought it :).
Since I had my Canon 400D, I started to shoot around and during traveling. Sometime around 2008, I developed a deep interest in landscape photography, and since then, landscape photography has become my unique focus in photography.
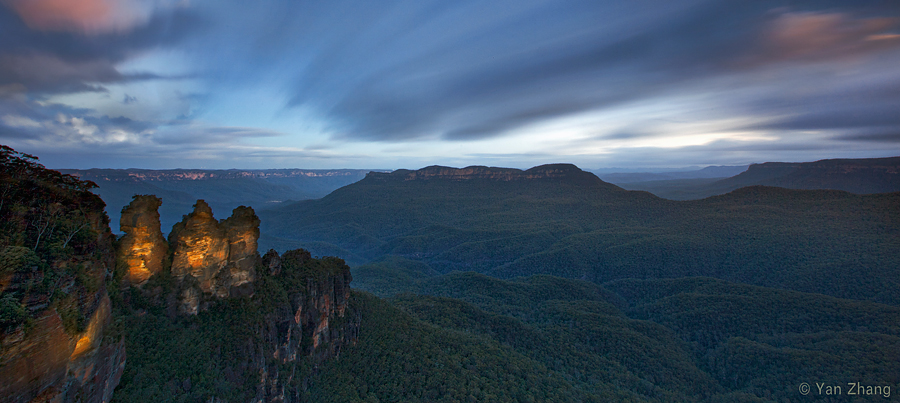
Photo by Yan Zhang. Click on the photo to enlarge.
Your landscapes are magnificent. How do you choose your locations?
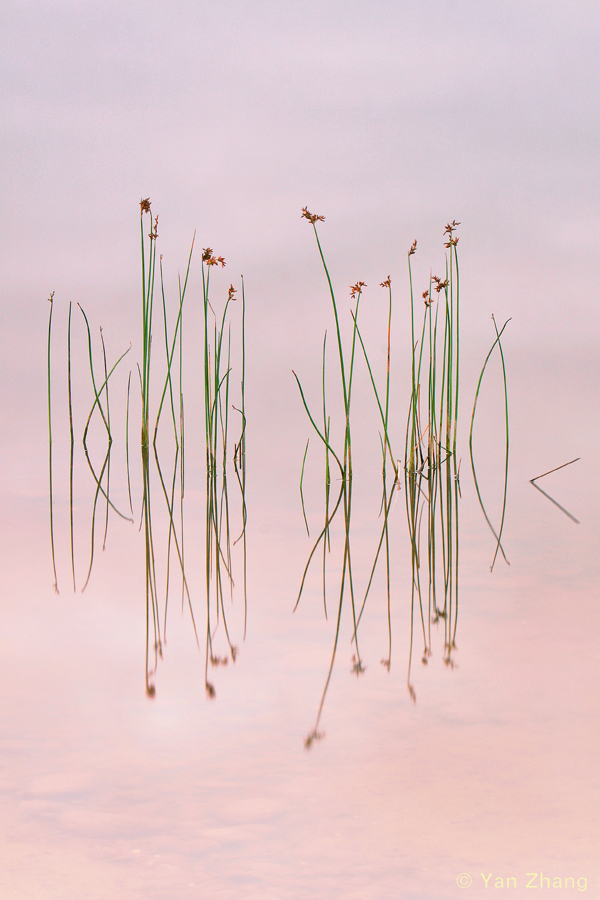
I think locations for landscape photography are not as hard to find as people usually think, except for those extreme places. In fact, some of my landscape photos were taken just around my home or my work place. For instance, the following photo (Reeds) was the first photo I sold since I had my first digital SLR camera in 2007 and it was taken at an unnamed small pond near my home. The next photo (The Touch) was taken in my university campus this July.
Photos by Yan Zhang. Click on the photo to enlarge.
In general, I always pay special attention to subjects that have certain characteristics. Once I found something attracting me, I then imagine whether it would look interesting under suitable light and weather conditions. Photograph “The Touch” was made this way: In order to capture the best light and sky, I went to this location more than 30 times within 3 months.
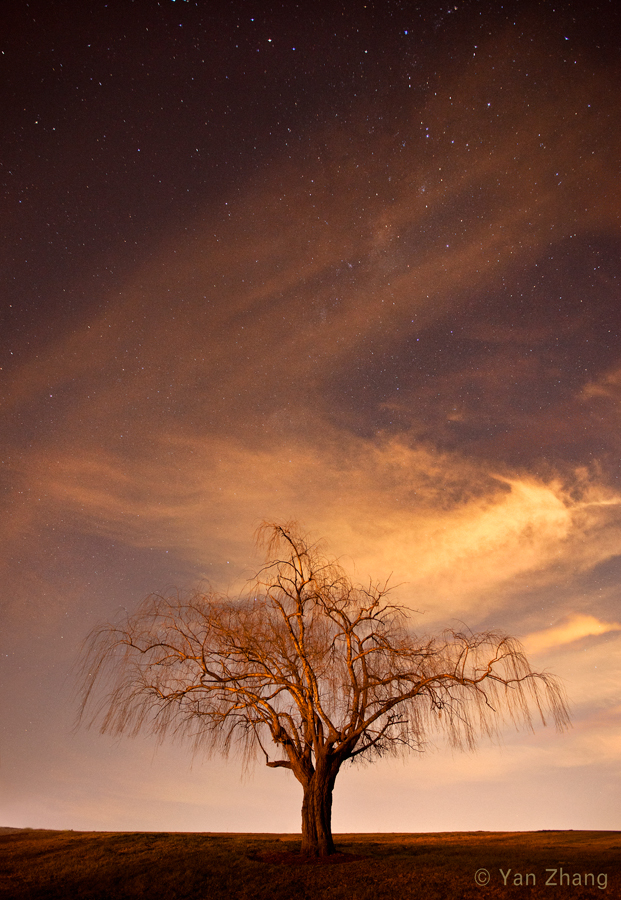
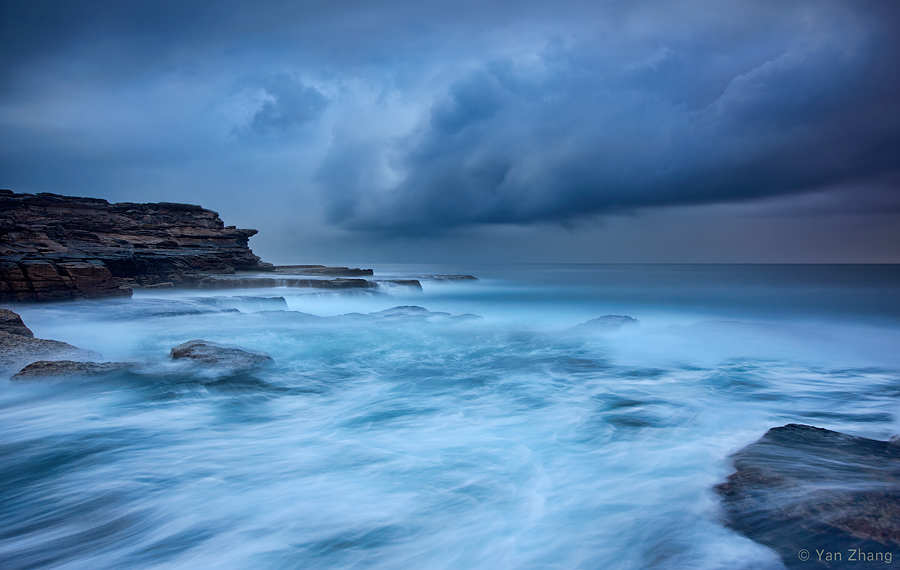
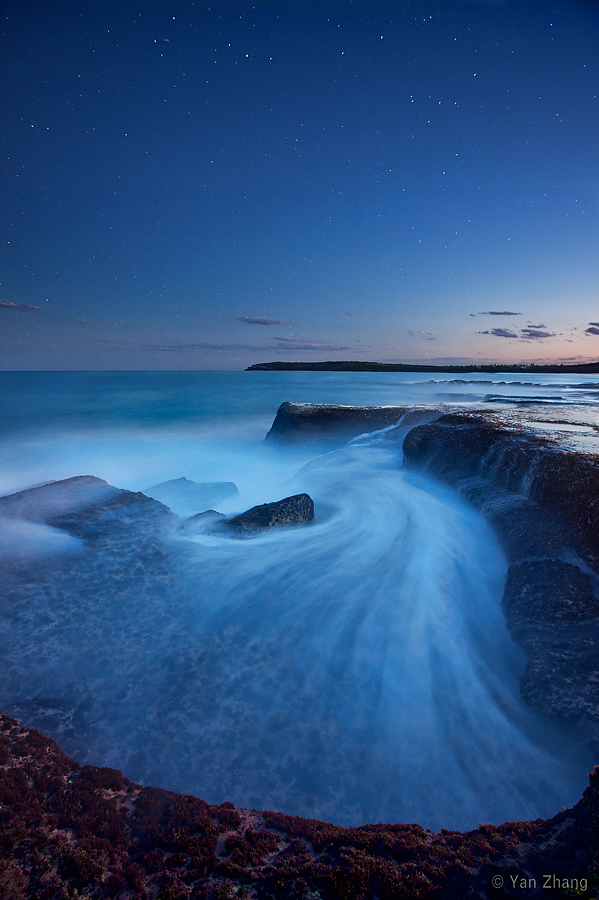
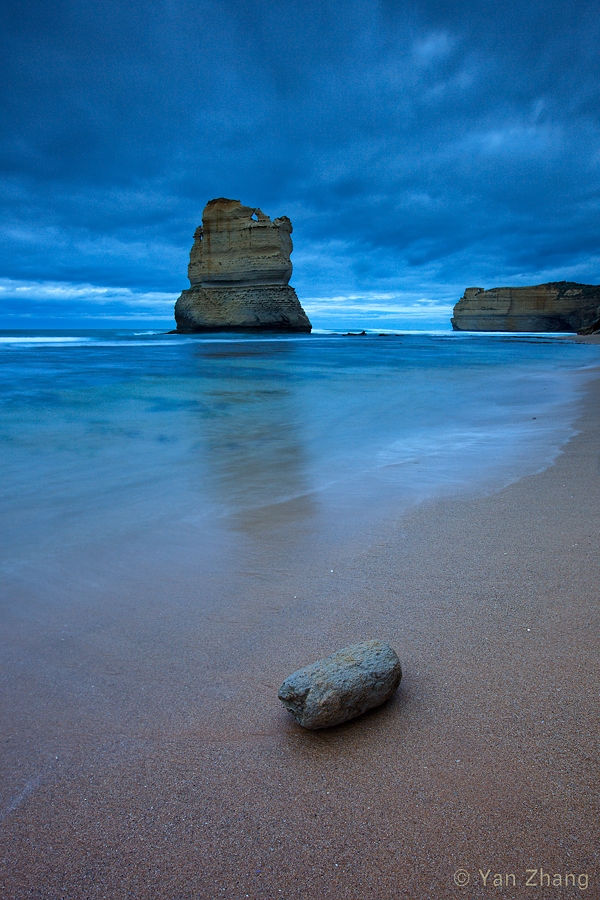
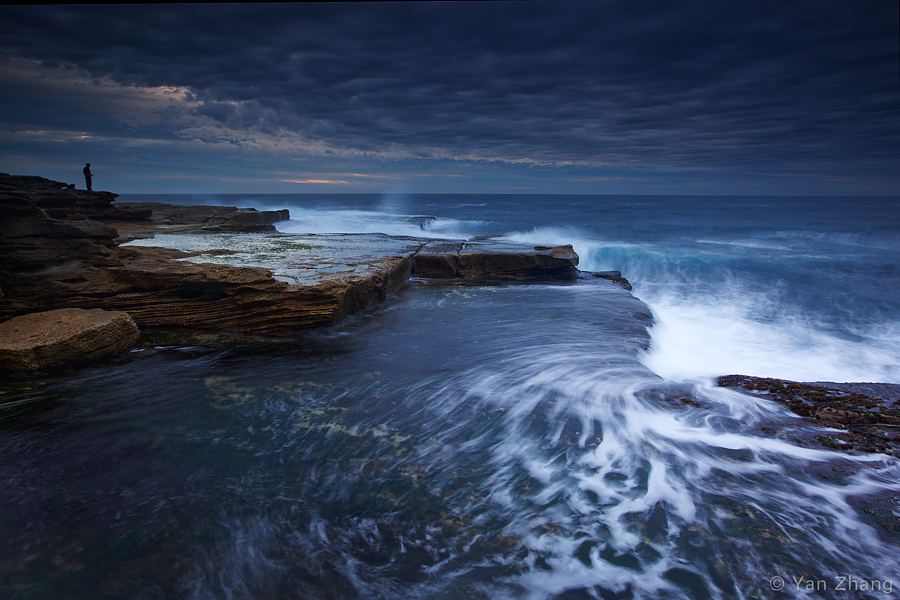
Since I am living in Sydney, I think I am very lucky to have the access to beautiful coast areas near Sydney. The following images were made on the East Coast of Sydney this year:
Photos by Yan Zhang. Click on the photo to enlarge.
Nevertheless, most landscape photographers believe that travelling to those unique places probably is essential to make original and stunning photographs. In recent years, I have travelled a lot to several places overseas to make photographs. China and New Zealand are the two special countries that I go for my landscape photography, because these two countries have many unique landscape locations and are relatively easy for me to travel to.
When you are planning your trip abroad, to the place you’ve never been before, how do you decide on your photographic locations?
This is a hard task indeed. Usually, I do a lot of research before I go. Looking at other photographers’ works on those candidate locations is very helpful. Traveller’s guide is also another information source. However, sometimes I think it is more important to discover some places that haven’t been considered by other photographers. In that case, it takes me a lot of time to find such interesting places abroad. However, once I found one, I would come back again and again to make good photographs.
Photo by Yan Zhang. Click on the photo to enlarge.
Where do you draw your inspiration? What motivates you?
I have a deep passion for the nature, which always motivates me to experience such a pure beauty only existing in the nature’s wilderness. For a very long time, I knew that I was so passionate about the nature, but somehow I did not know how to express that until I started landscape photography in 2007. For me, I think photography probably is the most effective way to get close to the nature.
Do you hike and photograph alone, or you have a partner?
Most of the time, I travel only with my camera and make photographs alone. However, since I’m living relatively close to Blue Mountains area of Sydney, almost every weekend, my wife and I spend one day hiking in the Blue Mountains. Sometimes I take my camera gear with me on our hike.
What photographic equipment do you use?
As I mentioned earlier, I started with Canon 400D, then in 2008 I bought my Canon 5D Mark II full frame digital SLR camera. Now I am still using it. Since I only focus on landscape photography, filters are critical to my photography. I use both Lee and Singh Ray graduated ND (Neutral Density) reserve and graduated ND filters. I also use CPL (Circular Polarizer) filter sometimes for certain subjects such as waterfalls.
For landscape photography, I think that having a complete filter system and mastering it in practice are very critical to achieve high standard landscape photographs. A stable tripod is also essential.
Photo by Yan Zhang. Click on the photo to enlarge.
How do you post process your photos? What software do you use, and what are the main adjustments that you perform?
I believe in the principle of “getting it right in camera in the first place” in my photography practice. During the process, I always put great efforts in the field to make proper shots. Nevertheless, post process is an unavoidable procedure in current digital photography. I always shoot in RAW format and process in Photoshop CS 5.
Generally speaking, my approach to photo adjustments in CS 5 is quite standard: first open raw file in Adobe Camera Raw, perform necessary adjustments there, then load it to CS 5 to perform further adjustments, such as using layer masks, curves, contrast, etc., to adjust the photo to meet my vision.
However, from time to time, I apply a specific Photoshop technique to do a certain adjustment. It is called Tony Kuper (TK) Luminosity Mask technique (http://goodlight.us). It is a very powerful technique allowing you to do some very subtle adjustments on certain pixels to increase/decrease their brightness, and so on.
Photo by Yan Zhang. Click on the photo to enlarge.
Do you have any specific goals that you want to achieve in or with your photographs?
I said earlier that I started my digital landscape photography in 2007, and I sold my first landscape photo in the same year. Since then, each year I would sell some of my photographs through various art exhibitions in my area. In September 2010, I established my own photography website. Recently I sold several large prints. As an amateur photographer, I feel I am very lucky to be selling photos.
Having said that, I should stress that my photography goal is not just to make my works to be of some commercial value. More importantly, I wish my works to be recognised by the professional photography community. This was the main motivation that brought me to get involved in 1x.com photography website’s activities.
Photo by Yan Zhang. Click on the photo to enlarge.
This one is a selfish question, but I had to ask it :). In my photographic portfolio, landscapes section, did you see a photo that you particularly liked? And if you did, what did you like about it?
Yes. I like this shot:
because this image presents a nice mood with mist in the forest. The vertical trees in the mist create a good depth of field, which makes me try to explore this wilderness.
And finally, my traditional question. If you had only two advices to give to a beginning photographer, what would they be?
My two advices for beginning photographers who are dedicated to landscape photography would be:
(1) Originality – I believe that originality is the key to make photographs that differ yourself from other photographers;
(2) Persistence – to make outstanding photographs you have to be persistent, to stick to the idea you have in mind and then try every effort to fulfil this idea or adjust it in the field.
Photos by Yan Zhang. Click on the photo to enlarge.
Yan, thank you very much for this interview, and good luck in your future artistic endeavors!
You can see more of Yan’s beautiful photographs on his website:
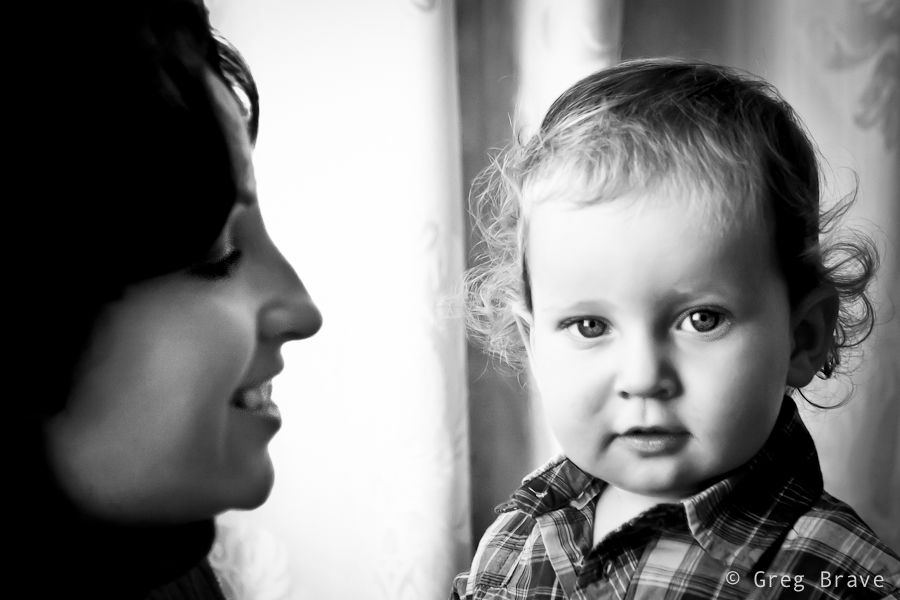
I think that this is how many photographers start their venture into the realm of professional photography (by “professional” I mean paid jobs): I photographed my friend’s kid, then his friend saw the photos, got excited and offered me the job.
He asked me to make portraits of his one year old son and of the whole family. Needless to say that I agreed. Even though nowadays everyone has a digital camera, and any parent snaps tons of family photos, there are many people who still appreciate good photography, and can tell a great portrait from snapshot. Still, the job of photographer is harder now than ever before – his photos has to stand out of thousands of such snapshots.
So let me share my experience from this family photo shoot.
First of all I talked to the guy and asked him what did he expect from the shoot. This is very important – you have to be absolutely clear in regards to what your client expects from you. Here are some example questions to ask your client:
– How many digital photos (in files, not printed) does he expect to receive?
– Does he want prints, or just the digital files?
– Agree on the time frame for you to deliver the photos
– Does he want any artistic post processing?
– Which portraits exactly does he want – of the whole family only, individual portraits only, both, or maybe he has some kind of special request.
– Ask your client if he can show you (from internet or his friends) examples of photos that he particularly liked.
-If the shoot is to be held at client’s house ask the client about the dimensions of the house, and whether he wants the shots to be studio-like, because in that case you’ll have to bring your own background.
Click on the photo to enlarge.
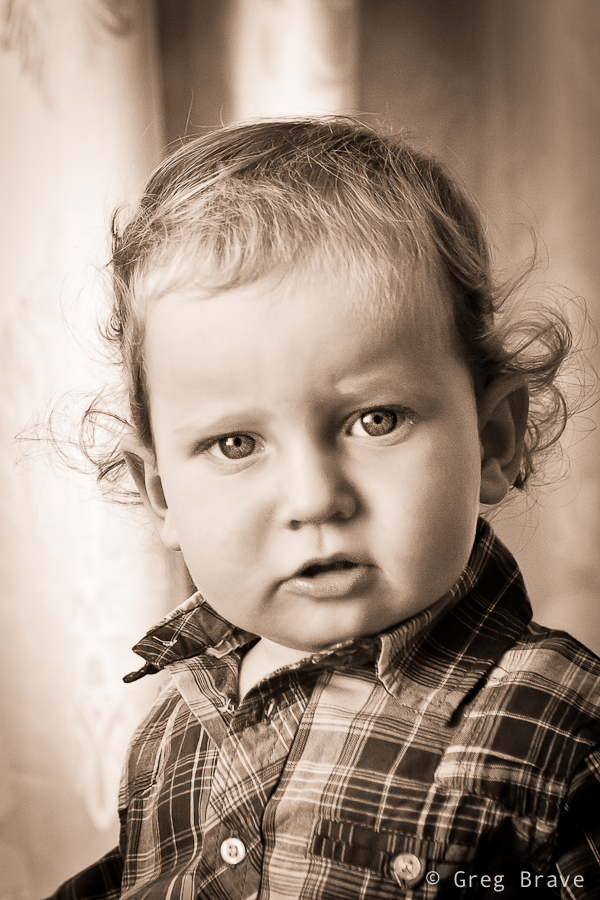
In my case client already saw my work and he said that he wants something of that kind. What he saw was portrait of a child tightly cropped and processed in sepia tones. In addition he said that he would like similar kind of photo but of the whole family. He also said that he doesn’t need a lot of photos, just a portrait or two that will remain for the years to come.
Click on the photo to enlarge.
The photo above is my favorite from that shoot. I love the kid’s look, and his inviting hand that “takes” the viewer’s hand and leads him into the child’s world…
Sorry, I got distracted… where were we? Ah, the expectations! So after talking to the client I understood his demands, and tried to fulfill them during the shoot.
Preparing for the shoot
I did this shoot at the client’s house, so I’ll describe my preparations for that specific case.
– Most important thing: Lighting. Even if the shoot takes place during daylight, if it is indoors there might not be enough sunlight, so you’ll have to bring your lighting equipment. I had a light stand, two strobes, a white shoot-through umbrella and a soft box.
– Lenses. If your client doesn’t have a lot of space in the house, you might not be able to use your favorite telephoto lens for portraits, which is too bad as it creates lovely bokeh :).
For portraits I used two lenses – Canon 24-70mm f2.8L and Canon 100mm f2.8 macro.
– Memory cards, backup batteries, cleaning cloth etc. Though this might seem trivial, but forgetting any of these (well cleaning cloth excepted) can cost you the photo shoot. If you bring strobes, then don’t forget backup batteries for them.
Click on the photo to enlarge.
The Shoot
Don’t be late. This is very important – it shows how seriously you take your job.
As a photographer you will benefit from being an open and communicative person. Talking freely and openly with people you are about to photograph makes them feel more comfortable with you and in front of your camera, and enables you to capture their natural expressions.
Shooting little kids is difficult because you can’t just ask them to be still, sit at one place, smile, or play with their toys. So you have to improvise. It is a good thing to ask parents for help. In my case the kid’s mother played with him and I was able to catch some nice facial expressions and poses.
Click on the photo to enlarge.
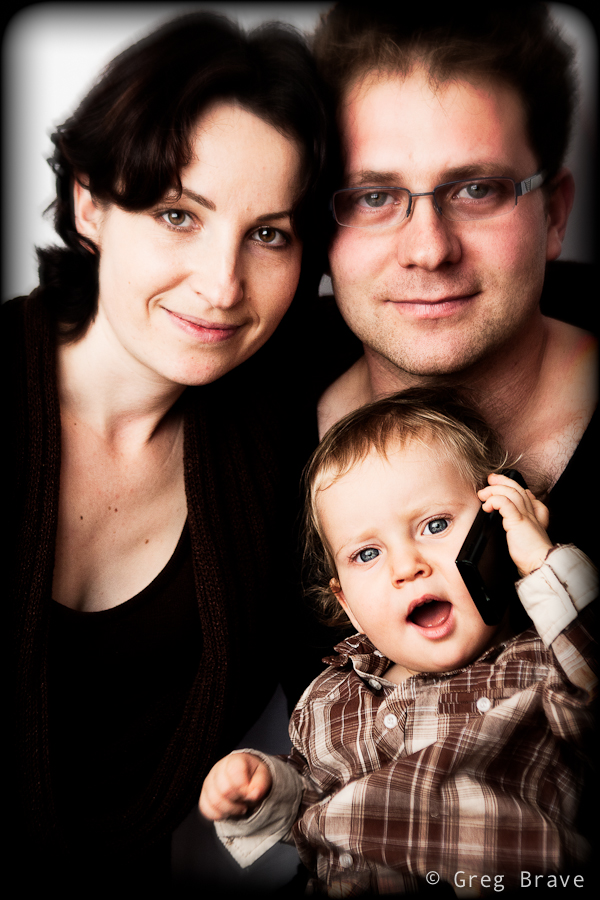
When we got to shoot the family portrait, at first parents had difficult time keeping the child still in front of the camera, but then they gave him father’s cellphone, and it was a bingo!
After the Shoot
We agreed that I will deliver the finished photos within a week from the shoot, but I delivered them in tree days, reasons being first of all because I love processing photos and couldn’t wait to see what I can do with the “raw material”, but also because I think it is a good little marketing trick. When people expect to receive a product in certain amount of time, but they receive it earlier than that, provided that the product is good, they feel even better about your services.
The most important thing that I’d like to leave you with is: Don’t be afraid to try! Don’t think that you can’t do it, and the client won’t like your photos. If you love photography, and someone offers you the job – Take It! You can read a thousand articles on the subject (including this one), but they won’t give you the same experience you’ll get from the actual shoot.
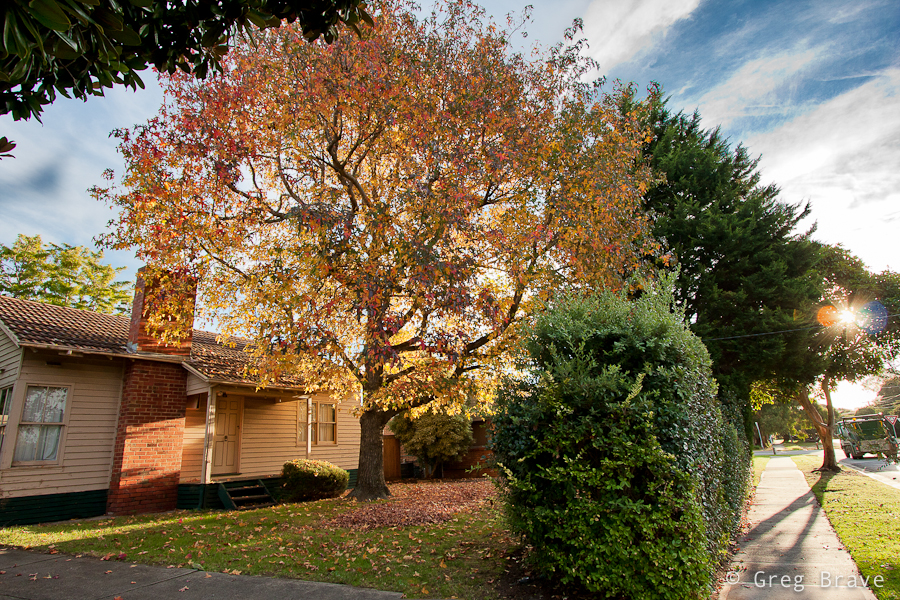
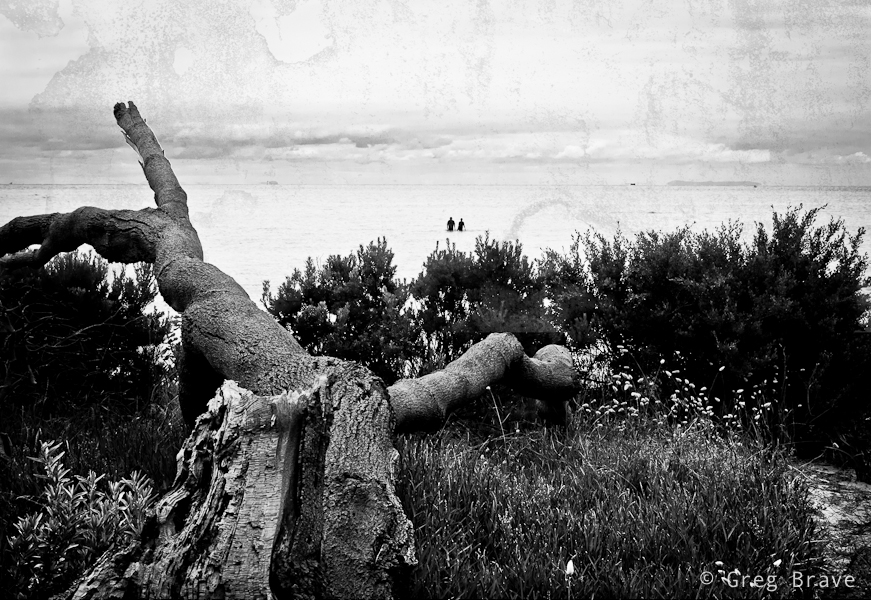
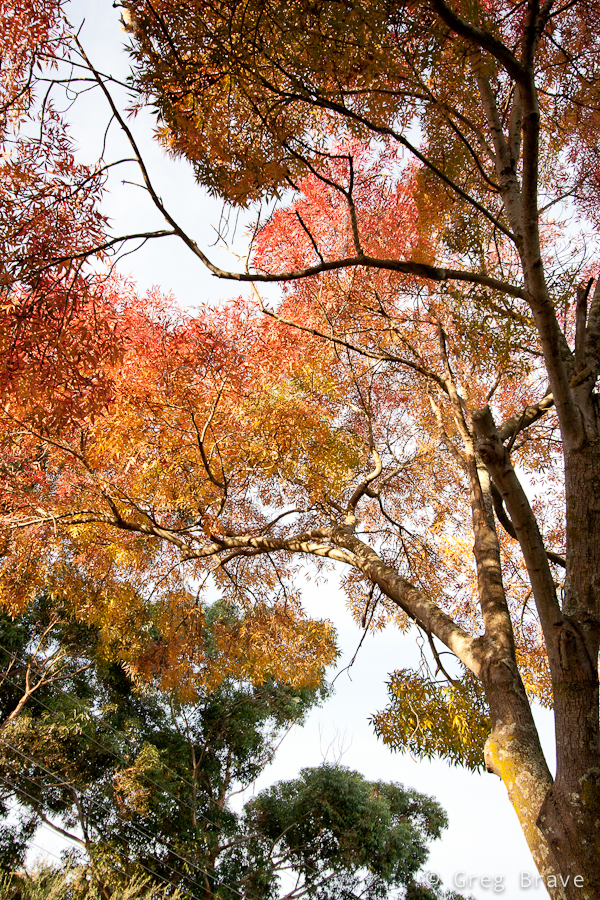
While Spring rules in most parts of the world now, Australia is heading for winter. Driving through my neighborhood towards home from work I felt a kind of Autumn mood in the air. So when I came home I quickly grabbed my camera and went out for a walk. I wanted to capture this mood before it vanished.
This maple tree fascinated me. The autumn colors are revealed here in all their beauty. Warm light of the setting sun gets even warmer filtered through the orange-yellow leaves creating a very cosy atmosphere. The only thing I’m missing in this photo is a lonely person sitting on the stairs…
Click on the photo to enlarge.
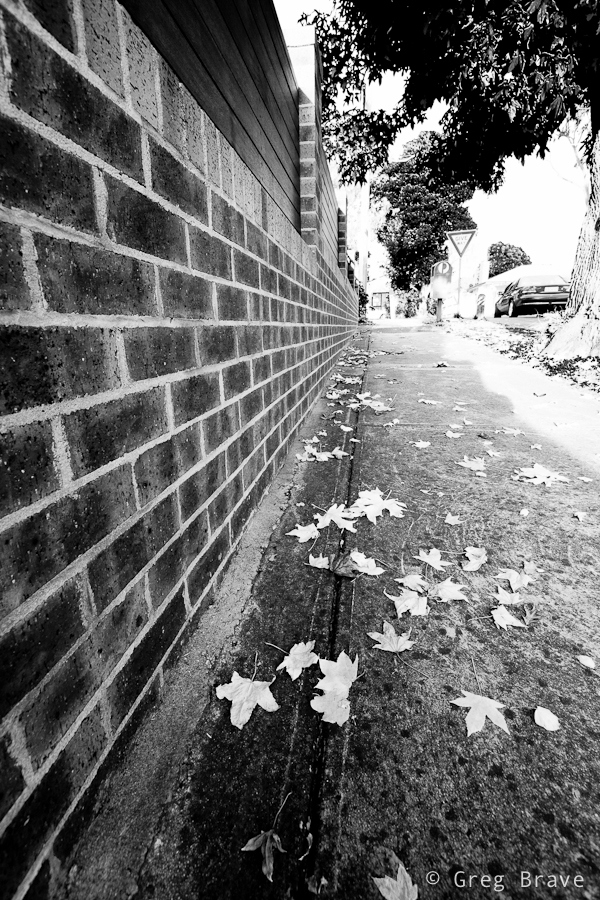
In the next photo I focused my attention on the fallen Autumn leaves adding the fence on the left to emphasize the perspective and add a sense of movement to the photograph.
Click on the photo to enlarge.
At first I didn’t realize why I wanted to capture what you see in the next photo, but then I realized that it was the combination of cleanliness of forms, simplicity of the composition, and the background texture. Combined together these three factors formed a complete picture in my mind and I pressed the shutter-release button.
Click on the photo to enlarge.
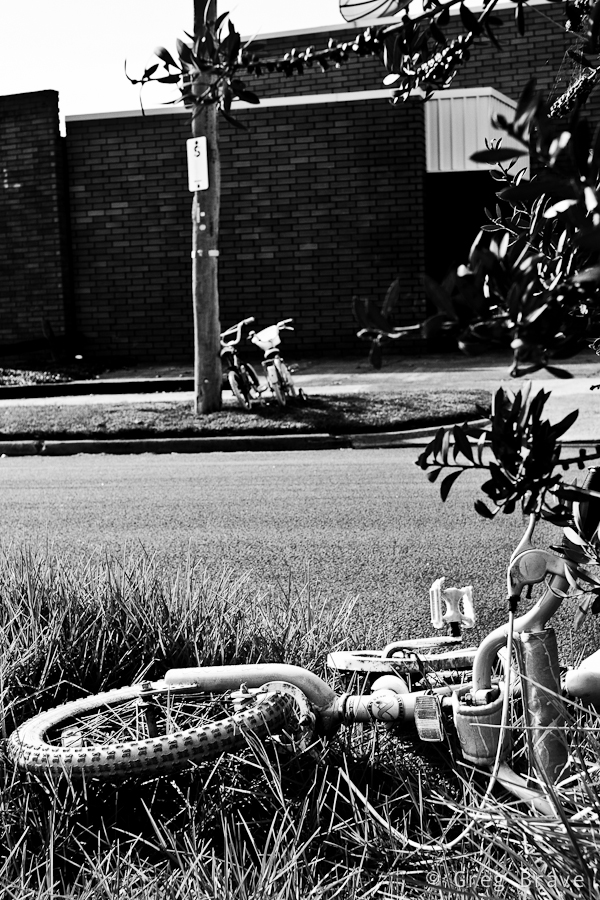
Walking around I saw these bicycles and immediately the words such as “separation”, “loneliness”, “different” started popping into my mind. You know kids can be cruel sometimes, and in my mind this was a good visualization of this fact. Even thought there is not much of an Autumn mood in this picture, since I took it on the same walk I decided to present it here.
Click on the photo to enlarge.
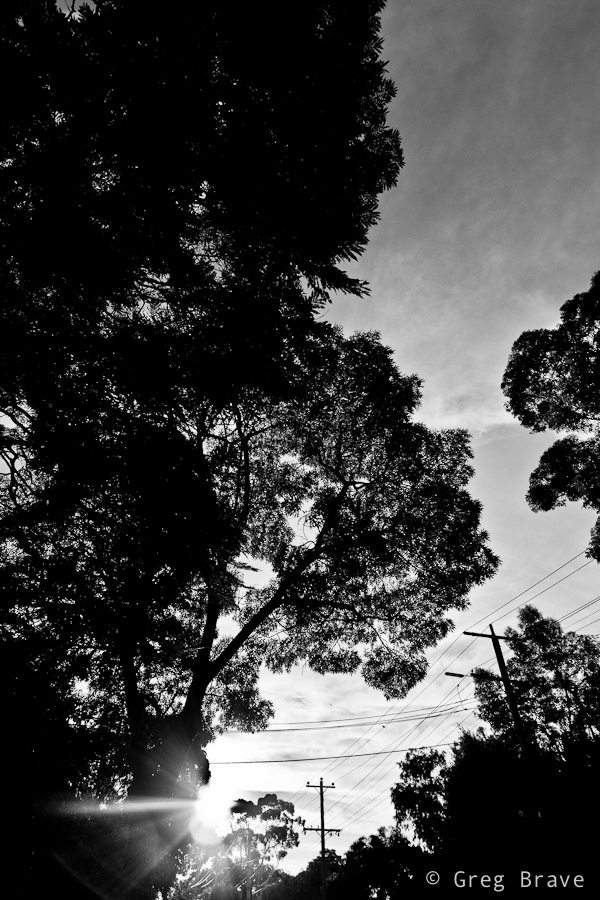
And finally going back home, when Sun was getting close to the horizon, I took this photo. I can’t say much about it except the fact that I like it.
Click on the photo to enlarge.
Hope you enjoyed the photos. Feel free to comment on them in the comments section below, I’d be happy to know what you think!
Sometimes I see a photograph, and I wonder how it was done, what tricks or special equipment (if at all) did the photographer use to achieve the result? In most cases there is no way of asking him, and I have to guess and speculate on how it was done.
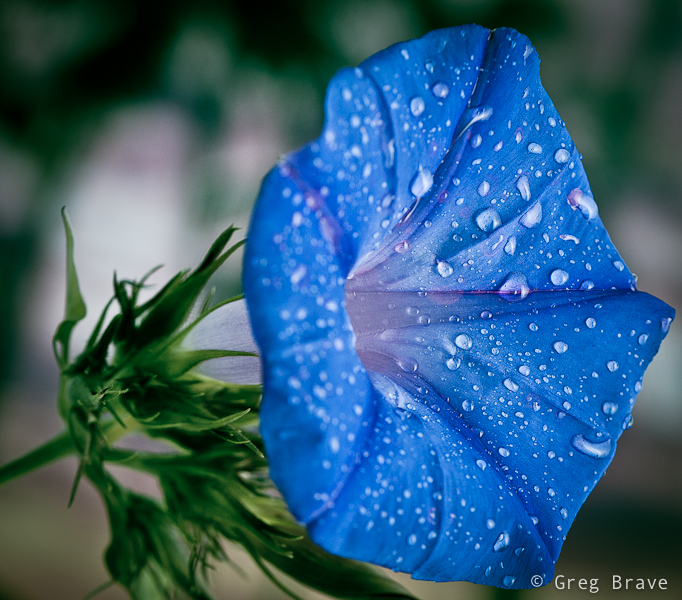
A few days ago I did a few flower macro shots, and posted one of them in a couple of forums. In the responses I’ve received I saw some questions as to how I did it, so I decided to write a post about it.
I used Canon 100 mm f2.8 Macro lens, a light tent, and two flashes – the main one from the right side, and another flash from the left side. I set the second flash to be much weaker, so it would make the back side of the flower just a little brighter.
I didn’t want big depth of field so I set my aperture to f5. On the contrary, I wanted to be able to control what exactly will be in focus.
The shutter speed was 1/200 of a second, but it is not important in this case because I didn’t use ambient light – only strobes.
Since I had total control of my lighting, and I could set it to be as bright as I wanted to, I used ISO of 100, the lowest ISO on my Canon 40D. As you probably know, the lower your ISO setting, the less noise you’ll get in your photo.
Of course I used tripod. This is an important point. You might think that shooting at speed of 1/200sec doesn’t require the use of tripod, and under certain circumstances you might be right. For example when using wide angle lens with fairly closed aperture. But in my case I used telephoto lens (100mm) with f5, which means that even the slightest movement will shift the focus from where I want it to be to another random location. So, the conclusion is that in macro shots tripod is almost always an essential piece of equipment.
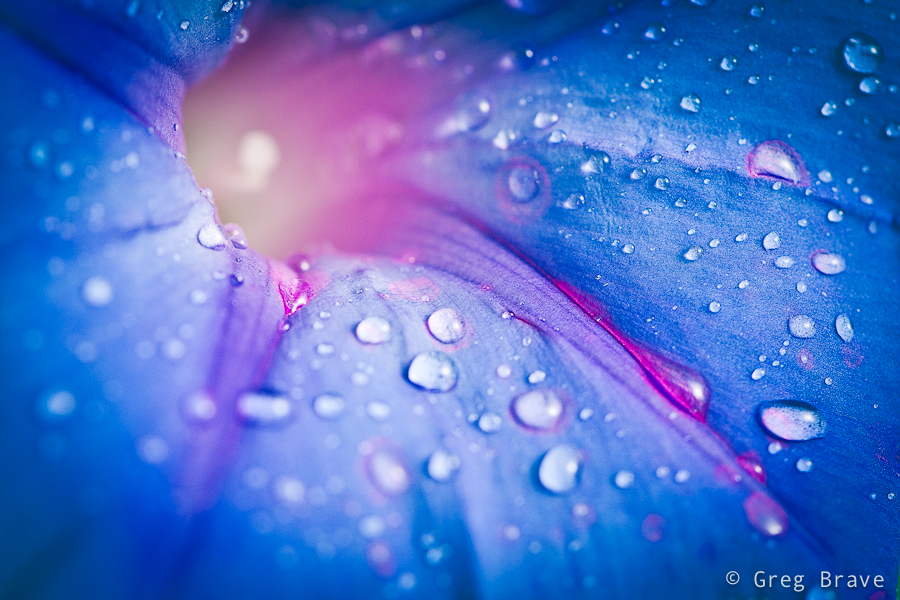
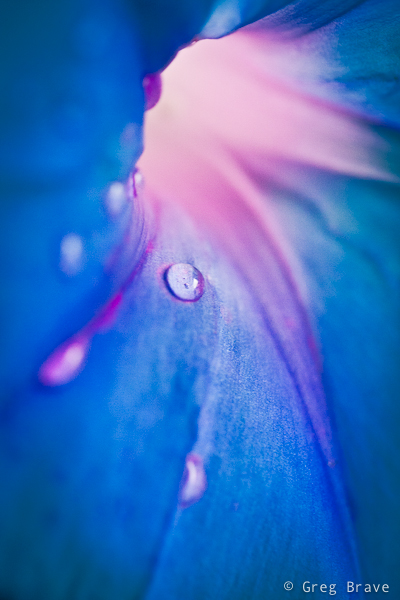
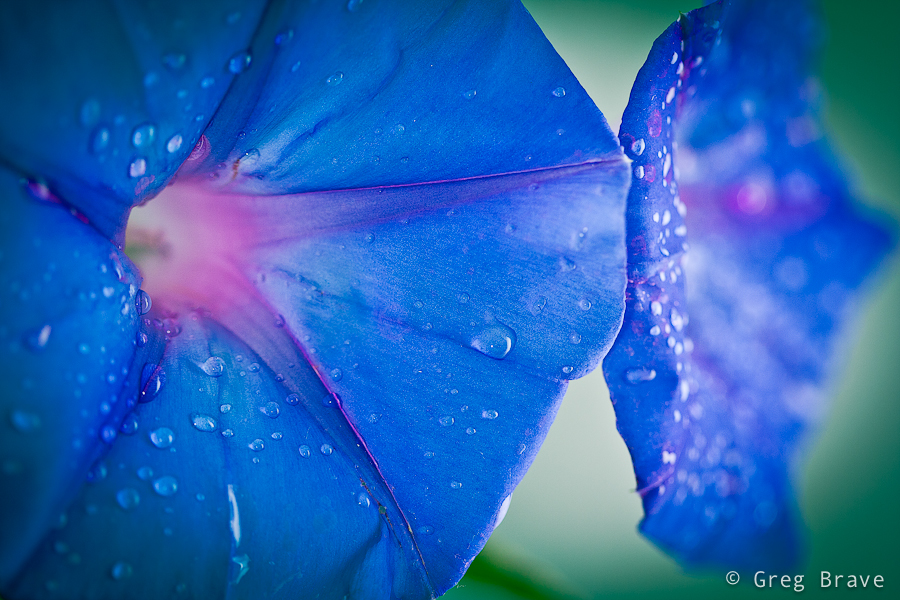
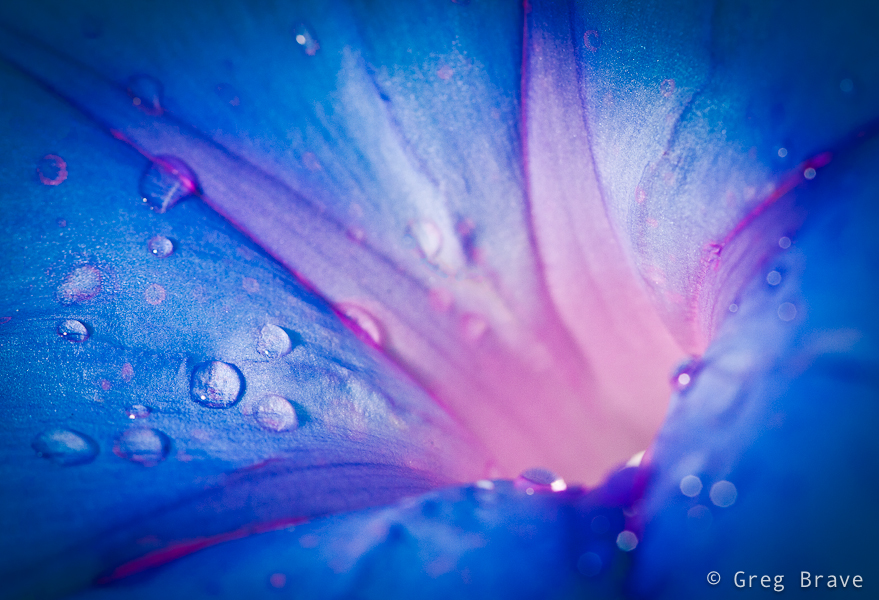
As you can see on the shot I sprayed the flower with water. Water drops are a very nice touch to many natural subjects, not only flowers. Sometimes photographers photograph the water drops on their subject in such a way that a reflection of something would be visible in the drops, and it makes for great images. In my case I wanted to achieve the exact opposite – I didn’t want any reflections in the water drops in order to focus the attention of the viewer on the flower, and to achieve that I photographed my flower in a white light tent.
And finally, the background. In the shot above and in one of additional examples from that photo-shoot below you will see that my background wasn’t plain white. But what was it? It is easy – I used one of my calendars with colorful photos as the background. When shooting macro, DOF is so tiny that a photograph placed 30 cm behind the subject becomes totally indistinguishable collection of colorful splashes, which makes for a nice background.
Below you can see a few more examples from that shoot
>
I hope you learned something from my experience.
As always, feel free to share your thoughts and suggestions in the comments section.
Cheers,
Greg.
P.S. For those of you who wonder, the flower’s name is Morning Glory
Imagine that you need to photograph a large dark space, like a cave, or a church, but you only have a single flash. Is it even possible?
Quite some time ago I saw in a photography magazine photo of a big beautiful cave, perfectly lit, all the beautiful stalactites perfectly visible, and I thought to myself – there is no way photographer could bring powerful studio lighting equipment down there!
Fortunately there was a brief description to this photo – photographer put his camera on tripod and set it to long exposure, then during the exposure time he ran around the cave with small strobe flash and flashed all the areas of the cave. “Simple and Genious” I thought to myself back then.
Genious? Sure. Simple? Well, not really.
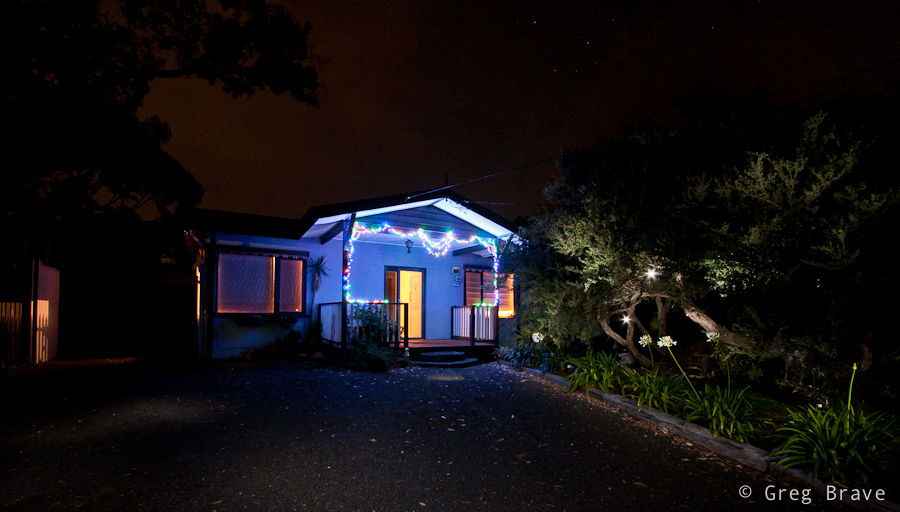
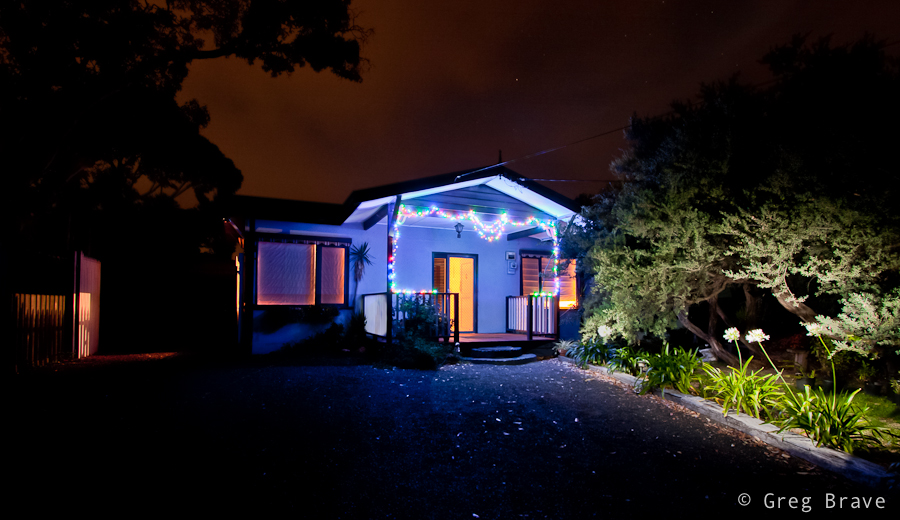
Recently I decided to photograph the front of my sister’s house decorated with shiny Christmas lights. Yes they still haven’t took them off, because my three year old nephew likes to turn them on every night before he goes to sleep :).
In order for Christmas lights to be visible, I had to do that after dark, and I only had one flash (not that it matters but it was Canon 430 EX). So I decided to try the technique described above, and it turned out not as simple as I first thought it would.
I’d like to share with you the tips that I learned from this experience, hoping they will make it easier for you should you decide to use this technique. I will do this in the form of step-by-step instructions how to perform this kind of shoot.
Here we go:
1. Set your camera on a tripod and compose your shot.
2. Choose the desired f-stop (here your guide should be only your artistic intentions, and not exposure considerations).
3. Focus your camera where you need to, then switch to manual focus. The reason for switching to manual focus is that in the dark it is hard for automatic focus to work, so each time you’ll press the shutter it may take a long time for camera to focus if at all.
4. Look at the scene and decide which areas need to be lit and which don’t.
5. Set your flash power to about 1/8th of its max power.
6. Press the shutter, and run around the scene with a flash in your hand flashing all the areas that need light. Flash ONCE each area.
7. Take a look at the result, and go over all the areas that needed to be lit. If they are too dark, next time you’ll flash them twice, or increase the flash power. Using low flash power and flashing several times the same area gives you more versatility in case you need different areas to be lit diferently.
8. Repeat the steps 6 and 7 until you are satisfied with the result.
In addition to this process you also need to have in mind the following:
When flashing hold the flash pointed outwards from your body, and as far from you as possible so that no light will spill on you (otherwise “ghosts” of you will be visible in the image).
Always point the flash away from the camera, so that no direct light from the flash will hit the lens (otherwise you’ll see bright points of light all across the image).
Remember that the longer the exposure time, the more noise you’ll have in the photo. Try to complete the shot as quickly as possible, unless you want the noise for artistic purposes.
Here are a few examples of the house that I photographed:
In the photo above, you can see that I deliberately flashed into the lens a couple of times to create lights in the tree. This is also a good example of what you’ll see in your image if you do it by chance.
And here is another example, this time without the lights, and with better lit right side.
Feel free to ask questions and share your experiences in the comment section below.
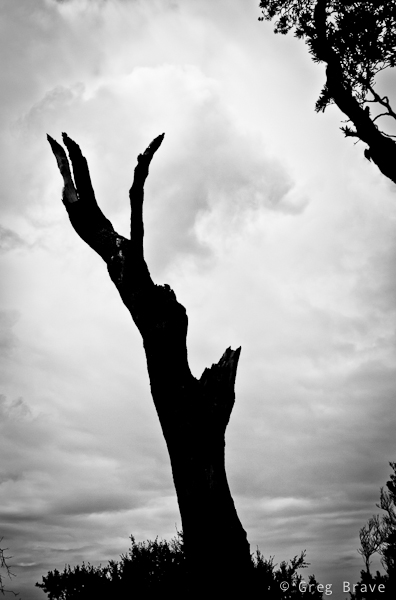
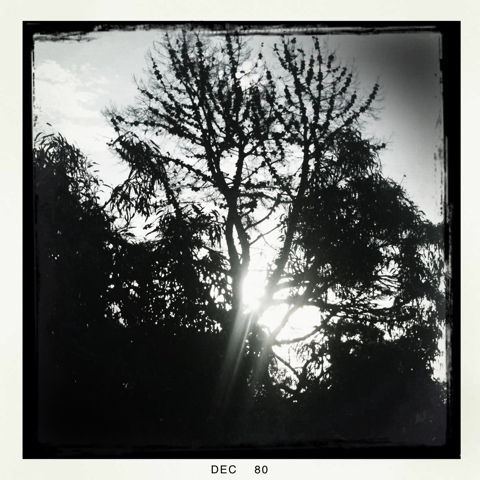
In one of my previous articles I wrote about shooting with intention for B&W (tip number 6), and not merely looking at your photos and trying to convert them to B&W to see if that looks good. Now I would like to add the concept “seeing in black and white”. It comes to you when you shoot a lot of b&w images – you then gain the ability to look at your composition and in your mind see how it would look in b&w. Sometimes, the weather is such that you don’t need this ability – the colors are simply black (dark gray) and white (light gray), but on other occasions the sky may be blue with white clouds and everything around you so colorful that imagining how it would look in b&w would be difficult. This is when the “seeing in black and white” skill comes handy.
Click on the photo to enlarge.
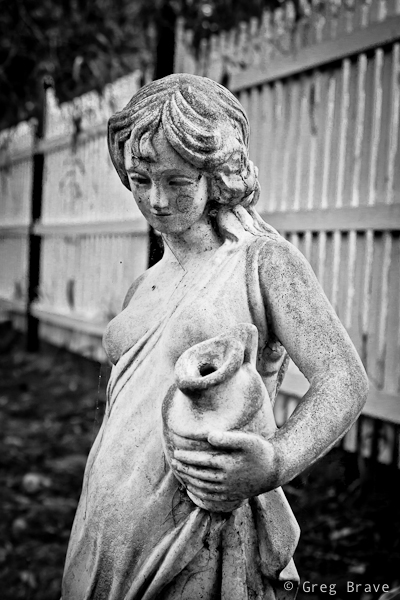
Sometimes the scene itself calls for b&w, as it was with this garden statue. This woman was standing in this garden for a long time and her skin turned from pearl white to muddy gray, the same happened to the color of the fence, and in any case the emphasis here is not on the color.
Click on the photo to enlarge.
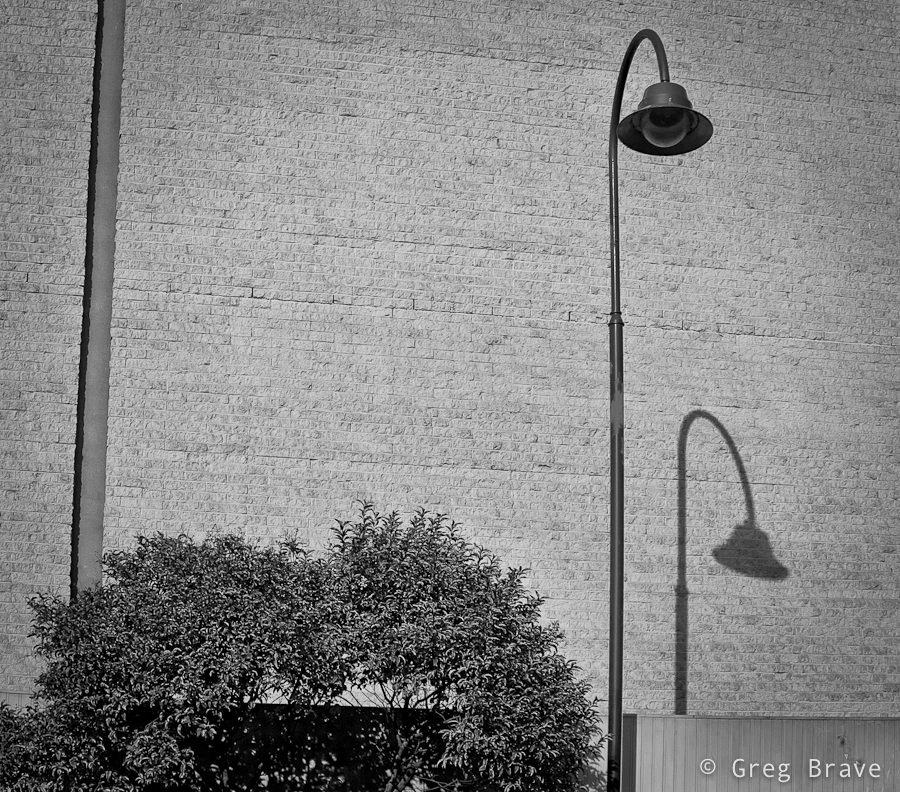
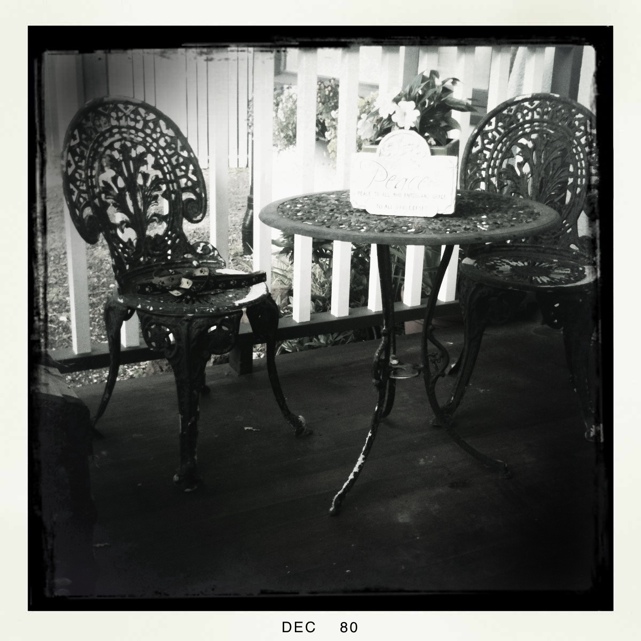
Black and white in photography often helps to convey mood, and emphasize shapes and textures.
Click on the photo to enlarge.
Here is another example of emphasizing shapes by shooting in black ans white.
Click on the photo to enlarge.
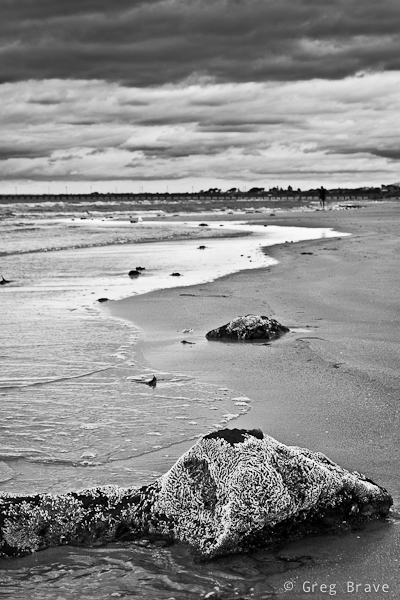
Did I mention mood already? I just love it when the sky looks like it is going to rain any minute, and light is dim. These minutes before the rain are great for capturing photos such as this one. I wish there would be a bird sitting on the hanger at the foreground though…
Click on the photo to enlarge.
I hope you liked the photographs, and I’ll see you next time!
As always your comments, thoughts, and experiences are highly appreciated.
I should have written this post a long time ago, as I’ve been using Hipstamatic ever since I got my iPhone. First of all I must say that I am not affiliated with the creators of this app in any way, I simply love this app!
So what is it? Simply put “Hipstamatic” is an alternative app to iPhone’s native camera application. It is very different though. This app attempts to emulate the ancient plastic film cameras in a very realistic way. Its creators put a lot of thought in the design and functionality of this app, and they keep improving it. Since this app emulates film camera, it has a virtual film loaded into it, and the great thing about it is that you can change this film. For example they have different types of B&W films. But it is not all – you can also swap virtual lenses on the Hipstamatic camera, each lens creating a different effect in the resulting photograph, and you also can swap flashes!
Even though all these features are virtual, their effect on the final photograph is very real, and I find it very interesting. There are many combinations of flash/lens/film that you can use to achieve the look that you want.
Currently you can purchase this app from the Apple Store for $1.99 ($2.49 in Australia), and it comes with basic set of lenses and films. Then you can purchase additional “Hipstapacks” (packages of lens+film) from inside the application.
Though I found a few combinations of lenses and films that I particularly like, and have been using them a lot for my daily photo section, I still have tons of fun playing with different combinations creating different new looks for my photos.
If photography is your hobby, passion, or you just like playing with your iPhone, I highly recommend this app. In my opinion it worth every penny.
You might think I’m going a little bit crazy here, but hey, don’t make any rushed judgments!
Yes, flash won’t help you to light the landscape but it can help you make your sunset photos a little bit different. Usually when you see sunset photos, the foreground elements of composition are silhouettes due to the high contrast between the backlight from the setting sun and the darkness of the foreground. Sometimes these silhouettes of objects or people look good in the photo, but sometimes adding a little foreground light can improve the final image.
In the following example you can see pretty much the same composition taken with (on the right) and without (on the left) the flash.
Click on the photo to enlarge.
While the silhouette in the left photo looks nice, using a little bit of light to show the cool red hair of the standing person adds a nice touch to the photograph. It also reveals a bit more detail in the foreground, though I’m not sure if it is a good thing in this case.
In the photo below I also used flash to light the foreground, and show the beautiful color and texture of the wood. Without flash this photo would have been too dark and much less interesting. Another way of achieving this result would be shooting several frames with different exposures and later combining them into an HDR image, but it would take much more time and possibly look less realistic.
Click on the photo to enlarge.
These are only a few examples of endless possibilities which open up when you start using flash in many situations where it is not normally used, not only during sunset. For example you can use flash when shooting in harsh daylight in order to soften the hard shadows that daylight produces.
Hopefully this post inspired you and gave you a starting point for your own creative ideas when and where to use that flash that has been lying in your photo bag for too long 🙂
If you have any original ideas or examples of unusual use of flash, please share them in the comments.
If you are new to the whole HDR concept I suggest you first read my posts titled HDR Introduction and Pseudo HDR
Anyone who heard about Photomatix, knows that it creates HDR images. But in addition to a usual HDRs combined from several exposures, you can also create a nice pseudo HDR images – in short an “HDR looking” image made from a single RAW file.
In order to do that you open just that one RAW file in Photomatix, and it “understands” that you want to create a pseudo HDR. Then you use the great tone mapping tools that Photomatix offers and tweak your final result. In my next post I will go into more detail of how exactly to work with Photomatix, but here I just want show a little of what’s possible.
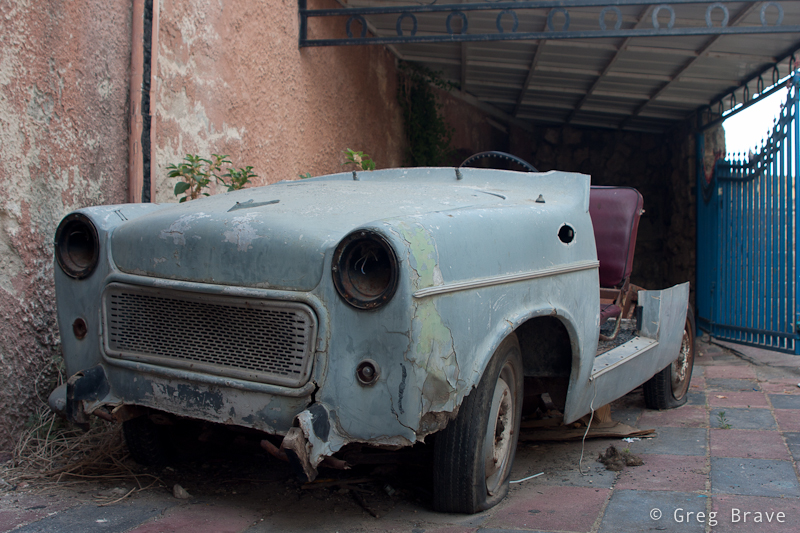
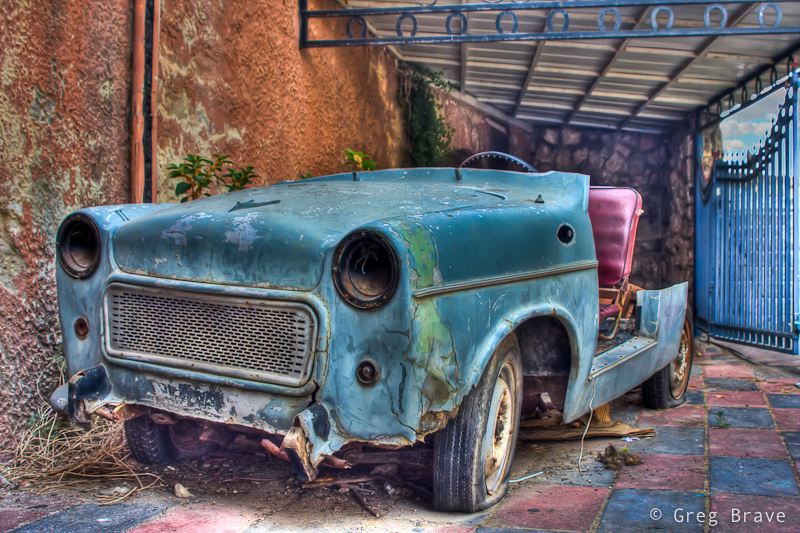
I would like to illustrate this by presenting the before and after versions of an old car photograph. As you can see the change is quite drastic, and it shows how much information is really hidden inside that RAW file.
Photographs by Greg Brave. Click on the photo to enlarge.
Somehow in my mind an “exaggerated” HDR images, the ones with slightly unreal look, are always associated with old cars and industrial scenes, so in order for this post to be complete I am adding here another pseudo HDR image (yes, that one is also made from a single RAW file), containing industrial buildings.
Photograph by Greg Brave. Click on the photo to enlarge.
One of the advantages of pseudo HDR is that you don’t always have to use tripod to make it. What I mean is that in order to create ordinary HDR image you’d have to take multiple exposures and use tripod to stabilize your camera so that all your exposures would be framed exactly the same. This is not a problem when you are using only one raw file.
So if you have in your photo collection some single RAW photos that don’t look too interesting, you may want to use Photomatix to create a pseudo HDR from them and see what happens. The result might surprise you!
This time I would like to talk about creating abstract photographs. There are many ways of doing it, and one of the simplest ones is to take a closeup shot of something with interesting texture making it unclear what it is from one side but creating an interesting combination of forms, colors etc. from the other side.
For example you can find an old wooden door with paint which partially came off and take a closeup of it, or take closeup shots of rusty metal. Another idea would be taking closeup shots of architectural creations including particular parts without revealing the form of the building. There are many more ways of course, and these are only a few examples.
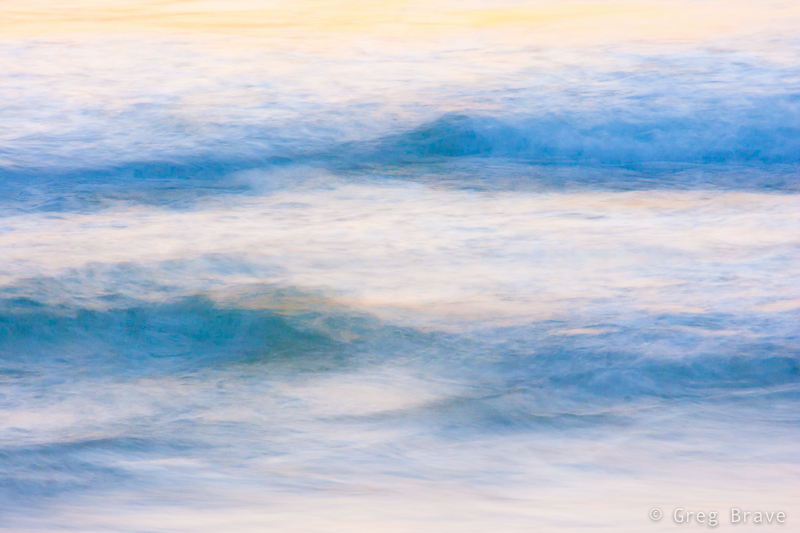
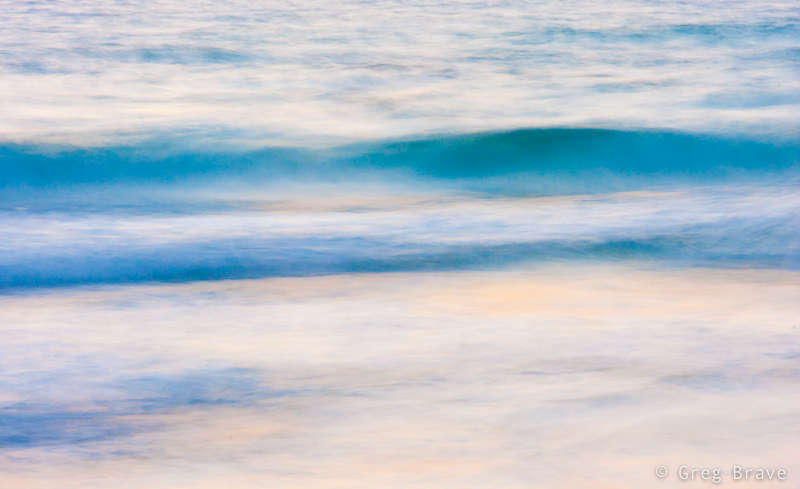
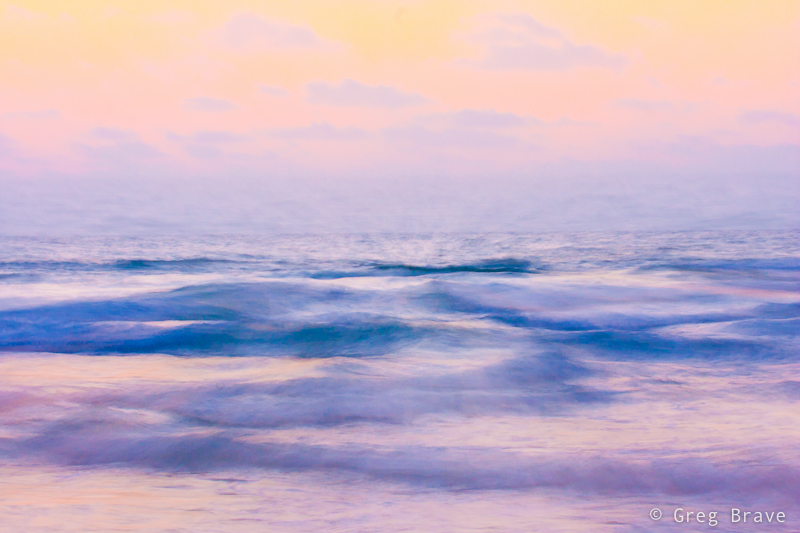
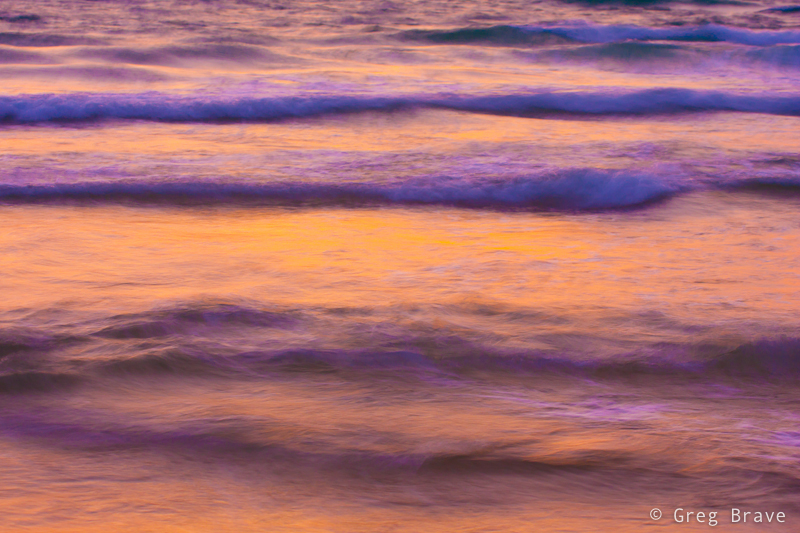
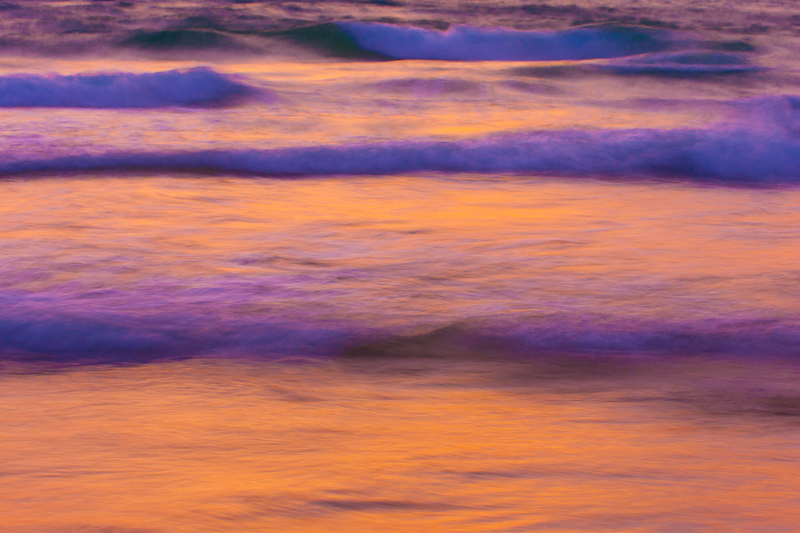
For these series of abstract photographs I decided to photograph waves. I came to the seashore about an hour before the sunset, put down my tripod, mounted my Canon 40D and started shooting.
Photographs by Greg Brave. Click on the photo to enlarge.
As you can see these all tight crops (well all except one) of waves taken with long exposure. Using long exposure in this case is critical because if I would use normal exposure (1/50 sec and faster) then the waves would be easily recognizable even in tight crops.
Photographs by Greg Brave. Click on the photo to enlarge.
After the shoot I came home, opened the photos in Lightroom and started playing with them trying to get the best abstract results I can. And I found something really beautiful, which I would like to share with you.
Everybody plays with Vibrance and Saturation controls (in any photo processing application), but when you work on a “real world” images, not abstract, increasing saturation or vibrance too much makes the image look not real, over-saturated. But in this case my goal was to create a beautiful abstract image, and I saw that when I crank the saturation slider to the maximum, it gives me very nice result making the photos look more like paintings and also emphasizing the warm sunset colors. But it wasn’t perfect, and I am sure that many of you encountered this – when you increase the saturation to a certain level you start having color artifacts in your image, and you are forced to decrease it to the level where there are no artifacts.
Here is what I found in Lightroom – in order to eliminate these color artifacts you have to increase the Luminance Noise Reduction slider (in the Develop module) until no color artifacts present in the image! I was stunned – because now I could increase saturation as much as I wanted. There is one downside to it though – the image looses some of its sharpness, which wasn’t a problem in my case.
Photograph by Greg Brave. Click on the photo to enlarge.
I would be happy to hear what you think of these images. How would you create an abstract photograph?
Remember, you only have to enter your name to leave a comment!
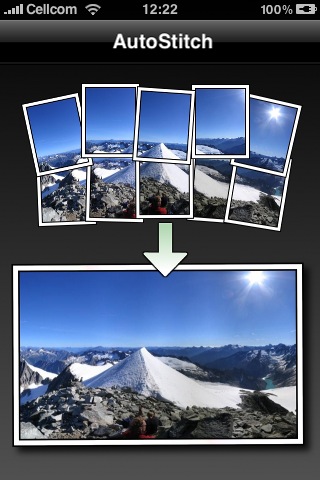
At first this thought might sound crazy to you as it sure sounded to me, but then I thought that I could at least try to do that. Since my iPhone is always with me and my camera isn’t (due to circumstances beyond my control of course! ) it had already been more than a few occasions on which I really wanted to make a panoramic image but couldn’t.
So I decided to see if there are any apps for iPhone that can help me create panoramas. During my research I found several applications that were created for this purpose. But after trying to use them I found out that most applications don’t do a good enough job – either the whole process was too time-consuming and difficult or the result wasn’t satisfying. And then I found application named AutoStitch.
First of all I want to say that I am not affiliated with makers of this application in anyway, and I don’t receive any benefits if you decide to buy this application after reading this article. I am writing this only because I loved this app and want more people to enjoy it.
AutoStitch really did the job so well that I was truly amazed at the results! And the process is also very simple. All you need to do is to take photos for panorama with your usual iPhone camera application. Just make sure that each photo overlaps with the next one at about 30 percent. Then you open the AutoStitch application, simply choose the photos that you want to create panorama from, and let the application to do all the work.
After AutoStitch finished, you will see the final image and also will be able to crop it as you wish. Then you can save it to your photos. There are several great things about AutoStitch that I liked very much:
1. The panorama creation process is pretty fast and simple.
2. The result is very impressive – photos are stitched perfectly together, and if you made each shot correctly, the final result is just great!
3. The final panorama can be saved at the maximal resolution of the iPhone, what I mean is take for example 5 photos with your iPhone, stitch them together in AutoStitch, and the final resolution that you’ll get will be 5 times bigger than single photo resolution.
4.You don’t have to use tripod or to be extreeemely careful! Just try to maintain the initial angle of shooting, and make sure that your photos overlap with each other. AutoStitch will do the rest.
I’d like to show you two of the panoramas that I created using AutoStitch. Please note that I reduced the resolution of these images in order to fit them here.
High Tech District in Tel Aviv. Photograph by Greg Brave. Click on the photo to enlarge.
Alonei Itzhak Nature Reserve. Photograph by Greg Brave. Click on the photo to enlarge.
And now here is what welcome screen of AutoStitch looks like, when you open the app in the iPhone:
In conclusion – AutoStitch is a great application for creating panoramas in your iPhone. It is cheap, simple to use, and delivers great results.
If this article was helpful to you, or you have additional thoughts on creating panoramic photos in iPhone, you are welcome to leave comments to this article or drop me an email to greg at photopathway dot com.
Why photographers use tripods? Well, the answer to this question is pretty simple – to prevent camera shake as much as possible and create sharper photos.
Beginner photographer might think that tripod is necessary only for long exposures, but it is not exactly so. The longer your focal length, the more sensitive you get to camera shake. For example if you shoot with wide angle lens (I am intentionally taking this to extremes) with shutter speed of 1/60s you will get pretty sharp photo, but if you’ll take your telephoto lens, lets say 300 mm (without image stabilizer) and shoot with the same shutter speed, most of the chances that you’ll get a very blurred result. But consider also this – most professional landscape photographers use tripod even when they are shooting landscapes in bright light using wide angle lenses! So in order to get tack sharp photos you must use tripod.
How to use tripod correctly
Though it seems pretty simple – just put your camera on a tripod and start shooting, there are several things you need to know that will help you get good results from shooting with tripod.
1. Use Manual Focus.
When you hold camera in your hands and shoot, you can always press the shutter button half-way to focus on your subject, then recompose, and take a picture with correct focus. But when you shoot with tripod this simple task gets a little bit more complicated. So what you should do is use auto focus to focus on your subject, then switch to manual focus, recompose according to your intentions, lock the tripod and then shoot. Since you switched to manual focus, it won’t change when you press the shutter button after recomposing. Of course that you can always use only manual focus, making this advice irrelevant.
2. Use Manual Shooting Mode.
Same as with focus, when you shoot handheld, you can take light metering from the area that you want to, then lock exposure, recompose, and shoot. Using tripod you’ll have to first take light metering from the desired area, then set shooting mode to manual and set the correct exposure according to metering. After this you can recompose and shoot.
The following tips will help you get even sharper photos when shooting with tripod
3. Use Cable Release.
Cable release is simply cable with a button. You attach it to your camera and instead of pressing the shutter release button on your camera, you press the button on the cable. This prevents the camera shake caused by your finger pressing the shutter release button.
4. Use Mirror Lock.
In SLR cameras there is a mirror lock option. For those who doesn’t understand what it means, I’ll shortly explain. When you look through the viewfinder of your SLR, you see everything through the lens. Although you must have noticed that actual position of the lens is much below the viewfinder. In other words – viewfinder and lens are not in the same plane. So how can you look into the view finder and see through the lens? Thats right – there are mirrors involved. There is a mirror that you can see when changing lenses, it is at 45 degree angle to the lens. This mirror is reflecting everything the lens “sees” up, to the viewfinder (there is also a pentaprism involved which enables you to actually see through the viewfinder, but that’s not important right now). When you press the shutter button this mirror goes up, and then shutter opens to expose the sensor (or film). I bet you have noticed that when you press the shutter button, you can’t see nothing in the viewfinder – it is because the mirror is up.
And now to the sickest part – camera shake caused by the mirror movement! When you press the shutter release button, this mirror goes up, and this movement also causes camera shake! Though this shake might not seem to be a significant one, it exists. In order to prevent it there is a mirror lock option. This option first locks the mirror in the up position (when you don’t see nothing in the viewfinder) and only after the mirror is locked the shutter is released.
5. Turn off Image Stabilizer.
If your lens has image stabilizer you should turn it off when shooting with tripod. Image stabilizer is very good when shooting hand-held, but on a tripod it is of no use since there is no camera movement. Image stabilizer engine can even cause some shake thus making images less sharp.
So as you can see, shooting with tripod is not as trivial as it might seem at first, but also not that hard when you know how to do it.


