
When I just started getting interested in photography I discovered many interesting sites and forums on the web. And from time to time I saw this mysterious abbreviation HDR, and very unusual photos under it. And for some time I couldn’t figure out what it is that people do with their photographs that make them “HDR”.
So finally I decided to research this issue and found out what it is, and many different techniques to achieve an HDR image. It has been quite some time now that I have been playing with HDR images and gaining knowledge on the topic.
This is an introductory article into the HDR photography. I won’t discuss now any ethical or ideological questions regarding this issue but only explain what is HDR image.
HDR stands for High Dynamic Range. Seeing this, a beginner photographer will ask himself: “what the hell is this Dynamic Range”? Though this is somewhat complicated question, I’ll try to simplify it having HDR photography in mind.
Dynamic Range
When you shoot a photograph, you set certain exposure time and an f-stop. Let’s say, for example that you are shooting a scene with very dark areas and also very bright areas. In this case if you expose for light areas, in the resulting photograph you will have them correctly exposed and all light details visible while all the dark areas will be plain black. And if you will expose for dark areas, in the resulting photograph you will have the dark areas correctly exposed with all dark details visible, but now white areas will be completely burned (e.g. white, with no details). So dynamic range is how many dark tones and light tones can be seen in the same image without being burned or blackened. If I would take photo of the same scene with two different cameras – one with high dynamic range and another with low dynamic range (with the same exposure and aperture settings), then in the resulting photograph from the first camera I would see more details in very dark and very light areas, while in the photograph from the second camera these areas would be completely black and completely white.
But as high as the dynamic range of any camera can be, it has its limits, and these limits are way below the dynamic range that human eye can see. This fact makes it practically impossible to create photographs of places with high contrast lighting, on which you will be able to see everything your eye saw while taking the photo. For example you are shooting a street with buildings on both sides of it. The sun is lighting the scene so that tops of the buildings on one side of the street are bright but rest of the scene is shadowed. No matter how you will expose, you will either get the building tops in good exposure and all the rest dark with barely visible details or burned building tops with good detail in dark areas. You get the idea. It is always a compromise. Well, not always – you can create an HDR image! This brings us to the second part:
High Dynamic Range image – HDR.
HDR image is created from combining several photos of the same scene taken with different exposures. This merge is done, of course, on the computer with the aid of photo-processing software. So in order to create an HDR image you will have to take several photos (usually not more than three) of the same scene each time shifting exposure by one stop (or 1/2 stop or 3/2 stop – your experience will guide you here). The easiest way (but not always the best) is to make first exposure according to what the camera suggests (using center weighted average meter), second exposure should be one stop below the suggested exposure and the third exposure – one stop above the suggested. Using a tripod is highly recommended so that all three photos will have exactly the same composition without little shifts. These shifts can be somewhat corrected in post-processing though.
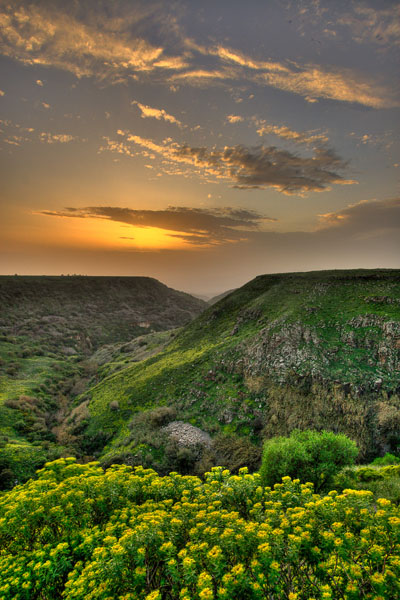
In order to create this image I took three photos with exposures spaced by single stop, and then combined them in Photomatix. It is a very easy to use but also very versatile program for creating HDR images. Here I intently exaggerated the HDR effect of the resulting image.
After the photos are created you load them to your computer and use software to create a final HDR image, in which both – light and dark areas of the photograph will have details. One of the most known and used software for creating HDR images is Photomatix. In several recent versions of Photoshop there is also an option for creating HDR images. When this “HDR effect” is used to its extremes, the resulting photos look unreal, like a drawing or painting, but used carefully it helps to bring back the otherwise lost details to photograph without making it look unrealistic.
There are many opinions regarding whether should one use HDR or not. Some people claim that it is not real photography, others use HDR to its extremes creating “paintings” instead of photos. In this article, as I promised I won’t go into this question and just say that I don’t agree with either of these two opinions ☺
Pingback: What is Pseudo HDR image? | Photo Pathway
Pingback: How to create HDR image in Photoshop | Photo Pathway