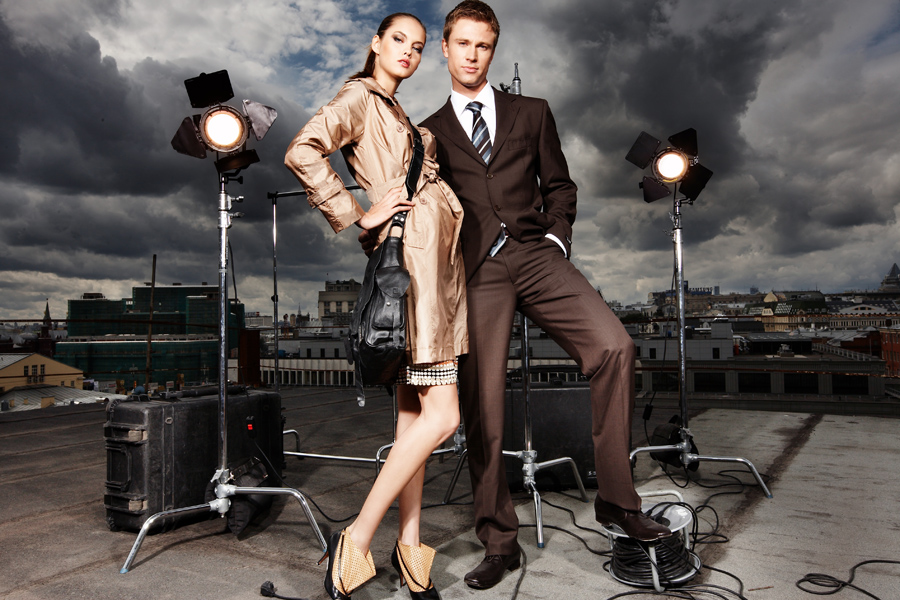
It is a very common issue among photographers, therefore many articles were written on this, and now it is my turn. In this post I will describe how I try to keep myself inspired and what helps me to come up with ideas for photographs hoping that you find my experience useful.
Inspiration and ideas go somewhat together – when you feel inspired, most of the chances that you’ll have ideas for photographs, and when you have an idea for photograph, it’ll probably inspire you to bring it to life. Therefore the following text will be a mix of tips for getting inspired and coming up with ideas for images.
I have a notepad in which I write quotes from different sources, which inspire me. You know, you read something or watch TV and at some point you hear a sentence that makes you go ” That’s right! What a great thought!”. If you don’t write it down most of the chances that you’ll forget it. So I write down these quotes and go over them from time to time or when I feel uninspired. That helps a lot, because not only you will be reading inspirational quotes, but you will also remember the circumstances at which you wrote it down, and that in itself can bring back the inspiration.
During your “good” periods, when you feel inspired think of the things, events, places, people, which inspire you and write all that in the same notepad. It’ll help you a lot to get some of the inspiration back during the “low” periods.
Another thing that inspires me is listening to the music that I like. Listening to music while looking around for ideas for photographs can be a huge help. Think about it for a second – in the movies they always use various kinds of music to create different moods. Take action movies for example. A certain music can add tension to otherwise usual situation. So when you listen to certain music and look around you, you will see things differently depending on the music that you listen to and it just might inspire you to raise your camera.
I have a separate folder on my computer with my best photographs. When I create an image that I like very much, I add it to that folder. When inspiration leaves me and I feel that I won’t ever be able to create one good image, I go over my best images to remind myself what I am capable of.
When I come across an image that captivates me, I try to find out who is the photographer and then visit his website. If I find his works exceptional I bookmark his website. Over the years I gathered list of photographers that inspire me, and I come back and go over their work when I need inspiration.
I bet it happened to many of you, you keen photographers! You walk around doing your daily routine, and then suddenly a picture or a scene pops into your mind. It might be due to something that you see in front of you (on the street, in public transport, etc.), or because of your thoughts at that moment. It doesn’t matter why. But when it happens – write it down in a few words so that you won’t forget it. I do it in my iPhone because it is always with me. I have this nice diary application called Momento, and I write down there in a few words these pictures of my imagination. It doesn’t mean that I implement them all, but when I am out of ideas, I take a look at my notes and it helps.
In the Momento app that I mentioned above I can also add photos to text. So if I see certain situation and an idea pops to my mind based on that situation, I simply take a photo of it and add it to the diary entry.
Well that’s about it. All these things combined help me stay inspired and keep shooting during my lowest periods and I hope that you’ll find useful at least some of them.
If you have your own ways to get ideas for photographs and stay inspired, I sure would like to hear about them in the comment section below, and
Remember, you only need to enter your name to leave a comment!
I am self-taught photographer. Actually I did take one course in photography, but it didn’t help me much, besides understanding the fact that I don’t like to shoot in groups where ten cameras are pointed at single subject. I learned photography from much practice, web sites, other photographer’s work, tutorials, and books.
Books… books… sounds easy right? You pick up a book, you read it, and you become that much smarter. Well, as I found out in photography it is not always the case. There are tons of photography related books, but I might just start a war here by saying that many of them are pretty much the same. You know, books that named something like “The complete photography book” or “Everything you need to know about digital photography” or “The most useful photography tips”. I am just throwing titles here so you’d get the idea.
Here is the thing – when you’re into photography for a couple of years, and you already got your basics as to how to operate your camera, what are f-stops and shutter speeds, ISO, you know all the basic stuff – you realize that all such books have no value for you whatsoever because they are chewing on the same material over and over again. In photography all these basics are just the beginning, not really photography but the initial tools to it, and frankly you can learn all that on the net much faster.
So realizing that, I was looking for books that would really be helpful to me in my evolution as a photographer. And here are two of the books that I found to be just great! I learned so much from them, and I am sure that many of you will too, if you decide to read them.
In this book Michael describes different aspects of photographic composition such as framing the image, graphic and photographic elements of composition, composing with light and color, the intent of the photographer when composing, and more.
What I liked the most about this book is that Michael doesn’t say that you need to do this or that in order to get a successful image. He describes all the different aspects of composition and how they might affect the result, giving appropriate examples along the way.
Michael explains certain rules of photographic composition and at the same time shows that rules are meant to be broken.
In my opinion this book is… how can I put it… the advanced basics of composition in photography. I really couldn’t say that this book is very basic, but at the same time I think that any photographer should read it right after his camera’s manual, or even before. It is not enough to know how to operate your expensive equipment (though it is essential, I must say 🙂 ) in order to create compelling photographs. You have to understand how composition is created in photography, and Michael Freeman explains it perfectly in this book.
If I would learn photography in any institution, I’d sure hope that this book is included in the curriculum.
This book is actually is pretty famous one, and Joe McNally is pretty famous himself. He was Life magazine’s staff photographer, he also shot for National Geographic, and many other big names. Really, I am sure that Joe McNally doesn’t need my introduction 🙂
Recently I’ve read some negative feedback about this book, saying that Joe doesn’t teach in this book useful things but instead talks about his life and photographs. Another argument was that Joe has a big budget for his assignment and he could allow to buy expensive props for his shots. I felt pity for the person who wrote
that feedback as he (or she) didn’t understand what really this book is about. In this book Joe writes about his assignments – how he got them, what were the demands, and how he solved them. There is not a lot of technical data, but there ARE enough technical details, for a thinking person to fill in the blanks.
More important to me was to know HOW this man thinks, how he operates under pressure, and where his creativity comes from. Joe writes about all this in this book. It is also PACKED with creative solutions to many difficult problems that Joe’s assignments presented. I learned a lot from this book, and if you read it with right mindset you will too.
This book’s aim is to inspire photographers to explore and develop their creativity, to show that any photographic problem can be solved one way or another. And it contains lots of examples to back it up. From the other side Joe also tells the truth about photographer’s life, that it is not easy, and not everything always goes the way that you’d like it to.
Again, when you are past the basics of photography, you need to develop your photographic vision and creativity, and this book helped me a lot in my quest. I think it could help you too should you decide to read it.
Did you read any of these two books? What do you think of them?
Remember, you only have to enter your name to leave a comment!
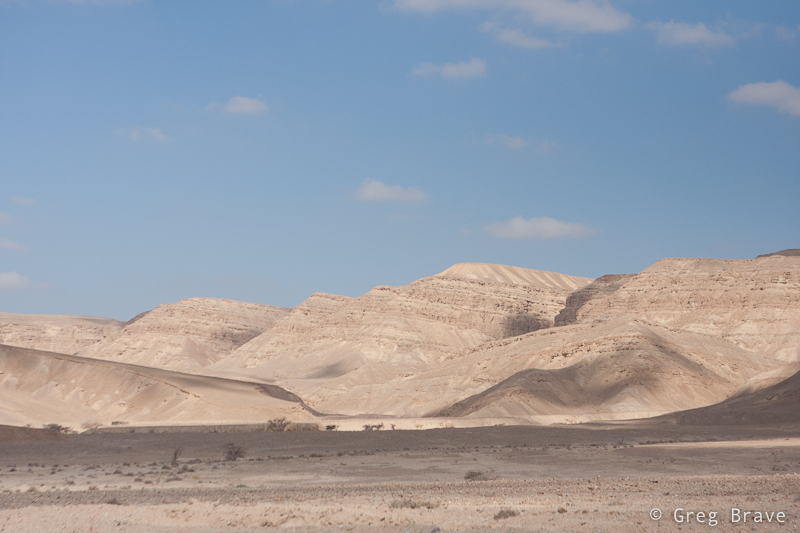
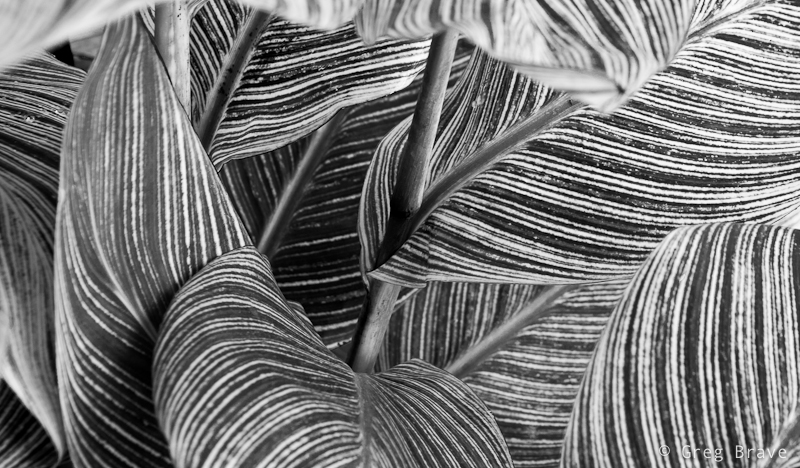
From time to time we all encounter black and white (B&W) images that look very dramatic. Many times I’ve seen B&W images that simply took my breath away, but somehow most of the times when I tried to convert some of my most beautiful images to B&W (which I thought would look great in B&W), I was disappointed. I tried to increase contrast but it didn’t help a lot. And then I discovered (by myself! 🙂 ) the way of manipulating B&W images in Lightroom to significantly improve their visual impact, and I want to share it with you here.
I mostly shoot RAW, so my images are always in color even if I shot them with BW intentions. In order to turn them into B&W in Lightroom I go to the develop module and choose B&W. But only converting to B&W most of the times doesn’t deliver good results, and image often looks dull and uninteresting. Even if you try to adjust the color version of the image (vibrance, contrast, etc.) before converting to B&W, still the B&W version lots of times won’t be satisfying.
Here’s what I do. In the develop module of Lightroom there is the following section:
When your image is in color then the “Color” is highlighted, and if you click on the “B&W” it is automatically converted to black and white, below it appears caption “Black & White Mix” and 8 sliders (from Red to Magenta).
Below you can see an example of colored photograph before I clicked on the B&W, and immediately after. As you can see the B&W image is not that good.
Click on the photo to enlarge.
Now I’ll show you how the black and white version of the above image can be improved.
After I converted the above image to black and white by clicking on “B&W” button, here is what the Black and White Mix looked like:
Each slider in the mix is responsible for a different color, but since the image is in BW, when you drag the slider, what changes is the brightness of that color in the B&W image. So for example if I want to darken the sky, I drag the blue slider to the left side. In this manner I adjust all the sliders, so that my final image looks just as I envisioned it in the first place.
Back to my example. Here is the final image after adjusting the sliders:
Click on the photo to enlarge.
And here is how the sliders of the final image are positioned:
Blue slider is moved to the left in order to darken the sky and make the white clouds stand out. Yellow slider is moved to the right to make the hills brighter. Some other sliders are also adjusted but not all of them. For example I didn’t change the position of the red slider, because there is almost no red tones in the image, so dragging it doesn’t change much.
Of course you can use this technique with any image and not only landscape shots.
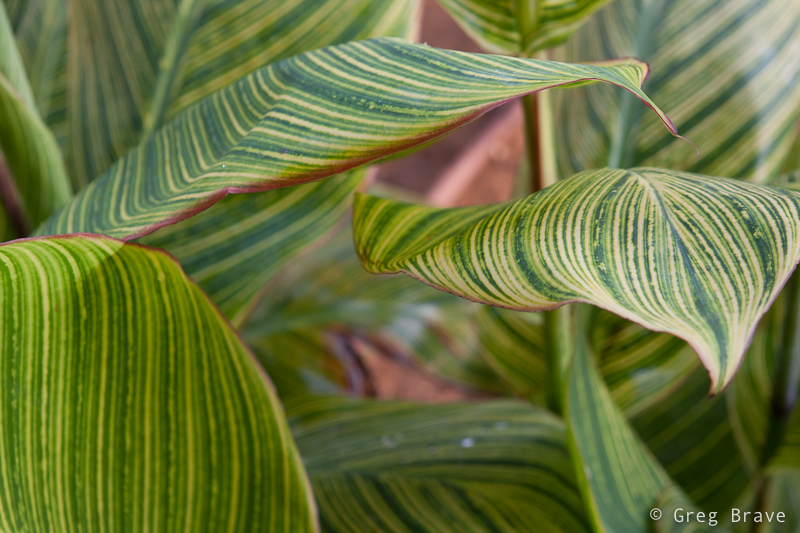
Here is another example. I shot these green leaves with intention to later convert them to B&W for a more graphic representation.
Click on the photo to enlarge.
This is what the sliders looked like before I played with them:
And this is the final version of the image just the way I imagined it in the first place. Below it you can see the final positions of the sliders.
Click on the photo to enlarge.
Converting just to black and white is not the limit. In this final example you can see another shot of the same leaves, but with two versions of creative editing.
Click on the photo to enlarge.
The first is the black and white version, but then I tried to add a sepia tint and vignetting and ended up liking this second version even more than the B&W one, but it only became possible after creating the B&W version using technique that I showed.
Click on the photo to enlarge.
If you have your own techniques for converting to B&W you are most welcome to share them here, and Remember, you only have to enter your name to leave a comment!
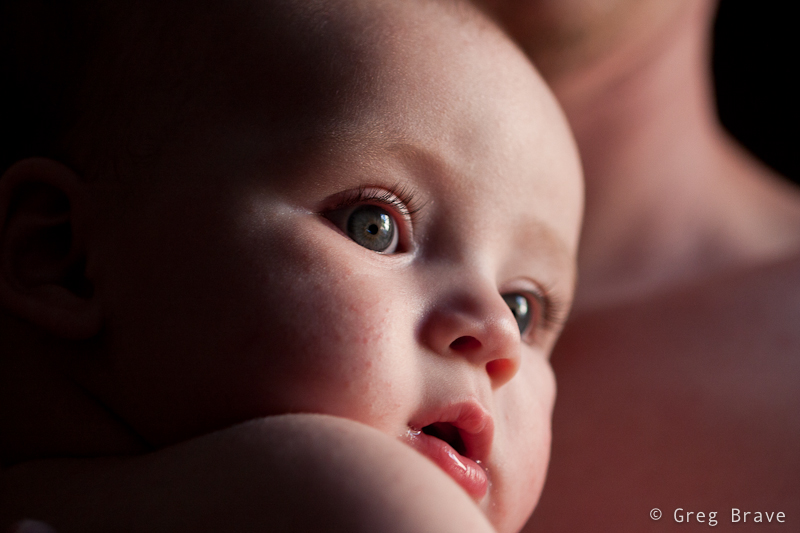
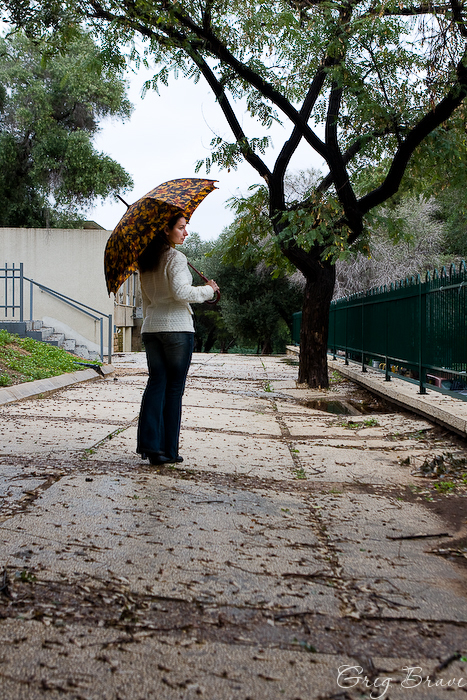
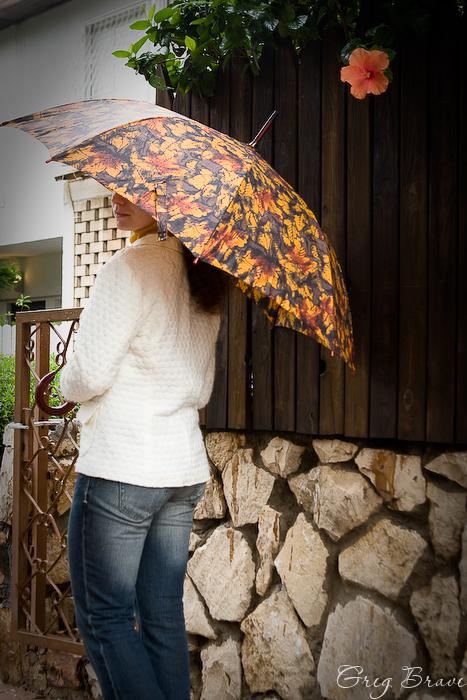
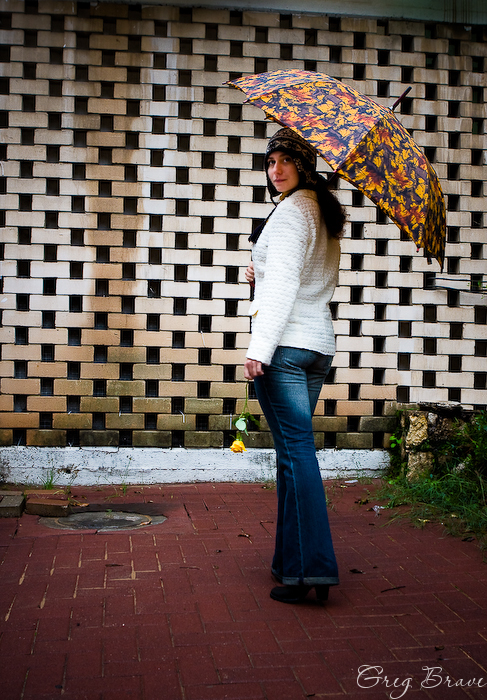
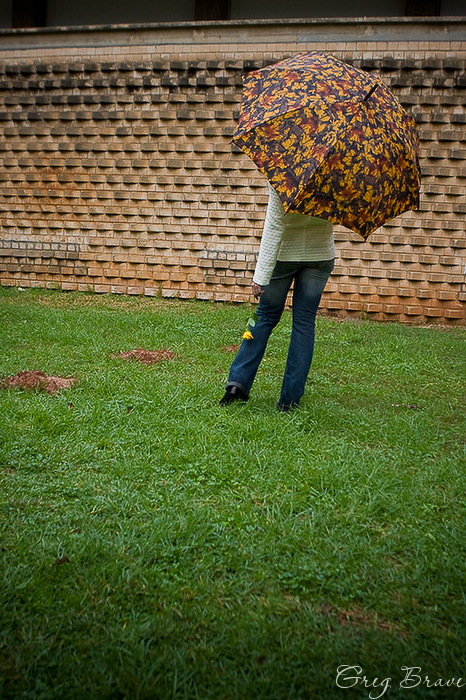
Recently my good friend asked me to photograph his baby son Eric. I gladly accepted because I don’t usually get to photograph babies and wanted to give it a try. The only problem was that my friend’s house didn’t have any suitable place to make a little studio out of, every place I looked at was too cluttered with stuff, which could distract the viewer’s attention from Eric. Finally I found a few places but knew in advance that the resulting photographs won’t be the way I’d like them to be.
Still I wanted to make at least a few photographs that would stand out and satisfy my artistic demands 🙂 The only solution I could come up with was to shoot close-up shots of Eric so that background wouldn’t matter much. Three of those shots I chose to present here.
The key aspect of the following photographs is the light. It is different in all three of them, but in each photo it plays very important role.
For the following photograph I used a 100mm Canon macro lens at f2.8. I had a flash with me and tried to use it, bouncing from the ceiling or walls and varying its power, but I didn’t like the results – the light was too harsh and too white for my taste. Yes I could use a 1/4 CTO gel to warm up the light a little bit, but I choose a different approach instead – I asked my friend to take Eric and come closer to the window.
It was about 5 o’clock in the afternoon and sun light was still pretty strong, but was already getting warmer as sun got lower and lower. After positioning the happy couple the way that there were no significant shadows on Eric’s face I started to shoot, and the photo below was the winner of that batch. I like it because of the intimacy it transmits to the viewer, the closeness between the child and his parent. Because the light coming from the window was much stronger than the light in the room I could set the exposure so that the background remained completely black.
In the next photo I took Eric to another window in the house, with transparent white curtains to serve as background. I intentionally went for the high contrast in lighting in order to create a little drama. But nevertheless as you can see there are no harsh shadows on Eric’s face, that would be unaesthetic for my taste. I like the way his eyes are emphasized in this photograph as if they were eyes of an adult but on a cute baby face.
Click on the photo to enlarge.
I also included the photo below in this article to demonstrate use of reflected light. In this photograph my friend hold’s Eric close to his body, and the light from the window reflects from his body and lights Eric’s face with soft warm light. So in order to create warm light you don’t always need gels and flashes… sometimes human skin can do the job just fine! 🙂
Click on the photo to enlarge.
What additional tips can you share regarding photographing babies? Did you like the photographs presented here?
As always comments are highly appreciated, and
Remember, you only have to enter your name to leave a comment!
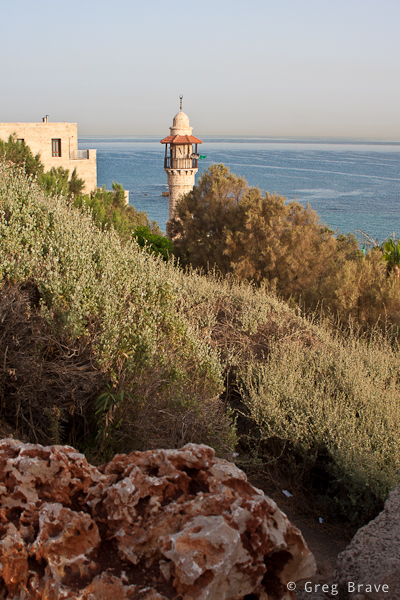
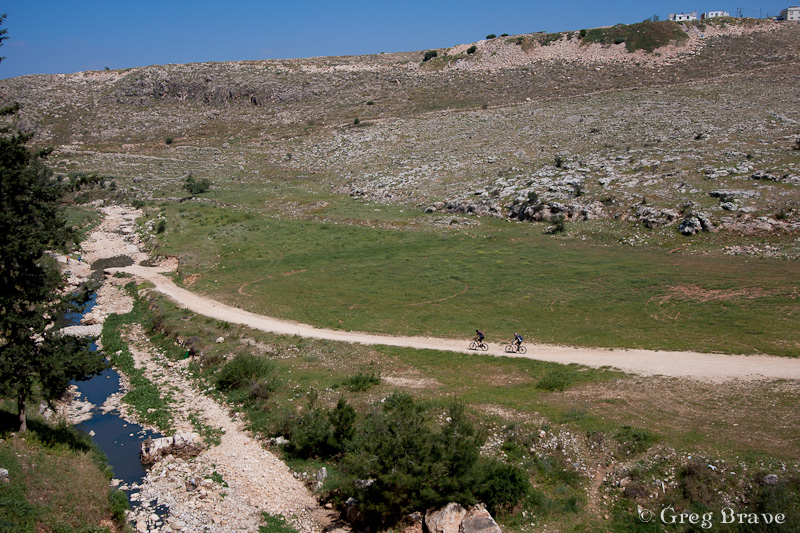
Any photographer who lived in Israel, amateur or professional, must have visited for at least one photographic session the old Jaffa town. It is known for its beautiful alleys, old architecture, and historic heritage. The downsize of this is that it is difficult to create unique images of Jaffa since so many have photographed it before. But still I decided to give it a try.
One early morning Ira and I went to the Old Jaffa. Ira to take a walk there and me to try and create unique images of Jaffa. I would like to share some of those here.
In the photo below you can see the Sea Mosque. It is a small mosque (closed to visitors) standing near the Jaffa’s sea promenade.
Click on the photo to enlarge.
This is Wishing Bridge. On the bridge’s rails there are Zodiac signs. Ancient legend has it that if you stand on the bridge, touch your Zodiac sign, look at the sea, and make a wish, it will come true. I was standing near this bridge for some time thinking how I could photograph it differently, because I’ve seen so many photographs of this place. And then this little dog showed up, and just before stepping on to the bridge turned back to it’s owner for permission. I snapped the photo right that moment, and it looks like the dog invites the viewer to the bridge.
Click on the photo to enlarge.
In the next photo you can see The Faith Statue. Even though I shot several photos from much closer distance, I like this photo the most, because in my opinion the palm trees add a nice touch to the overall mood of the image.
Click on the photo to enlarge.
This one is just a closeup, but I like it. In order to create something like this you need to have the fluffs 🙂 which are in focus to be much closer to you than the rest of them. Otherwise the background won’t be blurry enough.
Click on the photo to enlarge.
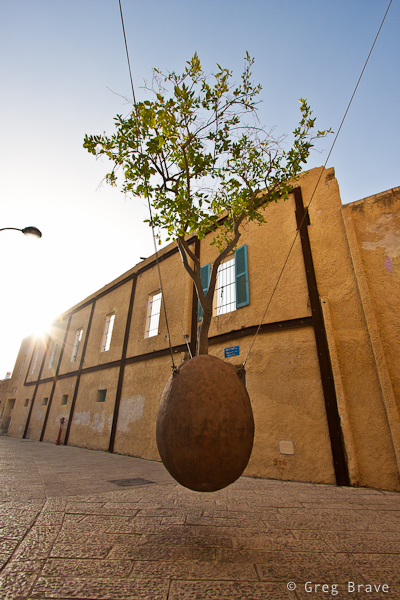
Now this is very famous Suspended Orange Tree of Jaffa. When we came there the sun was getting pretty high and I was looking for ways to use it in my photograph. Instead of shooting with the sun behind me, I decided to try and include the sun in the frame. Since I shot RAW I could later brighten the shadowed foreground (I did it in Lightroom by increasing the fill light). After shooting the photo on the left, I started thinking of ways to give this composition a more surreal look. Suspended tree itself is somewhat surreal, and so I wanted to enhance it. While I was wandering around the tree and thinking, I suddenly saw Ira standing behind it… actually I saw only her legs and it looked interesting to me and I photographed her standing behind the suspended tree so it looked like the tree had legs to stand on the ground. As I was getting ready to wrap it up and go somewhere else, this woman showed up from one of the alleys, and Ira was still standing behind the tree. I quickly snapped another shot and ended up liking it the most.
Click on the photo to enlarge.
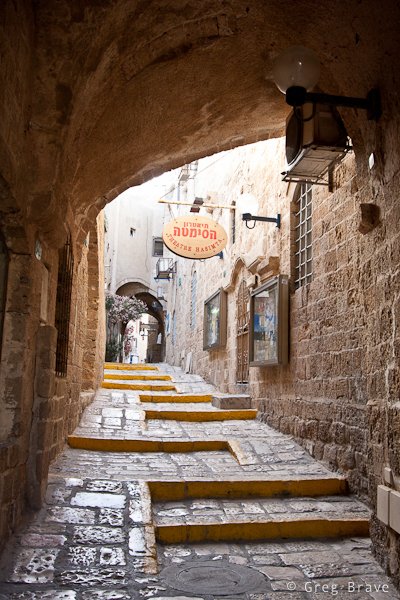
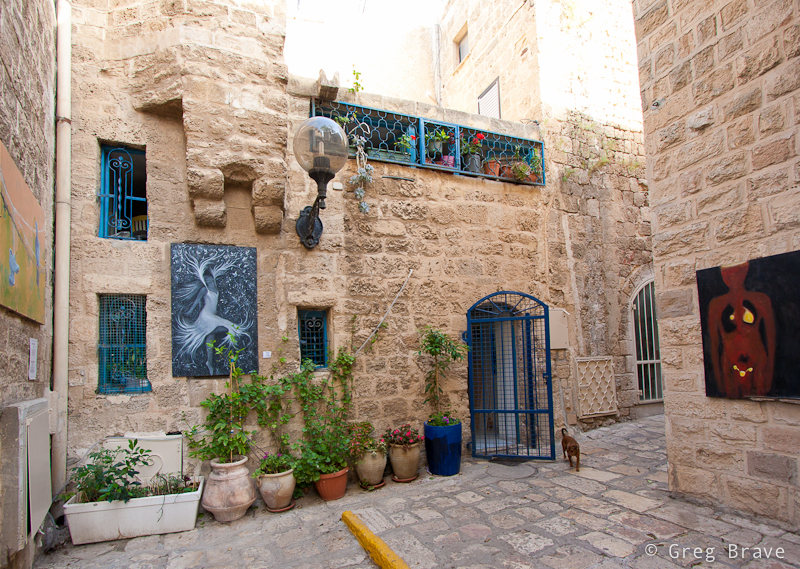
Many artists live in old Jaffa. In the photos below you can see a typical alley and an entrance to artist’s home. The paintings that are hanged on the walls help create the unique Jaffa atmosphere of art, ancient age, beauty, and relaxation.
Click on the photo to enlarge.
But not only artists live in old Jaffa town. There are also many half ruined buildings occupied by homeless people, and one can strongly feel the presence of poverty. I saw this man sitting on the plastic chair right there on one of the Jaffa’s streets. He had such a wise-proud look that I couldn’t resist and snapped a photo of him.
Click on the photo to enlarge.
That concludes my photographic reportage of Old Jaffa town in Israel.
As always comments are highly appreciated, and
Remember, you only have to enter your name to leave a comment!
If you are new to the whole HDR concept I suggest you first read my posts titled HDR Introduction and Pseudo HDR
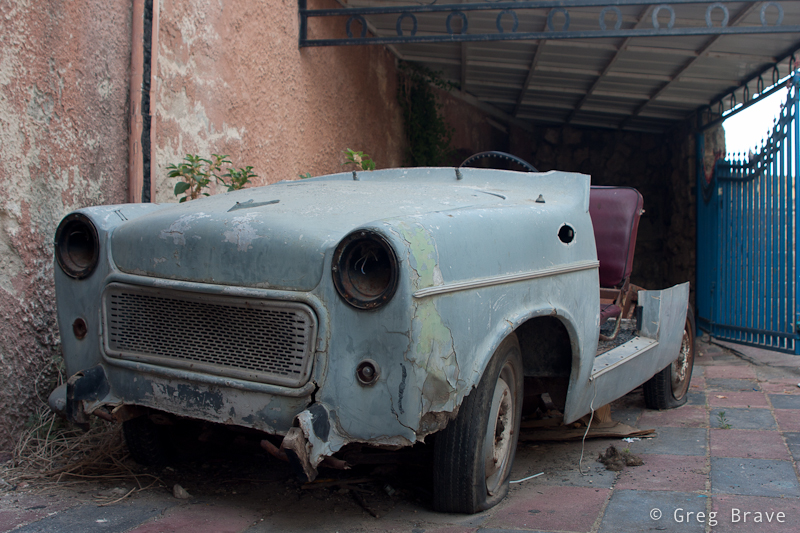
Anyone who heard about Photomatix, knows that it creates HDR images. But in addition to a usual HDRs combined from several exposures, you can also create a nice pseudo HDR images – in short an “HDR looking” image made from a single RAW file.
In order to do that you open just that one RAW file in Photomatix, and it “understands” that you want to create a pseudo HDR. Then you use the great tone mapping tools that Photomatix offers and tweak your final result. In my next post I will go into more detail of how exactly to work with Photomatix, but here I just want show a little of what’s possible.
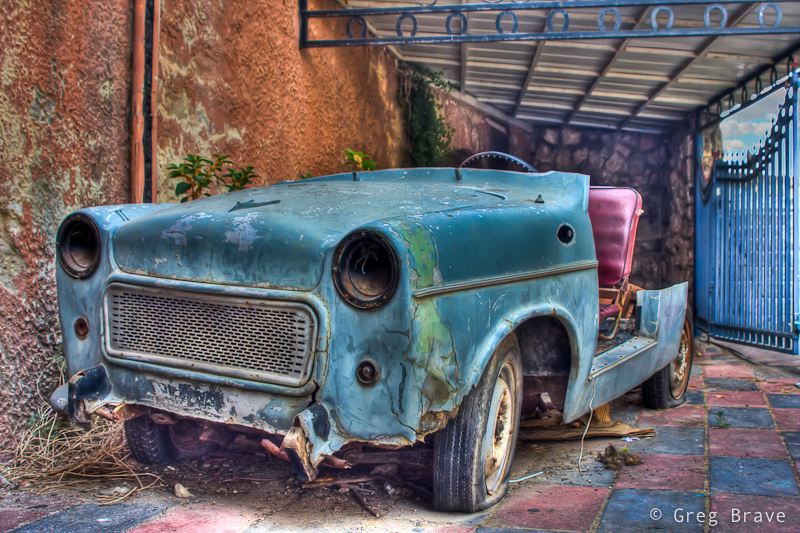
I would like to illustrate this by presenting the before and after versions of an old car photograph. As you can see the change is quite drastic, and it shows how much information is really hidden inside that RAW file.
Photographs by Greg Brave. Click on the photo to enlarge.
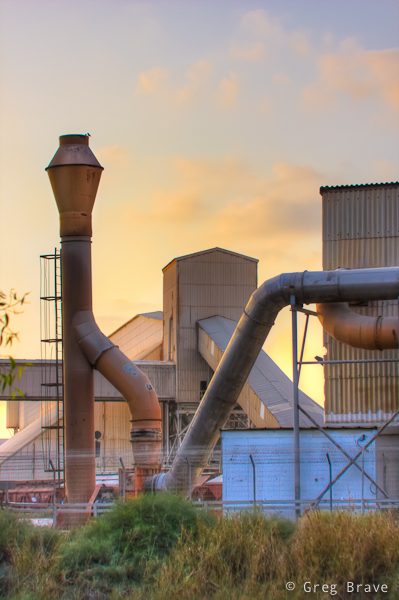
Somehow in my mind an “exaggerated” HDR images, the ones with slightly unreal look, are always associated with old cars and industrial scenes, so in order for this post to be complete I am adding here another pseudo HDR image (yes, that one is also made from a single RAW file), containing industrial buildings.
Photograph by Greg Brave. Click on the photo to enlarge.
One of the advantages of pseudo HDR is that you don’t always have to use tripod to make it. What I mean is that in order to create ordinary HDR image you’d have to take multiple exposures and use tripod to stabilize your camera so that all your exposures would be framed exactly the same. This is not a problem when you are using only one raw file.
So if you have in your photo collection some single RAW photos that don’t look too interesting, you may want to use Photomatix to create a pseudo HDR from them and see what happens. The result might surprise you!
This time I would like to talk about creating abstract photographs. There are many ways of doing it, and one of the simplest ones is to take a closeup shot of something with interesting texture making it unclear what it is from one side but creating an interesting combination of forms, colors etc. from the other side.
For example you can find an old wooden door with paint which partially came off and take a closeup of it, or take closeup shots of rusty metal. Another idea would be taking closeup shots of architectural creations including particular parts without revealing the form of the building. There are many more ways of course, and these are only a few examples.
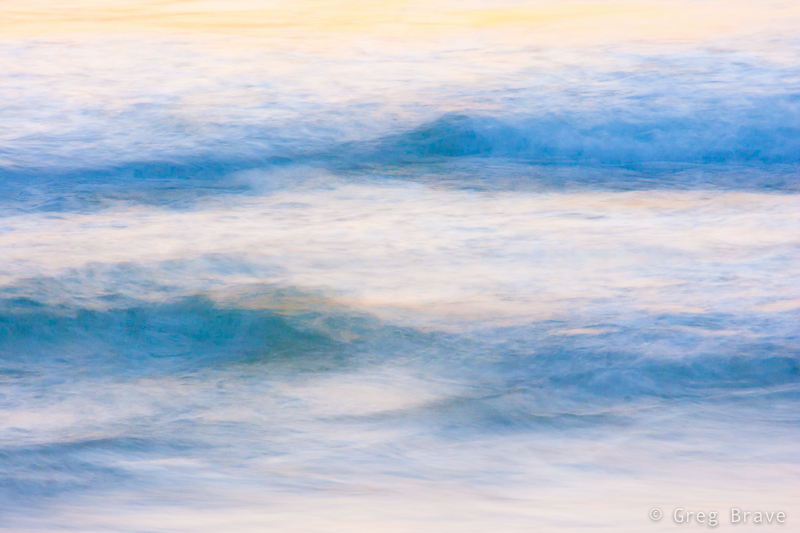
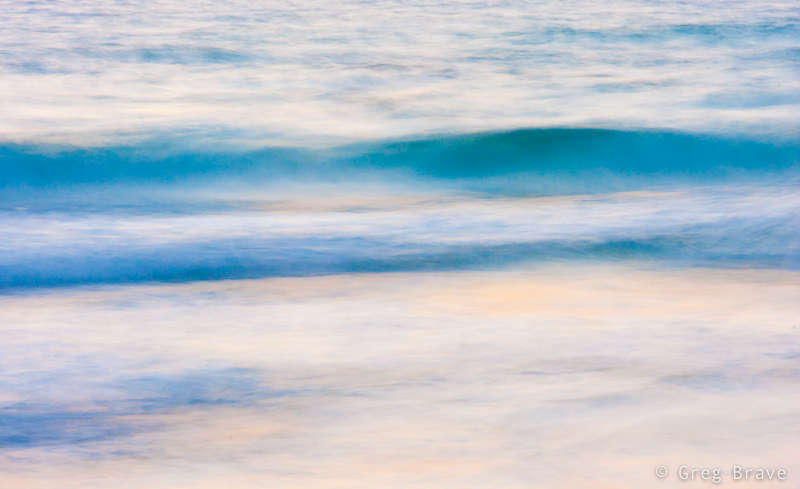
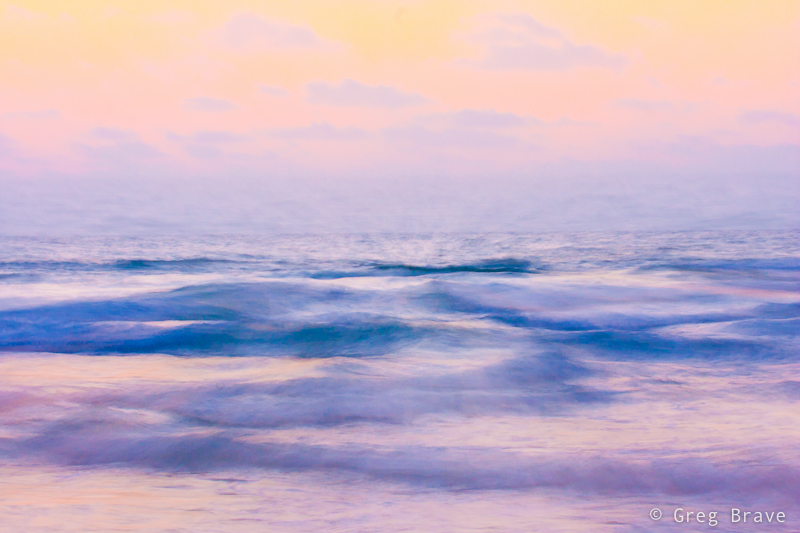
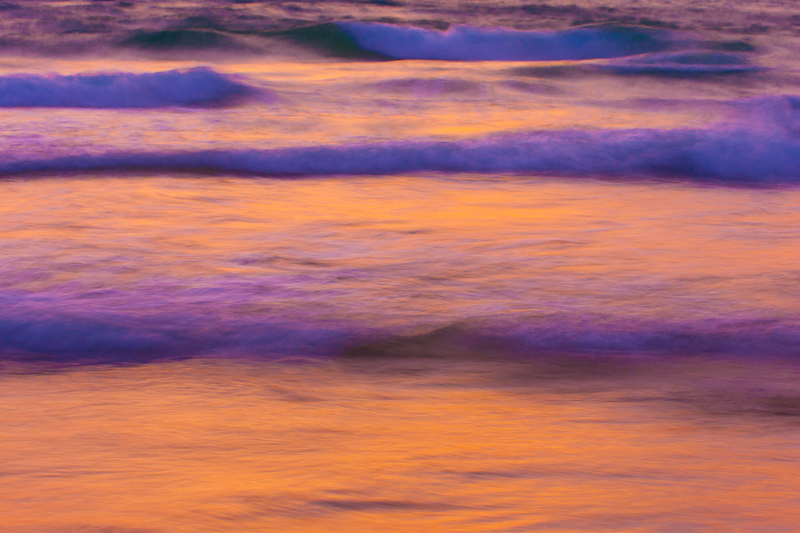
For these series of abstract photographs I decided to photograph waves. I came to the seashore about an hour before the sunset, put down my tripod, mounted my Canon 40D and started shooting.
Photographs by Greg Brave. Click on the photo to enlarge.
As you can see these all tight crops (well all except one) of waves taken with long exposure. Using long exposure in this case is critical because if I would use normal exposure (1/50 sec and faster) then the waves would be easily recognizable even in tight crops.
Photographs by Greg Brave. Click on the photo to enlarge.
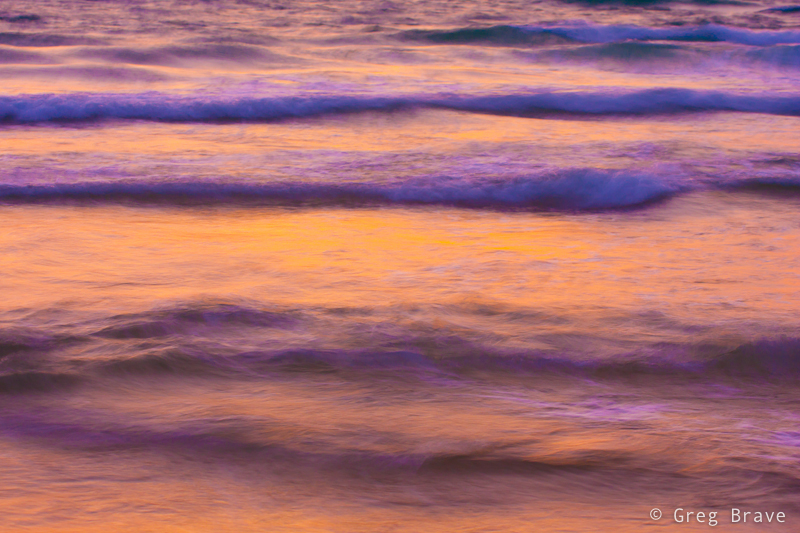
After the shoot I came home, opened the photos in Lightroom and started playing with them trying to get the best abstract results I can. And I found something really beautiful, which I would like to share with you.
Everybody plays with Vibrance and Saturation controls (in any photo processing application), but when you work on a “real world” images, not abstract, increasing saturation or vibrance too much makes the image look not real, over-saturated. But in this case my goal was to create a beautiful abstract image, and I saw that when I crank the saturation slider to the maximum, it gives me very nice result making the photos look more like paintings and also emphasizing the warm sunset colors. But it wasn’t perfect, and I am sure that many of you encountered this – when you increase the saturation to a certain level you start having color artifacts in your image, and you are forced to decrease it to the level where there are no artifacts.
Here is what I found in Lightroom – in order to eliminate these color artifacts you have to increase the Luminance Noise Reduction slider (in the Develop module) until no color artifacts present in the image! I was stunned – because now I could increase saturation as much as I wanted. There is one downside to it though – the image looses some of its sharpness, which wasn’t a problem in my case.
Photograph by Greg Brave. Click on the photo to enlarge.
I would be happy to hear what you think of these images. How would you create an abstract photograph?
Remember, you only have to enter your name to leave a comment!
This is a very interesting question you know. I am sure that anyone who takes interest in photography at times thinks about it. In my head sometimes these thoughts sound like “I’d really like to make a great photograph… yeah… but what should I shoot?… what should I create?… ”
If you really want to create something, especially if you are not sure yet what it is, you have to allocate a certain amount of time to thinking about it. I mean that you have to tell yourself – “today between 10:00 and 11:00 I am thinking about creating an interesting (also can be beautiful, romantic, breathtaking, sad… anything you prefer) photograph”.
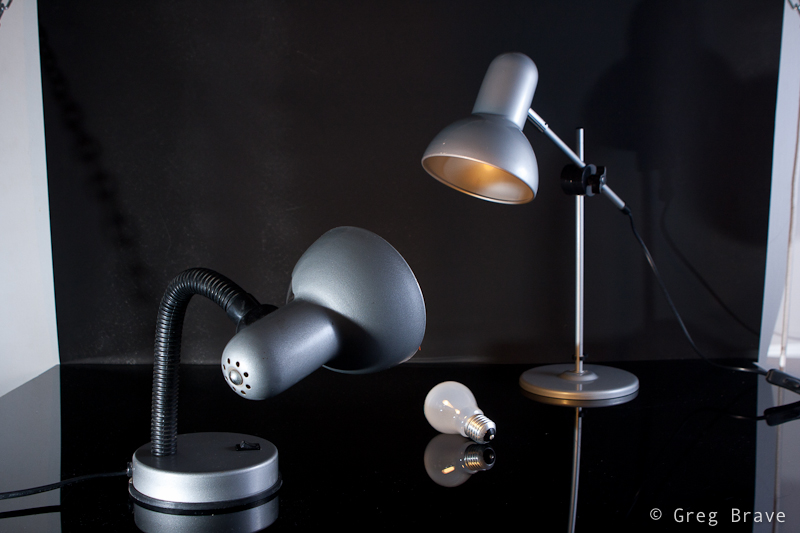
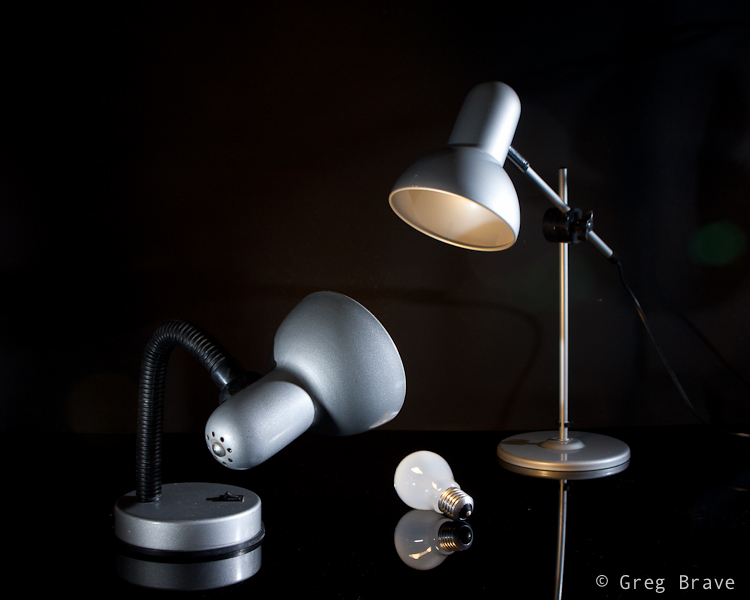
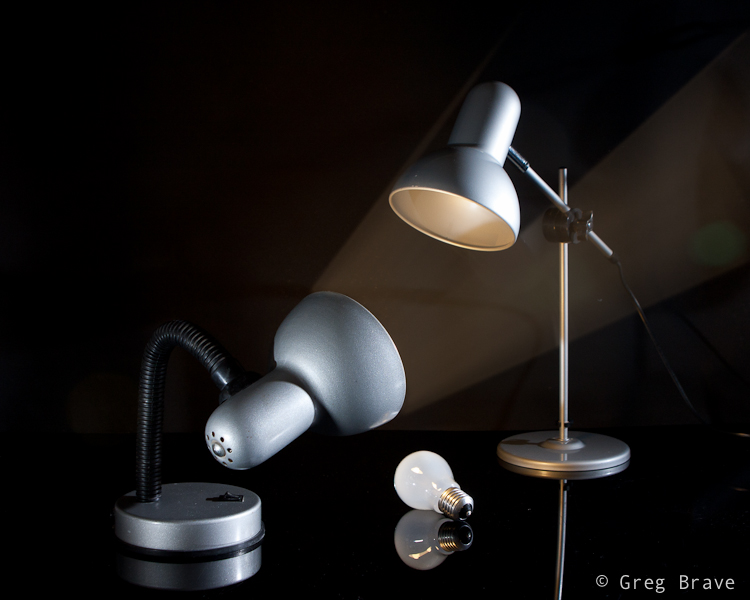
I want to demonstrate this from my own experience. A few days ago I felt this urge to photograph something at my tiny home studio. I didn’t have any idea what it would be, but I just had this desire to create. So I made myself sit down for about 45 minutes, come up with ideas, and briefly sketch them on piece of paper.
My first problem was that not ANY idea that came to my mind was possible to shoot because I was limited to the objects that I had in my apartment. Having realized that fact, instead of just thinking of any idea for photograph, I started looking around my home at different objects and thinking how can I use them creatively?
While looking I saw my table lamp. Actually it was always standing on my table, but until I made myself to think creatively, I never thought about this lamp as a subject for my photographs. And then, while looking at this lamp I remembered of some TV program I saw as a kid that had these two lamps jumping around like live beings, and I decided to try and create something in that direction.
I still had no idea what would come out of it, and I didn’t have any definite final result. So I just started sketching this lamp standing on the table in different poses and thinking what can be done with that. No, I can’t draw, and it doesn’t matter, because you need sketching only to help your thinking process.
One of the ideas that came to my mind was to photograph this small lamp with it’s light bulb lying beneath it, while the lamp “sadly looking” at the bulb. And so I did as you can see in the image below.
Photograph by Greg Brave. Click on the photo to enlarge.
In this image of lonely lamp looking at its light bulb I used only one flash from the left side with 1/2 CTO gel on it (this gel makes the white flash light to be warmer). I wanted a warm lighting here. Looking at the result I felt that it is not enough for an interesting image… I felt that it doesn’t conveys the “stare” of the lamp at the light bulb.
And then suddenly it hit me – I need another lamp to make this more interesting! And luckily my life partner Ira had one on her table. I took that lamp and started playing with two lamps. Finally great idea came to me – to make the second lamp “look” inside the first lamp as if to see “what happened? why you lost your bulb?” and so you can see my compositional setup in the photo below.
Photograph by Greg Brave. Click on the photo to enlarge.
Now, having the final idea of a shot in place I started thinking of little details. I wanted to emphasize the fact that the second lamp did have its bulb. How would I do that? Well, I decided that I would light the whole scene with white light, but I would also have yellow (warm) light coming out of the second lamp towards the first lamp. And you can see in the photo below that the down-looking lamp is warm-lit.
The final photograph below I accomplished using three strobes. Two strobes without any gels from left and right sides (I had to play with their powers to achieve the desired lighting), and the third strobe with 1/2 CTO gel on it I held in my hand and pointed inside the first lamp.
Photograph by Greg Brave. Click on the photo to enlarge.
After getting the final image above, I felt that there is not enough emphasis on the light that comes out of the second lamp. I wanted those rays of light to actually be seen. And here is a point that I am sure not all of you thought about. Rays of light are invisible unless they reflect off of something and hit our eyes. So in order to make these rays of light to be actually visible I had to have them reflect off of something – for example dust, or smoke. So if I would fill up the whole area with smoke then the rays of light would be seen. But then the rays of my two other flashes would also be seen, and the whole image wouldn’t be clear and crisp.
So I decided to take this work to Photoshop, and artificially add the rays of light, using the original light warmth that 1/2 CTO gel gave me (just used eyedropper tool in photoshop to sample that color). To give you an idea how I did it – think of Radial Blur filter in Photoshop. If you have additional questions regarding how I did it feel free to ask me in the comments. And for all the people who are against “Photoshop manipulation” – in the case of this photograph my goal was not to show reality, but to convey an idea of mine, therefore I am totally cool with using Photoshop here.
Here is the final result, which I am pretty happy to come up with.
Photograph by Greg Brave. Click on the photo to enlarge.
In conclusion – the main idea of this article is to show that in order to come up with interesting photographs, you have to allocate time for thinking – what you want to do and how you are going to do it. Even if you don’t have any specific idea in mind, just make yourself sit down and think for half an hour or so, and I am sure that you’ll come up with something interesting!
As always your thoughts and comments are welcome.
Do you agree with this article? If you don’t then why? Can you suggest additional steps towards being more creative?
Remember, you only have to enter your name to leave a comment!
Good day everybody! It has been a while since my last post. I had some pretty cardinal changes in my personal life, and was so caught up that couldn’t free my mind to write anything. But I continued to take photos and have some new stuff to share.
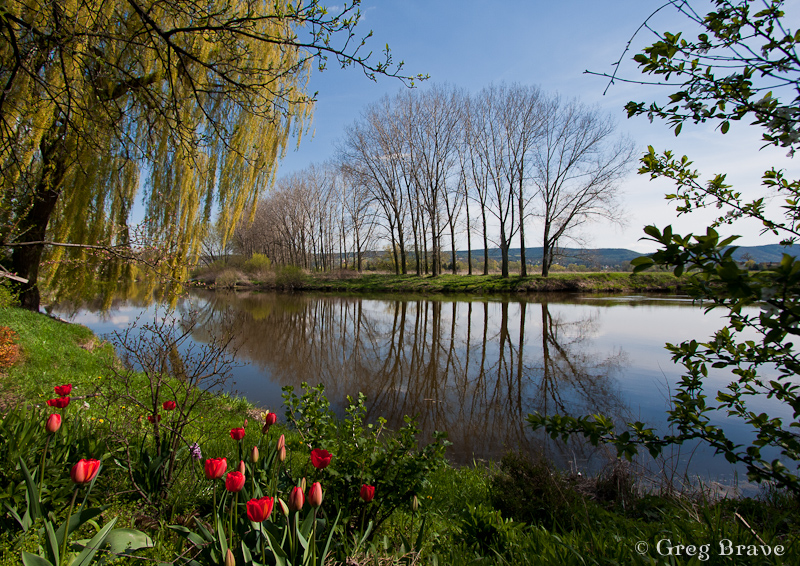
In addition to the changes, during this time me and Ira also went on an 8 day trip mainly to Switzerland but with short, 2 day stop in Prague. Actually one out of these two days we weren’t in Prague but in a small village named Černošice. It is located about 20 minutes by train from Prague, and it is so beautiful!
Černošice lies on the Berounka river, so we stepped off the train and went to the river right away. There is a nice walking trail along the river, and in the photos below you can see some of the views that we saw while walking there.
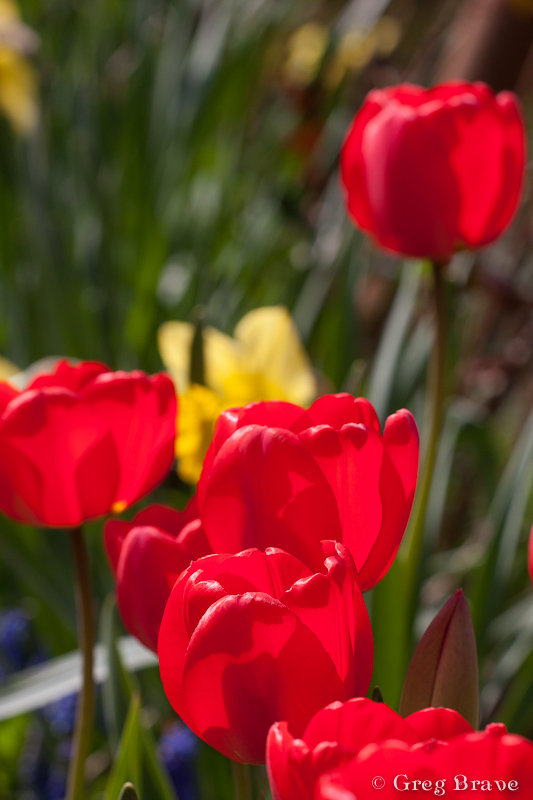
I saw these naked trees on the shore and their beautiful reflections in the water. I wanted to photograph them but thought that only the trees with their reflections were not enough to make interesting photograph, so I was looking for an additional element for my photograph. These red tulips were it.
Photograph by Greg Brave. Click on the photo to enlarge.
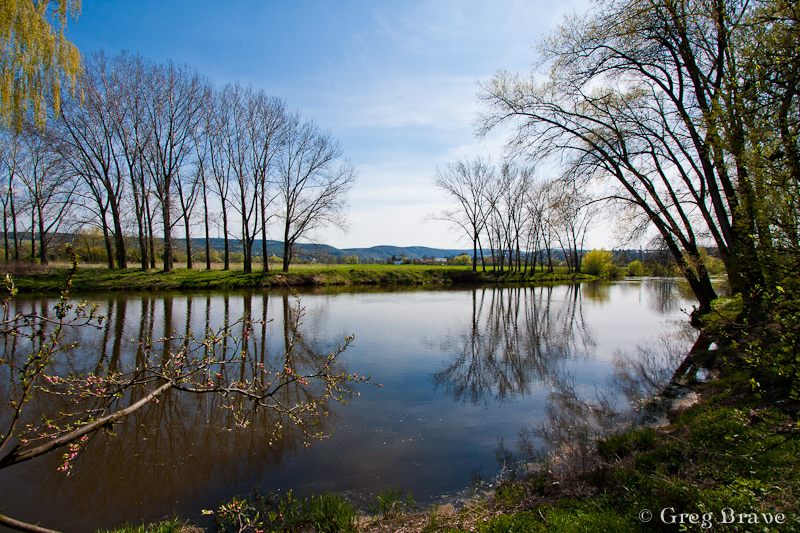
The photograph above was not enough for me and I was looking for additional ways to photograph these trees and their reflections and as a result I got the photo below. The additional element was the tree branch from the left. As you can assume I have much more photos of these trees in my collection, but I chose these two to show here because I think they are most successful composition-wise.
Photograph by Greg Brave. Click on the photo to enlarge.
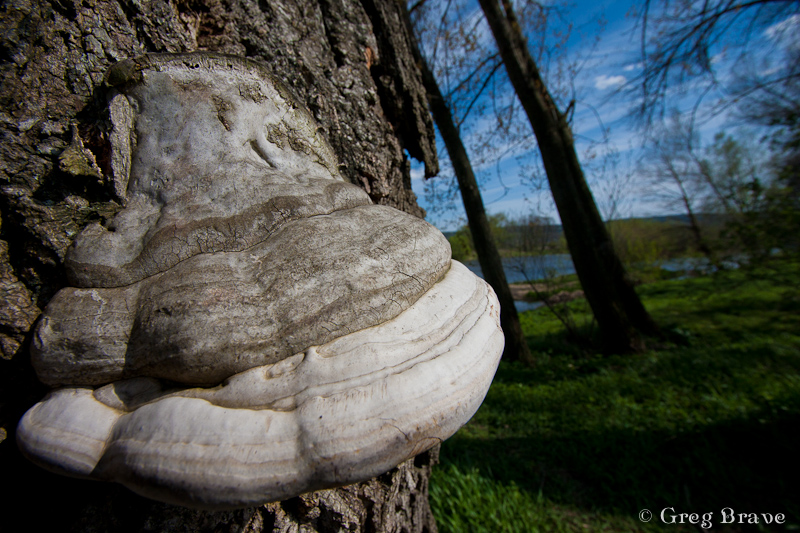
While walking, I saw this horse’s hoof fungus. Well, it is not an unusual sight, at least not in Europe, but I just got this idea to photograph it, but as always I looked for somewhat different way of doing it. I decided to use a wide angle lens to emphasize its form and at the same time to hint about where it grows.
Photograph by Greg Brave. Click on the photo to enlarge.
When I took the photo below I was almost certain that it won’t be something I’d share. The sun was harsh creating a very high contrast between the sky and the earth, but the clouds looked so interesting that I couldn’t resist giving it a try. And I am glad I did! I like this photo because it is pretty simple, but at the same time it conveys movement and a feel of space.
Actually this photo didn’t look exactly like this when I opened it in Lightroom. The lower half of it was almost completely dark. But here comes the magic of shooting raw – using the “fill light” slider I was able to recover many details. In general, I use the “fill light” adjustment slider when I am forced to shoot in harsh afternoon light, and there are some strong shadows. The fill light adjustment helps make these shadows much less disturbing.
Photograph by Greg Brave. Click on the photo to enlarge.
Next photo is pretty ordinary, I mean there are many photos like it out there, but I still liked it for being so bright, happy, and colorful, and couldn’t resist sharing it.
Photograph by Greg Brave. Click on the photo to enlarge.
I am not presenting here photos I made in Prague, since not long ago I had a more substantial trip to Prague and already posted photos from it. You can find my articles about Prague here and here.
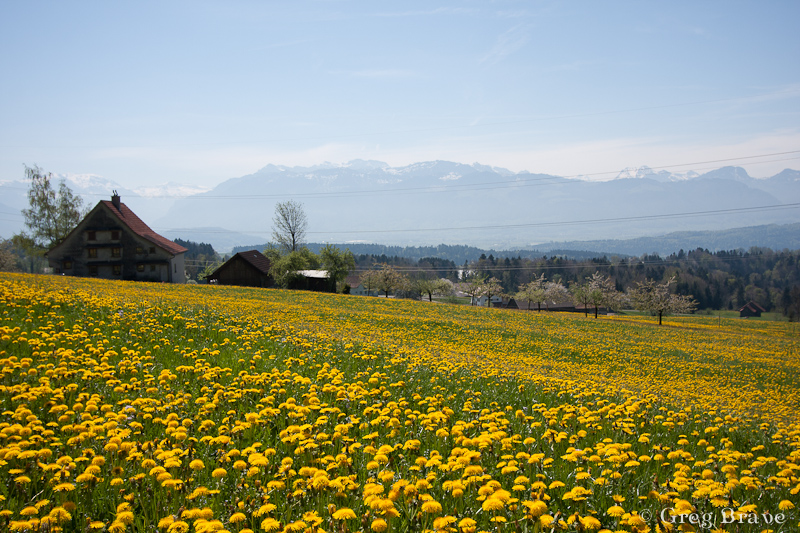
After short stop in Prague we continued to our main destination – Switzerland. I always wanted to see whether this country is as beautiful as photographs show. Believe me – it is!
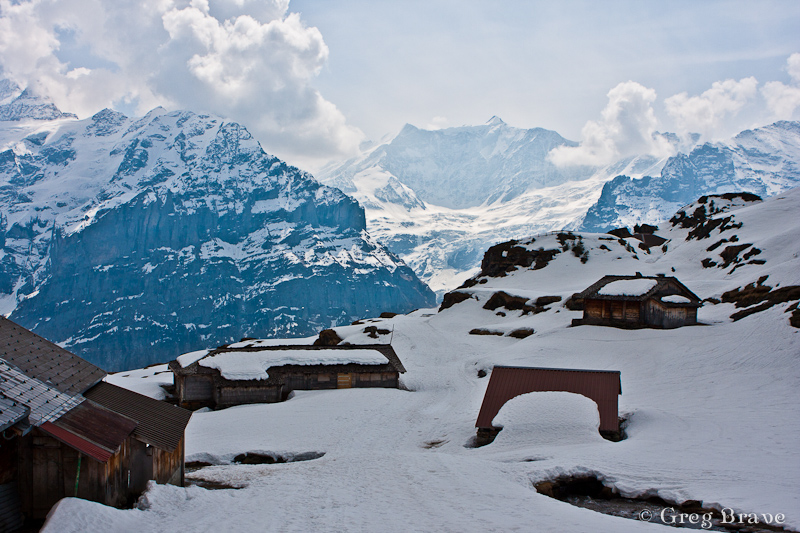
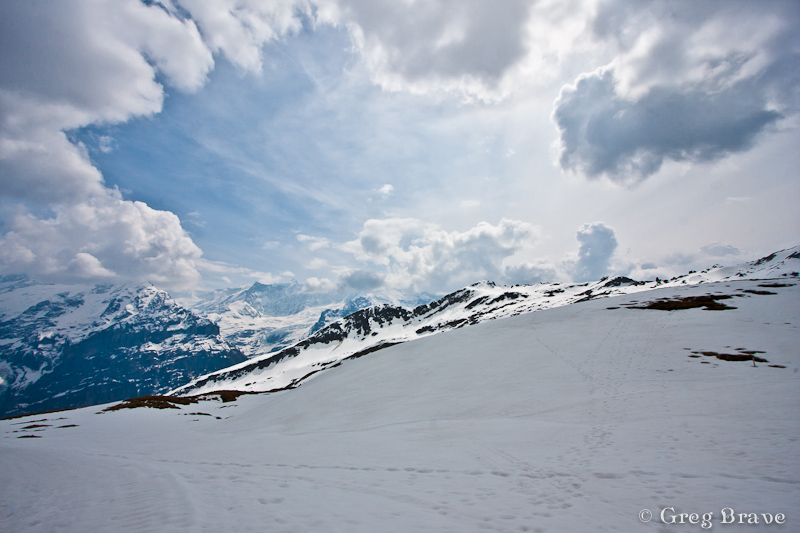
Our first destination was small town named Grindelwald. It is located in a very beautiful and mountainous area, which was exactly what we wanted. We camped in Grindelwald and went for a long hikes up the mountains from there. Since late April is still pretty cold, there weren’t much tourists (the ski season was over, and the summer hiking season didn’t begin yet), and we mostly hiked alone.
In the photographs below I will show some of the stunning views we saw on our hikes.
Photographs by Greg Brave. Click on the photo to enlarge.
I was looking for interesting shapes, patterns and angles to create interesting photographs, that would stand out. Whether I succeeded or not is for you to decide.
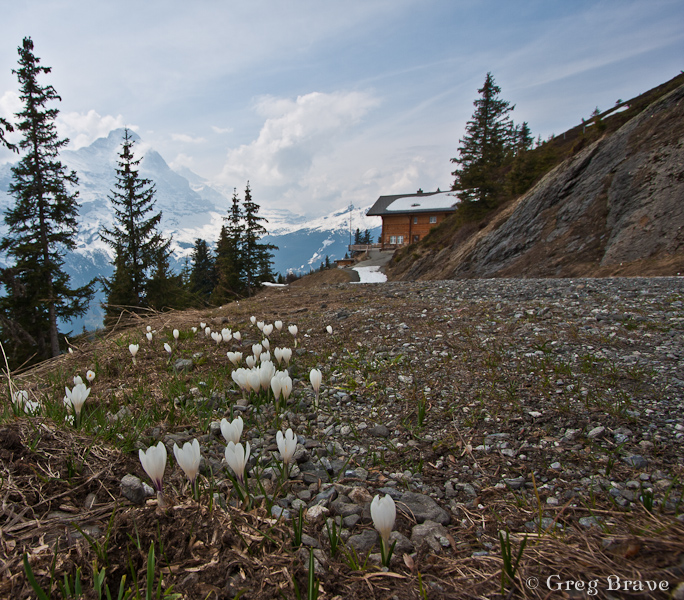
On one of our hikes we went so high up the mountains that we reached areas where snow didn’t melt yet and the wooden houses, which are restaurants and resorts in the summer, were completely covered with snow! There is one catch in photographing snow under bright sunlight (just in case that you are not familiar with it) – because the snow is so white it reflects the light very good, and the light meter in the camera perceives the scene to be very bright thus underexposing the photograph. So you have to set your exposure compensation to about +1 stop. It is not an exact science so just try and see for yourself.
Photographs by Greg Brave. Click on the photo to enlarge.
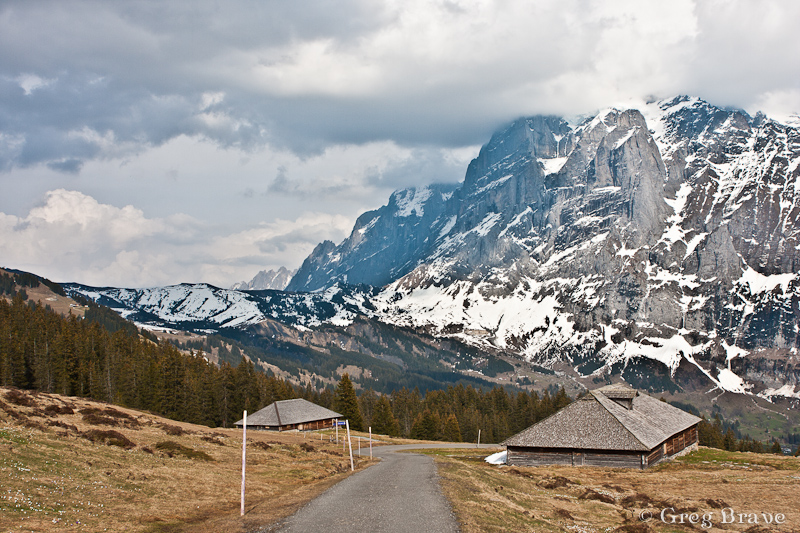
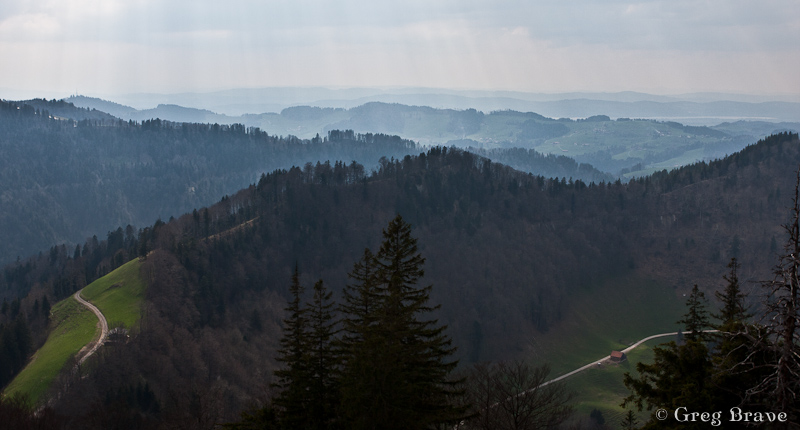
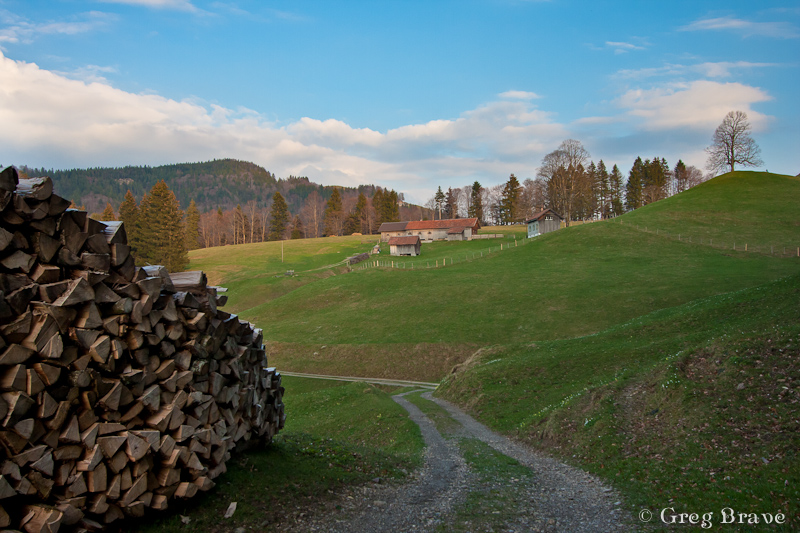
After two days in Grindelwald area we went to another area near town named Hintergoldingen, also with mountains but they were lower so there was almost no snow there. The next photo is from that area. The wast green fields are breathtaking! At the end of this article I will put some more photos from here.
Photograph by Greg Brave. Click on the photo to enlarge.
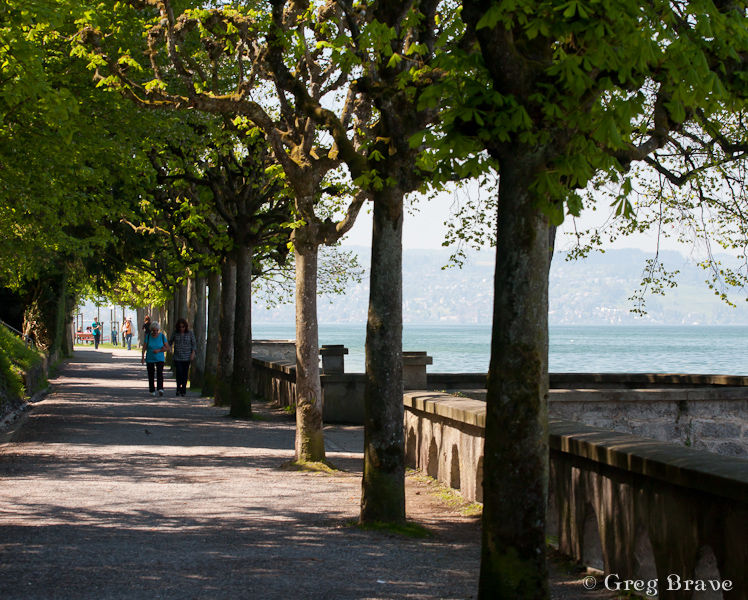
And finally on our last day, on the way to the Zurich airport, we stopped in Rapperswill – a small town located near Zurich lake. This tree caught my attention as light was hitting its leaves making them shine beautifully.
Photograph by Greg Brave. Click on the photo to enlarge.
I also tried to capture the slow pace of this place, where locals and tourists relax and don’t hurry anywhere.
Photographs by Greg Brave. Click on the photo to enlarge.
Photographs by Greg Brave. Click on the photo to enlarge.
We had a great time on our trip and I hope I succeeded in showing it in my photographs. I bought a backpack for my photographic equipment especially for this trip, it was a “CompuRover” from Lowepro. I was very satisfied with it and I am planning to write a detailed review on it in the near future, so stay tuned if you are interested!
This is it for now, and until next time take care!
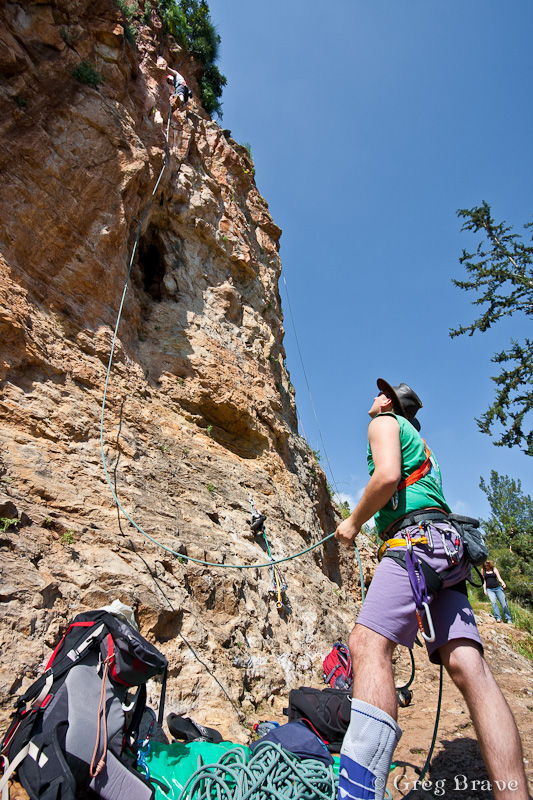
In addition to my passion for photography I also like to climb. Climb as in rock climbing. Up until now I didn’t mix these two things, and when I went out climbing I didn’t take my DSLR with me, because I was afraid that it would “get hurt”, and I also wanted to concentrate on climbing. Actually I was climbing long before I got into photography, so at first there was no issue here. But since I started photographing it always bugged me that I don’t have my camera with me.
Photograph by Greg Brave. Click on the photo to enlarge.
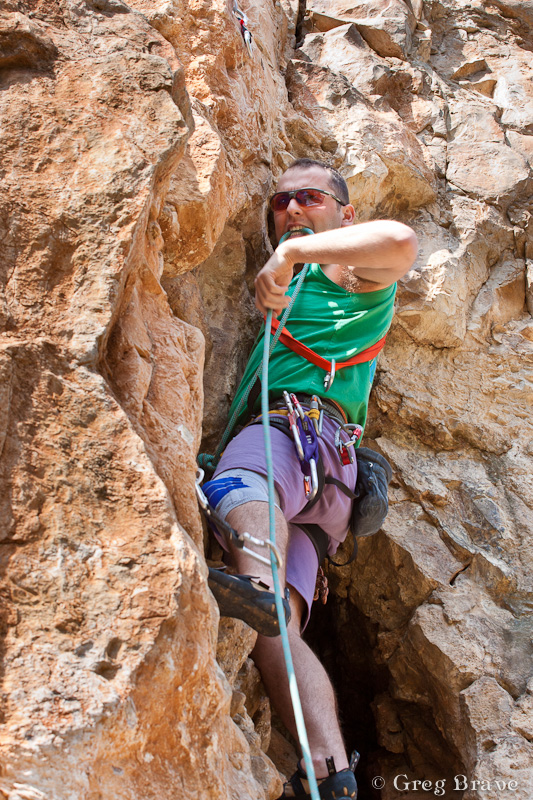
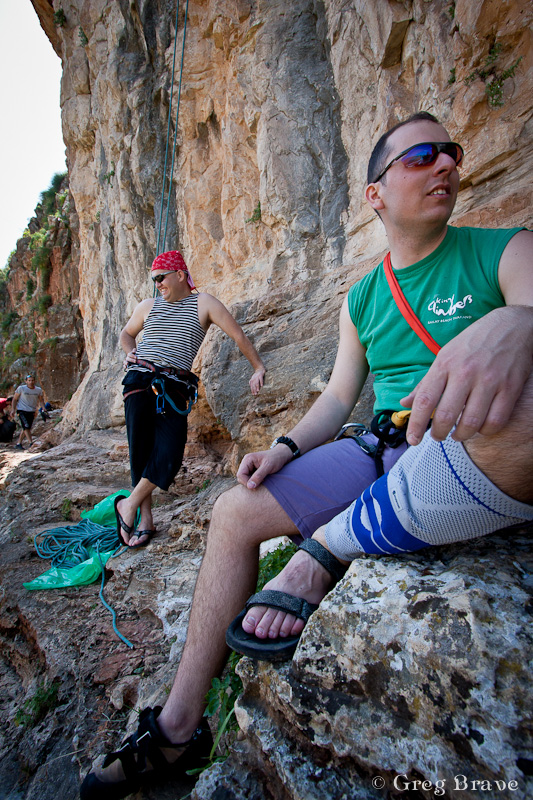
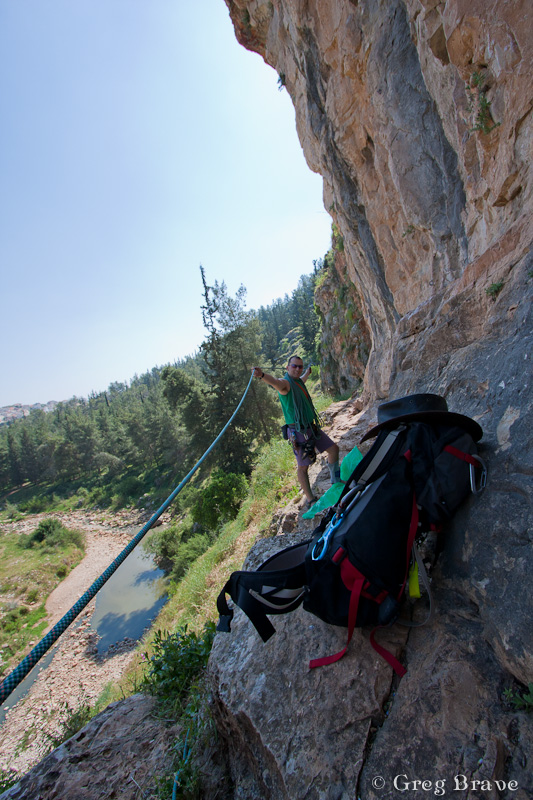
Recently it started bugging me so much that I couldn’t resist it anymore, and took my camera and three lenses with me when we went to climb. I decided first to climb a few routes, and then to take photos of my friends climbing. It worked out just great.
In my photos, I wanted to achieve several goals:
1. To show the surroundings in which we climbed.
Photograph by Greg Brave. Click on the photo to enlarge.
2. To show the climber and the belayer in such a way that viewer would understand what is going on, and also to make the height of the climb “visible”, so the viewer would feel that the climber is high above the ground.
Photograph by Greg Brave. Click on the photo to enlarge.
3. To show the dynamics of climber when he climbs the route.
Photographs by Greg Brave. Click on the photo to enlarge.
4. To create rather artistic than documentary photos.
Photographs by Greg Brave. Click on the photo to enlarge.
You can judge for yourself to what extent I succeeded in achieving these goals.
One very important thing that I couldn’t control was the harsh sunlight, which made the contrast between the shadows and highlights very strong. When I go to photograph alone, I can time my visit to early morning or late afternoon, but in this case there were factors beyond my control. Partial solution to the harsh sunlight was shooting in RAW, and then in post processing playing with the “fill light” and “contrast” sliders to make the deep shadows brighter.
Any comments, suggestions, or opinions are always welcome.
Michael Lidski is a professional photographer currently living in New Zealand. He has lived in several places around the world and traveled in many more. Michael kindly agreed to give me this interview, in which he reveals parts of his life story and also shares his professional opinions on photographic equipment that he uses, all this together with many examples of his beautiful photographs.
Ladies and Gentlemen, I am proud to present you – Michael Lidski !
Self portrait by Michael Lidski. Click on the photo to enlarge.
Tell a little about yourself. Where are you from?
I am from USSR (remember, once upon a time there used to be a USSR?) – and left it when it was still called a USSR, albeit falling to pieces.
Photo by Michael Lidski. Click on the photo to enlarge.
I was born and grew up in the city of Kiev – the Mother of Russian cities, today it is the capital of Ukraine, which is trying to be an independent country.
Photo by Michael Lidski. Click on the photo to enlarge.
I am Russian by language and culture. It always was a bit of a love-hate relationship, because on one hand Russian culture, especially Russian literature is great and I’m proud of it, but on the other hand, while living in USSR, I always wanted to leave it, because I considered it a totalitarian police state inhabited by a rather barbarian people.
Photo by Michael Lidski. Click on the photo to enlarge.
Doctor Zhivago’s self-sacrifice always seemed wrong to me, because the people whom it was supposed to be for were unworthy of it. One of my favorite jokes about Soviet Union is about a young guy who appears in court for killing an old woman in the street at night to rob her.
The judge says:
– Young man, how possibly could you have killed a poor old lady – and for what?! For just one rouble you found in her purse?!
The defendant replies:
– Well, your honour, look at it from my perspective: 5 old ladies buys a bottle of vodka, ey!
Unfortunately, it seems that the only thing that changed over there since then is the price of vodka.
Photo by Michael Lidski. Click on the photo to enlarge.
This is the miners wives’ strike – their husbands didn’t get paid for several years. Translation of their banner: “Independent Ukraine has everything but God, Truth and Honor”.
Having been forcibly stripped off my Soviet citizenship (and having had to pay for that, too) – no great loss, by the way – I immigrated to Israel when I was 29 and spent the next 15 years there…
Photos by Michael Lidski. Click on the photo to enlarge.
…unsuccessfully trying to become part of the great Zionist idea for the first 10 years and then for the next 5 years trying to figure out where to go to have a normal life. I traveled quite a bit in the meantime…
Photos by Michael Lidski. Click on the photo to enlarge.
…gaining some ideas about how different can life be in different societies. Maybe, like Bulgakov’s Master, I haven’t earned the Light, but have earned my Rest – New Zealand became my Eternal Refuge, and here I am today…
Photos by Michael Lidski. Click on the photo to enlarge.
…living in a place probably as close to paradise as one can find on Earth, in the city of Christchurch:
Photo by Michael Lidski. Click on the photo to enlarge.
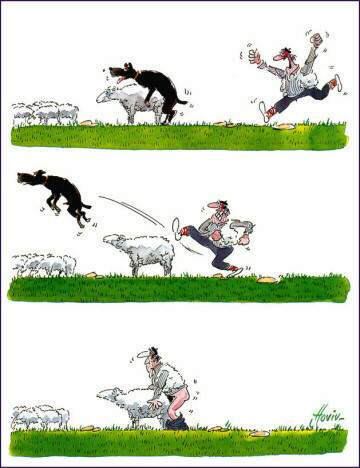
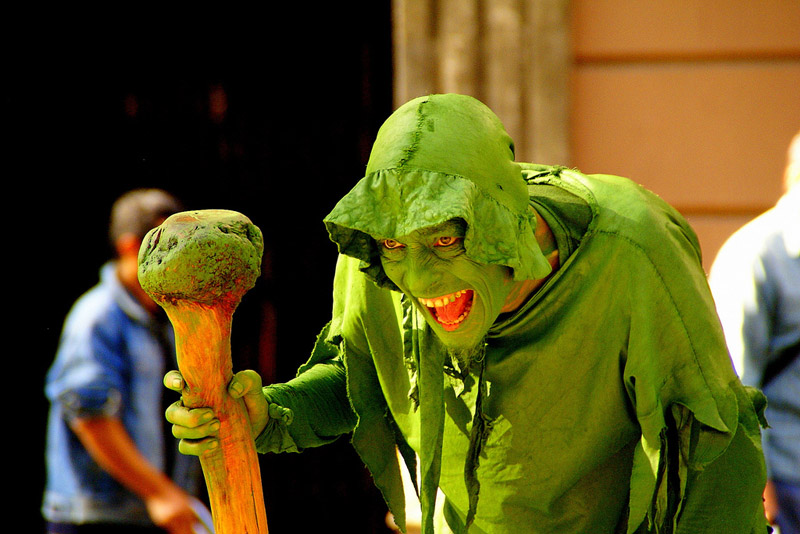
The following image has nothing to do with me, it is a humorous portrayal of New Zealand by an artist whom I would like to thank for using his work:
Click on the photo to enlarge.
How did you get involved in photography and how long have you been into photography?
I became interested in photography quite early, my first works were published 25 years ago, when I was studying to become a biologist. By 1990 I became a pro photographer instead, working at the ‘Radyans’ka Ukrayina’ state publishing house (department of artistic postcards, calendars and photo albums).
By now I have more than 3.000 images & 500 articles published in various books, magazines, newspapers, calendars, postcards, etc. Artworks in private collections in Christchurch, London, San-Francisco, Tel-Aviv, Jerusalem and Kiev.
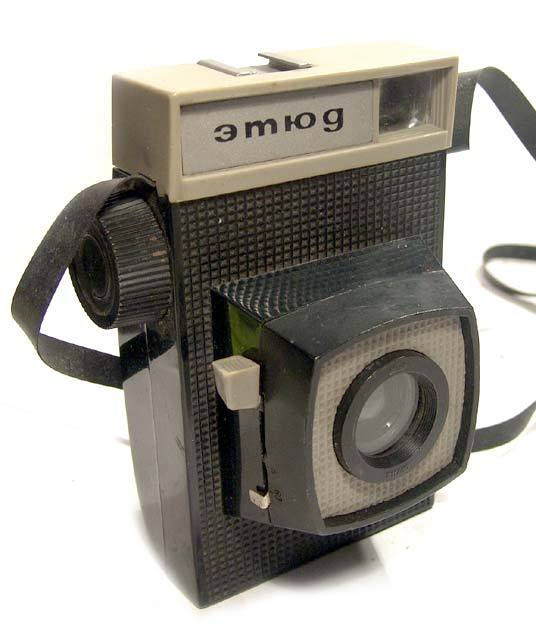
What was your first camera?
I got my first camera as a birthday present when I was 7 years old, it was an ‘Etude’:
Click on the photo to enlarge.
and it was the worst camera ever made as far as I can tell, no way it could take photos!
What projects are you involved in nowadays?
I am currently doing several different things in terms of photography:
1) Private customer orders, like portraits, events, technical photography, etc. Those are mostly rewarding in terms of $$$.
Photo by Michael Lidski. Click on the photo to enlarge.
4) Last but not least – studio photography (it’s a fairly recent thing for me and I’m enjoying it!):
Photos by Michael Lidski. Click on the photo to enlarge.
What gives you inspiration in photography and how do you keep creative and improve?
Difficult question. First and foremost I would like to say that my beautiful wife is my inspiration – I couldn’t live without her! Second – I would say that the most important thing in photography for me is not to register the reality, but rather to express myself through portraying it. Like an artist expresses himself in his paintings, like a composer expresses himself in his music, like a poet expresses himself in his poems. Only sometimes I think that ‘inspiration’ is more like a transmission of a divine ‘radio’ signal, for which an artist simply serves as a receiver. I am like a camera obscura, a pinhole through which the divine light passes into this world…
Photo by Michael Lidski. Click on the photo to enlarge.
…creating images for people to admire. At least I hope I am…
What do you like to shoot the most?
I am always concentrating on what I’m shooting and processing now. My most recent shoots were a young couple double portrait session done in the studio and outdoors, a shoot of rare birds from a boat in the ocean, and a landscape session in a remote location which was difficult to access.
What equipment do you use?
Canon 5D, Canon 5D Mark II, Canon 1Ds Mark III, Canon 15mm fisheye:
Photo by Michael Lidski. Click on the photo to enlarge.
Canon 17mm TS-E L:
Photo by Michael Lidski. Click on the photo to enlarge.
Canon 85mm F1.2 Mark II L:
Photo by Michael Lidski. Click on the photo to enlarge.
Canon 28-300mm IS L:
Photo by Michael Lidski. Click on the photo to enlarge.
Canon 200mm F1.8 L:
Photo by Michael Lidski. Click on the photo to enlarge.
Canon 2x TC:
Photo by Michael Lidski. Click on the photo to enlarge.
Kenko automatic extension tubes:
Photo by Michael Lidski. Click on the photo to enlarge.
My additional equipment includes:
Canon Speedlite 580EX Mark II flash, UNI-LOC tripod MA2300, 3 ancient Broncolor studio lights, ring flash diffuser for macro, a small and a large (14 inch) beauty dishes, flash remote cable, Manfrotto flash bracket, LowePro SuperTrekker back pack.
Now, that’s rather dry – what should I add? From my perspective, there is no ideal camera as of today. We are talking strictly Canon here, and should probably start with why. Wide format gives better image quality, but is rather limited in it’s use due to available focal lengths of lenses and the absence of higher ISO, not to mention the prices and weight/size.
Nikon D3x is not a bad camera, but I would never switch because of the lenses Nikon doesn’t have (2 of which I own and enjoy). Cropped (castrated) sensor cameras have image quality visibly inferior to full frame. Of course, it would be nice to use different formats, cameras and systems for different purposes, like, wide format only in the studio, etc., but that’s just too expensive. So that limits us to the cameras listed, right? Of those I’m not happy with either one, because 5D is ancient (no highlight tone priority, no usable ISO 6400, slow AF), 5D Mark II has issues (noise and banding at base ISO visible in post-processing, red/inky blotch colour issue, slow AF), and 1Ds Mark III is in respects inferior to 5D Mark II (monitor, higher ISO) – so I’m anxiously waiting for Canon 1Ds Mark IV, which I’ll buy as soon as it comes out.
I hope I won’t have to wait much longer. Well, bodies come and go but lenses stay, as they say, so about the lenses: my fisheye is a very sharp lens, but not an L lens due to inferior build quality (went to warranty repair and back recently), disgusting chromatic aberration and – oh, I wouldn’t mind if it could focus closer, but there is no alternative. Of course, there is a comparable Sigma, but it is not better than Canon…
17mm TS-E is an awesome lens, very sharp, easily usable handheld with liveview in spite of no AF, the one and only wideangle.
28-300 is surprisingly good optically for its zoom range and very versatile.
85/1.2 is bloody awesome, same as the 200/1.8 – unique bokeh, creamy, beautiful – and razor-sharp where the focus is:
And finally, if you had only two tips to give to a beginner photographer what would they be?
A) Choose a different profession which would guarantee you a well-paid, reliable regular job and let photography be your hobby. B) Have fun while you are young!
Thank you Michael for this wonderful interview. Personally I enjoyed it very much, and I am sure that all my readers will!
Good luck to you in your present and future projects!
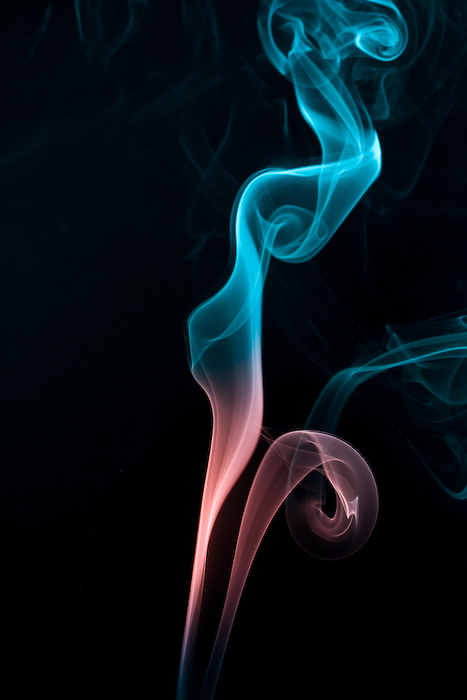
In every photographer’s evolution process comes a time when he tries to photograph smoke. As a result you can see many photos of smoke on the internet. Now my time has come!
As always I wanted to do something different with smoke, so that my photos will differ from most of what can be seen online. Common practice with photographing smoke is to photograph it with plain white flash and then add color to it in photoshop. But I decided to do it a little bit different – I used flashes with colored gels on them, so I received the colored smoke “in-camera”. That was not enough for me and I tried to use two flashes with different color gels pointing at different parts of smoke, and here you can see what came out of it:
Photo by Greg Brave. Click on the photo to enlarge.
The red flash had a gobo so that the light wouldn’t spill on the top blue part, and it was also stronger than blue flash so it would overpower the blue light spilling from above. Of course I didn’t get the result that you see in the photo above right away. It took me couple dozens of shots to achieve it.
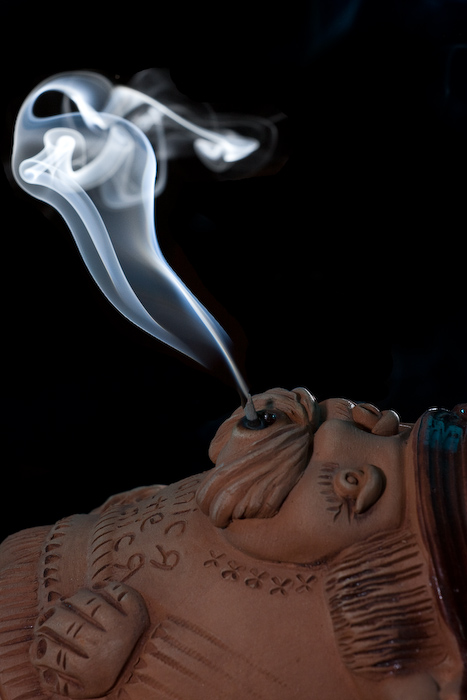
My next move was the following one – I thought that most of the beautiful smoke I saw online wasn’t “attached” to anything, so I tried to add a “source” to the smoke as you can see in the photo below.
Photo by Greg Brave. Click on the photo to enlarge.
In this photo I faced a technical issue – the flash power that I needed to properly light the smoke was too much for the “smoker” and resulted in overexposed lower part of the photo. I solved this issue by using again two flashes. The flash that was lighting the smoke was placed behind and to the right of the “smoker” and set to “high” power. Then I used a second flash to light the smoker, and placed it in front of the smoker and a little bit to the left. This flash was set to a much lower power and was directed in such a way that the light from it wouldn’t spill on the background (because I wanted a black background).
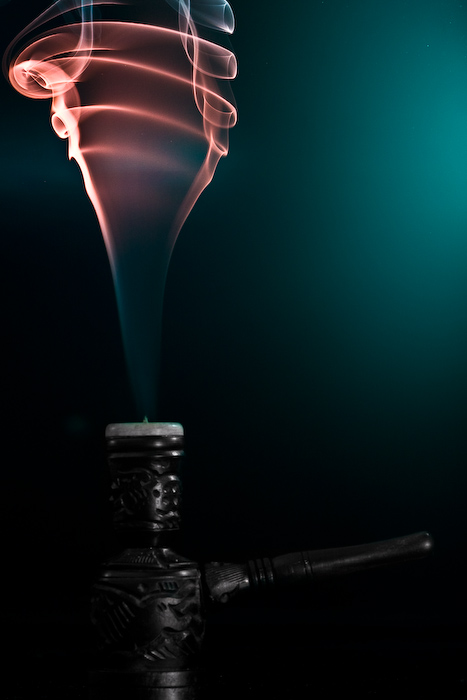
Here is another attempt of adding a source to the smoke.
Photo by Greg Brave. Click on the photo to enlarge.
For this shot I also used two flashes – one with dark-green and another with red gel on it. The red flash was placed from the left and pointed high up to light the upper part of the smoke, while the green flash was placed to the right of the composition and pointed to the lower part. In this photo I had a glossy background and you can see the greenish reflection of the flash in it. I tried to shoot this scene also with matte background but I liked this version more because it adds nice color touch to the overall dark image.
Continuing my experiments I placed two smoke sources and tried to blow on the smoke to create different shapes while I am taking shots of it. I got many interesting photos this way, and this is the one photo I chose to present here:
Photo by Greg Brave. Click on the photo to enlarge.
Strangely it reminds me of two opposite sex persons having a conversation. In this shot and two of the following shots I used two flashes with blue and red gels on them, placed from the sides of the frame pointed up at the smoke and away from the background.
This is pretty important – if you want your background to remain dark, you have to point your flashes towards the camera and away from the background. When I say “towards the camera” it doesn’t mean that flashes have to point straight into the lens, they just need to be pointed in the direction of the camera and, again, away from the background. This way, since the light travels in straight lines it won’t hit the background (unless it reflects off something, so make sure it doesn’t) leaving it black.
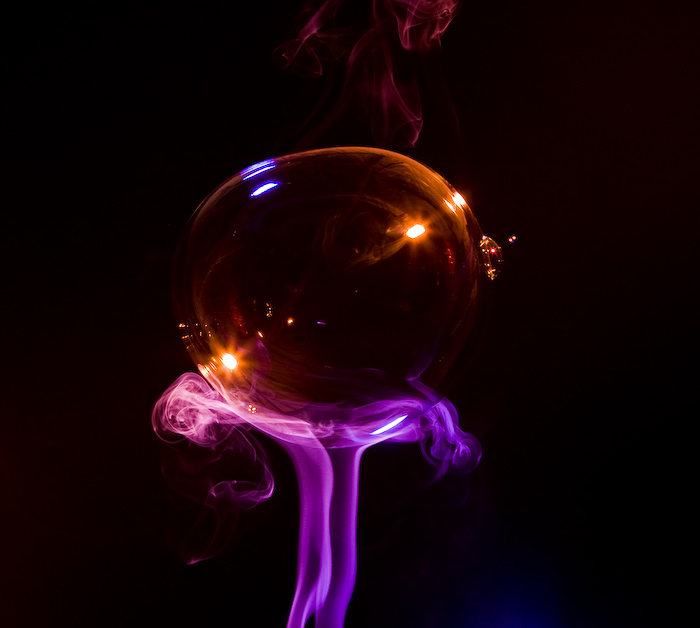
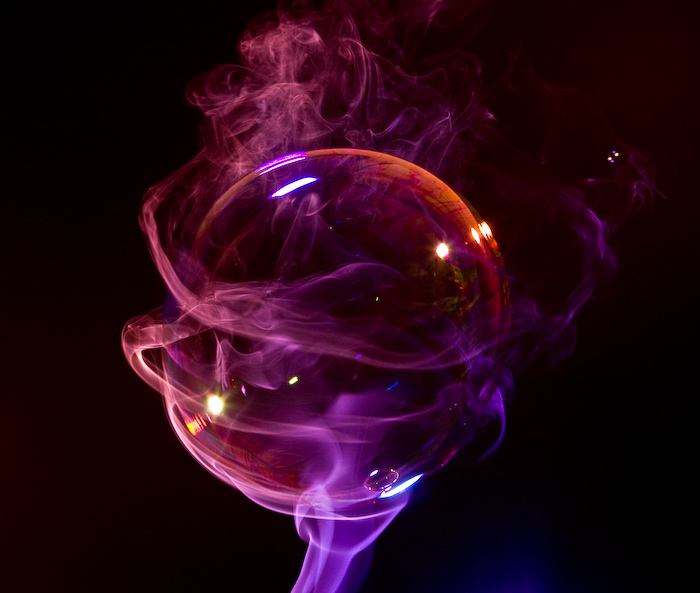
During the time that I was experimenting with smoke I was constantly thinking what more can I do to make my photos stand out. And one day, at work, my friend brought this childish toy to make soap bubbles. We had so much fun playing with it and remembering the days that we were kids… and then it hit me – I can combine smoke with bubbles to create beautiful images. At this point I started to visualize what can be done with smoke and bubbles, and the idea that I liked the most was to create image of a soap bubble resting on top of smoke pillar.
This was not an easy task to do, as I didn’t have anyone to help me shoot this. So here is what I did: I placed my camera on a tripod, and pointed it exactly at the area where I intended to “place” a bubble on top of the smoke pillar. I focused the lens on the plane of the smoke and changed to manual focus. Then I connected a remote shutter release cable so that I could stand away from the camera. Then I just made a soap bubble and tried to place it where I wanted, shooting in continuous mode during this whole process. Then bubble would pop, and after checking the LCD and seeing that I didn’t get any satisfactory results I would repeat the process.
Eventually, after way too many failures 🙂 here is what I’ve got:
Photo by Greg Brave. Click on the photo to enlarge.
This is pretty much what I had in mind. But in the process I also got the following image, and I like it much more than the image above. It looks like a planet in deep space…
Photo by Greg Brave. Click on the photo to enlarge.
One more tip if you decide to try this yourself – bubbles reflect everything, and I mean EVERYTHING around them. So after seeing myself being reflected in the bubbles, I had to wear black sweater and a black hat to eliminate my reflection as much as possible. I also turned off any additional lights in the room.
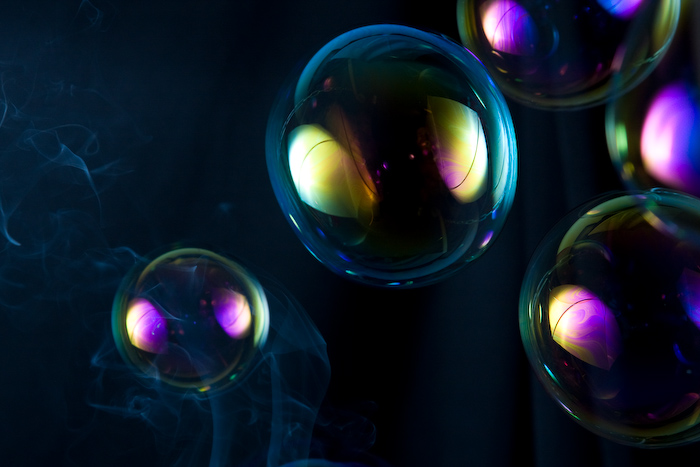
In the next, and last photo I tried a little different approach – I used only one flash but I shot it through umbrella in order to make my light source bigger. In the result below you can see that umbrella can be recognized in the reflection, but I still like this photo. I call it “Aliens!” 🙂
Photo by Greg Brave. Click on the photo to enlarge.
I hope that you learned something new from my experience with smoke and bubbles and it inspired you to try this yourself.
Comments, suggestions and critiques are welcome as always, and if you have any questions, technical or other, you can leave a comment or drop me an email to greg at photopathway dot com
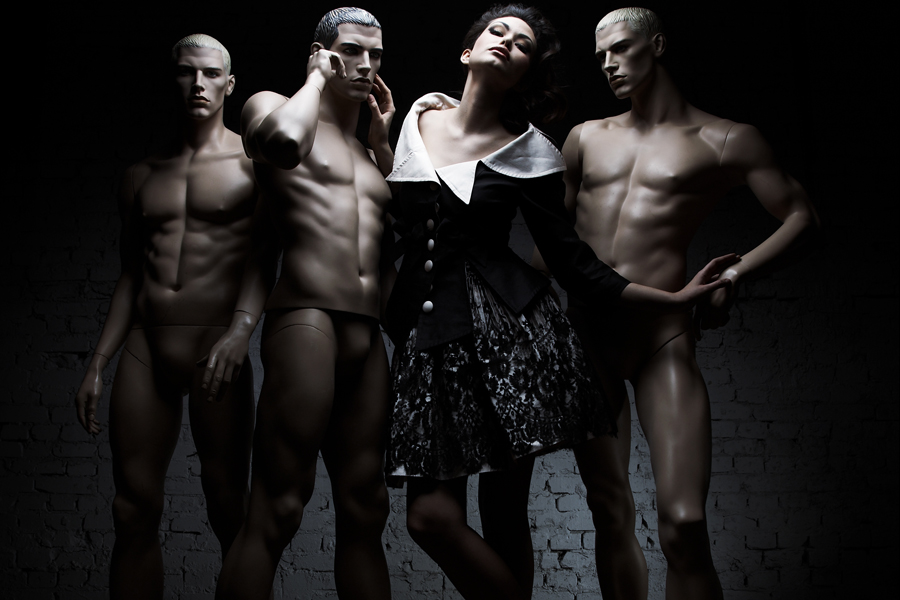
Oleg Igorin is a fashion photographer currently working in New York. He has a pretty busy schedule but he was able to make time for this rather short interview. In compensation I get to show here quite a lot of his magnificent work!
Oleg Igorin. Click on the photo to enlarge.
First of all a little about you.
5 years ago, in Moscow, I bough a compact digital camera and started photographing. My first models were my friends. In time I got many clients, and it allowed me to set up my own large studio Moscow that gradually turned to my own rental business. Half a year ago I decided to move to New York, which is the capital of world’s commercial photography, and now I am working on creating my own studio and making connections with people in fashion industry
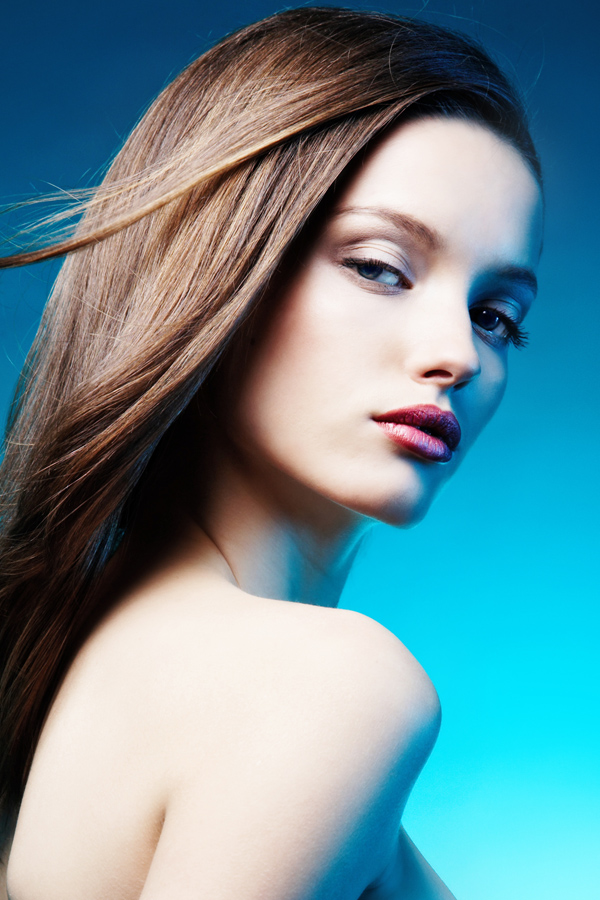
Photograph by Oleg Igorin. Click on the photo to enlarge.
Were you always interested in fashion photography or this interest developed over time?
Yes, I was always interested in fashion and beauty photography. I liked to paint and now it helps me to feel better the photographs that I make.
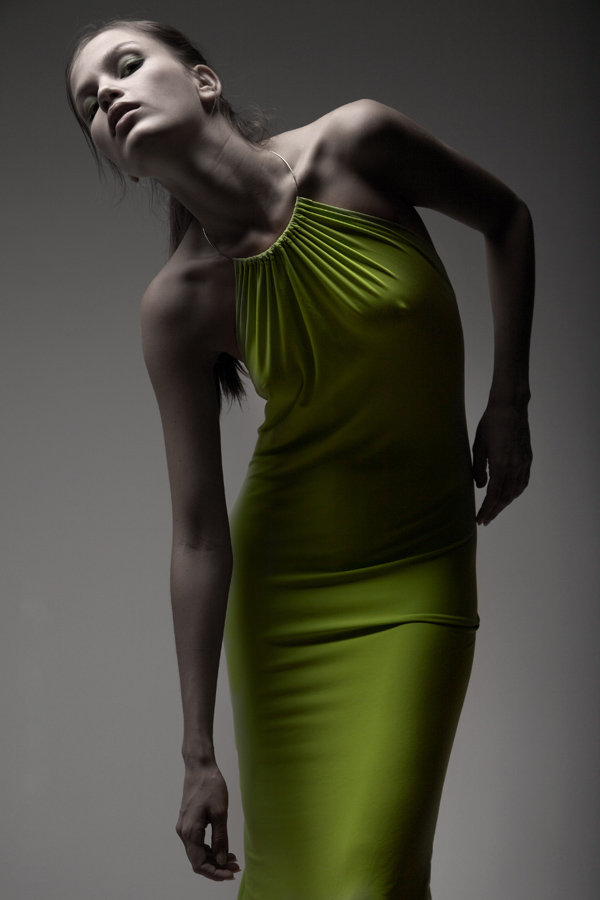
Photographs by Oleg Igorin. Click on the photo to enlarge.
How would you describe your photographic style?
With my work I want to show the beauty of people and fashion.
What does it take to be a fashion photographer?
It is very hard work that takes most of my time. But this is also a very interesting part of my life.
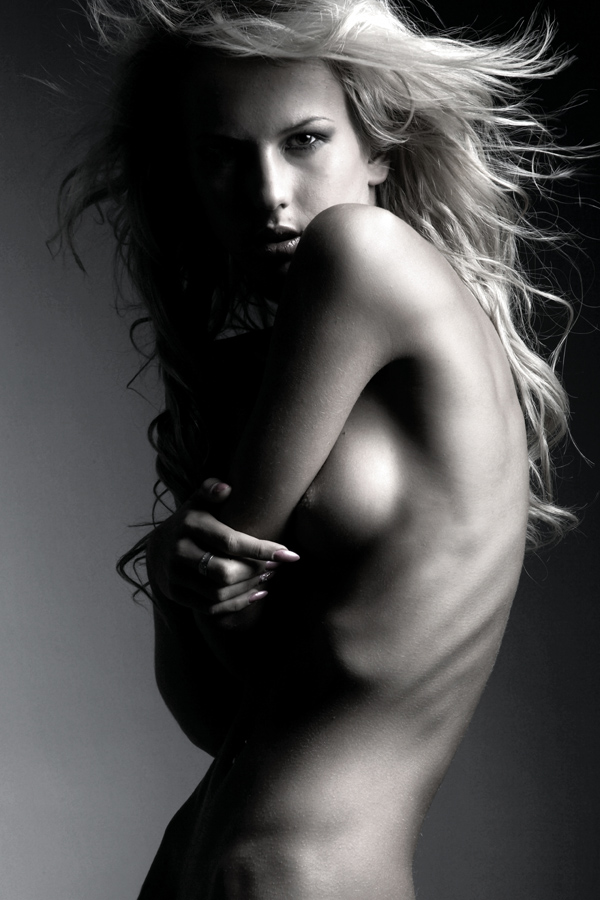
Photographs by Oleg Igorin. Click on the photo to enlarge.
Do you find your models or models find you?
Models are the part of my work. They appear when I need them.
Photograph by Oleg Igorin. Click on the photo to enlarge.
And now to more technical questions.
When you are photographing your models on the streets of New York city, how do you do that? I mean do you just take the model out on the street, take out all your gear and shoot ignoring the people around you, or you make certain preparations, ask people not to interfere?
New York is very “photographed” city and shooting on the streets doesn’t take a lot of people’s attention. For me it is much more interesting to take shots not in touristic places, but in the real New York – places that are usually not crowded.
Photographs by Oleg Igorin. Click on the photo to enlarge.
Where do you prefer to shoot – in your studio, or on location, and why?
I like studio, and I also like outdoor shooting. But I don’t like shooting in interiors. I don’t like it when a certain interior “forces” it’s story on my work.
Photograph by Oleg Igorin. Click on the photo to enlarge.
What photo and lighting gear are you using?
I use Hasselblad H3D-II 31MP, and for lighting I use Hensel equipment.
Can you share with us some of your favorite lighting techniques?
I like to experiment with lighting techniques, making a lot of discoveries every day. And I think that every photographer needs to do the same.
Photograph by Oleg Igorin. Click on the photo to enlarge.
What advice would you give to beginner photographers that want to start in fashion industry?
One of the best way is to work as an assistant of fashion photographer. You will get experience, connections and self-confidence.
Photographs by Oleg Igorin. Click on the photo to enlarge.
Thank you Oleg for your time and for sharing these great photographs with me and my readers!
Greg.
I think that one of the most important aspects of photography is about joy of creation, expressing yourself and enjoying every minute of it. I always try to be creative, and though I don’t always get the desired results from my experiments I just continue trying. For me there is no other way. I try to put my heart and soul into my work mixed with feeling and emotions.
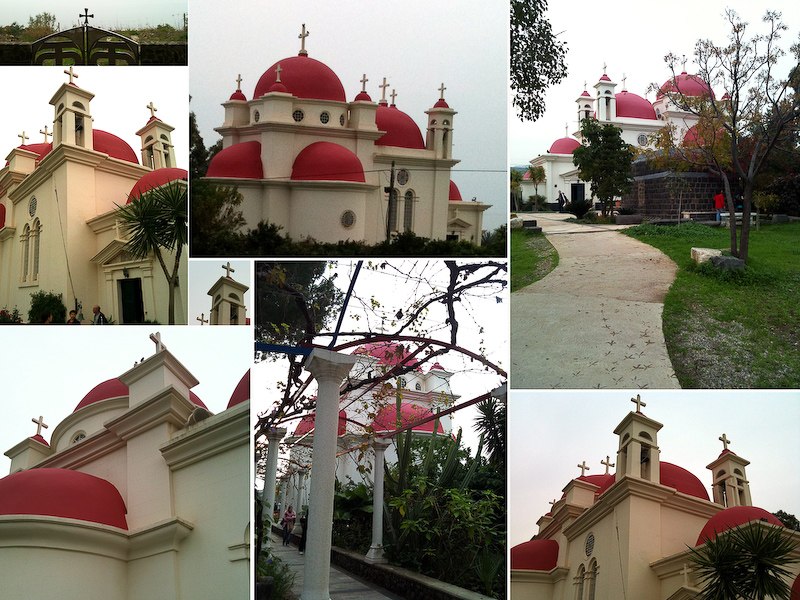
Today I’d like to share with you one of my attempts at creativity. It was a nice autumn weekend in Israel when me and Ira went to the Upper Galilee region to do a walking track near the Sea of Galilee. On our way back we stopped to visit the Greek Church of the 12 Apostles. This church always attracted me when I was driving by with its’ red roofs but I never had the chance to actually get inside.
This time we had about an hour, so we decided to finally give this church a closer look. I was so tired from our trip that I left my Canon DSLR in the car. I just didn’t have any mental mood for photography. But the closer we got to the church the stronger grew my desire to photograph it. Eventually I decided to photograph it with my iPhone.
This Greek church is very beautiful and is also located in a beautiful place. When we returned to our car I was surprised to find out that I took about fifty photographs of the church and its surroundings from variety of different sides and angles.
Another important aspect of photography (again, in my opinion) is to know how to choose your best photos, and to be brave enough to delete most of the rest. Otherwise you’ll end up with tons of photographs, which are very similar to each other (a tiny difference in a crop here, and in viewing angle there).
Thus on our way back (Ira drove the car) I went over all the photos of the Greek church that I took and deleted about 90% leaving only the ones I though were most successful. After that I started thinking – what would be the best way to present these photos in a way that would show the Greek Church of the 12 Apostles in all its beauty and also reveal some of the architectural details.
Eventually I decided to create a photo-collage of all the best photos. During the following months I was busy with other projects (including trip to Prague) and only recently got the time to put the idea of a photo-collage to test. It took me quite some time to do that as I had to change sizes, crops and other things in order to create what I had in mind.
Here is the collage of the Greek Church of the 12 Apostles. Remember that all the photos here were taken with my iPhone, and don’t judge the quality too harsh 🙂
And as always feel free to leave comments!
Cheers,
Greg.
Greek Church of the 12 Apostles. Photograph by Greg Brave. Click on the photo to enlarge.
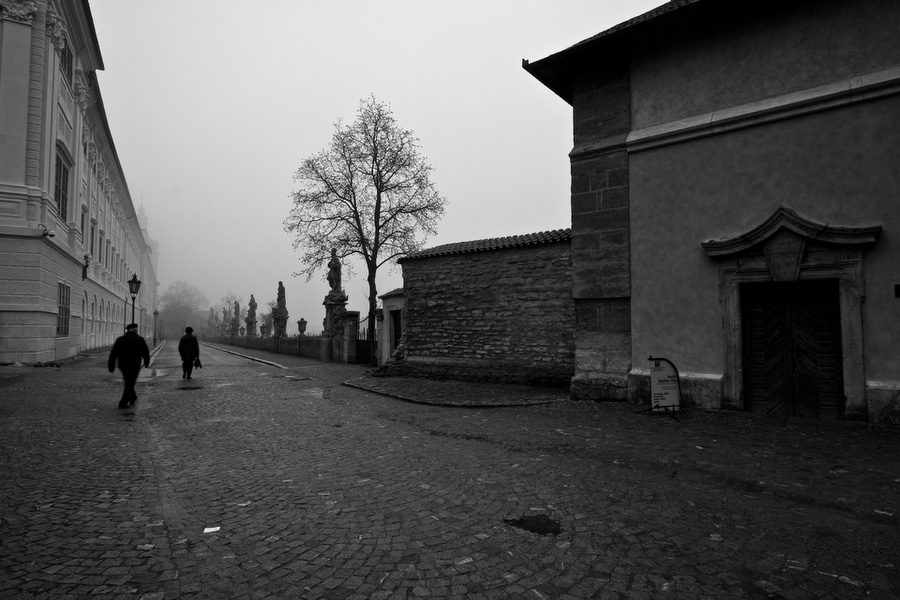
During our vacation in Prague me and Ira also visited a small town near Prague named Kutná Hora. At first I didn’t think of writing second chapter about my trip, but when I finally had time to browse through my photos from that town, I saw that I had a few very nice photos from there (if I won’t compliment myself on my photographs, then who will ? 🙂 ), so I decided to write a short post on our day in that sweet little town.
Kutna Hora is about an hour train ride from Prague, and if you, like me, don’t like organized trips, you can just buy a train ticket in Prague and visit it by yourself. The old town centre is about 20 minutes walk from the train station, and I think there is even a bus going from the station to town. Anyway we didn’t use any kind of transportation but our feet.
Alley leading to St. Barbara Church. Photograph by Greg Brave. Click on the photo to enlarge.
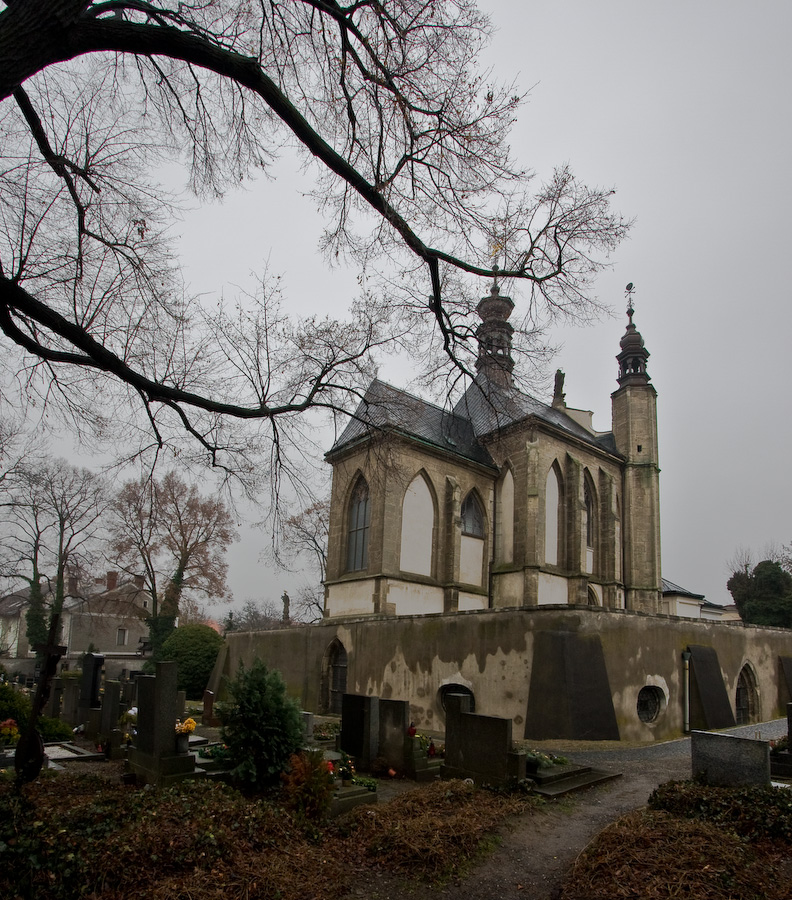
There are quite a few tourist attractions in Kutna Hora, such as St. Barbara Church, which is one of the most famous Gothic churches in central Europe. It is also a UNESCO world heritage site. By the way St. Barbara is the patron saint of miners, and this town was mostly based on silver mines in the past. Another attraction of the town is the Sedlec Ossuary. It is a small Roman Catholic chapel. Its’ main feature is that inside it is artistically “decorated” by many real human bones. It is estimated to contain the skeletons of between 40,000 to 70,000 people.
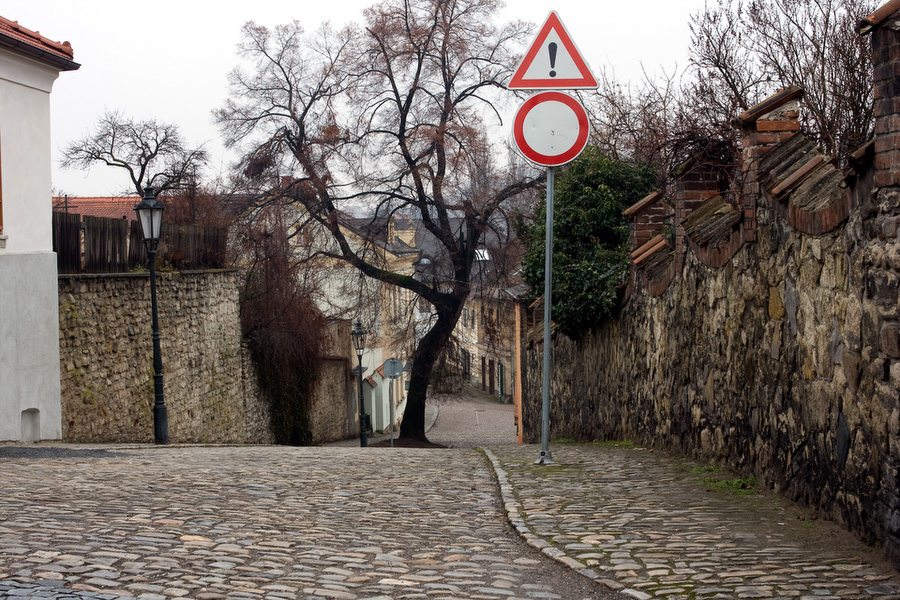
In addition it is pure pleasure just to walk the streets of the old town centre in Kutna Hora. This is what we did the most – just walking on the narrow streets between old buildings and taking photos, of course! When we got there it was rainy-misty weather. It was pretty dark for photographing, but I had my tripod with me, and all the photos that you see here were shot from tripod. Yes, even the dog in the last photograph!
St. Barbara Church Photograph by Greg Brave. Click on the photo to enlarge.
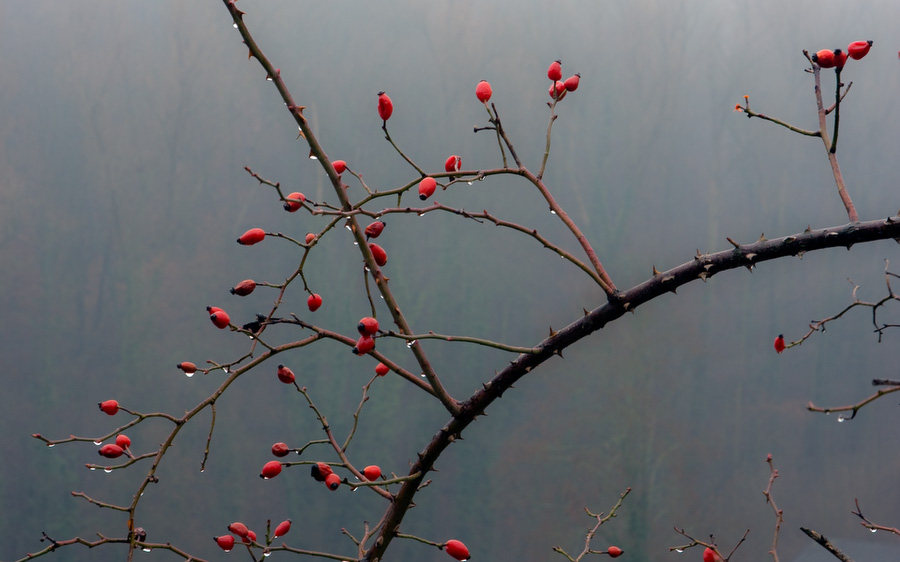
Actually I was surprised that I could use my tripod just about anywhere. Nobody told me that I couldn’t, which was strange because I am used from other places in Europe (Greece for example) that in most touristy places they don’t let you use the tripod. Shooting in mist I tried to convey this darkish and melancholic atmosphere. But it was not the case with these rose hips. Here I aimed at showing the “freshness” of the branch and the “coolness” of the air. I was captivated by the color of the hips!
Rose hips in the rain. Photograph by Greg Brave. Click on the photo to enlarge.
When photographing tourist attractions such as Sedlec Ossuary (which you can see below), I wanted my photos to be different from what most tourist were shooting (which is just straight-forward showing of what eye sees). So I tried to include elements that would add mood, which in my opinion was appropriate. In case of the Ossuary I went around it several times until I found this spot where the tree branches looked like they were reaching towards the building and blending nicely into the seamless gray sky.
Sedlec Ossuary. Photograph by Greg Brave. Click on the photo to enlarge.
During our visit, there were not many people on the streets. Here and there we met tourists, but I was looking for local people to “put” in my frame, to make my photos more authentic. In the left photo below I succeeded, while in the right one I waited and waited for someone to pass by, but with no luck, and finally shot the scene without anyone. It is a shame, I would really like to have there a person or two.
Kutna Hora old town streets. Photographs by Greg Brave. Click on the photo to enlarge.
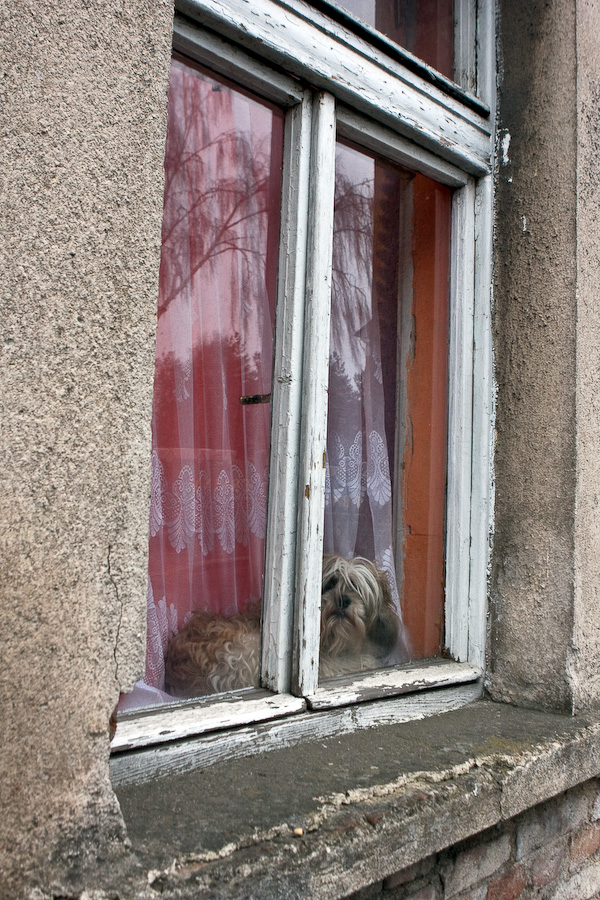
On our way back to the train station, we were walking on a narrow sidewalk when I spotted this dog watching us from behind a window. Even though we had little time left till the train I couldn’t just pass by this photo opportunity. The thing is that it was getting dark already, and even high ISO wouldn’t help me out here. So even for this shot I had to take out my tripod. The doggy was watching intensely all my actions and at some point I thought, that’s it now it will start barking… but everything was just fine – I took a few shots and we took off to catch our train.
I hope you liked the photographs, and as always – comments and critiques are welcome!
The Doggy 🙂 . Photograph by Greg Brave. Click on the photo to enlarge.
The Autumn is finally here. Even though it is warmer than I’d like it to bee, I definitely can feel the end of this year coming… You might say that December is a winter month, but not here, not in Israel! We barely have an Autumn and then it is Spring and Summer all over again. This is why this time of the year is very precious to me, I won’t be able to smell the wet earth and get this melancholic Autumn feeling for much longer… a couple of months, that’s all I’ve got.
Last Friday it was heavily raining all morning, but in the afternoon rain stopped and me and my life partner Ira went out for a walk in the park, and of course, I took my camera with me. It turned out to be a nice photo session. I would like to share some of the photos that I liked, and since I am learning photography, I will also discuss some “photographic” aspects of the photos. So here we go:
I like this photograph probably the most. The lines on the floor lead the eye towards the first subject – Ira, and then continue to lead towards the second subject – the tree. I like this tree so much, its branches curve so beautifully.
Photograph by Greg Brave. Click on the photo to enlarge.
This image could be pretty casual but, in my opinion, the red flower on the wooden fence adds a lot to it. There are also some disturbing elements in this photo that I’d like not to be there – the whole left part of the photo, in front of Ira. I wish it was simpler… much less cluttered. I also like the lower part of the fence, which is made of stone.
Photograph by Greg Brave. Click on the photo to enlarge.
Here I found a nice brick wall for the background, and we experimented with different poses for a while, but nothing worked. Then I just asked Irina to walk from me towards the wall and at some point called her name. She turned around and I made this shot! So I guess it was somewhat spontaneous.
Photograph by Greg Brave. Click on the photo to enlarge.
This next photo is a bit disappointing for me. I found this great fence for the background, but after seeing the final image, I realized that I didn’t use its full potential. I could at least made this photo horizontal, to emphasize the horizontal lines of the fence. I can see this picture in my mind now – Ira standing on the right side of the horizontal photograph, and the horizontal lines of the fence lead the eye from her to the interesting statue that stood there a few meters to the left. I wonder now how I didn’t see this at the time of the shoot? Well, I guess this is how you learn stuff 🙂
Photograph by Greg Brave. Click on the photo to enlarge.
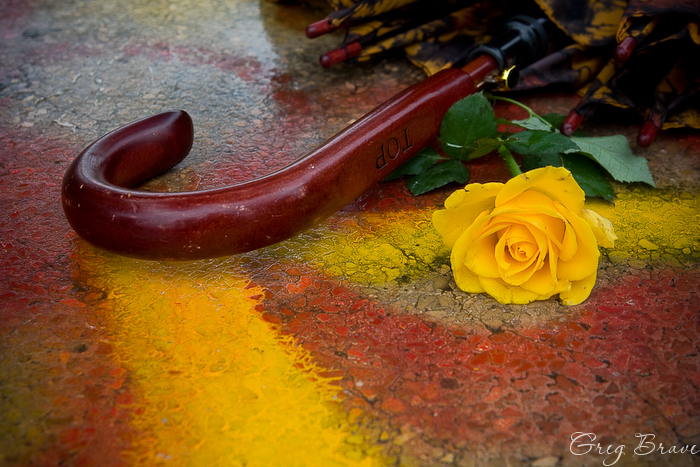
I absolutely love this photograph! Almost as much as the first one. As we were walking in the park I saw some garden tables and decided to take a closer look at them. When we came near we saw that one of the tables was painted with graffiti, the main colors being vivid yellow and red. I looked at these colors, then I looked at the yellow rose that Ira was holding, then at the umbrella handle, and then I saw this picture in my mind. It took me about ten attempts to get it just the way I wanted though…
Photograph by Greg Brave. Click on the photo to enlarge.
Everybody makes reflection shots, and I am not an exception. But I always look to create something different, something with my personal touch. Usually you can see either the full scene together with its reflection, or only the reflection, but here I included just a little bit of the scene to complement the reflection. I find this shot a little bit unbalanced due to the placement of the rose, but still I like it a lot.
Photograph by Greg Brave. Click on the photo to enlarge.
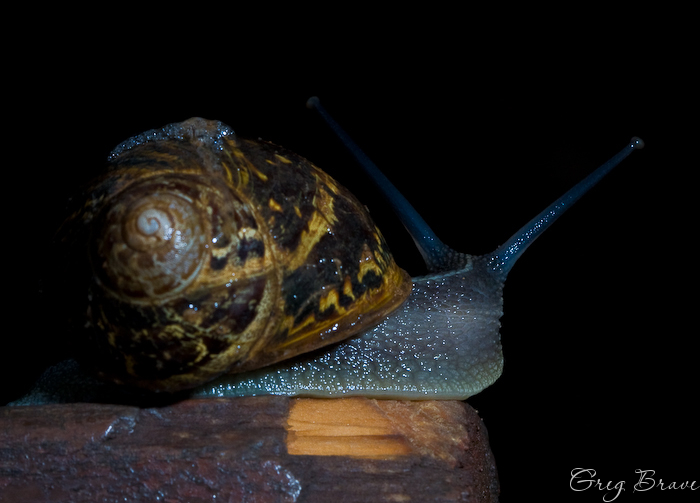
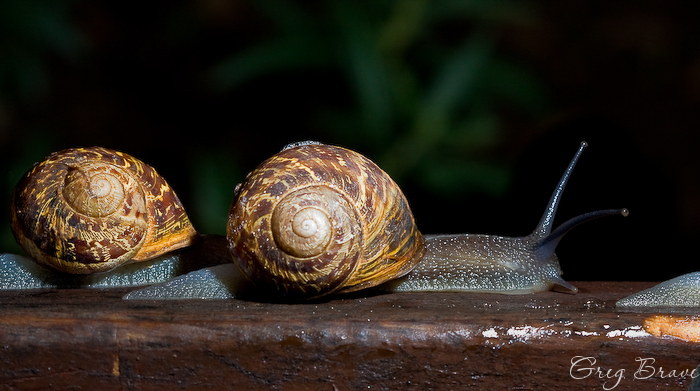
The following images were a nice and unexpected bonus. While we were walking in the park we were amazed to see this – after the rain dozens of snails came out of nowhere and occupied a lonely wooden bench. There were maybe a hundred snails or more. They were crawling one on top of the other and pretty much… mingling 🙂 I can’t find a better word to describe what was happening there. I was lucky to have my macro lens with me, and I was even luckier to have an external flash with remote trigger! So I asked Ira to hold it for me and made a couple of shots. Here you can see an example of the shots I got.
Photographs by Greg Brave. Click on the photo to enlarge.
That’s it for today. I hope you liked my photos. Any comments or suggestions, technical, artistic, or other are always welcome!
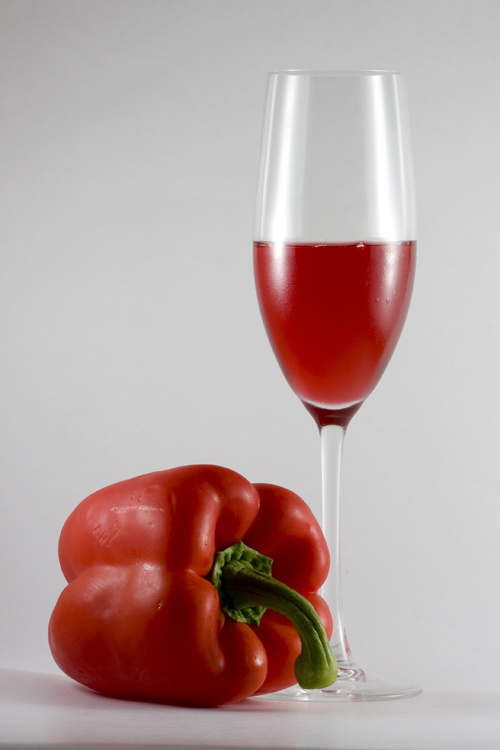
Recently I was learning a lot about lighting and together with that I am now slowly making my way into the still life photography. I made me my own little studio. Well not really a studio, but a table and some accessories so that I can try and photograph still life. For one of my sessions I decided to shoot a glass with liquid in it. It turned out to be not a simple task as glass reflects absolutely everything! So that particular session wasn’t successful at all, but I didn’t give up, and after working on it for a few weeks, I finally got my lighting straight and about a week ago I made the following image:
Photograph by Greg Brave. Click on the photo to enlarge.
It looked pretty darn good to me, so I posted it on PhotoSig to try and get some critiques. To tell you the truth I was hoping to receive more compliments than critiques. I actually received some compliments, but there were two critiques that simply opened my eyes to still life photography, and I would like to present here several tips from those critiques. But first take a good look at the photo above and try to see what is wrong with it.
… ok, now, when you have your own opinion on my photo lets see what improvements I could have made to that shot.
The highlight on the glass seems stronger than the highlight on the pepper, and therefore takes away more attention – reduce the highlight on the glass.
The pepper that was chosen is not flawless, but it is also not an old one so that little imperfections that it has don’t emphasize its age, and only disturb the eye of the viewer.
Pepper has a darker are due to my lighting imperfection. I should have put a reflector near the pepper to light better that area.
There is a reddish area at the foreground that should be fixed.
The definition of the foreground (the contrast) could also be better.
The glass is poorly separated from the background. In order to better separate it, two black cards can be placed at two sides of the image (outside the composition). They would throw a black reflections on the glass contours, making it better separated from the background.
The background darkens towards the top of the photo. A reflector or soft box could be placed on the top to fix that.
Now I also received additional and very useful tips that I sure will use in my still life photography (when appropriate of course!). Here are some of them:
Always dilute the liquid to make it less dark
When possible slightly crumple some foil small enough that it can’t be seen and place it behind the drink, so that it will add sparkle to the liquid.
If you want to add bubbles to the liquid, then add glycerin and use straw to make a bubble.
This is the second part of my interview with Katerina Lomonosov. Click here to read the first part.
To read the whole interview in one piece click here.
Let’s talk about the following photograph:
Photograph by Katerina Lomonosov. Click on the photo to enlarge.
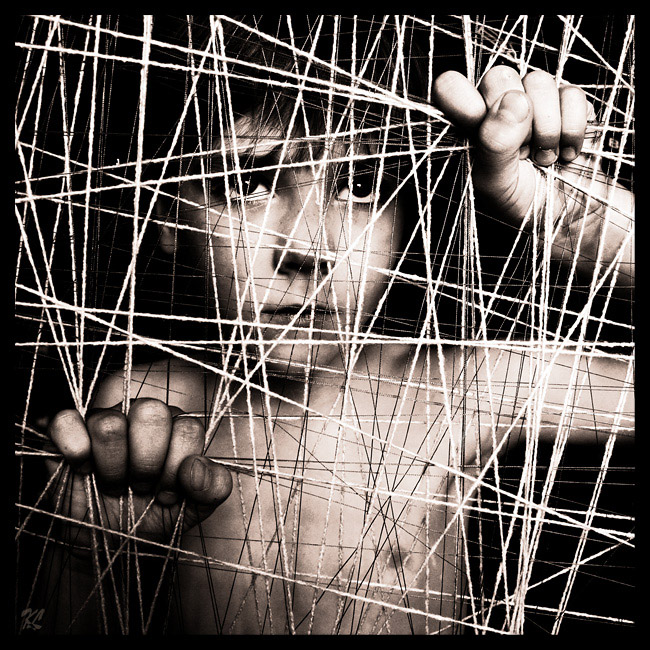
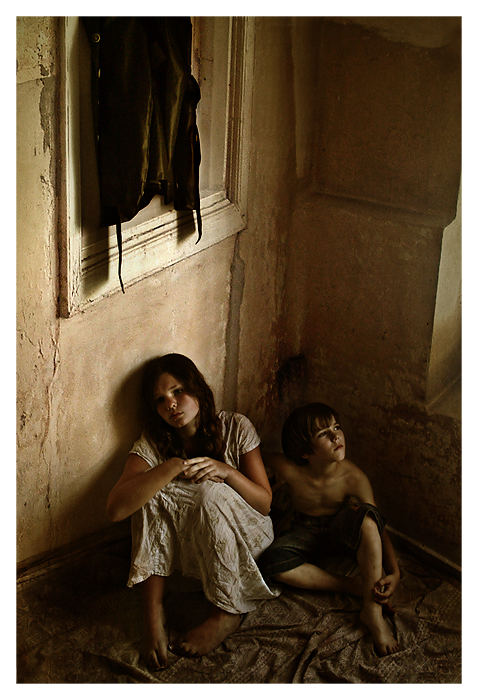
Looking at it I feel vague associations with some of my childhood fears. What did you want to communicate through this photograph?
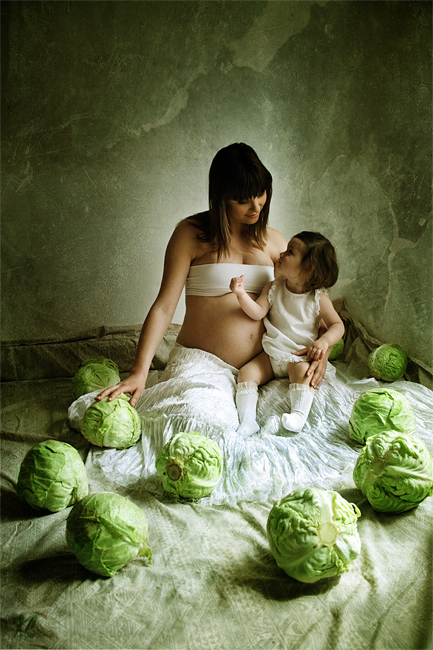
This photograph is named “Philosophy of Unfreedom”. At first this photograph is simply gives an impression of prisoned child staring outside from the “cage”. But I put also a hidden meaning here. Pay attention to the child’s hands. Look how hard he clings to his “cage”. How often we, being unfree in the literal or figurative meaning of this word, are afraid to loose our “cage”, fear to make changes in our lives, and feel comfortable in our unfreedom, though not always admit it?
Such interpretation doesn’t lie on the surface, and if a viewer won’t take time to “decipher” it, it will remain hidden. But even without it the photograph turned out to be deep, memorable, and strong – mostly thanks to a good acting of my five years old son ☺.
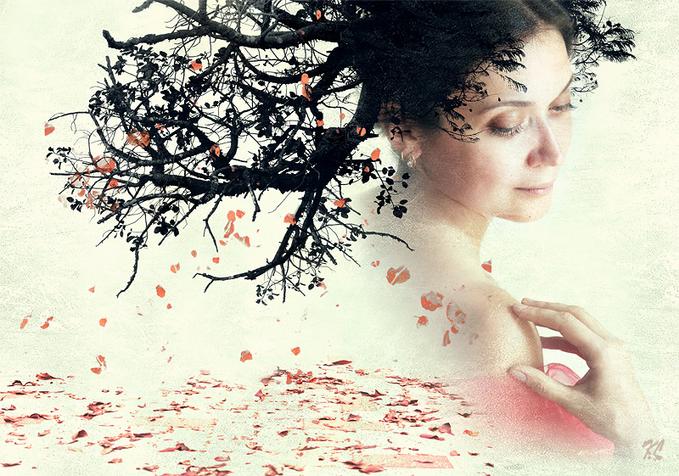
Photo “October…” I liked the most. It breathes with tenderness and freshness of the autumn… Tell us a bit about the creation of this photograph.
Photograph by Katerina Lomonosov. Click on the photo to enlarge.
This work is one of my favorites. The model is a young woman who came to me. She wanted me to create beautiful photographs of her. So she wanted to look good in the pictures, and my goal was not to disappoint her…
The idea of hair-tree came immediately to my mind, but post-processing took several hours. Then I was ready to send the work to my customer, but something stopped me…
I was returning to work on it each day of that week – tried to add various elements, but nothing worked. Until one day I had the idea to add falling leafs to the tree… Then everything fell into place, and the photograph got its final look.
Tell us about the accessories that you use in your work.
Each composition gets its own accessories. Sometimes it’s gloves or a fan, often different types of fabric, sometimes flowers. I also like to use fruits and vegetables – they seem “real” to me, just as the nature created them, I think this is important for my work. Once I even brought a stepladder from work – it complemented the background of the composition, and I made some very nice pictures with it.
Photograph by Katerina Lomonosov. Click on the photo to enlarge.
What equipment do you use? How important is quality equipment for photographer?
I started with a small point-and-shoot Fuji A210. Many of my early works, which are made with it, now participate in international exhibitions and competitions. Later, I bought Canon 350D and used it for three years. My best works are made using this camera.
Now I have Canon 5D Mk.II. I gladly switched to full frame, but still think that the photographer’s eyes and mind create the photograph and not the camera.
My opinion is that in most cases it is not essential which camera captured the picture – most important is when photograph reaches deep inside and touches your feelings.
Tell us a little about your work with light. What lighting techniques and equipment do you use?
Lighting? I use natural light that reaches my living room through the windows. Nothing more. I don’t use flashes, umbrellas, or reflectors. The important thing for me is to have free time during the daylight hours.
How much time you devote to Photoshop? What features of Photoshop you use the most?
Post-processing in Photoshop is crucial to me. I devote quite a lot of time to it. I work on each photograph for several hours. I use color-correction, add various textures, and work a lot with masks and layers.
Photograph by Katerina Lomonosov. Click on the photo to enlarge.
Is it possible to buy your work, and if so, where?
I sell my work in galleries on the internet, some of them are presented in the Moscow gallery “Fotoloft”
You can also purchase my work directly from me.
If you could give only one piece of advice to a beginner photographer, what would it be?
I would advise to photograph with your “soul”. To put a maximum of “yourself” in what you do, and the result will not be long in coming.
Photograph by Katerina Lomonosov. Click on the photo to enlarge.
Thank you Katerina for your time and knowledge! It has been a true pleasure talking with you.
If you liked Katerina’s works, you can visit her Gallery.
You can also contact Katerina regarding purchasing her work through her email: lomonosov.katerina at gmail.com
Katerina has a unique style in photography and she is a winner of many international photographic competitions. I was very lucky to have a chance to interview her, and she also turned out to be a very nice person.
It is my pleasure to present you Katerina Lomonosov!
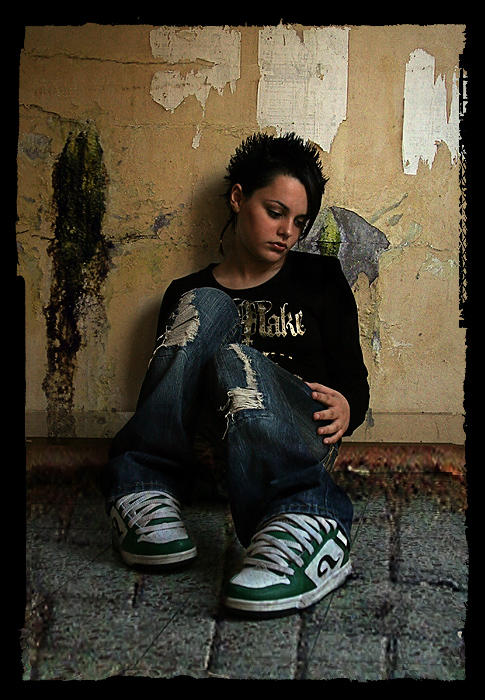
Click on the photo to enlarge.
First of all please tell us a little about yourself. When did you start getting interested in photography? Which stages of your development as photographer were the most important?
I was born in 1975, in Ukraine. As a child I liked drawing and graphics. In 1997 I moved to permanent residence in Israel, where I live now. From the year 2000 I am working as graphic-designer in an advertisement company.
I got interested in photography back in 2005. It so happened that at that time, a certain kind of emptiness appeared in my life. I wanted to fill that emptiness with something interesting, beautiful, bright… That “something” turned out to be photography…
I grow and evolve with my every new work, I’m a painter, I live, think and feel with my creations… Creative photography has become a crucial part of my life… I take part in various projects in the field of documentary and art photography, and I plan to grow and develop further in this area.
Photograph by Katerina Lomonosov. Click on the photo to enlarge.
Where are you drawing inspiration and ideas for your works?
Inspiration and ideas for my works come in different ways… Sometimes idea just pops up from the subconsciousness, and some things come from pictures of other authors on the Internet. Some of my works are inspired by paintings of famous artists. There are also ideas on a particular subject, which are literally “nursed” in my head for a long time before they find their way out to be captured in a photograph.
Who are your models? Are they your relatives, acquaintances, or maybe professional photo models? How do you choose them?
My first models were my children – my son, who was then five years old, and a daughter, she was thirteen back then. Later, some of my friends and acquaintances were added to my arsenal, and also friends of my daughter. Nowadays many professional photo models would be honored to participate in my photographic work.
The most important thing for me when I choose a model is not the professionalism of the model but his/her natural body language and an expressive face, especially the eyes.
For me it is important to show in my photographs not only the beauty of lines, and location of light-spots, but also something from the depths of human nature, you may call it the “soul”. In my work I always strive to give depth of meaning to my photographs, so that they would make people think and try to understand what I wanted to express. I want my photographs to reach for the person’s deepest feelings and emotions.
Photograph by Katerina Lomonosov. Click on the photo to enlarge.
How do you find and choose locations?
Most of my photographs are a created at my house’s living room. I just move the furniture aside and make a small “studio”, but it is more like a simple corner. Occasionally I get out with my friends to take pictures outside. When shooting outside I prefer abandoned houses, but with walls and windows still intact , so even outside I seek places that look like my familiar environment at home.
How much time in your weekly routine is given to photography?
In good times, every Friday is all about photography. One day a week. Sometimes I also shoot on Saturdays. But I also have busy periods, when I have to sacrifice my hobby for other matters, and several weeks can pass without me creating a single photograph.
* * *
This is the end of Part I of my interview with Katerina Lomonosov. Click here for Part II.
If you liked Katerina’s works, you can visit her Gallery.
You can also contact Katerina regarding purchasing her work through her email: lomonosov.katerina at gmail.com
I was introduced to Jairo’s work on Flickr, and I liked it very much. In my opinion Jairo has very good eye for people and different situations that involve people. I frequently visit his Flickr account and enjoy great new photos, which he posts pretty often.
Though Jairo has a very busy schedule, he kindly agreed to this interview, and I am very grateful for that!
First of all a little about you. Tell me a little about yourself. Where are you from? What do you do for a living? My name is Jairo Abud and I’m 52 years old. I was born in Brazil and live in Sao Paulo. I’m professor of economics at a Business School.
When did you start getting involved in photography?
I always loved photography since I was a teenager. My brother-in-law had a darkroom back then. I used to take pictures in B&W and he would lend me his chemicals and his darkroom so that I could learn and get used to developing my own photos at the age of 16. After I graduated from college, I got involved more with work and did not have much time to spare for my hobby, so I slowed down with photography.
I used to photograph with Praktica (brand of camera manufactured by Pentacon), which is still working pretty well. But two years ago I decided to get a new camera and bought a Sony Alpha 100. And my love of photography came back stronger than before, I guess. My wife told me about Flickr and I decided to start sharing my photos with other people.
Photograph by Jairo Abud. Click on the photo to enlarge.
What do you like the most about photography?
Unlike in movies, I believe that people have different interpretations and feelings when they look at a photo. Your life experience is the main interpreter of the photos. I really believe that photograph can touch you and set your hidden feelings and sentiments free.
Photograph by Jairo Abud. Click on the photo to enlarge.
Which subjects are your favorite to photograph?
I would say I’m a people’s photographer. I always like to see a human as subject when composing the whole photo scene. I like to take pictures in Sao Paulo downtown where I can compose images in which the architecture plays an important role, though the major role is played by the people of the city. As you know, Sao Paulo is the second largest city in Latin America, and you can find many different personages there – lonely people, people with sad or happy faces, and people with different life experiences. I like it when my photos try to illustrate that.
Photograph by Jairo Abud. Click on the photo to enlarge.
Is there photographers that you are inspired by? Who ?
I like Sebastião Salgado, a Brazilian photographer – he always put the human being in the foreground. And I’m also a big fan of Bresson’s art (Henri Cartier-Bresson).
Photograph by Jairo Abud. Click on the photo to enlarge.
And now, a little more details for us, keen amateurs 🙂
What advice would you give to a beginner photographer?
I consider myself as an amateur too. And I always will be an apprentice. In my opinion the first step to take good photos is to observe and study different photos taken by different known photographers and try to make similar ones. It’s just like a painting learning process. Painters also try to emulate great painters of the past to learn their technique before painting their own art.
You can also do that as a photographer. With time, you will start to compose by yourself and to create your own style. It is a learning process. But this was my recommendation for a first step… The next, and most difficult one, is to be yourself, and take pictures the way you like taking pictures and not because other people like that style. After you have found out what you like, stop worrying about what others would say about your photos and just take them.
Photograph by Jairo Abud. Click on the photo to enlarge.
What photographic equipment do you primarily use?
I use a Nikon D90 with 3 different lenses: Tamron 10-24mm for landscapes, a 18-200mm for general purposes and a 80-200mm for photographing people. I also believe that good equipment is fundamental for you to improve your photos.
Other important thing: you have to know your equipment really well, and have control over it, to have the camera as an extension of yourself. My next camera will be a full frame, for sure.
I also use Photoshop CS4 for processing – especially for contrast and minor adjustments.
Photograph by Jairo Abud. Click on the photo to enlarge.
Could you tell me a little bit about your typical photo-shoot?
I always invite friends to go out and take photos. After a couple of hours we take a break in a coffee shop and start to look at each other’s photos. That’s very interesting because you can realize that, even when you’re on the same spot, you find completely different photos among your friends.
I always try to take photos of people spontaneously, but if I see an interesting face that I would like to photograph, I ask that person’s permission and start talking to him or her to make them comfortable. And I always focus on their eyes, where the real emotion is.
Lately I’ve been trying a different way of taking photos: I don’t look at the camera display right after taking a photo – I think the movement of looking at the display will distract me and make me miss other important shots.
There is no “decisive moment” but a “decisive sequence”. After that sequence, those series of moments, you can choose the best shot.
Photograph by Jairo Abud. Click on the photo to enlarge.
Thank you Jairo for your time. I wish you all the best in your future endeavors!
If you liked Jairo’s photographs and want to see more of his work, visit him at:
As a result of my interest in working with light in photography I am starting to get interested in portraiture. From time to time I stumble across a good portrait on the net and find myself thinking about how photographer achieved the final result, and what things he had to consider before making the portrait. I also think about the lighting techniques used in different portraits. Finally I decided to give it a try myself. In the following photos you can see what came out of it.
My lighting equipment was pretty simple: Two flashes (Canon 430EX and Yongnuo) One flash was used as a main light placed on a light stand shooting through umbrella. Second flash was also on a stand but without umbrella used mostly as fill light or hair light. I had a piece of black fabric for the background, but in any case my ambient light was pretty low and most of the light came from flashes.
This portrait is pretty straight forward. I think that my lighting is a little harsh, and I don’t have a hair light from the left/top to separate the model from the background. I could say that I intended it to be that way… but I didn’t 🙂
In the next two photographs I experimented with different facial expressions that in my opinion suited the model. I chose B&W because of two main reasons:
1. There were not many colors in the scene anyway, and I wanted to make the viewer concentrate on the expression of the model.
2. I confess – I couldn’t achieve the skin tone that I wanted.
I noticed an undesirable shadow near model’s right eye only after the shoot so I couldn’t do much about it, but I sure will pay more attention to this kind of details in the future.
While shooting I asked my model for different poses (even though it was a strictly portrait shoot, I think that pose affects the facial expression), and at first I took all the control. What I mean is that I told her what to do, where to look, where to turn her head, etc.
But at some point I told her to feel free to do what she wanted, to pose as she would like to be photographed herself. And it was the best decision I ever made in that shoot.
Just look at the following photos.
And as she got more relaxed I could get more interesting photographs. Here is an example of one, which I especially like:
I felt great after this photo session because finally I got to try something that I thought a great deal of. I doubted that I could get any satisfactory results. And though I do understand that I have a long way to go from here, I still really like these photos and they keep me motivated to continue improving my skills.
I will be more than grateful for any comments or suggestions. Feel free to comment on my work – it will help me and other readers a lot!
And here is one last photo from that photo session:
Anyone who finds a site about photography probably asks himself – who is the guy that writes this stuff ? What does he/she shoots? I think that these are very legitimate questions. You wouldn’t take a legal advice from a taxi driver, would you?
In order to provide an answer for such questions regarding myself I created a website where I display my photographic works, and here I will make a short tutorial around my website.
As I wrote in my About page, I am relatively new to photography and I started my “PhotoPathway” from photographing nature, plus the fact that I currently live in Israel – and there you have it: IsraNature.
Most of this website is dedicated to the Nature of Israel, but there are also a few albums from my trips abroad, and I imagine there will be more of them in the future. Most of the albums are named after different places in Israel that I photographed, and some of them have general names like “Nature of Galilee Region”. In such albums I put photos that there are not enough of them to create designated album for the specific place.
In the album named Artistic Impressions I put my artistic works that I like the most. Here is an example:
If you like my photographs and want to see new photos that I add to my site, you can just visit the homepage of my site. There will always be my latest photographs.
You can also reach IsraNature from the thumbnails on the sidebar of this blog and from the top menu. I will appreciate any comments on my photographs. I am always looking for other people’s opinion on my work.
To post-process or not? This is a somewhat philosophical question. It is also a very controversial one. Some people claim that photo should be seen the way it gets out of the camera without any adjustments. Others do adjustments freely and sometimes even take it to the extremes. So what is the right thing?
Any photographer, even an amateur one like me, has an opinion on this issue. And here is mine.
I think that even if you don’t adjust anything after downloading your photo from the camera, it is already not faithful to reality. It doesn’t have “real” colors or the “real” white balance. That photograph looks as your camera “saw” it considering the settings you set. There is no such thing as one and only reality. So even by the action of pressing the shutter-release button you are already making adjustments to the reality.
Another thing is that even before you press the shutter-release button, when you building your composition, you are already adjusting the reality by making the viewer of your photographs see things the way you want.
Then what is the difference between these “adjustments” and adjustments in Photoshop like contrast, levels etc.? I don’t think there is a big ideological difference. In my opinion you are free to make any post-processing you like as long as you manage to convey the meaning, the idea, the story of your work to the viewer – just like any other art.
Of course there may be adjustments or extremes that people go to in Photoshop that I don’t like. For example – any kind of fraud, I mean editing the original photograph by changing or adding (or detracting) some features in it, and then saying that this is how it was from the beginning.
But if you present your photo as work of art, then personally I relate to it only in this way, and examine only the final result whether do I like it or not.
I learned the following tips from two professional photographers I happen to know. These are not the most common tips that any amateur receives like “Try shooting the same frame with different exposures and see what works best” or “To freeze action use fast shutter speed”. These tips are more profound and “rare” as I call them, having more meaning than I can actually explain here, so you will have to rethink for yourself some of them. And one more thing – some of them can be achieved only with SLR (Single Lens Reflex) camera.
1. When looking through the viewfinder “scan” with your eye the whole frame.
Human eye is seeing the sharpest only the object that it looks at. All other objects are not in perfect focus. But camera sees all the things that are in the same plane in the same sharpness, and if your aperture fairly small then many more planes will get sharp. So when taking the shot you have to be aware of other “sharp” objects that will be visible in the final photo.
One way to do this “scan” is to first focus with AF (auto focus) on what you want, and then rotate the manual focus ring just a little bit. It will make the whole frame a little blurred. When everything is blurred your eye will automatically scan the whole frame for something sharp, thus going over the whole frame.
Another way is just to stare into the view finder for a few seconds, not trying to focus on anything specific. This is something that takes a little practice to master.
2. Use manual focus override to adjust focus to what you need.
Sometimes you need to control the DOF (Depth Of Field) to achieve the desired result. First you focus on your main subject using auto focus, and then while the shutter release button is half-pressed you turn the manual focus override ring to adjust the focus to what you need. Have in mind though that manual focus override is not featured in all lenses. There are cheaper lenses that can work only in automatic or manual mode but not both simultaneously.
3. Initially compose the photo for cropping or adjustments.
Many amateur photographers just shoot the photo and then when they open it in photo-processing software (such as Picasa, Lightroom, Photoshop, ACDSee etc.), and only then, they start thinking what they can do to improve it. Maybe crop it like this? Maybe emphasize a little more shadows? Try to think about these things (especially the crop) before pressing the shutter-release button. It will make it much easier to perform cropping and other adjustments later. You will also be forced to THINK before you shoot.
4. During the shoot of an event – shoot on manual.
When you are shooting events that happen fast, you can’t afford to mess with camera controls. You can miss the shot of the day that way. So what you can do is: set your camera to aperture priority mode, and choose the desired aperture. Then half press the shutter-release button and on the screen (or inside the viewfinder) you will see the suggested shutter speed. Take a few photos and see if you like what you get (in terms of exposure), if not adjust exposure compensation. After you are satisfied, switch to manual and set the same values of shutter and aperture. From now on shoot on manual during the whole event with the same settings, unless there are drastic changes of light in the scene. I realize that this is kind of “half-tip” and many professional photographers are working only in manual changing between f-stops and exposure automatically to get the best results. But here I am talking about amateurs, like myself, who are not just yet there.
5.Don’t look at the back LCD screen after each photo.
Actually this tip is pretty controversial, but I’ll stick with it. Not looking at the LCD display after taking each shot makes you THINK more before each shot, and also leaves a room for anticipation towards the final images. This is a good exercise, and while it might not be a good idea during an important shoot, I advise to do it wholeheartedly during your everyday shooting. Think of it, if you have this habit of looking at your back screen after each photo, and you are in a scene where everything happens fast, you just might miss an interesting shot while looking at the LCD display.
6. Don’t just convert to b&w – shoot with intention for b&w.
Instead of going over your photographs after a shoot and thinking “Well, this photo might look good in B&W, lets try to convert it!” Shoot the photographs with B&W in mind, think B&W. When shooting B&W, highlights and shadows have more importance, and also other artistic aspects of the photo (such as facial expressions, hand gestures, etc.) stand out more in B&W, because you don’t have the “distraction” of the color. When shooting with B&W in mind you pay more attention to tones (light/dark) than to colors.
7.When shooting people in low light take spot light metering from their skin.
In difficult light conditions, particularly in low light, when using center-weighted average metering most of the chances that you will over-expose your photo. So it would be better to switch to spot metering and take the measure from the skin of the person you are about to shoot. If for some reason it is impossible, then take the measurement from the palm of your hand while placing it in similar lighting.
8. When shooting with slow shutter speeds hand-held, don’t release the shutter button.
When you shoot with slow shutter speed, you have to do everything in your power to reduce the camera shake, so in addition to holding it steady, leaning against the wall etc., when you press the shutter button, don’t press and release it straight away, but press it smoothly leaving your finger on it for a while after you hear the shutter sound. This little trick can improve greatly the outcome. In many ways shooting photos with slow shutter speed is like sniper-shooting a rifle – most of the actions are the same: for example it helps to take a deep breath in, then breath out, and then press the shutter-release.
Well, I hope you’ll find these tips useful and would really like to hear your thoughts about them. I probably will write more on some of these tips in my future articles.