If you are new to the whole HDR concept I suggest you first read my posts titled HDR Introduction and Pseudo HDR
Anyone who heard about Photomatix, knows that it creates HDR images. But in addition to a usual HDRs combined from several exposures, you can also create a nice pseudo HDR images – in short an “HDR looking” image made from a single RAW file.
In order to do that you open just that one RAW file in Photomatix, and it “understands” that you want to create a pseudo HDR. Then you use the great tone mapping tools that Photomatix offers and tweak your final result. In my next post I will go into more detail of how exactly to work with Photomatix, but here I just want show a little of what’s possible.
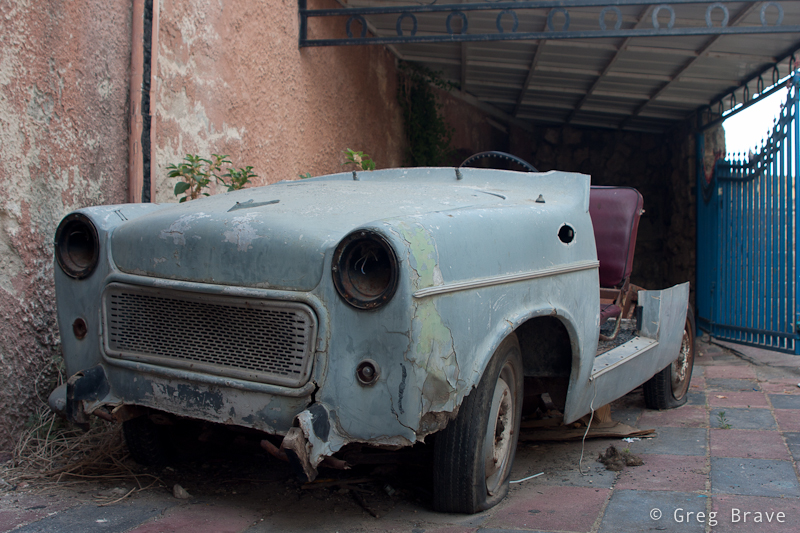
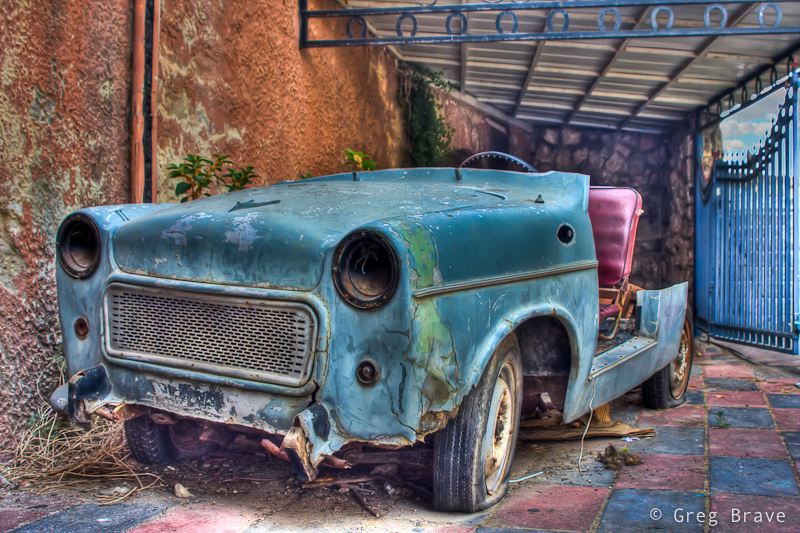
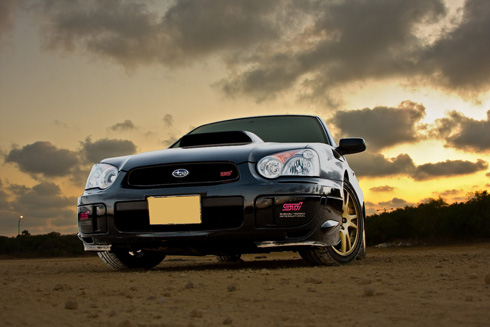
I would like to illustrate this by presenting the before and after versions of an old car photograph. As you can see the change is quite drastic, and it shows how much information is really hidden inside that RAW file.
Photographs by Greg Brave. Click on the photo to enlarge.
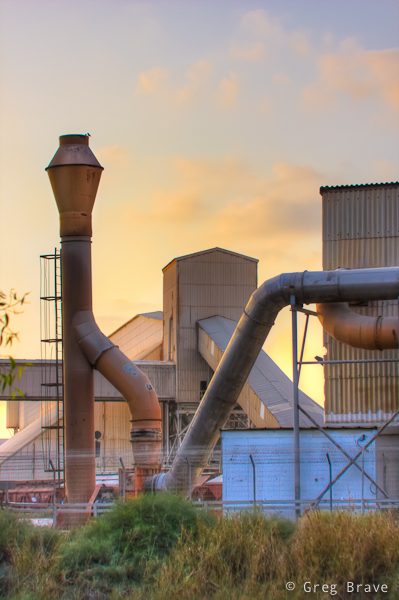
Somehow in my mind an “exaggerated” HDR images, the ones with slightly unreal look, are always associated with old cars and industrial scenes, so in order for this post to be complete I am adding here another pseudo HDR image (yes, that one is also made from a single RAW file), containing industrial buildings.
Photograph by Greg Brave. Click on the photo to enlarge.
One of the advantages of pseudo HDR is that you don’t always have to use tripod to make it. What I mean is that in order to create ordinary HDR image you’d have to take multiple exposures and use tripod to stabilize your camera so that all your exposures would be framed exactly the same. This is not a problem when you are using only one raw file.
So if you have in your photo collection some single RAW photos that don’t look too interesting, you may want to use Photomatix to create a pseudo HDR from them and see what happens. The result might surprise you!
Recently I have seen many HDR images that were too exaggerated, making them completely unrealistic and in some cases even unpleasant to watch. Programs such as Photomatix make it very easy to create HDR images but they are also tend to lead people to create very exaggerated HDR images, maybe because it is very easy to accomplish in these programs.
I have nothing against using HDR techniques in creating artistic imagery, but I would like to remind you that the original intention of the HDR was just to increase the dynamic range of the photograph.
However with a little knowledge of Photoshop, you can do that – you can create an HDR image that will look very realistic but still show all the detail that you want it to show.
I created a pretty simple tutorial that shows how to manually create HDR image in Photoshop. In this tutorial I used two photos taken at the same location (using tripod), one exposed for the bright sky and the other one exposed for the darker lower part. Though I used only two photos, you can use as many photos as you like revealing detail in any part of the scene according to your preferences.
There is one point of this tutorial that I would like to stress out one more time – use large brush with soft edges and opacity around 50 to 60 percent. It is important so that your final image won’t have these “white glow” edges that can be seen in so many HDR images.
If this tutorial helped you to create your own HDR images I would sure like to see them! But if you don’t have Photoshop, but still want to create HDR images, you might want to try Photomatix.
In one of my recent articles I wrote about HDR photography (you can read it here). So I learned about HDR, and I played with it, and everything seemed pretty clear to me. Of course there are endless variations that can be done with HDR, and only your creativity is the limit, but during my explorations I kept stumbling into these strange words: “Pseudo HDR”. Most of the photos I saw under this title looked pretty much as ordinary photos, but some of them looked like real HDR, and if I wouldn’t see that “pseudo HDR” phrase, I would have thought that it was usual HDR.
So this got my curiosity up and running, and finally I found out what the words “Pseudo HDR” mean. I want to share this knowledge, and in order to do that I have to start with something else.
RAW camera format
Those of you who have advanced point-and-shoot cameras or any type of SLR camera know that you can choose that your camera will save the photos you shoot in RAW format (there is usually a choice between JPEG of different qualities and RAW).
When you choose to shoot in JPEG, it means that when you click on shutter release button, light comes through the lens and hits the digital sensor. Then the information from the sensor is processed by the internal computer of the camera according to the camera settings (choice of white balance for example), compressed to JPEG file format, and finally saved to the memory card. Now, and this is important, during the JPEG compression phase, some information that was recorded from the sensor during the shot is LOST forever. Because of this loss, when you process the image in photo-processing software, you are less flexible in the adjustments that you can do to the photograph without compromising its quality.
This is why there is RAW format. RAW format means that all the information that is recorded by the digital sensor of your camera during the shot is saved without any compression or processing by the camera’s internal computer. When you process RAW file in your favorite photo-processing software you can apply pretty radical adjustments to your photograph without compromising its quality.
One of such adjustments is exposure. You can pull up your exposure by about 2 stops without compromising image quality (well, maybe I exaggerated a little with two, but 1.5 for sure). I wrote especially about the adjustment of exposure because it is critical for the explanation of the Pseudo HDR, but another generally very important adjustment is white balance, so even if you set the white balance setting completely wrong during the shot, you will be able to change it during the processing.
Note: In order to process RAW files you will probably have to install special software (however in Photoshop there is a built in plugin – so that when you open a RAW file you will automatically get a RAW processing window. You can also process RAW files in Lightroom, and almost certainly in Picasa). For example Canon supplies RAW processing SW for free when you buy a camera.
And now I finally get to the point:
Pseudo HDR
Pseudo HDR photo is made from a single RAW file. As I said you can change the exposure settings of the RAW file without compromising on image quality. So basically you open the same file two or three times, each time setting different exposure, revealing different areas. Thus in low exposure you have good highlights, and in high exposure you have good and visible shadowed areas. Then you merge this to a single pseudo HDR image. You see, it is not a real HDR image, you didn’t take three different photos taken with different exposure settings, but you achieve similar effect.
Of course there are some drawbacks. For example if the scene you shoot has very deep shadows and very bright highlights, then single RAW photo just won’t do it because there is a limit to how much exposure range you can pull from a single photo.
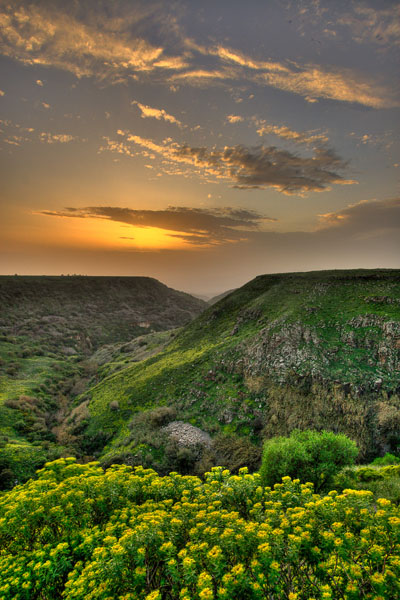
So pseudo HDR is mostly used when you only have to make slight adjustments to the picture. For this article I tried to take Pseudo HDR to extremes and here is what came out of it.
This is the photo without any adjustments and exposure changes ( shot in RAW format):
And here is what came out after processing this single shot using exposure and other adjustments:
You can see that in the final photo shadowed areas are more clearly visible, and hilights (the sky) are not burned. I created this pseudo HDR photo in Photoshop, but if you don’t have Photoshop, or want an easier way to create HDR or pseudo HDR images, check out Photomatix.
When I just started getting interested in photography I discovered many interesting sites and forums on the web. And from time to time I saw this mysterious abbreviation HDR, and very unusual photos under it. And for some time I couldn’t figure out what it is that people do with their photographs that make them “HDR”.
So finally I decided to research this issue and found out what it is, and many different techniques to achieve an HDR image. It has been quite some time now that I have been playing with HDR images and gaining knowledge on the topic.
This is an introductory article into the HDR photography. I won’t discuss now any ethical or ideological questions regarding this issue but only explain what is HDR image.
HDR stands for High Dynamic Range. Seeing this, a beginner photographer will ask himself: “what the hell is this Dynamic Range”? Though this is somewhat complicated question, I’ll try to simplify it having HDR photography in mind.
Dynamic Range
When you shoot a photograph, you set certain exposure time and an f-stop. Let’s say, for example that you are shooting a scene with very dark areas and also very bright areas. In this case if you expose for light areas, in the resulting photograph you will have them correctly exposed and all light details visible while all the dark areas will be plain black. And if you will expose for dark areas, in the resulting photograph you will have the dark areas correctly exposed with all dark details visible, but now white areas will be completely burned (e.g. white, with no details). So dynamic range is how many dark tones and light tones can be seen in the same image without being burned or blackened. If I would take photo of the same scene with two different cameras – one with high dynamic range and another with low dynamic range (with the same exposure and aperture settings), then in the resulting photograph from the first camera I would see more details in very dark and very light areas, while in the photograph from the second camera these areas would be completely black and completely white.
But as high as the dynamic range of any camera can be, it has its limits, and these limits are way below the dynamic range that human eye can see. This fact makes it practically impossible to create photographs of places with high contrast lighting, on which you will be able to see everything your eye saw while taking the photo. For example you are shooting a street with buildings on both sides of it. The sun is lighting the scene so that tops of the buildings on one side of the street are bright but rest of the scene is shadowed. No matter how you will expose, you will either get the building tops in good exposure and all the rest dark with barely visible details or burned building tops with good detail in dark areas. You get the idea. It is always a compromise. Well, not always – you can create an HDR image! This brings us to the second part:
High Dynamic Range image – HDR.
HDR image is created from combining several photos of the same scene taken with different exposures. This merge is done, of course, on the computer with the aid of photo-processing software. So in order to create an HDR image you will have to take several photos (usually not more than three) of the same scene each time shifting exposure by one stop (or 1/2 stop or 3/2 stop – your experience will guide you here). The easiest way (but not always the best) is to make first exposure according to what the camera suggests (using center weighted average meter), second exposure should be one stop below the suggested exposure and the third exposure – one stop above the suggested. Using a tripod is highly recommended so that all three photos will have exactly the same composition without little shifts. These shifts can be somewhat corrected in post-processing though.
In order to create this image I took three photos with exposures spaced by single stop, and then combined them in Photomatix. It is a very easy to use but also very versatile program for creating HDR images. Here I intently exaggerated the HDR effect of the resulting image.
After the photos are created you load them to your computer and use software to create a final HDR image, in which both – light and dark areas of the photograph will have details. One of the most known and used software for creating HDR images is Photomatix. In several recent versions of Photoshop there is also an option for creating HDR images. When this “HDR effect” is used to its extremes, the resulting photos look unreal, like a drawing or painting, but used carefully it helps to bring back the otherwise lost details to photograph without making it look unrealistic.
There are many opinions regarding whether should one use HDR or not. Some people claim that it is not real photography, others use HDR to its extremes creating “paintings” instead of photos. In this article, as I promised I won’t go into this question and just say that I don’t agree with either of these two opinions ☺