
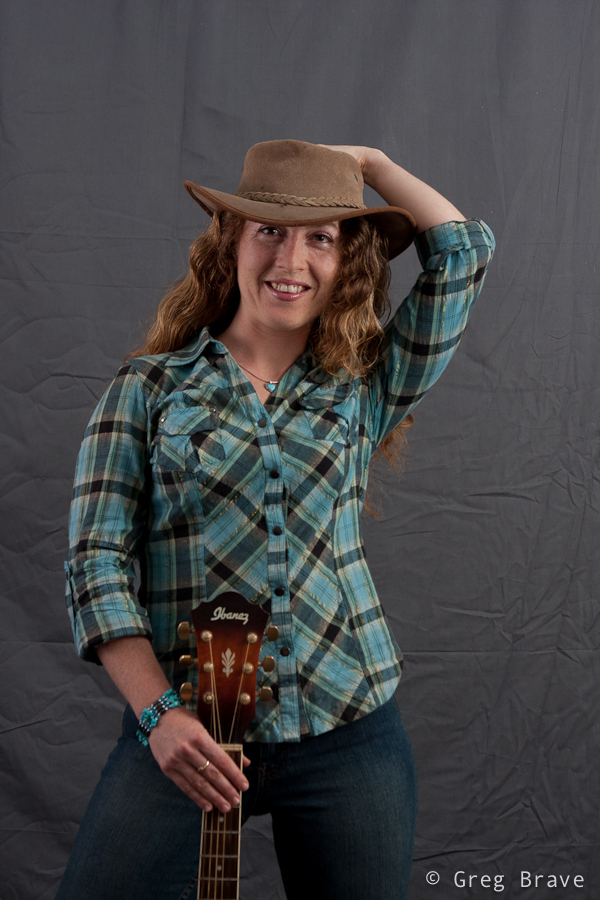
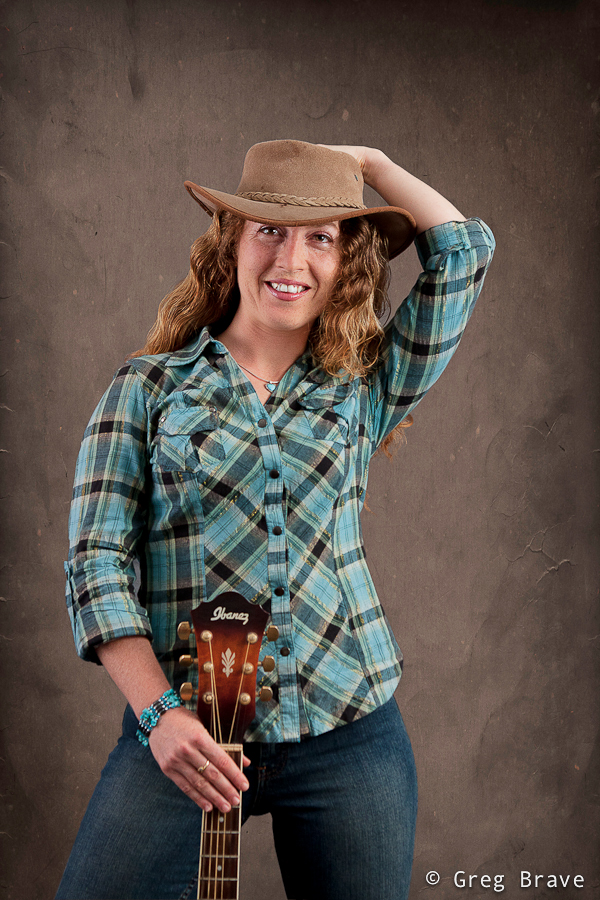
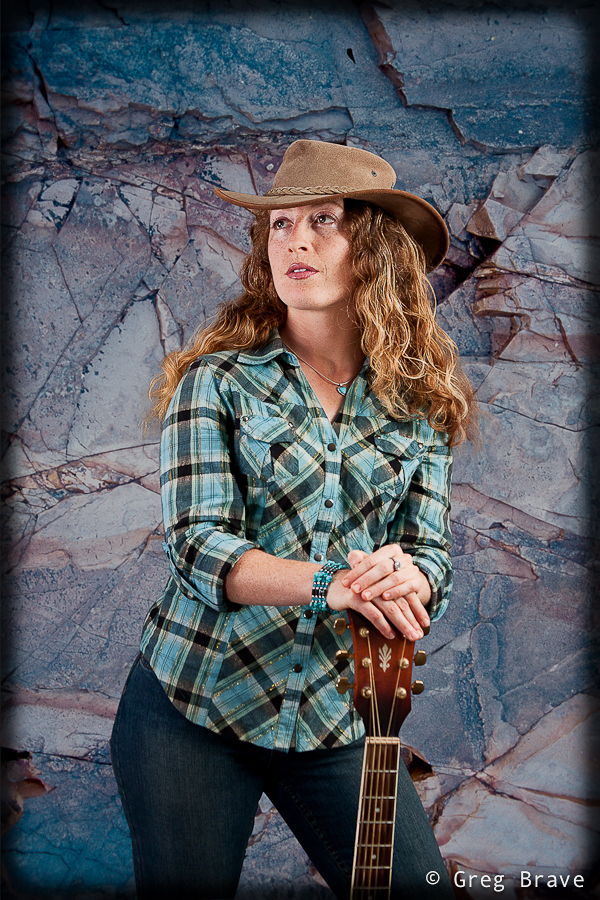
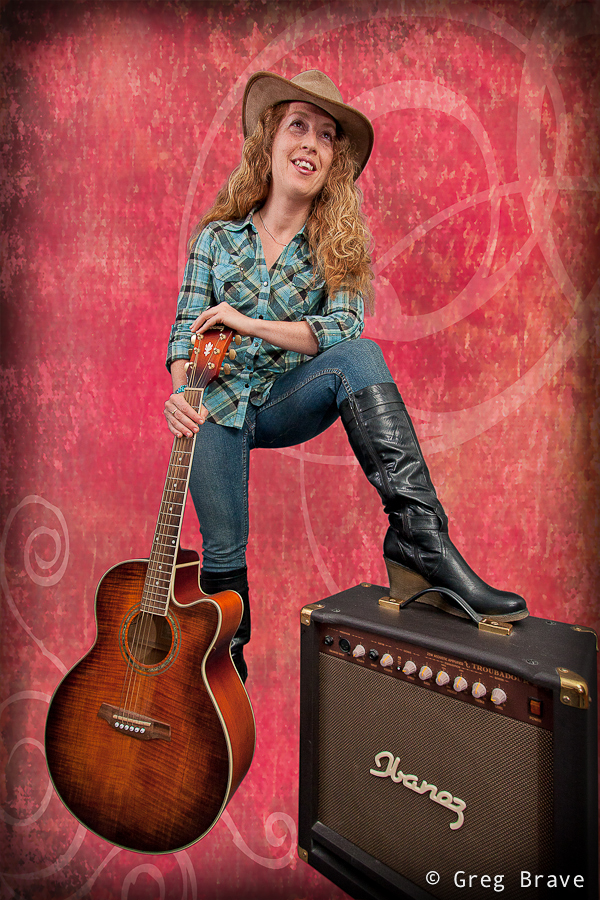
Couple of weeks ago I had a studio photo session with a beautiful woman. She is not a professional model, she just wanted to have some nice photos of herself. In this post I am going to share with you some tips on how to do a shoot like that.
Category Archives: Portraits
Portraits photo tips
Birthday Photoshoot
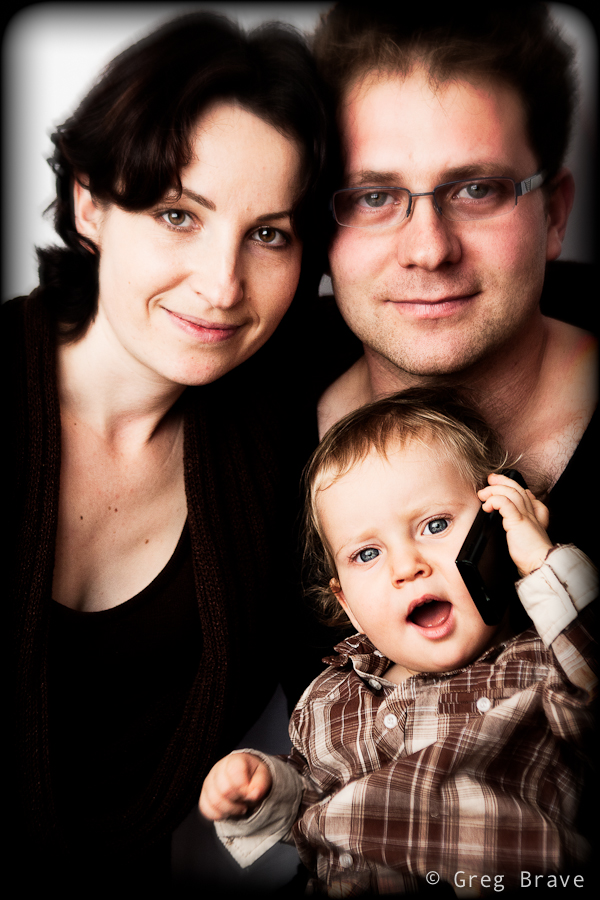
A couple of weeks ago I’ve got another family photoshoot. It was a very nice couple and a cutest little boy Leon who just recently turned 2 so they wanted some photos to remember this age. Parents wanted photos to be taken in the boys’ natural environment – their home and backyard. Therefore for me it was an “on location” photo shoot and I had to bring my lighting equipment.
Click on the photo to enlarge.
When shooting kids in studio you have time to set up all the lighting equipment before the session, but when you come to a family home, chances are you won’t have that luxury. There also might not be enough space for your light stands and stuff, which was exactly the case in this shoot. Lucky for me there was a large window with white curtains that provided a great light source. I also mounted a Canon 430ex speedlight on my camera and used it as additional light source, bouncing the light from the walls and ceiling.
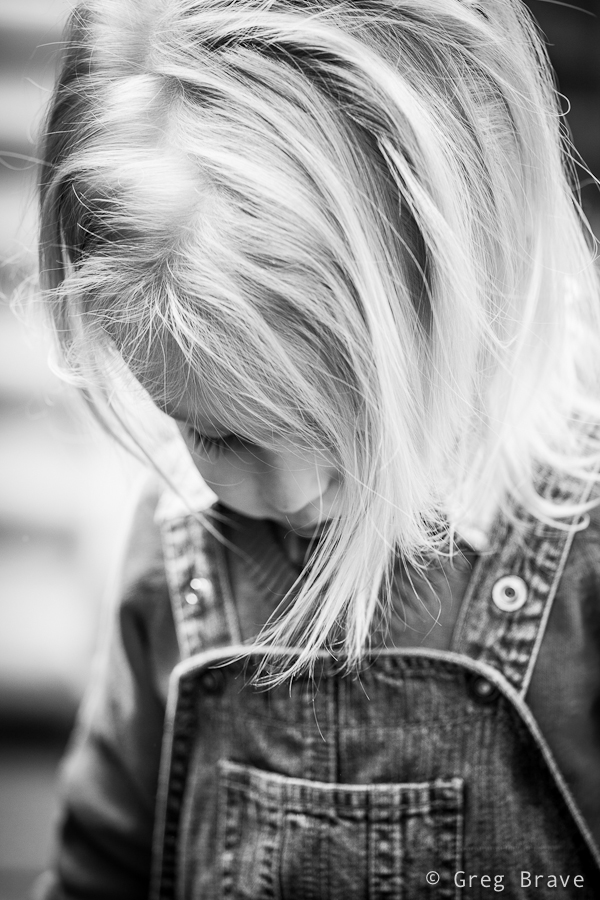
For example, in the photo below I pointed the flash at the ceiling to get Leons’ beautiful long hair to be lit from above.
Click on the photo to enlarge.
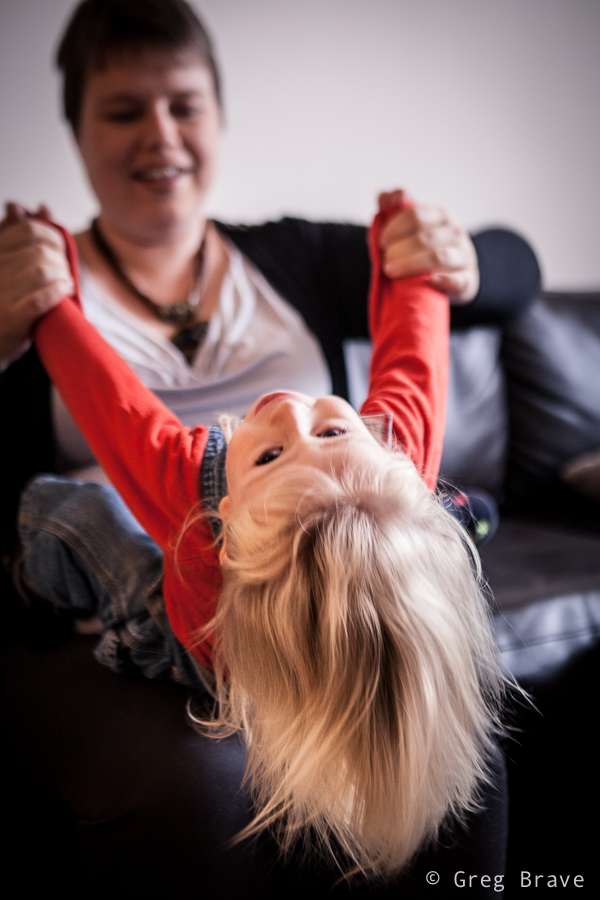
With little kids most of the times you have first to earn their trust by playing with them and smiling a lot :), and then you have to react to their movements and catch those brief moments in which they forget about your presence and act naturally. I was also looking to capture various emotions and moods of the child.
Click on the photo to enlarge.
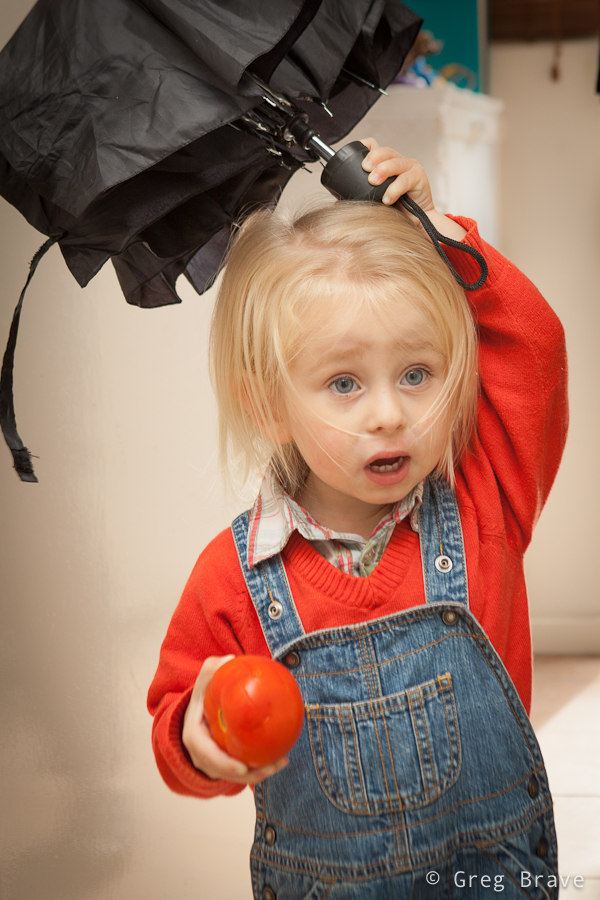
Another good idea is to give a kid something to play with. When Leon saw my large shoot-through umbrella, his eyes lit up with interest and he started to play with it, but it turned out to be too big for him. However his parents found a solution – they gave him a smaller umbrella, which kept him (and me) occupied for a while.
Click on the photo to enlarge.
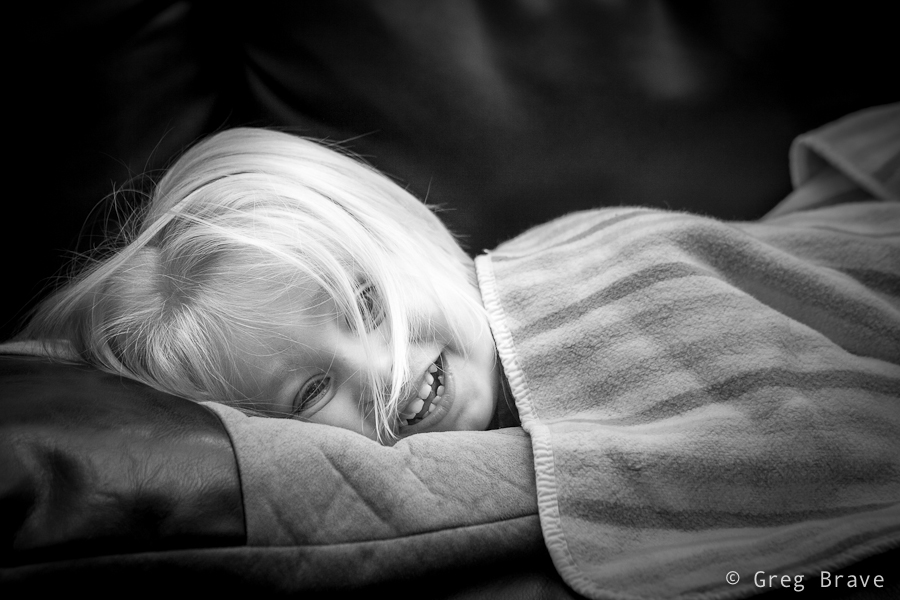
At some point during the shoot Leon got so comfortable with me and my camera that he started intentionally posing for me. When kids pose for camera it is nothing like when adults do it. Kids are natural, they can’t look “posing for camera” by definition, and I can prove it to you. In the next two photos Leon was intentionally posing for me.
Click on the photo to enlarge.
Could you tell that he was intentionally posing?

Click on the photo to enlarge.
I didn’t think so!

Click on the photo to enlarge.
I enjoyed this photoshoot very much and most importantly – the parents loved my work!
Brightening the eyes in Lightroom 4 quickly and easily
Sometimes, after shooting portraits, when I look at the photos, I see that in some of them the persons’ iris is too dark. In that case I want to brighten it (obviously 🙂 ). To do that, in Lightroom 3 I used to choose the adjustment brush, bump up the brightness slider a little bit, and brush the eyes. This presented a problem because it would brighten up everything I “brushed”, so I had to be very accurate with the brush and the process took quite some time considering I would do it to many photos.
Luckily Lightroom 4 improved the overall processing workflow and now I can do it much faster and more efficiently. So If you have Lightroom 4 and want to brighten up a bit eyes of your models here’s a quick and easy way to do it.
1. Go to develop module in Lightroom and select the adjustment brush:

2. Increase the Shadows slider quite a bit, but make sure that all other sliders are zeroed out.
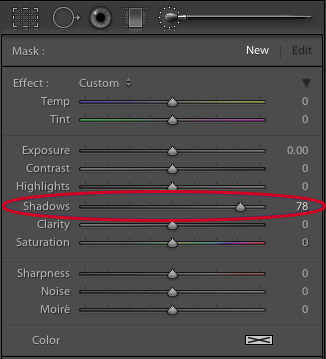
3. Brush over your model’s eyes quickly, not trying to make the exact selection.
4. Adjust the Shadows slider to taste 🙂
What happens is that the Shadows slider brightens (or darkens if you slide it to the left) only the darks, and usually around the area of the eye, the iris is the darkest part. The eyelashes and the pupils are completely black and Shadows slider doesn’t affect them. So if you accidentally select a small portion of the white of the eye, or the skin, they won’t be affected by this adjustment.
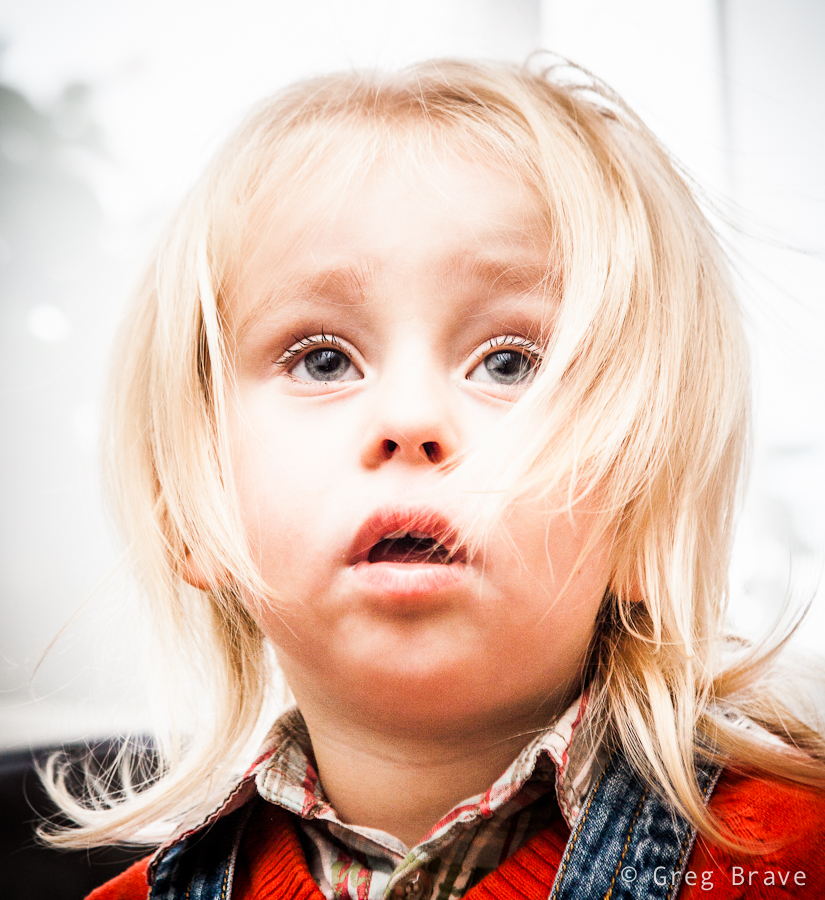
Here’s an example of before and after using this technique
Before (click to enlarge)

After (click to enlarge)
I hope you will find it useful, and be sure to let me know how you go in the comments section below!
P.S. For best results I recommend shooting RAW
Nepal In Photographs – Part 2 (Portraits)
This is my second post, in which I write about my photographic experience in Nepal. You can read the first part here. While in the first part I showed you Nepali landscapes, now I’d like to show a few portraits of Nepali people.
Interestingly in some cases people would not let me to take their photographs at first. In that case I would nod in agreement (like, hey I won’t take your photo if you don’t want me to) , point my camera at other subjects, and take a few photos here and there. This would get them interested. Then I would approach them and show them the photos I just made on the back screen. Next thing you know they are posing in front of the camera and running back to me to see the picture. I wished I had a portable printer with me so I could print out and give them their photos.
The photo below was taken on Helambu trek. We were passing a settlement in the hills of Kathmandu valley and made a short break in a nice spot overlooking rice terraces. These women were passing by, and seeing us smoke asked for a cigarette. In return we asked to take their photos 🙂
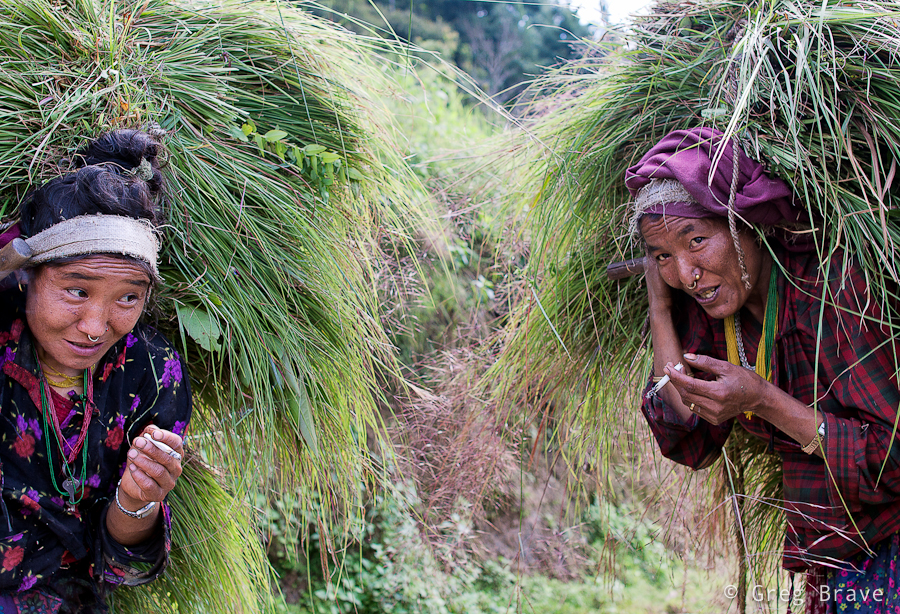
1/200sec at f3.5, 28mm | Click on the photo to enlarge.
One of the settlements on Helambu trek is Golphu Banyang. It has only one main “street” and not many tourists are staying there overnight, trying to reach the next village of Khutumsang. But it so happened that we did stay there, and I had the whole evening to photograph local kids. Once I showed them a photo on my camera they wouldn’t stop posing, only downside being late time of the day and, as a result, very dim light.
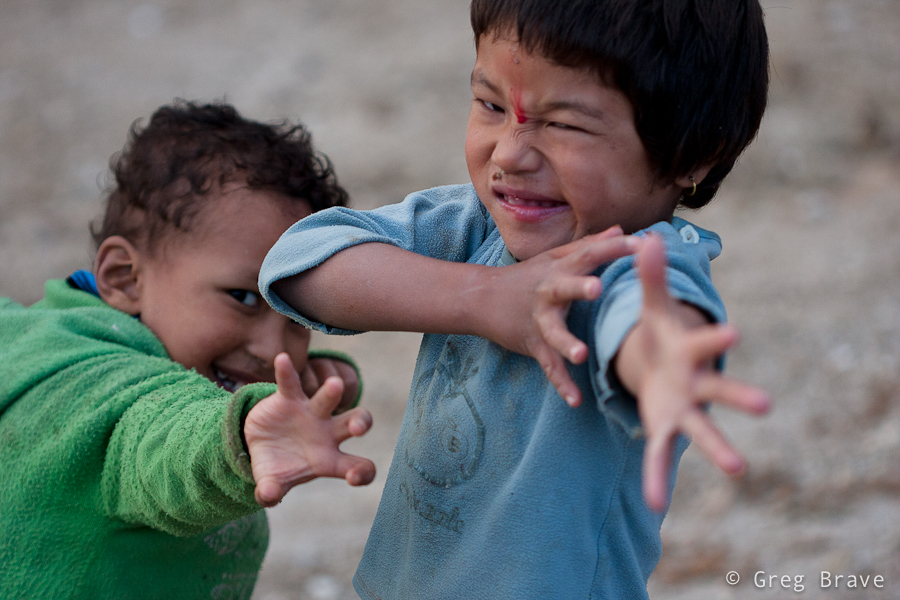
1/500sec at f2.8, 100mm | Click on the photo to enlarge.
The photo below was also made at Golphu Banyang on the following morning when we were leaving the village. The evening before I saw this old man in the same pose, doing the same thing, but it was too dark to make a good photo. In the morning though, there was this beautiful ray of light, lighting perfectly his face and hand. The result you can see below.
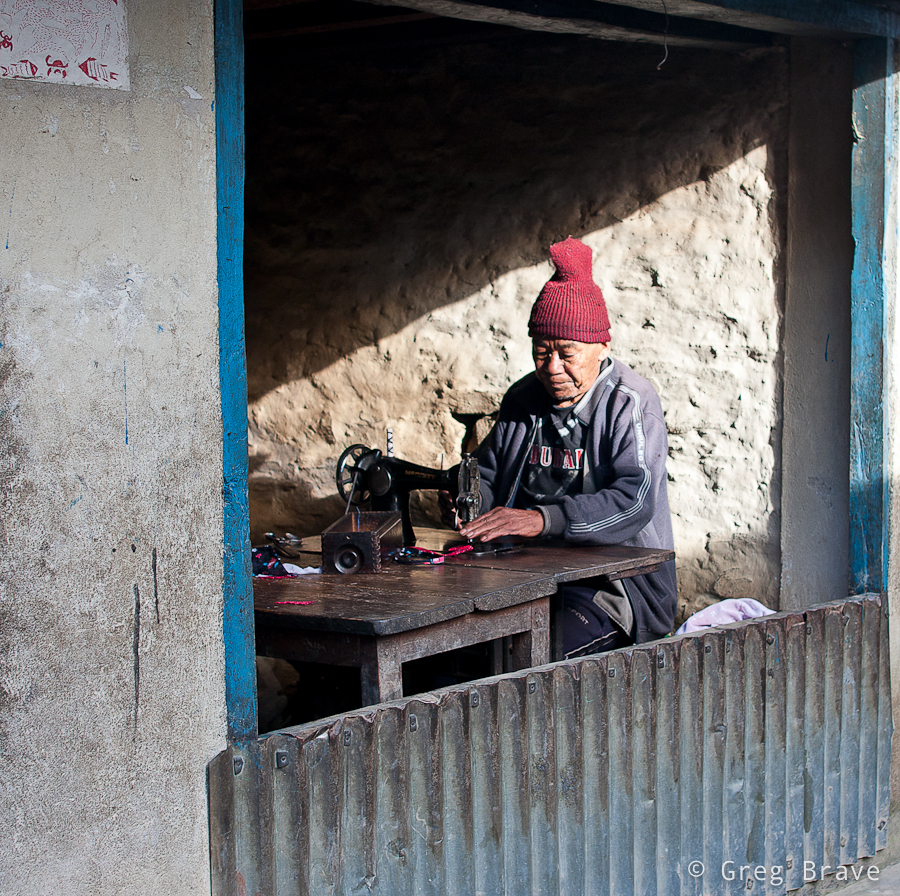
1/160sec at f3.2, 28mm | Click on the photo to enlarge.
On our way to Gosainkund Pass we stopped at one of the two lodges in Phedi. The lodge was run by a Sherpa couple. While woman was preparing our dinner, we were chatting to the man. Well at least we tried. Even though he seemed to be speaking English fluently, I realized that we hardly understand each other. In any case the conversation turned out to be very interesting and we learned a lot about local animals… or at least we think we did 🙂
I took the following shot of this man in the lodge’s dining room in very poor light, hence the f1.8 and 1/30sec. This is one of several shots I made trying to get his eyes to be sharp, which was difficult with f1.8 and his constant movement.
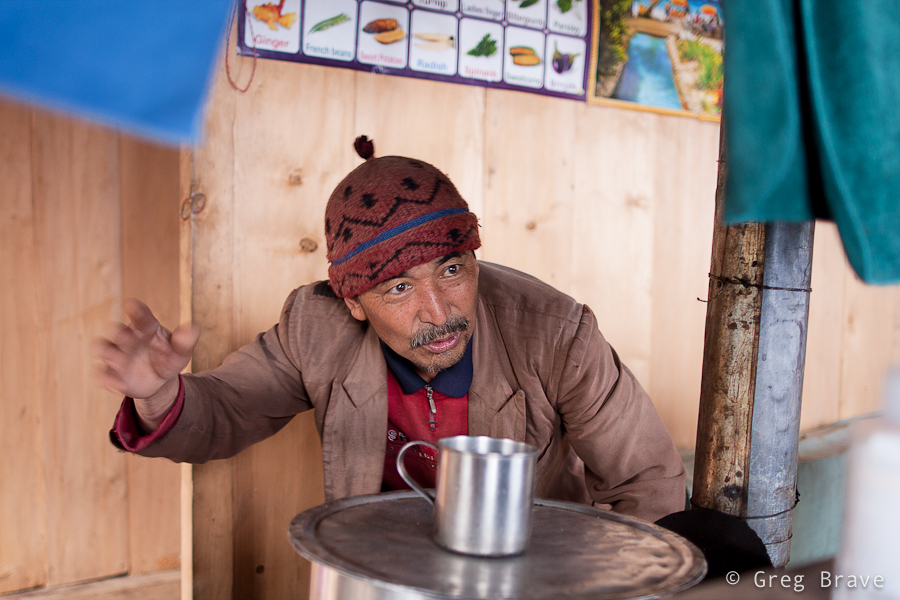
1/30sec at f1.8, 28mm | Click on the photo to enlarge.
Continuing from Phedi up to the Gosainkund Pass we reached a lonely lodge standing in a beautiful view of the surrounding mountains above and the valley below. Ram Sherpa, the owner of the lodge kindly agreed to be photographed. Ram was fixing holes made by some rodents in his rice bags when we reached his lodge. I liked the window lighting on him, which created definitive shadows on his face.
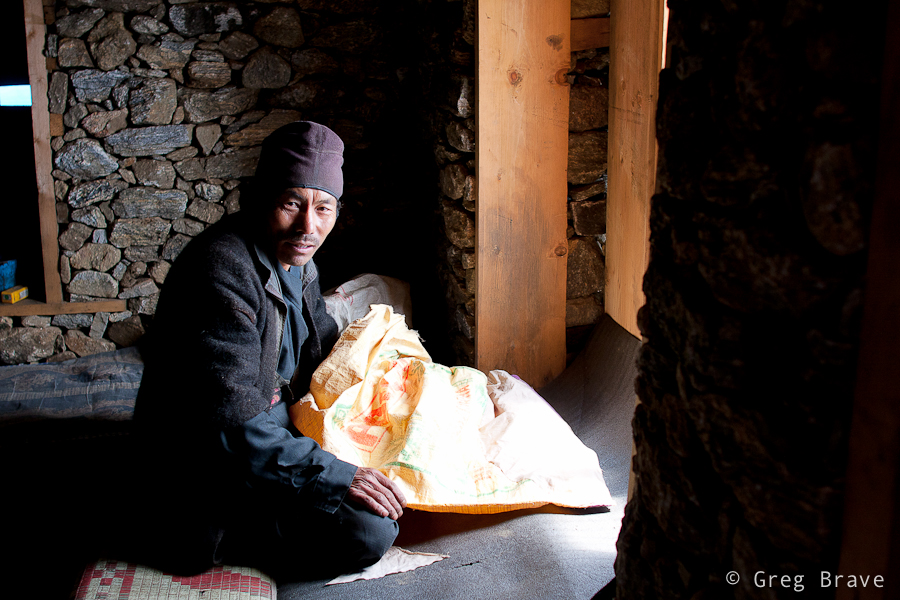
1/200 at f3.2, 28mm | Click on the photo to enlarge.
The man below is a Tibetan refugee living now in Nepal, in a village named Melamchi Gyang. He has a Dalai Lama badge on his hat, and he runs a small tourist lodge in the village. He asked me to take his picture and said I should bring him the photo when I come visit again… I wonder if there are any postal services to this village.
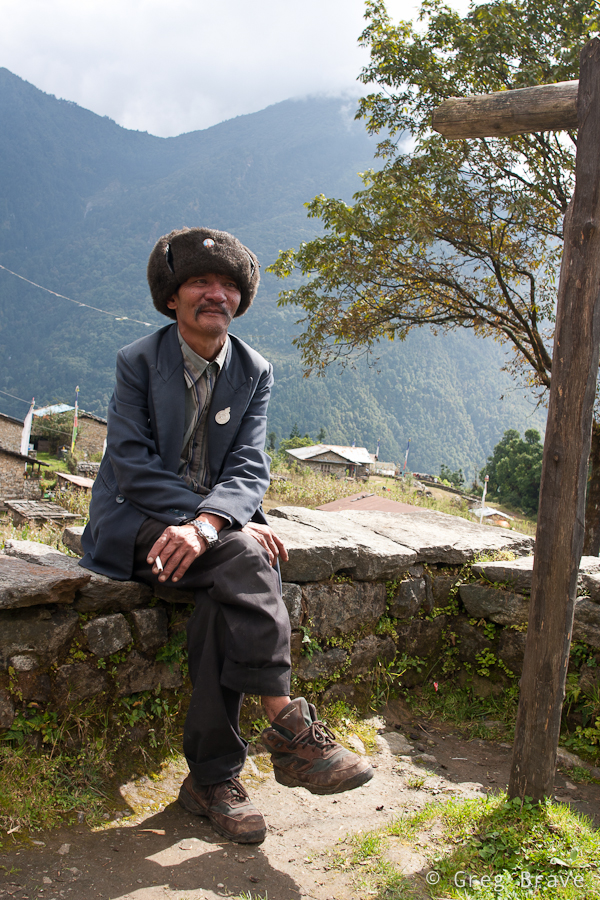
1/100sec at f8, 28mm | Click on the photo to enlarge.
In one of our final days in Nepal we went to an ancient city of Bhaktapur. It is about 30 minutes drive from the touristy Thamel, and it well worth a visit! One of my future posts on Nepal will probably consist solely of Bhaktapur’s photos. Bhaktapur is the third largest city in Kathmandu valley, and was once the capital of Nepal during the great Malla Kingdom until the second half of the 15th century. It is also listed as a world heritage site by UNESCO for its rich culture, temples, and wood, metal and stone artwork ((C) Wikipedia).
In addition to all the heritage sites, there are many shops for tourists. Walking around I saw a large Mandala shop and a woman drawing Mandalas for sale right there. If you saw mandalas you know that it is a very laborious task, which requires concentration and devotion. And look, she also holds the canvas by herself!
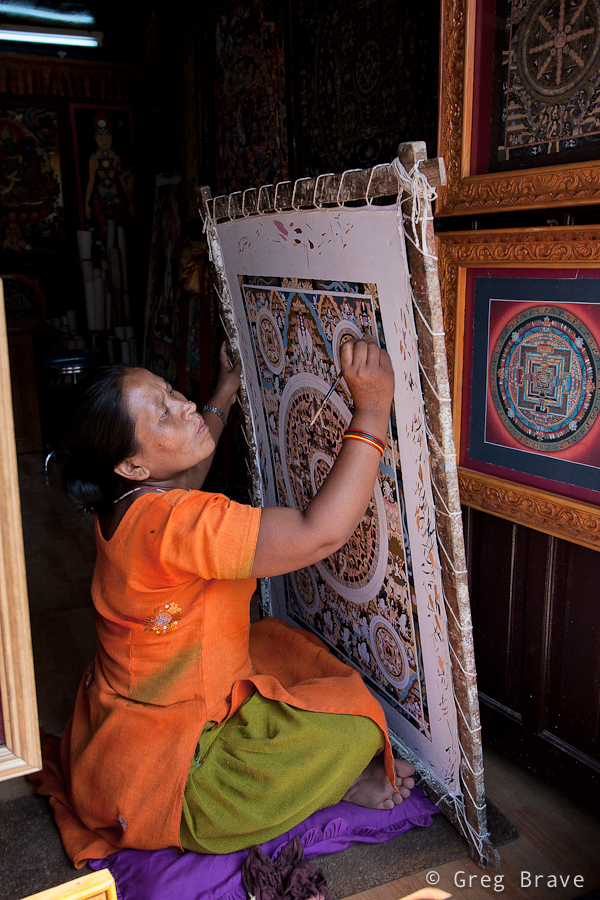
1/500 at f4.5, 20mm | Click on the photo to enlarge.
All in all I can say that people in Nepal are open and friendly to tourists, which doesn’t deny them to try and make as much money as they can from them.
As always your comments are highly appreciated!
How Ideas Come To Life
Thinking of it, maybe I should’ve titled this post “story of an idea” because I will be talking about creation of one particular image. But I eventually I decided on the current title because the way this creation emerged from the depths of my imagination is one of the most common ways.
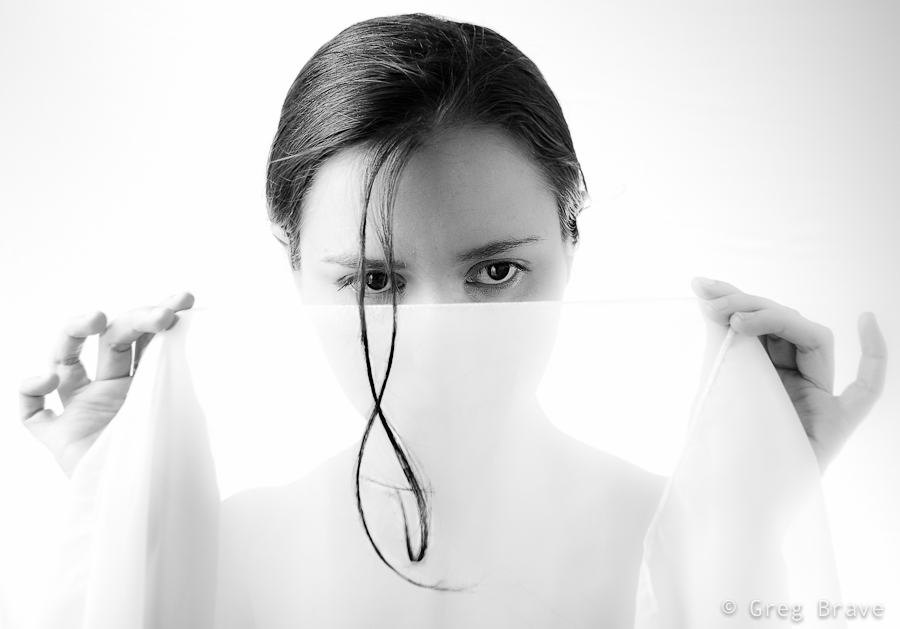
A few weeks ago I had a photo session with Ira, in which my primary goal was to try some new lighting techniques that I thought of. In that shoot I decided to focus on close up portraits (chest line and up). I experimented with different backgrounds and asked Ira to put on a few different shirts.
At first nothing was working for me. The lighting was bad, and I didn’t get any interesting results… but then again, I didn’t start this shoot with a specific idea in mind – it’s like that phrase from Alice in wonderland:
– In which direction should I go?
– It depends on where do you want to arrive
But I felt inspired that day and just kept on shooting and trying to get some nice shots. At one point Ira suggested adding an accessory – a piece of white semi transparent white fabric that she had, and I agreed to try it – it is a good idea to listen to your model, especially when you are out of ideas 🙂
Trying different variations we came up with this photograph:
Click on the photo to enlarge.
I liked it, but quite frankly it lacks an idea behind it. I looked at this photo and thought “nice photo! but what am I trying to tell with it?”. And I couldn’t find an answer. So I forgot about this photo for a while and focused on other tasks.
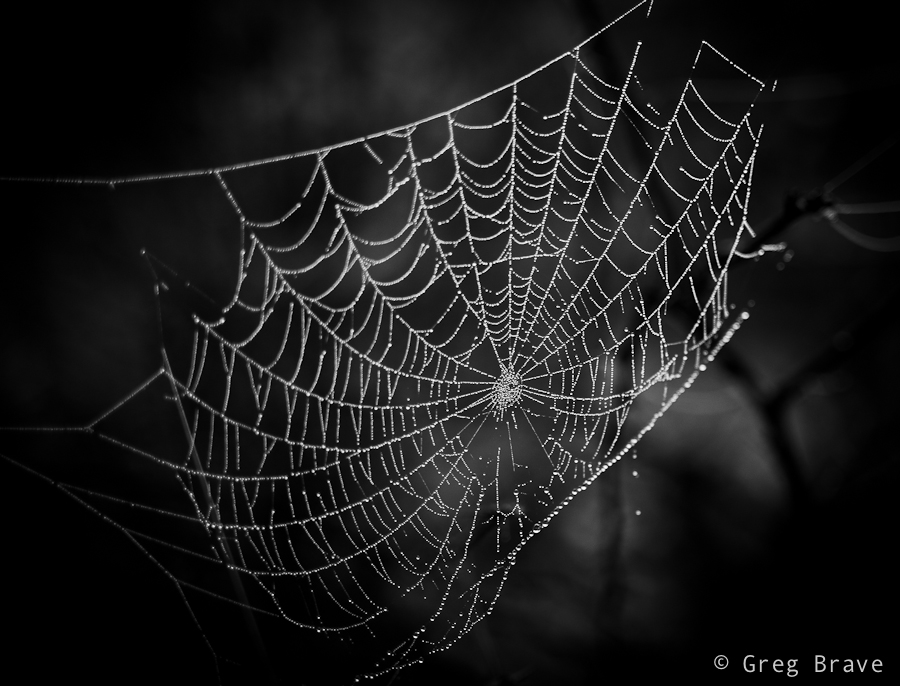
After a while (a few days have passed since the shoot), when I was watching a Phlearn Pro photoshop tutorial (which by the way was magnificent!), suddenly an idea emerged in my mind. I remembered this photo of a spider’s web that I took:
Click on the photo to enlarge.
And it suddenly got layered, in my mind, onto that photo of Ira holding white fabric, as if she was holding the web itself. I rushed into photoshop to try it, to see how it looks in reality. It was nice but still something was missing… what was it? The spider of course. So I searched the net for images of spiders and chose the one I liked the most. Then I brought it as a layer into my working file, and converted the spider to be pure black.
Now I needed to find a meaningful placement for the spider. I tried different variations before I came up with the final result, which you can see below. I call this image “The Way Up” :
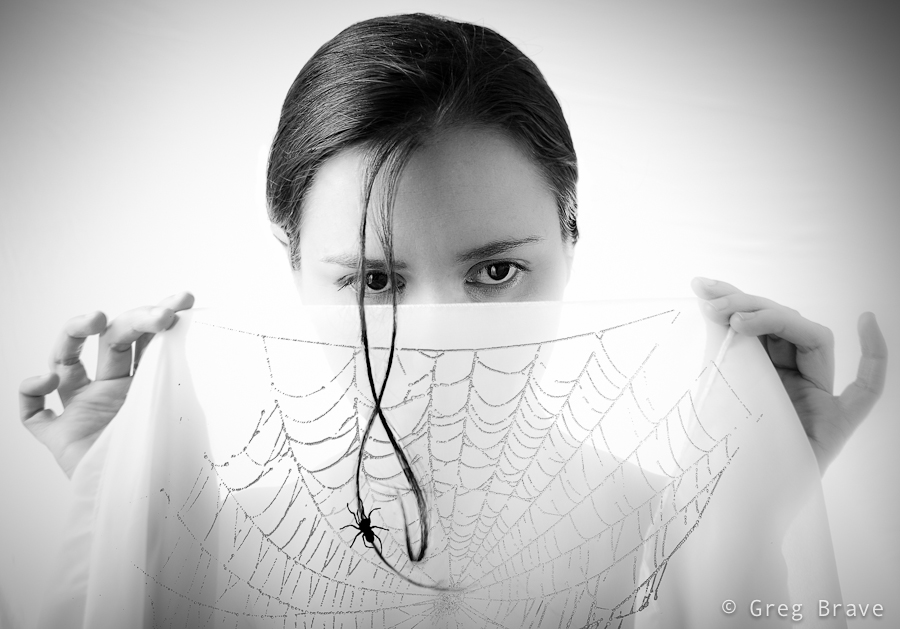
Click on the photo to enlarge.
By describing my creative process on one particular image I wanted to show one of the many ways creative ideas come to life – they are not always pre-conceived, and sometimes, as it was in this case, they develop step by step over time, graduating slowly towards the end result.
What do you think about the final image? Your thoughts, comments, and suggestions are always appreciated!
Family Photo Shoot – How I Did It
I think that this is how many photographers start their venture into the realm of professional photography (by “professional” I mean paid jobs): I photographed my friend’s kid, then his friend saw the photos, got excited and offered me the job.
He asked me to make portraits of his one year old son and of the whole family. Needless to say that I agreed. Even though nowadays everyone has a digital camera, and any parent snaps tons of family photos, there are many people who still appreciate good photography, and can tell a great portrait from snapshot. Still, the job of photographer is harder now than ever before – his photos has to stand out of thousands of such snapshots.
So let me share my experience from this family photo shoot.
First of all I talked to the guy and asked him what did he expect from the shoot. This is very important – you have to be absolutely clear in regards to what your client expects from you. Here are some example questions to ask your client:
– How many digital photos (in files, not printed) does he expect to receive?
– Does he want prints, or just the digital files?
– Agree on the time frame for you to deliver the photos
– Does he want any artistic post processing?
– Which portraits exactly does he want – of the whole family only, individual portraits only, both, or maybe he has some kind of special request.
– Ask your client if he can show you (from internet or his friends) examples of photos that he particularly liked.
-If the shoot is to be held at client’s house ask the client about the dimensions of the house, and whether he wants the shots to be studio-like, because in that case you’ll have to bring your own background.
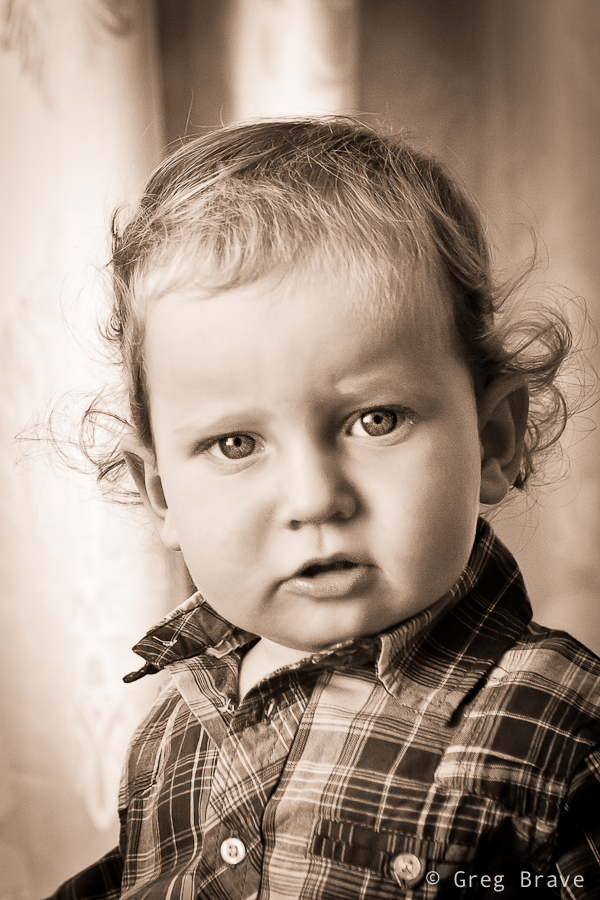
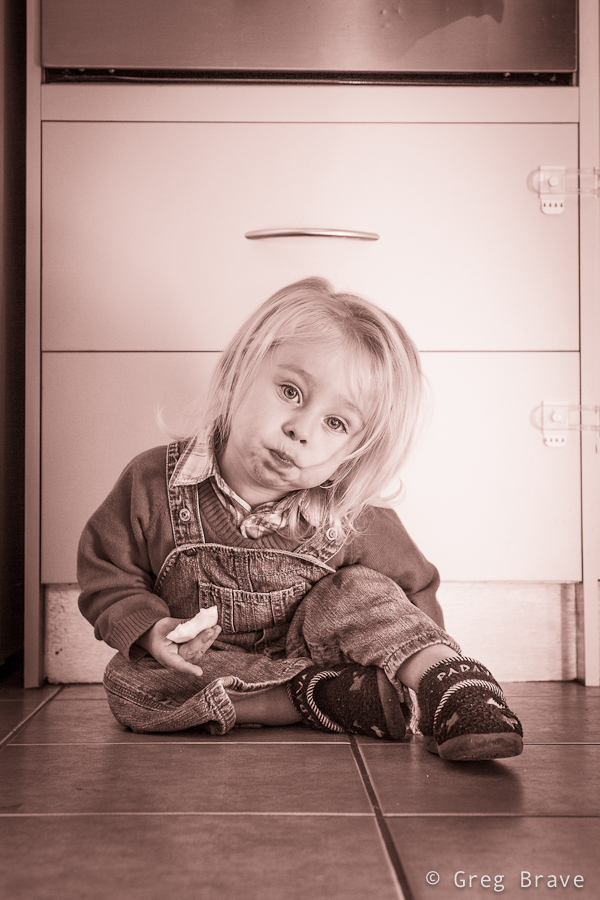
Click on the photo to enlarge.
In my case client already saw my work and he said that he wants something of that kind. What he saw was portrait of a child tightly cropped and processed in sepia tones. In addition he said that he would like similar kind of photo but of the whole family. He also said that he doesn’t need a lot of photos, just a portrait or two that will remain for the years to come.
Click on the photo to enlarge.
The photo above is my favorite from that shoot. I love the kid’s look, and his inviting hand that “takes” the viewer’s hand and leads him into the child’s world…
Sorry, I got distracted… where were we? Ah, the expectations! So after talking to the client I understood his demands, and tried to fulfill them during the shoot.
Preparing for the shoot
I did this shoot at the client’s house, so I’ll describe my preparations for that specific case.
– Most important thing: Lighting. Even if the shoot takes place during daylight, if it is indoors there might not be enough sunlight, so you’ll have to bring your lighting equipment. I had a light stand, two strobes, a white shoot-through umbrella and a soft box.
– Lenses. If your client doesn’t have a lot of space in the house, you might not be able to use your favorite telephoto lens for portraits, which is too bad as it creates lovely bokeh :).
For portraits I used two lenses – Canon 24-70mm f2.8L and Canon 100mm f2.8 macro.
– Memory cards, backup batteries, cleaning cloth etc. Though this might seem trivial, but forgetting any of these (well cleaning cloth excepted) can cost you the photo shoot. If you bring strobes, then don’t forget backup batteries for them.
Click on the photo to enlarge.
The Shoot
Don’t be late. This is very important – it shows how seriously you take your job.
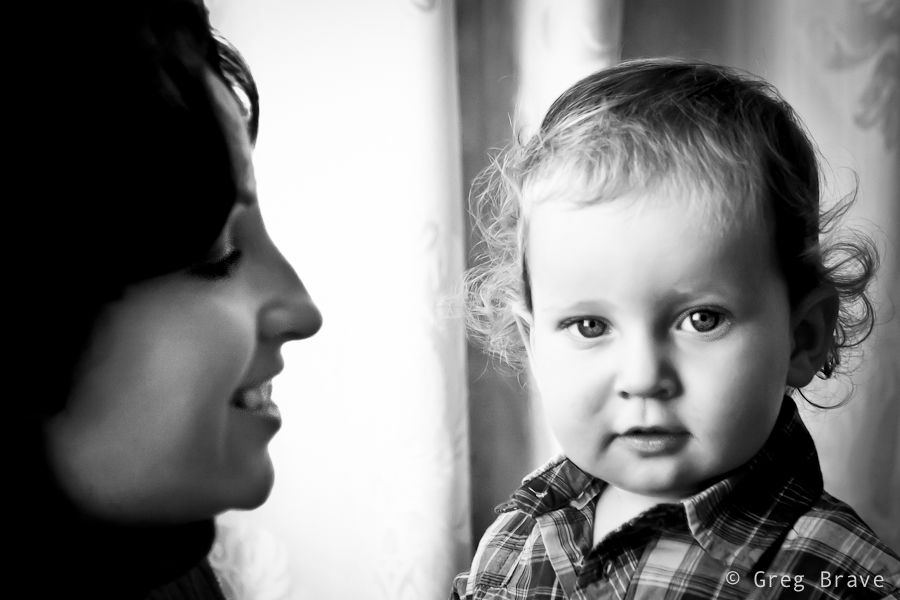
As a photographer you will benefit from being an open and communicative person. Talking freely and openly with people you are about to photograph makes them feel more comfortable with you and in front of your camera, and enables you to capture their natural expressions.
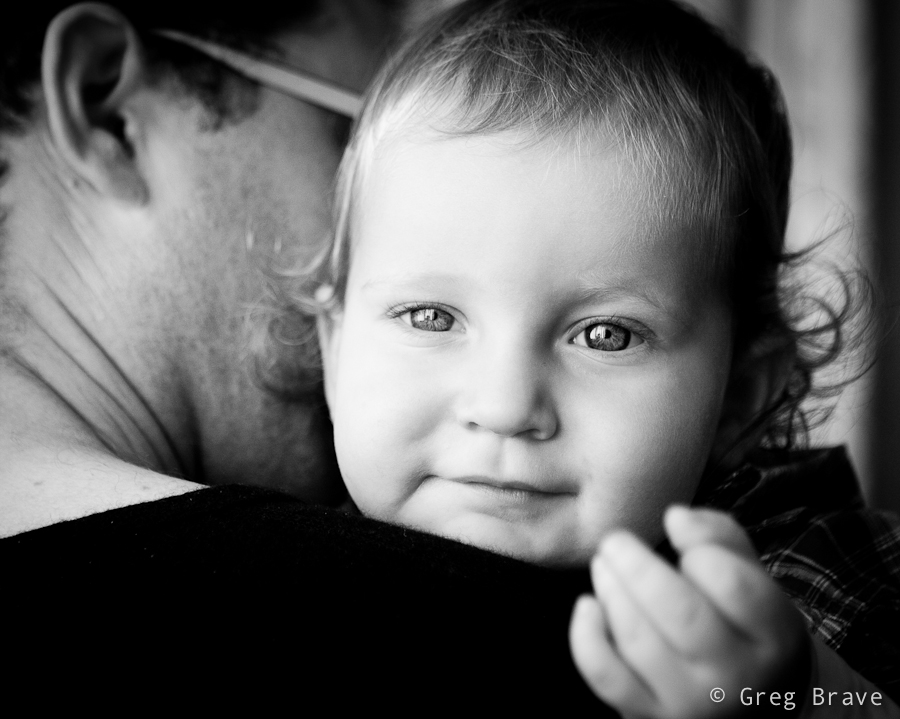
Shooting little kids is difficult because you can’t just ask them to be still, sit at one place, smile, or play with their toys. So you have to improvise. It is a good thing to ask parents for help. In my case the kid’s mother played with him and I was able to catch some nice facial expressions and poses.
Click on the photo to enlarge.
When we got to shoot the family portrait, at first parents had difficult time keeping the child still in front of the camera, but then they gave him father’s cellphone, and it was a bingo!
After the Shoot
We agreed that I will deliver the finished photos within a week from the shoot, but I delivered them in tree days, reasons being first of all because I love processing photos and couldn’t wait to see what I can do with the “raw material”, but also because I think it is a good little marketing trick. When people expect to receive a product in certain amount of time, but they receive it earlier than that, provided that the product is good, they feel even better about your services.
The most important thing that I’d like to leave you with is: Don’t be afraid to try! Don’t think that you can’t do it, and the client won’t like your photos. If you love photography, and someone offers you the job – Take It! You can read a thousand articles on the subject (including this one), but they won’t give you the same experience you’ll get from the actual shoot.

Click on the photo to enlarge.
Portrait Studio Photo Shoot
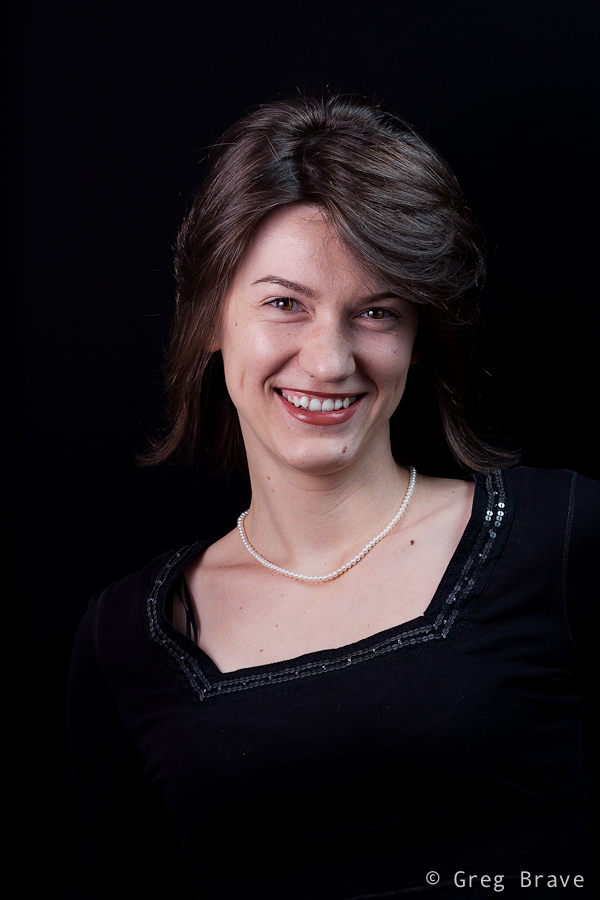
Recently one of my friend’s friends, Renata, saw these portraits I shot about a month ago, and liked them. So we decided to do a studio photo shoot with her. When I said “studio”, I meant a tiny studio that I put up in my living room. It consists of a black or white background, one light stand with Canon EX430 flash inside soft box, and one tripod converted to light stand with Yongnuo flash and white shoot-through umbrella.
Shooting in my home studio I am limited by the size of my living room, so I can’t use any focal length I want. The biggest zoom I can use is about 100mm. In that case I have to stand at the far end from the model, and still be able to shoot almost only head-shots.
The following photo was made using Canon 100mm f2.8 macro lens. Even though when shooting studio portraits I usually use my soft box as the main light, in this photo my main light was the Youngnuo flash through white umbrella from the left, and I used my soft box as hair light from the top right and it also acted as a fill in light to soften the shadows.
I placed the lights at such angles so that almost no light would spill on the background as I wanted the background to remain black. It is intentional that the Renata’s dress is also black and looks only slightly lighter than the background – I wanted to make an emphasis on her face.
Canon 100mm f2.8 macro; Shot at f8, 1/200 sec | Click on the photo to enlarge.
Continuing the discussion regarding the photo above – shooting that portrait I looked for Renata’s natural expression. At first she was a bit constrained trying to pose for the camera, but then we started a conversation about all kinds of topics and she got more relaxed. At one point I put the camera down and we continued speaking about a particularly interesting subject for her, and I noticed that she got completely relaxed. So I grabbed a camera and started shooting. This is when I got the shot above.
Next photo is posed, of course. It was my idea to shoot Renata with a candle, but after trying everything I had in mind, I couldn’t make a single nice photo. Then I asked my model to do anything she liked with the candle and just watched and shot. After a while I saw her making this pose and thought – “this is what I was looking for!”, so I asked her to remain in that pose and shot several variations. The photo below is the one me and Renata liked the most .
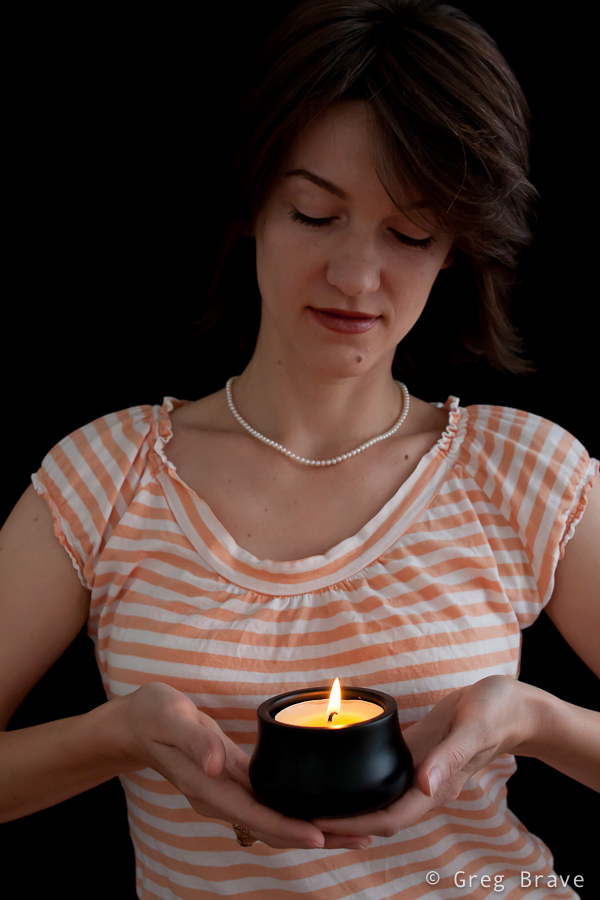
Sigma 28mm f1.8; Shot at f5, 1/200 sec | Click on the photo to enlarge.
In the next photo, I wanted to try a bit more dramatic lighting with stronger shadows. One of my primary concerns was to make her left eye (the one to your right when looking at the photo) free of shadows coming from the nose. I wanted it to be as vivid and visible as the right eye, and still to have strong shadows. This involved moving the main light around the model until I found the desired angle. All my flashes were set to manual mode, so in order to achieve stronger lighting I just increased the power of the flash.
Sigma 28mm f1.8; Shot at f5, 1/200 sec | Click on the photo to enlarge.
One more aspect to think about is the flash recycle time. I use small strobes (Canon EX 430 and Yongnuo), which are powered by 4 AAA batteries. Using such strobes at full power means waiting two to five seconds between shots, loosing priceless facial expressions and body poses. So I never use my strobes at full power unless I absolutely have no choice. I usually don’t go above 1/4th of the full power and set ISO and f-stop accordingly (taking the DOF into account of course).
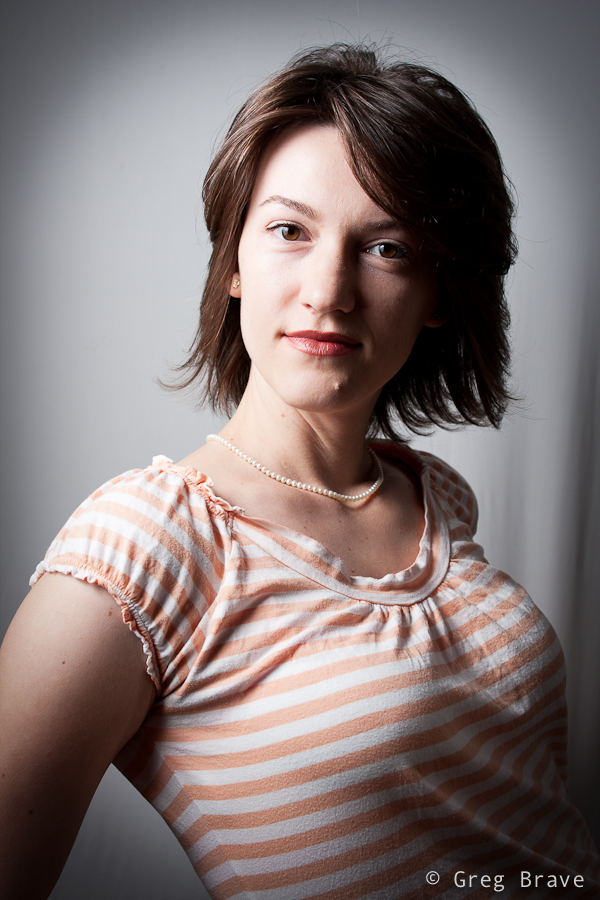
After getting a few decent portraits, which were the main goal of the photo shoot, we started to improvise. I particularly liked the shot with the sunglasses. I liked Renata’s expression in that one – it is radiant and tender at the same time. Of course I didn’t get this shot on the first try, but the final result is what counts, right? 🙂
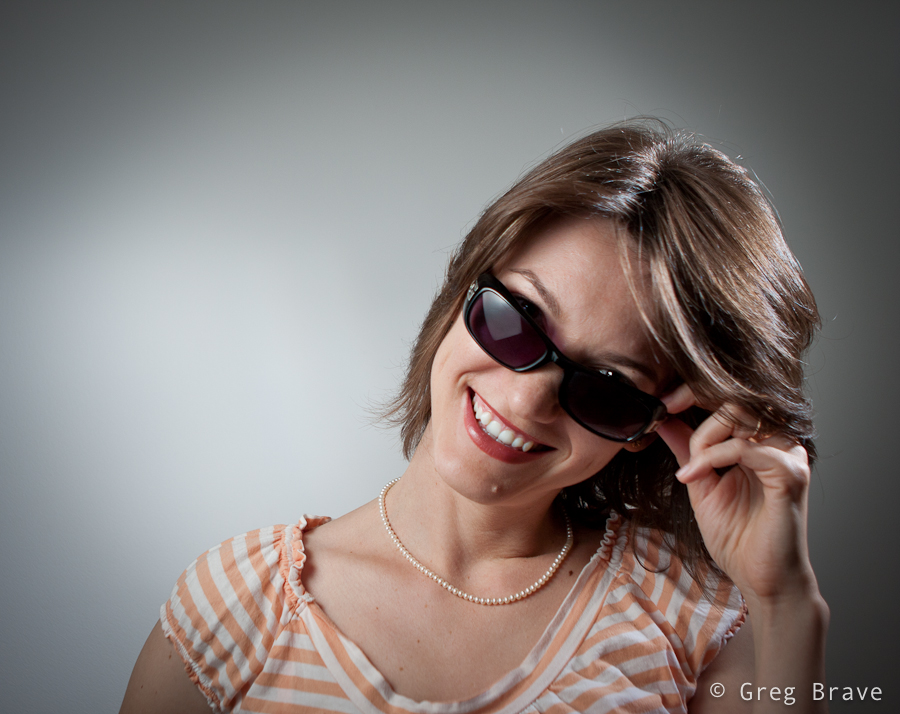
Canon 24-70mm f2.8 L; Shot at 24mm f2.8 1/200 sec | Click on the photo to enlarge.
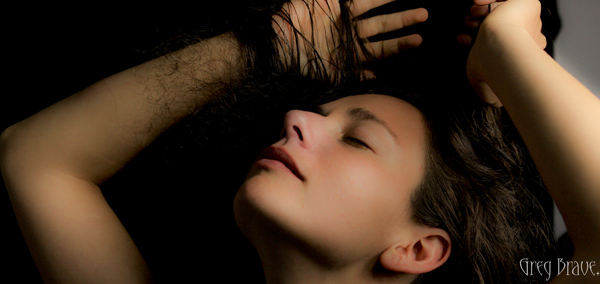
The following photograph is my favorite. I love the dynamics of it. For this photo I had Renata stand facing the background and then turning swiftly around on my mark. I really wanted to catch that hair movement. It wasn’t as easy as it sounds because at each turn hair moves differently, and it doesn’t always look as nice as in the photo below. I probably did about 15 shots before making this one.
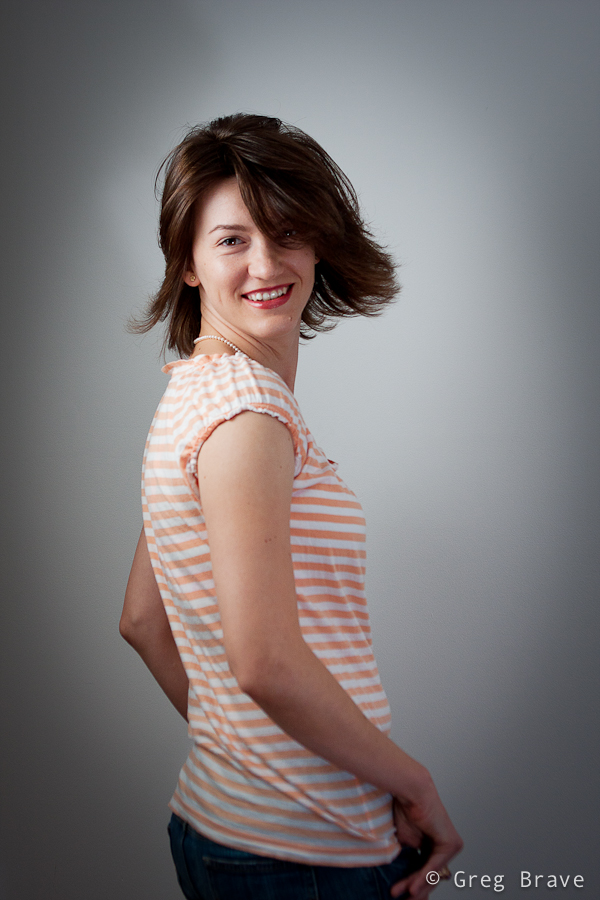
Canon 24-70mm f2.8 L; Shot at 42mm f4 1/200 sec | Click on the photo to enlarge.
I really enjoyed this photo shoot and I am pretty satisfied with the results. I find the background a bit boring, therefore thinking of my next photo shoot to be on-location somewhere.
I hope you found this article to be helpful and interesting, or at least one of these 🙂
Your comments / questions / suggestions are always appreciated!
Cheers,
Greg.
Portraits and Backgrounds
For quite some time now I wanted to shoot portraits, and finally I found a model to shoot!
Since photography is my hobby I don’t have a studio, so I had to improvise. I converted my living room into a studio for a day, and shot my model on gray muslin background. I bet everybody heard about these famous muslin backgrounds. But what the guys who sell them to you don’t mention is that you receive the muslin in a really crumpled state, and if it is 3 by 6 meters long, there is no way you can iron it by yourself. But I had no other choice than to use what I had.
My solution to this problem was in post processing – I had to “cut” the model from the original background and paste it onto another background in Photoshop. You can see before and after images in the example below.
Click on the photos to enlarge.
In order create precise selection of the model in Photoshop I used the pen tool. Many people don’t use this tool because they find it confusing just like I did before I saw this tutorial:
After getting used to the Pen tool, I promise you that you won’t ever go back to lasso or any other selection tool when you need to do a complex selection. After I selected the model using pen tool, I used the option “Refine Edge” to refine the edge of the selection in the areas with model’s hair. It is really important to make the hair look natural on the new background. My last step in the selection process was feathering the whole selection by 2 pixels to add a more seamless transition from the model to background.
Click on the photo to enlarge.
If you don’t want to cut and paste your model, and still use your crumpled muslin background, here is how you can do that:
If you have enough space, put your model far from the background, and use wide aperture – this will make the background go out of focus and its wrinkles won’t be visible. In addition to that, you can setup your lighting so that no significant light will fall on the background making it dark (you can use gobos for that).
Click on the photo to enlarge.
In all the photos you see here I used pretty much the same lighting setup, only slightly varying the position of my strobes and their strength. Here is my basic lighting setup diagram:
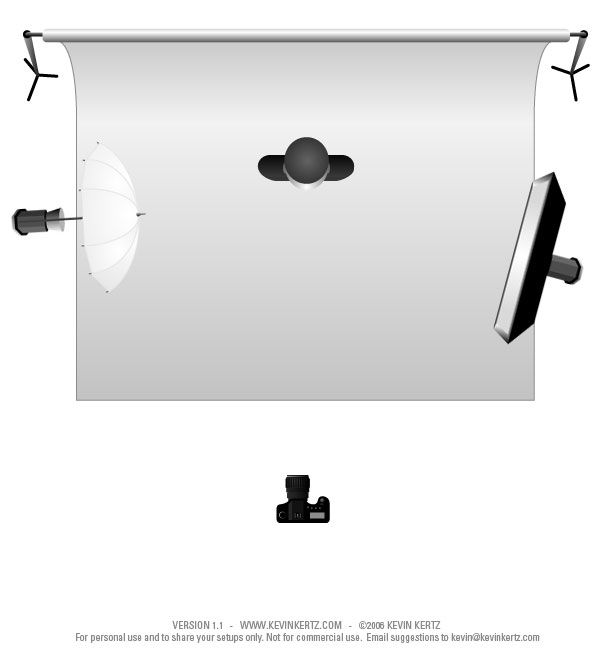
Click on the photo to enlarge.
You probably wonder where I got backgrounds that I use on these photos, and it is no secret. You must have heard about OnOne software. I used one of their products named PhotoFrame. This product can work as a standalone application or as a plug-in for Photoshop and Lightroom. The primary aim of this product is to supply the user with lots of photo-frame templates, so you can choose and add nice framing to your images, but it also has a great collection of backgrounds. I downloaded their trial version here. In the image below you can also see the frame that I created with this plug-in.
Click on the photo to enlarge.
But it is the only frame that I used from PhotoFrame. Other “frames” that you can see in the photos here, are simply a creative use of vignetting feature in Lightroom, which is pretty easy to achieve – you simply reduce the roundness of the vignette somewhere around -90 to -100, set it’s midpoint between 0 and 15, and the amount slider is up to you.
Click on the photo to enlarge.
While most important aspects of portrait photography lie in the artistic sphere rather than technical, still in order to get acceptable results, all the technical details must be carried out correctly, and this is why I dedicated this article to them. Nevertheless after all the technical aspects are set and done, I forget about them and concentrate on the model and on my artistic perceptions of what I want to achieve from the shoot.
Click on the photo to enlarge.
If you have any questions regarding the issues brought up in this post, feel free to leave them in the comments below, and as always any other comments are highly appreciated.
Cheers,
Greg.
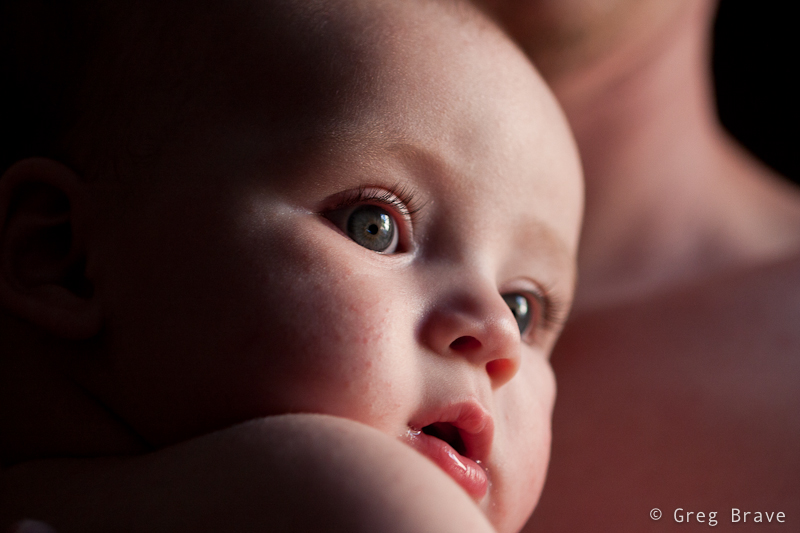
Shooting Baby Closeups
Recently my good friend asked me to photograph his baby son Eric. I gladly accepted because I don’t usually get to photograph babies and wanted to give it a try. The only problem was that my friend’s house didn’t have any suitable place to make a little studio out of, every place I looked at was too cluttered with stuff, which could distract the viewer’s attention from Eric. Finally I found a few places but knew in advance that the resulting photographs won’t be the way I’d like them to be.
Still I wanted to make at least a few photographs that would stand out and satisfy my artistic demands 🙂 The only solution I could come up with was to shoot close-up shots of Eric so that background wouldn’t matter much. Three of those shots I chose to present here.
The key aspect of the following photographs is the light. It is different in all three of them, but in each photo it plays very important role.
For the following photograph I used a 100mm Canon macro lens at f2.8. I had a flash with me and tried to use it, bouncing from the ceiling or walls and varying its power, but I didn’t like the results – the light was too harsh and too white for my taste. Yes I could use a 1/4 CTO gel to warm up the light a little bit, but I choose a different approach instead – I asked my friend to take Eric and come closer to the window.
It was about 5 o’clock in the afternoon and sun light was still pretty strong, but was already getting warmer as sun got lower and lower. After positioning the happy couple the way that there were no significant shadows on Eric’s face I started to shoot, and the photo below was the winner of that batch. I like it because of the intimacy it transmits to the viewer, the closeness between the child and his parent. Because the light coming from the window was much stronger than the light in the room I could set the exposure so that the background remained completely black.
Click on the photo to enlarge.
For the next two photos I used a 70-200mm f4 L Canon zoom lens at f4.
In the next photo I took Eric to another window in the house, with transparent white curtains to serve as background. I intentionally went for the high contrast in lighting in order to create a little drama. But nevertheless as you can see there are no harsh shadows on Eric’s face, that would be unaesthetic for my taste. I like the way his eyes are emphasized in this photograph as if they were eyes of an adult but on a cute baby face.

Click on the photo to enlarge.
I also included the photo below in this article to demonstrate use of reflected light. In this photograph my friend hold’s Eric close to his body, and the light from the window reflects from his body and lights Eric’s face with soft warm light. So in order to create warm light you don’t always need gels and flashes… sometimes human skin can do the job just fine! 🙂

Click on the photo to enlarge.
What additional tips can you share regarding photographing babies? Did you like the photographs presented here?
As always comments are highly appreciated, and
Remember, you only have to enter your name to leave a comment!
Till the next time,
Take care!
Greg.
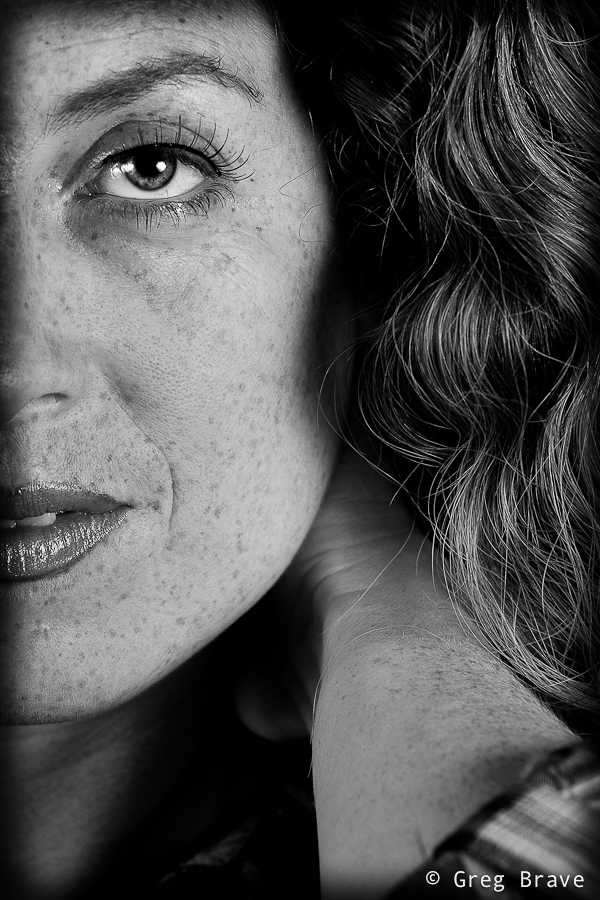
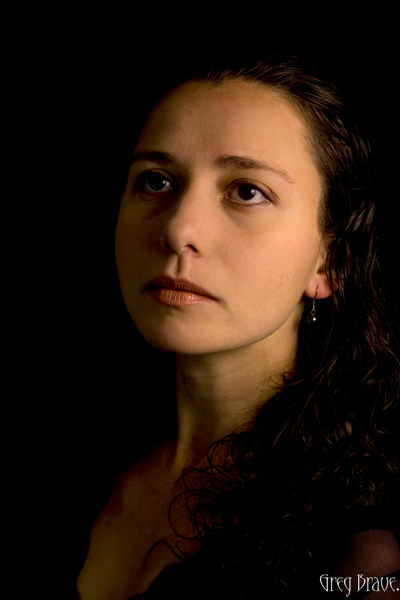
Beginnings in portraiture
As a result of my interest in working with light in photography I am starting to get interested in portraiture. From time to time I stumble across a good portrait on the net and find myself thinking about how photographer achieved the final result, and what things he had to consider before making the portrait. I also think about the lighting techniques used in different portraits. Finally I decided to give it a try myself. In the following photos you can see what came out of it.
My lighting equipment was pretty simple: Two flashes (Canon 430EX and Yongnuo) One flash was used as a main light placed on a light stand shooting through umbrella. Second flash was also on a stand but without umbrella used mostly as fill light or hair light. I had a piece of black fabric for the background, but in any case my ambient light was pretty low and most of the light came from flashes.
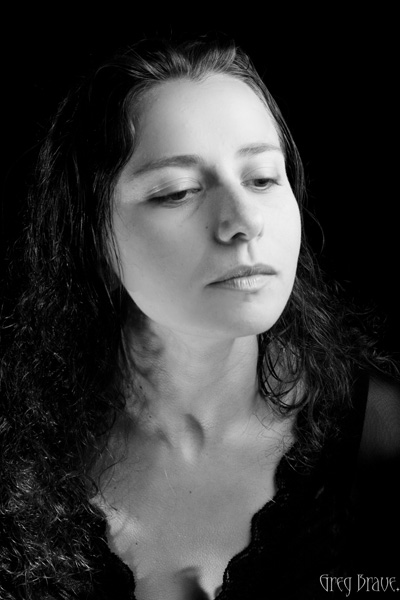
This portrait is pretty straight forward. I think that my lighting is a little harsh, and I don’t have a hair light from the left/top to separate the model from the background. I could say that I intended it to be that way… but I didn’t 🙂
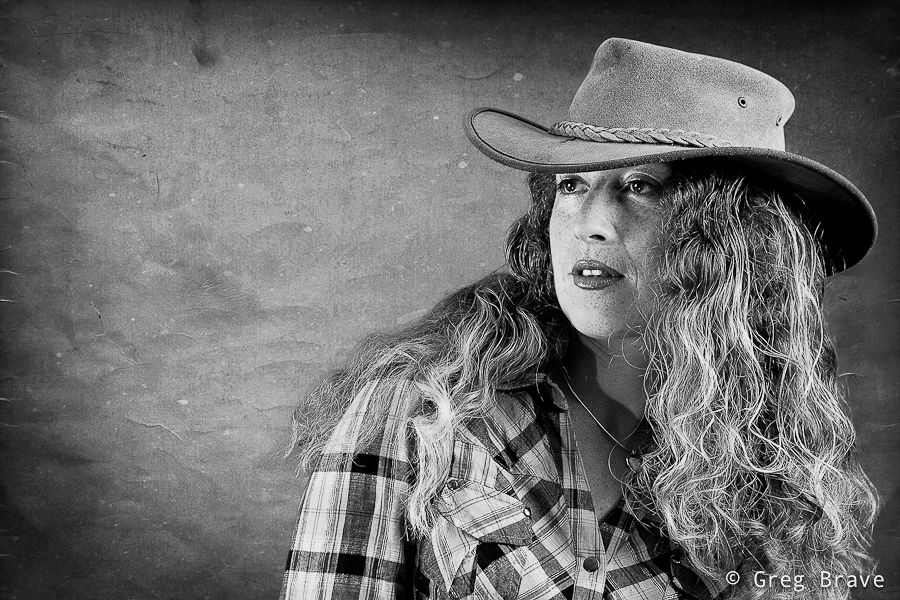
In the next two photographs I experimented with different facial expressions that in my opinion suited the model. I chose B&W because of two main reasons:
1. There were not many colors in the scene anyway, and I wanted to make the viewer concentrate on the expression of the model.
2. I confess – I couldn’t achieve the skin tone that I wanted.
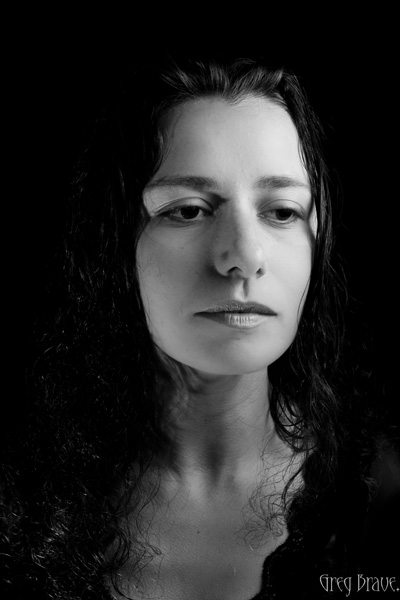
I noticed an undesirable shadow near model’s right eye only after the shoot so I couldn’t do much about it, but I sure will pay more attention to this kind of details in the future.
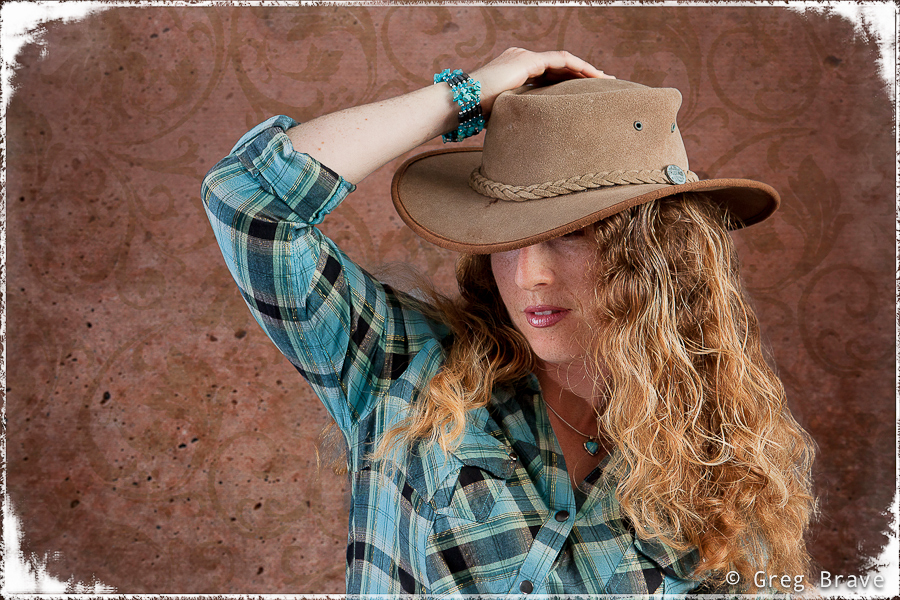
While shooting I asked my model for different poses (even though it was a strictly portrait shoot, I think that pose affects the facial expression), and at first I took all the control. What I mean is that I told her what to do, where to look, where to turn her head, etc.
But at some point I told her to feel free to do what she wanted, to pose as she would like to be photographed herself. And it was the best decision I ever made in that shoot.
Just look at the following photos.
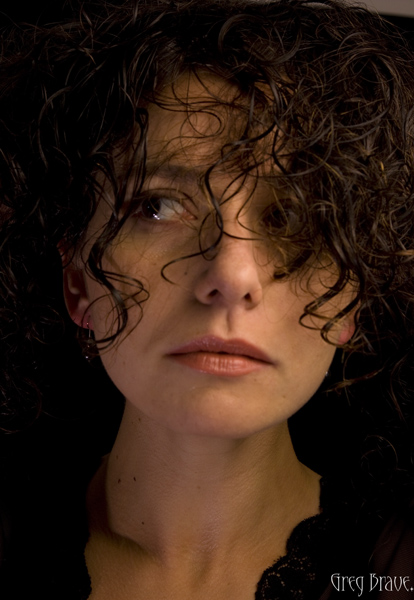
And as she got more relaxed I could get more interesting photographs. Here is an example of one, which I especially like:
I felt great after this photo session because finally I got to try something that I thought a great deal of. I doubted that I could get any satisfactory results. And though I do understand that I have a long way to go from here, I still really like these photos and they keep me motivated to continue improving my skills.
I will be more than grateful for any comments or suggestions. Feel free to comment on my work – it will help me and other readers a lot!
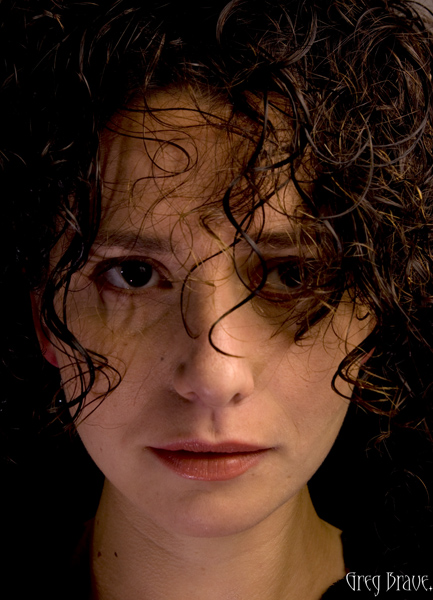
And here is one last photo from that photo session:
Until next time,
Take Care!
Greg.