Nepal In Photographs – Part 2 (Portraits)

This is my second post, in which I write about my photographic experience in Nepal. You can read the first part here. While in the first part I showed you Nepali landscapes, now I’d like to show a few portraits of Nepali people.

Interestingly in some cases people would not let me to take their photographs at first. In that case I would nod in agreement (like, hey I won’t take your photo if you don’t want me to) , point my camera at other subjects, and take a few photos here and there. This would get them interested. Then I would approach them and show them the photos I just made on the back screen. Next thing you know they are posing in front of the camera and running back to me to see the picture. I wished I had a portable printer with me so I could print out and give them their photos.

The photo below was taken on Helambu trek. We were passing a settlement in the hills of Kathmandu valley and made a short break in a nice spot overlooking rice terraces. These women were passing by, and seeing us smoke asked for a cigarette. In return we asked to take their photos 🙂

Hardworking Nepali Women

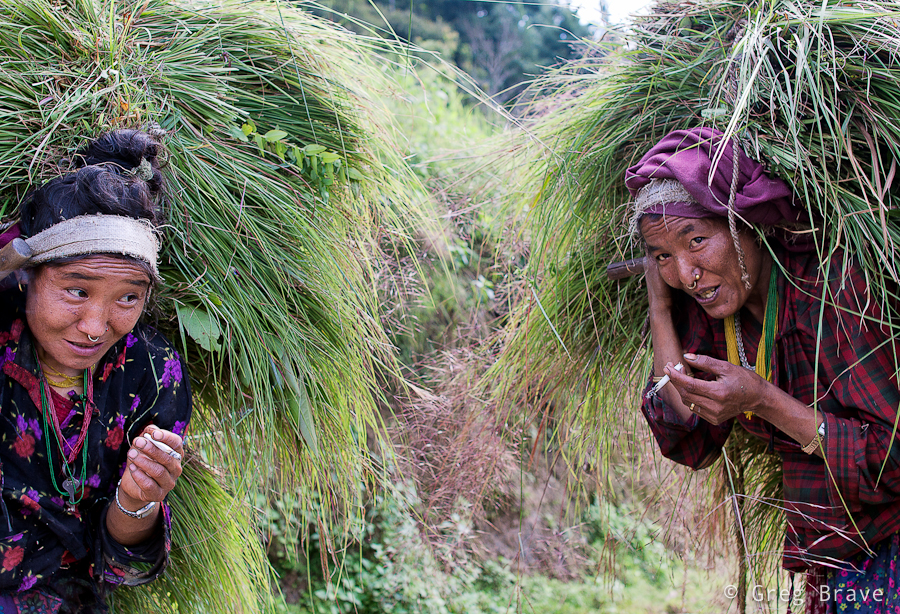
1/200sec at f3.5, 28mm | Click on the photo to enlarge.

One of the settlements on Helambu trek is Golphu Banyang. It has only one main “street” and not many tourists are staying there overnight, trying to reach the next village of Khutumsang. But it so happened that we did stay there, and I had the whole evening to photograph local kids. Once I showed them a photo on my camera they wouldn’t stop posing, only downside being late time of the day and, as a result, very dim light.

Kids Are Always Kids

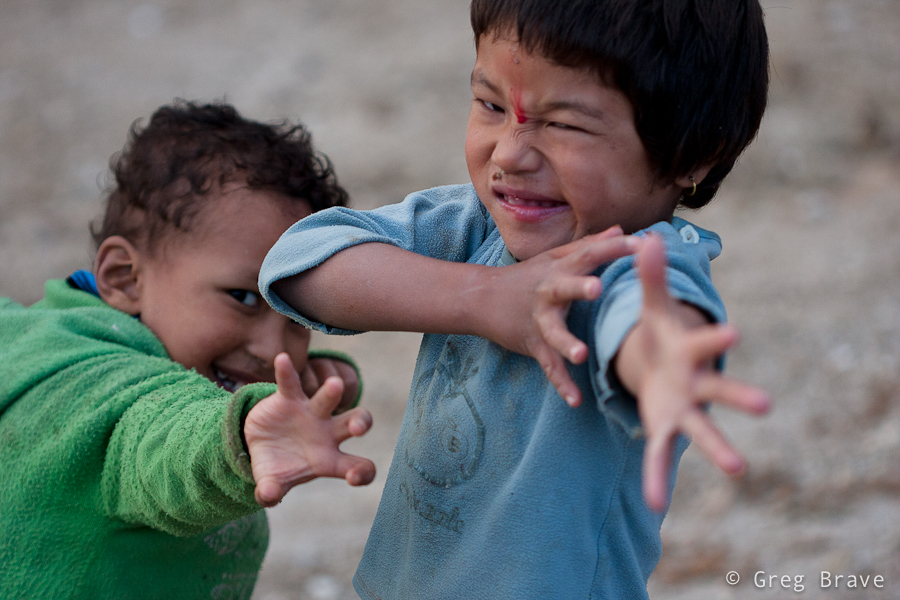
1/500sec at f2.8, 100mm | Click on the photo to enlarge.

The photo below was also made at Golphu Banyang on the following morning when we were leaving the village. The evening before I saw this old man in the same pose, doing the same thing, but it was too dark to make a good photo. In the morning though, there was this beautiful ray of light, lighting perfectly his face and hand. The result you can see below.

Working Man

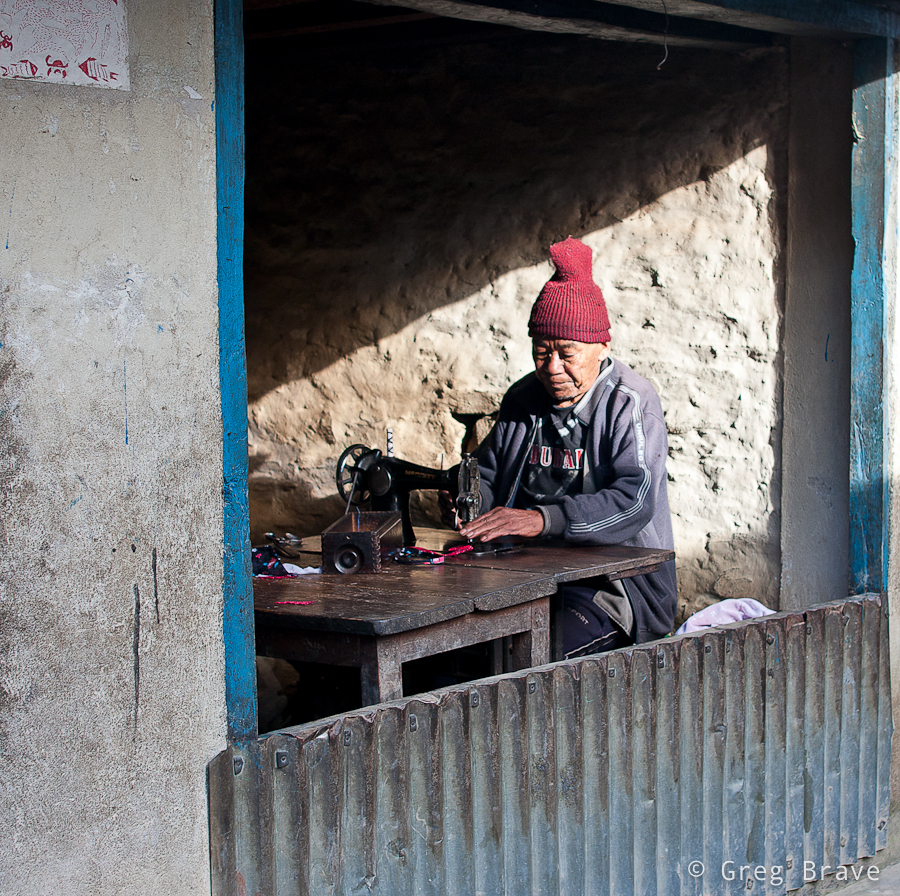
1/160sec at  f3.2, 28mm | Click on the photo to enlarge.

On our way to Gosainkund Pass we stopped at one of the two lodges in Phedi. The lodge was run by a Sherpa couple. While woman was preparing our dinner, we were chatting to the man. Well at least we tried. Even though he seemed to be speaking English fluently, I realized that we hardly understand each other. In any case the conversation turned out to be very interesting and we learned a lot about local animals… or at least we think we did 🙂

I took the following shot of this man in the lodge’s dining room in very poor light, hence the f1.8 and 1/30sec. This is one of several shots I made trying to get his eyes to be sharp, which was difficult with f1.8 and his constant movement.

Also Maybe Yak?

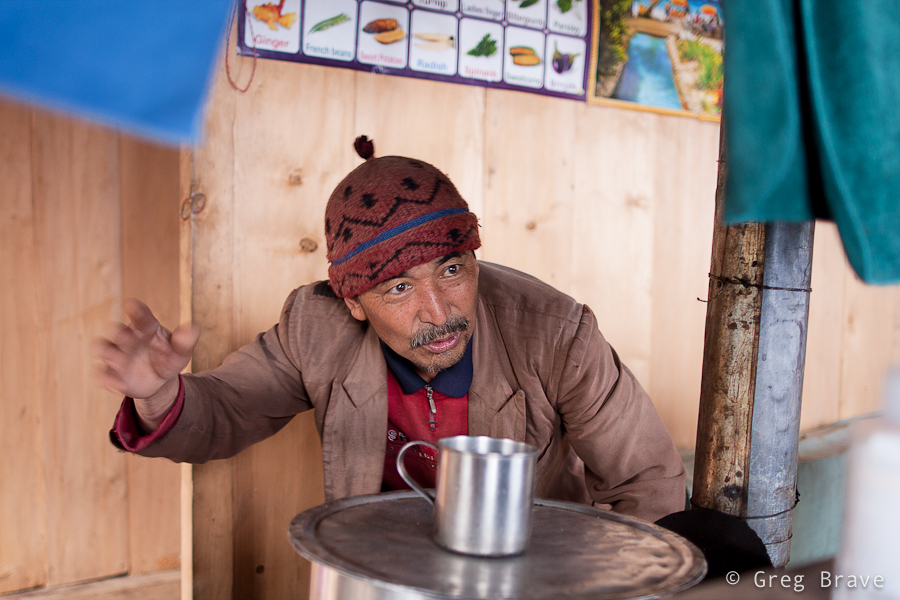
1/30sec at f1.8, 28mm | Click on the photo to enlarge.

Continuing from Phedi up to the Gosainkund Pass we reached a lonely lodge standing in a beautiful view of the surrounding mountains above and the valley below. Ram Sherpa, the owner of the lodge kindly agreed to be photographed. Ram was fixing holes made by some rodents in his rice bags when we reached his lodge. I liked the window lighting on him, which created definitive shadows on his face.

Ram Sherpa

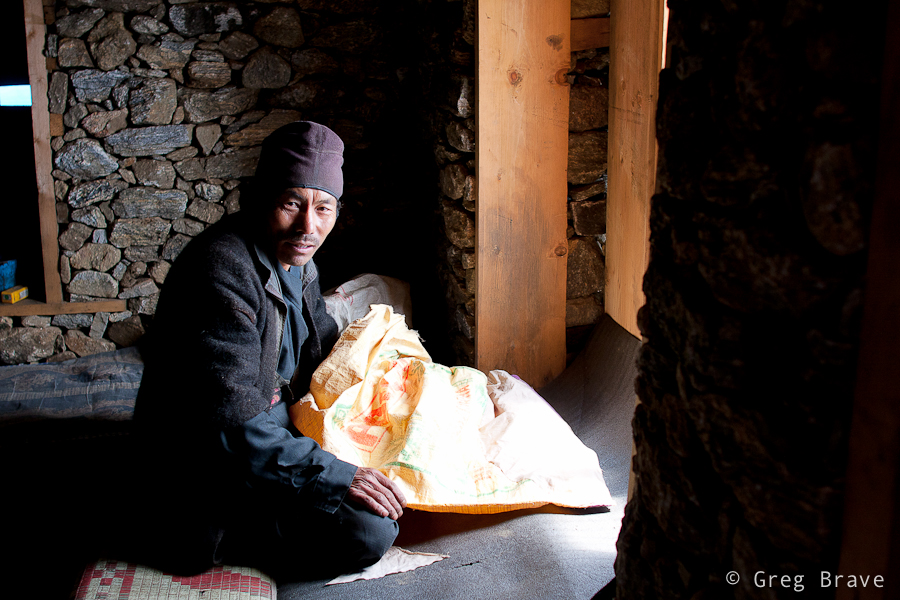
1/200 at  f3.2, 28mm | Click on the photo to enlarge.

The man below is a Tibetan refugee living now in Nepal, in a village named Melamchi Gyang. He has a Dalai Lama badge on his hat, and he runs a small tourist lodge in the village. He asked me to take his picture and said I should bring him the photo when I come visit again… I wonder if there are any postal services to this village.

Refugee from Tibet

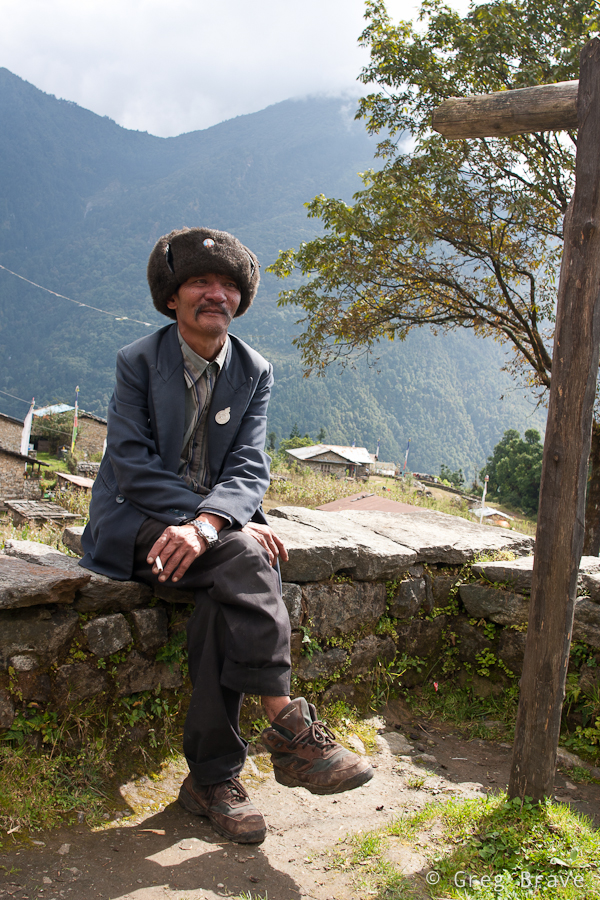
1/100sec at f8, 28mm | Click on the photo to enlarge.

In one of our final days in Nepal we went to an ancient city of Bhaktapur. It is about 30 minutes drive from the touristy Thamel, and it well worth a visit! One of my future posts on Nepal will probably consist solely of Bhaktapur’s photos. Bhaktapur is the third largest city in Kathmandu valley, and was once the capital of Nepal during the great Malla Kingdom until the second half of the 15th century. It is also listed as a world heritage site by UNESCO for its rich culture, temples, and wood, metal and stone artwork ((C) Wikipedia).

In addition to all the heritage sites, there are many shops for tourists. Walking around I saw a large Mandala shop and a woman drawing Mandalas for sale right there. If you saw mandalas you know that it is a very laborious task, which requires concentration and devotion. And look, she also holds the canvas by herself!

Nepali Woman Drawing Mandala

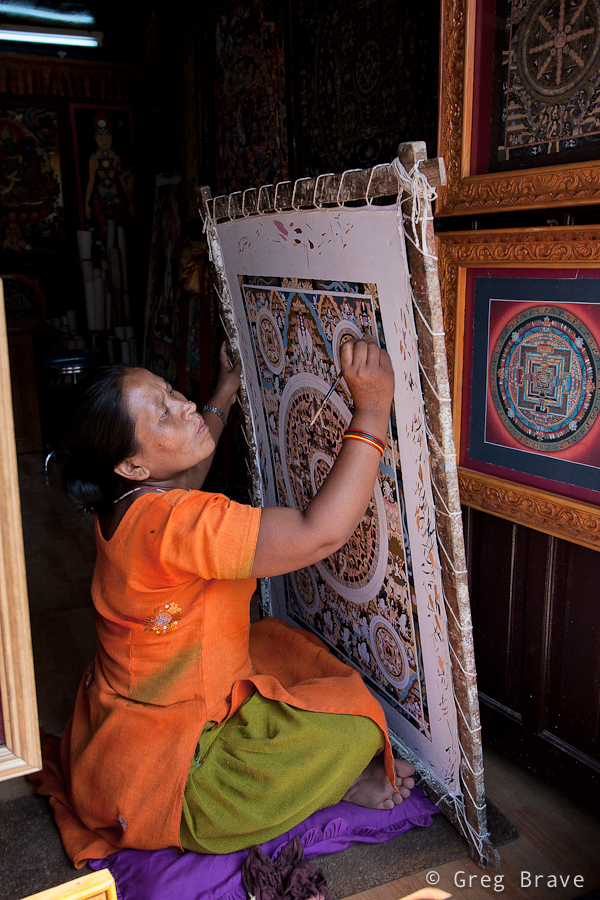
1/500 at f4.5, 20mm | Click on the photo to enlarge.

All in all I can say that people in Nepal are open and friendly to tourists, which doesn’t deny them to try and make as much money as they can from them.

As always your comments are highly appreciated!


Nepal In Photographs Part 1

As I promised, in the next posts I will write about my photographic experience in Nepal. To get everyone up to date – recently I took a rather long vacation of almost one month and went with my life partner Ira and one good friend to a trekking trip in Nepal. As always my camera was with me, but since we didn’t hire a porter (or a guide) I couldn’t take just any photo equipment that I wanted.

I was facing a hard decision – which lenses can I take with me and not add too much weight to my already heavy backpack? And here’s the list of the photo equipment that I took:

  • Canon 40D body. This wasn’t really a choice since this is the my only DSLR.
  • Canon EF-S 10-22mm
  • Canon EF 100mm f2.8 macro
  • Sigma 28mm f1.8
  • 4 Spare batteries, 2 circular polarizers (different diameters), lightweight SLIK tripod

Let me explain my choice of lenses. Even though I have two Canon L-series lenses (70-200 f4 and 24-70 f2.8) I didn’t take them with me for one simple reason – they weigh too much. Instead I decided to go mostly with prime lenses, which are much smaller and lighter but still produce very good quality photographs even though they are not from L-series. Canon 100mm f2.8 macro lens is known for its superb quality, and after shooting with Sigma 28mm f1.8 for a while I saw that it is also a very good lens though it has some minor issues with lens flare. In addition I took the Canon EF-S 10-22mm, which is known for its good quality-to-price ratio. In this case I didn’t have much of a choice since it is the only wide angle lens I have, and you can’t go trekking in Himalayas without a wide angle lens, can you?

The only thing I could’ve taken less of were the batteries. I found out that for a nine day trek I only need two batteries. But I must say that I didn’t use the live view, which is known for its ability to drain power quickly.

Our first trek was the famous Annapurna Base Camp (ABC) trek. In order to get to its beginning, we had to fly from Kathmandu to Pokhara (second largest city in Nepal) and then take taxi (~1h drive) to Phedi. Phedi is a small village, in which ABC trek starts with a long climb via stone stairs.

Before setting off to the ABC trek we had a rest day in Pokhara. One of the main attractions of this town is Pokhara Lake. For 300 Nepalese rupees you can take one of the boats below for a 1-hour sail. Add 50 more rupees and you’ll also get a boats-man.

1/60sec at f5.6, 28mm | Click on the photo to enlarge.

The next photo happened almost by accident. It was raining all morning that day, and we got completely wet, walking carefully not to slip on wet rocks. The heavy backpacks made it that much harder to keep balance, and we seldom shifted our eyes from the ground. It was a hard climb, and while we were getting near its ending, the skies suddenly cleared, and then we reached this house. I saw the mountain and the dog, which was laying calmly. My hand instinctively reached for the camera, suddenly a man appeared from the house adding final touch to this photo.

1/200sec at f9, 28mm | Click on the photo to enlarge.

On our ABC trek, as a general rule the weather was at its best early in the morning, 5 – 6am, sometimes until 8, then gradually clouds came in and covered everything. And then again weather would improve at about 4 – 5pm. Of course it was only usually like that, and different variations were possible, but our most certain bet would be to get up as early as we could. If we wanted to have clear view of the peaks that is. And as you can imagine – I really, and I mean REALLY wanted to see the peaks!

The next shot was taken early in the morning and the mountain peak that you can see on the right called “Fish Tail”. Locals call it Machapuchare, and revere it as very sacred to the god Shiva. This makes Fish Tail forbidden for climbing.

Click on the photo to enlarge.

Unfortunately, good colorful sunsets were rare because at sunset time the skies were usually covered with clouds, and the next photo is one of the very few I made during sunset time. But that particular sunset was marvelous! The orange colors changed hues constantly, and I made a dozen photos trying to capture them. I only wish there would be slightly less clouds so that more of the snowed mountains were visible.

Click on the photo to enlarge.

While two photos above were taken looking up at the mountain peaks, they are not the only attraction in Himalayas. When you are at high altitude, looking down can take your breath away as easily as looking up. The next photo was taken in the morning looking down on the “small” hills of Annapurna National Park. Some of these hills are higher than the highest  mountains in Europe (let alone Australia), but they still look tiny in this vast landscape.

Click on the photo to enlarge.

This is it for my first post in the Nepali series, and I hope you enjoyed it.

Let me know what you think, and what photographs and information would you like to see in my next posts on Nepal. This is what the comments are for!


Walk in the bush

I just realized that even though I love photographing flowers, I haven’t shown much of them here. But hey, don’t worry! I’m here to fix that 🙂

A couple weeks ago me and Ira went hiking in the Bunyip State Park here in Victoria. To be honest there wasn’t much to photograph, at least where we were hiking, as it was mostly plain and boring eucalyptus forest.


Click on the photo to enlarge.

But when there are no breathtaking views around me, I take out my macro lens and start looking for the little things. And there were quite a few beautiful flowers there. Macro photography in the nature has its own tricks. Aside from artistic aspects such as choosing the subject, angle, composition etc., there are technical issues that should be thought of.

Click on the photo to enlarge.

When shooting Macro, even the slightest movement of your subject can result in loss of focus. So having that in mind I would suggest shooting at shutter speeds above 1/100 sec. It is more difficult with choosing apertures because that would be part of an artistic choice. Generally speaking, the wider your aperture, the faster shutter speed needs to be.

Now, you’re probably going to ask me – what about tripod? Well tripod can be a huge help, but it is not a “complete solution” to all your problems, because when shooting in the nature you have wind, and even if your camera is dead still on your sturdy tripod, one blow from the wind and your flower moves out of the focus area.

Click on the photo to enlarge.

Personally, I find using tripod in macro shots too constraining. Tripod gets in my way when I circle around my subjects looking for a nice spot to shoot from, especially when there are fast moving clouds in the sky and the lighting conditions change constantly.

Of course there are conditions in which using tripod would be very beneficial. For example picture this: Early morning, everything stands still. The insects are sleeping inside flowers covered with droplets of dew. The morning light is beautiful, and a little dim. This is the perfect time to use tripod – you would have enough time to put the camera in place, choose the composition and shoot away.

Click on the photo to enlarge.

Here, have a look at this plant, at first I thought it was a giant caterpillar 🙂

Click on the photo to enlarge.

When I had enough of shooting macro, I started looking for a “bigger” subjects to put in front of my lens. I liked the moss on this huge stone. By the way, it is still a mystery to me how this huge stone ended up in the forest… it probably got there before these trees grew up.

I think I’ve already mentioned it in one of my previous posts – it is very difficult to take interesting pictures of forests, and if you just see a nice section of forest, point your camera at it and shoot, chances are that the photo won’t be of any artistic value.

In order to make your photo of the forest interesting, you must find a point of interest, something for the eye of the viewer to rest upon.

Click on the photo to enlarge.

And finally, here is one of my favorite photos from that hike. Ira serves as a good reference point to show the scale of this place.

Click on the photo to enlarge.

What are your favorite macro tips? I am always willing to learn new stuff!

Walk Around Sassafras

Sassafras is a small village located in Dandenong Ranges. The area was named Sassafras Gully, after the trees which grew in the area. Sassafras is a tourist destination with some antique shops, boutiques, and nurseries.
While most of the tourists visit Sassafras on their way driving the Dandenong Tourist Road through to other destinations, Ira and I came here specifically. We wanted to visit the “Tea Leaves” store, which has over 300 teas and herbs. But then again, we are not tourists – we live within 40 minutes drive from here.
As you probably guessed I wouldn’t write this post if I didn’t have some photographs to share along with it. The tea store was really nice, but it was too small and crowded to photograph. After we finished our tea-shopping, we decided to explore the surroundings.
I always liked the Australian Magpies. I think that they are very interesting birds, and I also like their singing – Australian Magpies are considered to be among Australia’s most accomplished songbirds. There were plenty of these birds in Sassafras, so I could take a few photos, and here is one.

Australian Magpie

Click on the photo to enlarge.

Dandenong Ranges is a beautiful place, and Sassafras is surrounded with eucalyptus and fern-tree forests with kilometres of walking trails. Ira and I came across one of the trails and went into the woods. It was such a beautiful walk! I can still feel the cold fresh air filled with smells of nature…

Dandenong Ranges Forest

Click on the photo to enlarge.

The forest was magical. It was around three o’clock in the afternoon, and the sun was already setting (the sunset time is currently around five o’clock) so the light was beautiful. I was fascinated with the rays of light breaking through the foliage.
The biggest problem when photographing forests is to find distinction. What I mean is when you walk in the forest and you simply like what you see and take a picture, most of the chances that the resulting photo won’t be interesting. It will be very cluttered with leaves, tree trunks, and branches. One of the keys here is to find some kind of order in the forest and reflect it in your photograph.
The photo above is a bit too cluttered to my taste, but I still like it – I found an opening in the forest, saw this fern lit by the sun, and decided to make it a main point of interest in the photograph. Rays of light in the background add another dimension to the photo making it… airy?

Wooden Stairs

Click on the photo to enlarge.

Walking down the trail we came across wooden stairs, and saw this “unreal” ray of light shining through. I just couldn’t pass the opportunity ☺. Though I am bothered a little by the wooden rail on the foreground right, overall I like this photo. The stairs lead the eye into the photo, and them being not straight enhances the feel of space, while ray of light helps creating magical forest atmosphere.

Mushrooms Growing On Eucalyptus 1 Mushrooms Growing On Eucalyptus 2

Click on the photo to enlarge.

At one point I saw a huge eucalyptus and just stood there admiring this nature creation, then Ira said – “look! There are lots of tiny mushrooms growing from the trunk of this tree!” And only then I saw them. The tree trunk was so big, and the mushrooms were so tiny that I didn’t notice them even though there were so many. I really liked this “crowd” and spent a good 15 minutes trying to find an interesting angle.

Waterdrops

Click on the photo to enlarge.

As in most of my walks in the nature, I couldn’t resist taking a few macro shots. I didn’t have a tripod with me (what a rookie mistake! ), so this photo might not be tack sharp, but it is sharp enough to show all the diversity of the water drops. I really like the tenderness and fragility in this photograph… one careless move and this beauty will disappear.

And finally I’d like to present my best photo from that walk in Dandenong Ranges.

Dandenong Ranges Forest

Click on the photo to enlarge.

I feel that in this photo I succeeded to create order from the forest’s chaos. I found a pattern made by the standing ferns, and a space in between, and the light was just right. I tend to think that in nature photography great photo is created when two factors come together – pure luck (the light, weather conditions) and the photographer’s vision. Sure, if there is no vision, there won’t be any great photos, but when you have the vision you still need the nature to play along with it.

I hope that you enjoyed this journey into the Dandenong ranges, a beautiful place in Australia, and I’ll see you next time right here, on my photo pathway.

As always your comments are most welcome!

Trip to Switzerland with stop in Prague

Good day everybody! It has been a while since my last post. I had some pretty cardinal changes in my personal life, and was so caught up that couldn’t free my mind to write anything. But I continued to take photos and have some new stuff to share.

In addition to the changes, during this time me and Ira also went on an 8 day trip mainly to Switzerland but with short, 2 day stop in Prague. Actually one out of these two days we weren’t in Prague but in a small village named Černošice. It is located about 20 minutes by train from Prague, and it is so beautiful!

Černošice lies on the Berounka river, so we stepped off the train and went to the river right away. There is a nice walking trail along the river, and in the photos below you can see some of the views that we saw while walking there.

I saw these naked trees on the shore and their beautiful reflections in the water. I wanted to photograph them but thought that only the trees with their reflections were not enough to make interesting photograph, so I was looking for an additional element for my photograph. These red tulips were it.

Černošice

Photograph by Greg Brave. Click on the photo to enlarge.

The photograph above was not enough for me and I was looking for additional ways to photograph these trees and their reflections and as a result I got the photo below. The additional element was the tree branch from the left. As you can assume I have much more photos of these trees in my collection, but I chose these two to show here because I think they are most successful composition-wise.

Černošice

Photograph by Greg Brave. Click on the photo to enlarge.

While walking, I saw this horse’s hoof fungus. Well, it is not an unusual sight, at least not in Europe, but I just got this idea to photograph it, but as always I looked for somewhat different way of doing it. I decided to use a wide angle lens to emphasize its form and at the same time to hint about where it grows.

Černošice

Photograph by Greg Brave. Click on the photo to enlarge.

When I took the photo below I was almost certain that it won’t be something I’d share. The sun was harsh creating a very high contrast between the sky and the earth, but the clouds looked so interesting that I couldn’t resist giving it a try. And I am glad I did! I like this photo because it is pretty simple, but at the same time it conveys movement and a feel of space.
Actually this photo didn’t look exactly like this when I opened it in Lightroom. The lower half of it was almost completely dark. But here comes the magic of shooting raw – using the “fill light” slider I was able to recover many details. In general, I use the “fill light” adjustment slider when I am forced to shoot in harsh afternoon light, and there are some strong shadows. The fill light adjustment helps make these shadows much less disturbing.

Černošice

Photograph by Greg Brave. Click on the photo to enlarge.

Next photo is pretty ordinary, I mean there are many photos like it out there, but I still liked it for being so bright, happy, and colorful, and couldn’t resist sharing it.

Černošice

Photograph by Greg Brave. Click on the photo to enlarge.

I am not presenting here photos I made in Prague, since not long ago I had a more substantial trip to Prague and already posted photos from it. You can find my articles about Prague here and here.

After short stop in Prague we continued to our main destination – Switzerland. I always wanted to see whether this country is as beautiful as photographs show. Believe me – it is!

Our first destination was small town named Grindelwald. It is located in a very beautiful and mountainous area, which was exactly what we wanted. We camped in Grindelwald and went for a long hikes up the mountains from there. Since late April is still pretty cold, there weren’t much tourists (the ski season was over, and the summer hiking season didn’t begin yet), and we mostly hiked alone.

In the photographs below I will show some of the stunning views we saw on our hikes.

Grindelwald area Grindelwald area

Photographs by Greg Brave. Click on the photo to enlarge.

I was looking for interesting shapes, patterns and angles to create interesting photographs, that would stand out. Whether I succeeded or not is for you to decide.

On one of our hikes we went so high up the mountains that we reached areas where snow didn’t melt yet and the wooden houses, which are restaurants and resorts in the summer, were completely covered with snow! There is one catch in photographing snow under bright sunlight (just in case that you are not familiar with it) – because the snow is so white it reflects the light very good, and the light meter in the camera perceives the scene to be very bright thus underexposing the photograph. So you have to set your exposure compensation to about +1 stop. It is not an exact science so just try and see for yourself.

Grindelwald area

Grindelwald area

Photographs by Greg Brave. Click on the photo to enlarge.

After two days in Grindelwald area we went to another area near town named Hintergoldingen, also with mountains but they were lower so there was almost no snow there. The next photo is from that area. The wast green fields are breathtaking! At the end of this article I will put some more photos from here.

Hintergoldingen area

Photograph by Greg Brave. Click on the photo to enlarge.

And finally on our last day, on the way to the Zurich airport, we stopped in Rapperswill – a small town located near Zurich lake. This tree caught my attention as light was hitting its leaves making them shine beautifully.

Rapperswill

Photograph by Greg Brave. Click on the photo to enlarge.

I also tried to capture the slow pace of this place, where locals and tourists relax and don’t hurry anywhere.

Rapperswill Rapperswill

Photographs by Greg Brave. Click on the photo to enlarge.

Hintergoldingen area Hintergoldingen area Hintergoldingen area Hintergoldingen area Hintergoldingen area

Photographs by Greg Brave. Click on the photo to enlarge.

We had a great time on our trip and I hope I succeeded in showing it in my photographs. I bought a backpack for my photographic equipment especially for this trip, it was a “CompuRover” from Lowepro. I was very satisfied with it and I am planning to write a detailed review on it in the near future, so stay tuned if you are interested!

This is it for now, and until next time take care!

Greg.

Prague Photographic Trip Report – Continued

During our vacation in Prague me and Ira also visited a small town near Prague named Kutná Hora. At first I didn’t think of writing second chapter about my trip, but when I finally had time to browse through my photos from that town, I saw that I had a few very nice photos from there (if I won’t compliment myself on my photographs, then who will ? 🙂 ), so I decided to write a short post on our day in that sweet little town.

Kutna Hora is about an hour train ride from Prague, and if you, like me, don’t like organized trips, you can just buy a train ticket in Prague and visit it by yourself. The old town centre is about 20 minutes walk from the train station, and I think there is even a bus going from the station to town. Anyway we didn’t use any kind of transportation but our feet.

Alley Leading to St. Barbara Church

Alley leading to St. Barbara Church. Photograph by Greg Brave. Click on the photo to enlarge.

There are quite a few tourist attractions in Kutna Hora, such as St. Barbara Church, which is one of the most famous Gothic churches in central Europe. It is also a UNESCO world heritage site. By the way St. Barbara is the patron saint of miners, and this town was mostly based on silver mines in the past. Another attraction of the town is the Sedlec Ossuary. It is a small Roman Catholic chapel. Its’ main feature is that inside it is artistically “decorated” by many real human bones. It is estimated to contain the skeletons of between 40,000 to 70,000 people.

In addition it is pure pleasure just to walk the streets of the old town centre in Kutna Hora. This is what we did the most – just walking on the narrow streets between old buildings and taking photos, of course! When we got there it was rainy-misty weather. It was pretty dark for photographing, but I had my tripod with me, and all the photos that you see here were shot from tripod. Yes, even the dog in the last photograph!

St. Barbara Church in Misty Weather

St. Barbara Church Photograph by Greg Brave. Click on the photo to enlarge.

Actually I was surprised that I could use my tripod just about anywhere. Nobody told me that I couldn’t, which was strange because I am used from other places in Europe (Greece for example) that in most touristy places they don’t let you use the tripod. Shooting in mist I tried to convey this darkish and melancholic atmosphere. But it was not the case with these rose hips. Here I aimed at showing the “freshness” of the branch and the “coolness” of the air. I was captivated by the color of the hips!

Rose Hips in the Rain

Rose hips in the rain. Photograph by Greg Brave. Click on the photo to enlarge.

When photographing tourist attractions such as Sedlec Ossuary (which you can see below), I wanted my photos to be different from what most tourist were shooting (which is just straight-forward showing of what eye sees). So I tried to include elements that would add mood, which in my opinion was appropriate. In case of the Ossuary I went around it several times until I found this spot where the tree branches looked like they were reaching towards the building and blending nicely into the seamless gray sky.

Sedlec Ossuary in Kutna Hora

Sedlec Ossuary. Photograph by Greg Brave. Click on the photo to enlarge.

During our visit, there were not many people on the streets. Here and there we met tourists, but I was looking for local people to “put” in my frame, to make my photos more authentic. In the left photo below I succeeded, while in the right one I waited and waited for someone to pass by, but with no luck, and finally shot the scene without anyone. It is a shame, I would really like to have there a person or two.

Old Town Street in Kutna Hora Old Town Street in Kutna Hora

Kutna Hora old town streets. Photographs by Greg Brave. Click on the photo to enlarge.

On our way back to the train station, we were walking on a narrow sidewalk when I spotted this dog watching us from behind a window. Even though we had little time left till the train I couldn’t just pass by this photo opportunity. The thing is that it was getting dark already, and even high ISO wouldn’t help me out here. So even for this shot I had to take out my tripod. The doggy was watching intensely all my actions and at some point I thought, that’s it now it will start barking… but everything was just fine – I took a few shots and we took off to catch our train.

I hope you liked the photographs, and as always – comments and critiques are welcome!

Dog looking from behind window

The Doggy 🙂 . Photograph by Greg Brave. Click on the photo to enlarge.

Kata Bag 3n1 20 Review

I decided to write this review since I have this bag for more than 7 months now and have been using it a lot. Before I bought it, like most of us do, I searched the net for reviews and thought I’ve got it completely figured out. I was sure back then that this bag is exactly what I need. And now, after months of experience with it I would like to share my conclusions and hope they would help some of you to make the right decision.

Buying Kata 3n1 (20) bag my requirements were:

1. I like to hike a lot, mostly one-day hikes, and I always want my camera with me. So I needed my photo bag to sit comfortable on my back.

2. Usually I take three lenses on a hike with me, all of them being Canon lenses: EF-S 10-22, EF24-70 2.8L, and EF70-300 f4-5.6. I needed my backpack to have room for these lenses, their hoods, 40D camera body, two polarizing filters and some additional stuff.

3. All the equipment should be properly stored but easily accessed when I need it.

4. Sometimes I take a tripod with me.

5. I also wanted a very durable bag that would provide a proper protection for everything I put in it since I am not so gentle with my equipment (except lenses of course!!!).

So did Kata 3n1 20 bag do the job?

Let’s go over each requirement and see:

1. This bag has very versatile shoulder straps. You can unclip each strap at its base and clip it to the other side making it possible to carry the backpack in three different positions: the usual backpack position, the sling position, and the x-position.

kata bag 3n1 20 review carrying positions

I tried all of them during my hikes and here are my conclusions:

The usual backpack position is the most comfortable one. I could hike for hours on rough terrain with backpack sitting comfortably on my back. The X-position is not very comfortable. I couldn’t walk long distances using it because x-shaped straps started pressing on my neck and shoulders and I had to pull them to the sides with my hands. Also the sling position, which is very convenient when you want to quickly get your camera, is not very comfortable. I couldn’t hike long distances using this position – the weight on a single shoulder (and neck) was too big. I think that if your gear doesn’t weight as much as mine, then you could use the sling position, but since I had to carry pretty big weight I didn’t find it useful.

2. I have enough room for all the equipment described above and I even have some free space left. So this requirement was fully satisfied.

3. But having this equipment organized conveniently is whole another story. The easiest thing is to get the camera with attached lens out of the side opening (the bag has openings from both sides so you can choose which side you want to use). But when you want to reach other lenses, it is not so easy. You have two options: a. To try and pull the lenses through the side opening and this is pure hell. And b. To take the backpack off your shoulders, put it on the ground (or table, or something), open the central compartment and take out what you need. Even the second option is not as easy as it seems since the central compartment can’t be fully opened – you can see it from the photo:

kata bag 3n1 20 review  main compartment

So when I put a lens in the far end of the bag then it won’t come out as easily as I would like it to. I have to say that the top compartment is very good. I like the way it opens and although it seems pretty small, I manage to put there quite a lot of stuff. I also like the handle on top. Two small side pockets on the outside are good for ipod, filters and cleaning cloths.

4. There is nothing on this bag that allows to attach a tripod, and this is too bad. If it had only a little something that I could use to securely attach a lightweight tripod, I would be a much happier man 🙂

5. This bag is very and I mean VERY durable. Its build quality is excellent. Much thought was put in all the weak elements, and in this bag they are very strong. All the gear is perfectly protected inside the bag, and it also has a rain cover. I took it on several hikes during rain and all the equipment stayed dry. I couldn’t say enough good things about the materials and the build of this bag and I am not going easy on it when I use it!

kata bag 3n1 20 review angle views

Conclusion

Pros:

  • Excellent build quality.
  • Comfortable when carrying it as a usual backpack.
  • Very convenient side openings.
  • Great top compartment.
  • Good equipment protection.

Cons:

  • The main compartment can’t be fully opened, which makes it difficult to access gear.
  • If your equipment is heavy, then you can only use this bag as a backpack and not as sling.
  • Impossible to attach tripod.

All that said, I am still using this bag and probably will use it for a while. If you found this review to be helpful, consider supporting my site by buying the Kata 3N1 20 backpack through my affiliate link.

After publishing this article as you can see from the comment below, I was contacted by Doug Feldner, the product manager for the Kata line in the US. He told me something very interesting! There is a tripod holder for the Kata 3n1 series! When I try it I sure will write a few lines about it here.

You can read my review on the tripod holder for the Kata 3n1 series here.